CS 120, Fall 2011, Lab 4: Publishing a Web Site
In the first part of the course, you have learned how to make basic web sites using HTML, CSS, and just a little JavaScript. But to have a real web site, it has to be published on the Internet. In this lab, you will set up a web site on 000webhost.com, a company that does web hosting. That is, they provide space on their computers where people can publish their web sites. They also provide support for creating web pages, adding features to the site, and using server-side programming with PHP and MySQL. We are using them for this course because they provide reasonably full-featured free web hosting. (They would like you to upgrade to their paid web hosting service, and they sent me a couple of emails after I signed up for an account there, but mostly they didn't bother me too much about it.)
Since you have an account on our Linux system, you can also publish a web site simply by putting the files in your www folder, as described in Lab 2. However, you don't get to keep that account forever, and you can't do anything commercial with it. You certainly can't set up a web site for a friend's business there, or earn cash by selling ad space on your site. You can do that with a commercial web hosting company.
This lab covers how to set up a free web site on 000webhost.com, and it shows you how to publish files from Aptana Studio to that site. The lab also requires you to publish a web site in your Linux account. The grading for this lab will be fairly simple. I will just check that you have managed to publish files on both sites
By next Thursday, you should have some files published on a web site on 000webhost.com, and you should have some files published in the www folder in your Linux account.
Creating Your Account On 000webhost.com
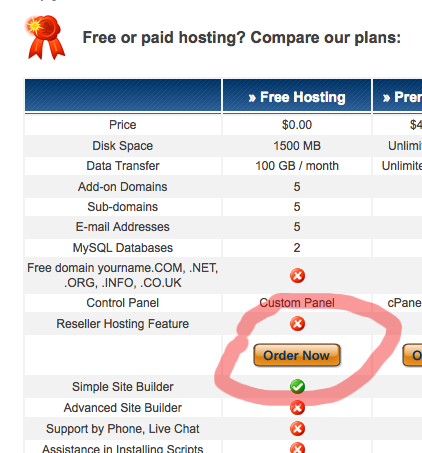
Open a new Web browser window and go to the web address 000webhost.com. You can look over the services that they offer. Then you need to click the "Order Now" button under "Free Hosting":
On the next page, fill out the form to apply for your free site:
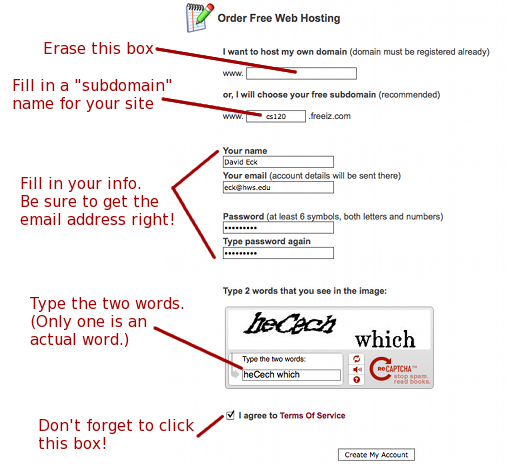
Click the "Create My Account" button. In just a minute or so, your account should be created, and you will see a page where your account is described. You will also get an email with this information. Your account info will look something like this:
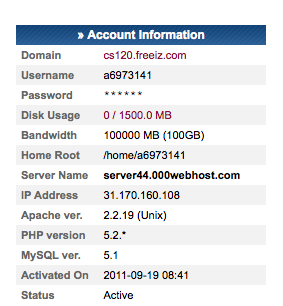
Keep a record of your username (probably a long number preceded by "a") and your password (as you entered it on the previous page. Also make a note of the name of your site, cs120.freeiz.com in the example. You should write the name of your site on a page that will be passed around during the lab.
Your site should already be up and running. Type the name of the site (the "domain" from the account information) into the location box of your web browser, and you should see a default page that looks like this:

You should also try logging in at members.000webhost.com. Once you've logged in, click on "Go to CPanel." The CPanel is an interface to your site and has many utilities for working on the site. (For example, the "fantasico installer" lets you do one-click installation of a variety of web site frameworks, such as the WordPress blogging framework.) However, you will not need to use the CPanel interface for this class. You will simply be uploading files from Aptana to the web site.
Adding Files To Your Site
You will be managing a web site that is on some computer out there on the Internet. (In fact, you don't even know where it is.) Generally, you will want to keep a copy of the site on your own computer. Aptana Studio is designed to help you do this. You've probably noticed the entry named "Connections" in each of your projects. A Connection in this context can mean the connection between the project and a live web site. Once you've set up the connection, it's easy to transfer files from the project to the web site (or vice versa).
To complete this part of the lab, you will make a connection between an Aptana project and your web site on 000webhost.com, and will copy the files from the Aptana project to the web site. You can use your lab3 project or one of your other projects. You can also make a new project if you want. (I will not look at or grade the project that you use.)
Go into your selected project and right-click "Connections." Select "Add New Connection" from the pop-up menu. You will see this dialog box:
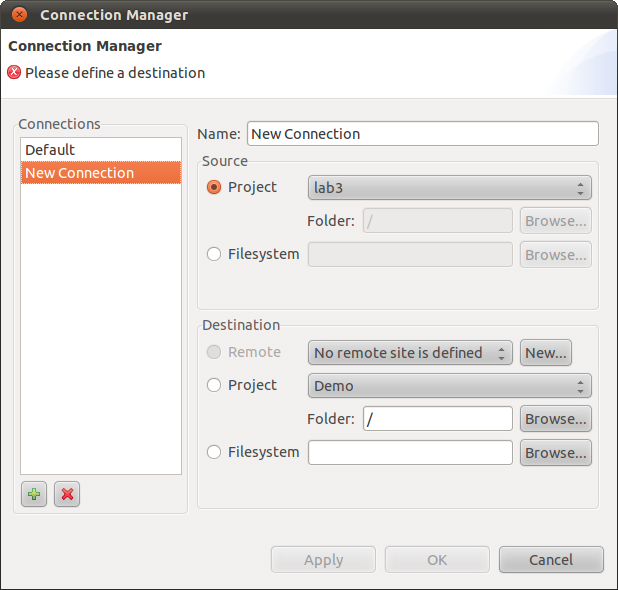
You can change the name of the connection from "New Connection" to something else (like "000webhost"), but the main thing is in the "Destination" section of the dialog box. This part of the box should specify the location of your web site. Click "New" next to "No remote site is defined." You will get a new dialog box. Fill it in with information about your account. Here is an example, using the account information shown above:
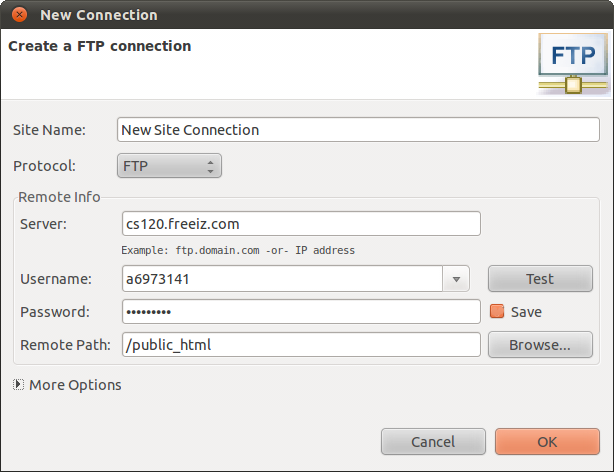
Under "Server", fill in the domain name for your site. The
Username is the one that was assigned to you when you created the account,
as shown in your account information. Under Password,
use the password that you entered when you created your account.
(You may be asked for the password again, when a connection to the site
is opened.)
Enter /public_html as the "Remote Path."
You might want to test the connection to make sure that you entered the data correctly. When done, click "OK", and then click "OK" in the previous dialog box.
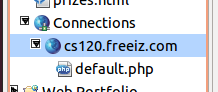
If things are set up correctly, there will be a little triangle next
to "Connections" in Aptana. If you open up "Connections", you will see
the connection that you just created. If you open up that connection,
you will see the files on the web site. Currently, only
default.php will be there. It will look like this,
with a different connection name:
Your goal is to copy the files from the Aptana project to the web site. This could not be easier. Open the connection, so that you can see the files on the web site. You can then drag files from the project to the web site. You can also use the Aptana interface to delect files from the web site, so you can delete default.php if you want. (You can get a more flexible interface for transferring files in the sub-menu that you get when you right-click the name of the connection.)
Copy the files from lab3 -- or whatever project you are using -- to your 000webhost.com web site.
Your Web Site on math.hws.edu
You could set up a connection between an Aptana project and your web site on our own server, using math.hws.edu as the server. However, because all the files in your Linux account are stored on the same file server computer, it's even easier than that. It's possible to set up your www folder as an actual Aptana project. When you do that, there is no need at all to transfer files -- your project files are already on the web. (This idea was Alex Kittelberger's, one of our TAs.)
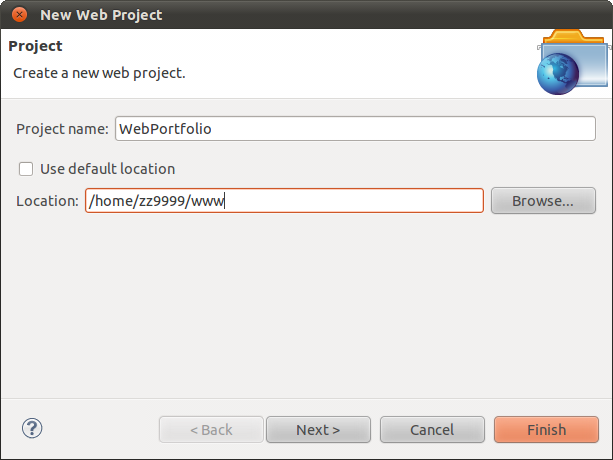
So, go into Aptana and start a new "Web Project". In the New Web Project dialog box, uncheck the "Use Default Location" box, and enter the location of your www folder, /home/zz9999/www, with your own user name substituted for zz9999. Name the project "Web Portfolio," since this will be the location of your web portfolio for the course.
When you click "Finish", the project will be created. If you have already added files to your www folder, you will see them when you look in the project. You can add more files by copy-and-pasting them from other Aptana projects. Remember that anything that you put there is immediately available to anyone on the Internet. Don't add files from future labs to the Web portfolio until they have been graded.
See Lab 2 for information about accessing the files in your www folder on the Internet.
Starting Your Web Portfolio
The final assignment for the lab is to make a start on your web portfolio. You should add an index.html page to the portfolio to serve as the main or "home" page for the site. This page should contain links to other work. This is a minimal requirement. You might want to add some text to describe the work, and you definitely want to make the page look nice. You might want to add other ways of navigating from page to page in the site. You might want to post some or all of your work from every lab, with links on the main page to each lab, but you are not required to do that. You might just want to show the work that you consider more interesting.
For this week, you should have the index page and at least other work, with one or more links from the index page to that work. If you do that, you get full credit. I am not looking for anyting fancy at this point. For the end of the semester, you should have a nice, well-organized portfolio.
It's a good idea to store parts of your portfolio in folders within the main project. To add a folder to a project, right-click the project, go to the "New" submenu, and select "Folder." Your index.html page should not be in a folder. Remember that to link from index.html to a page that is in a folder, you have to use the folder name as part of the path to a file. For example, to link to a file named slideshow.html in a folder named lab2, index.html would use an <a> element such as
<a href="lab2/slideshow.html">Lab 2: The slideshow</a>
Remember that your index page will be visible on the web at an address of the form
http://math.hws.edu/~zz9999
with zz999 replaced by your own username.
If you have any extra time during the lab, you can use it to do additional work on your portfolio or to work on Lab 3.