CS 120, Fall 2012, Lab 4:
Intro to Aptana Studio
Up till now, you have used a plain text editor to write your web pages. There are many tools that try to make it easier to create web sites. Some of them use a GUI (Graphical User Interface) approach that tries to hide the details of how web pages actually work; Dreamweaver is an example of a popular program of that kind. Since this is a computer science course, where we don't want to hide the details, we will stick to working with the HTML/CSS/JavaScript code. However, it is still possible to get some help with the coding. This lab introduces you to a web-site development environment called Aptana Studio 3.
The assignment for this lab is just to learn to use Aptana Studio and to use it to begin work on your web portfolio, as discussed below. By next Friday, you should have a reasonably attractive index page for your portfolio, with links to your work from previous labs. That page should be available on the web at your main URL, of the form http://math.hws.edu/~zz9999 where zz9999 represents your own user name. On the class web page, http://math.hws.edu/eck/cs120, your name is linked to this page. Clicking the link on the class web page should take me to the index page of your web portfolio.
Starting Aptana Studio
![]() You can find Aptana Studio in the "Programming" section of the main application
menu. (Note that to make it easier to start Aptana and other programs, you might want to
add them to the set of small "launcher" buttons next to the start menu. To do this, simply
find the program in the menu, and drag it down to the launcher area. The picture above
shows the launcher area after adding Aptana and several other programs. To launch one
of the programs, just click its launcher button.)
You can find Aptana Studio in the "Programming" section of the main application
menu. (Note that to make it easier to start Aptana and other programs, you might want to
add them to the set of small "launcher" buttons next to the start menu. To do this, simply
find the program in the menu, and drag it down to the launcher area. The picture above
shows the launcher area after adding Aptana and several other programs. To launch one
of the programs, just click its launcher button.)
Start up Aptana Studio. The first time it starts, it will take longer than usual since it will do some initial setup. After a bit, you'll see a dialog box where you can select your "workspace." You can simply accept the default by clicking "OK". (The workspace is a just a folder in your account, which will hold information about your Aptana projects.) After a bit more setup, the Aptana window will open:
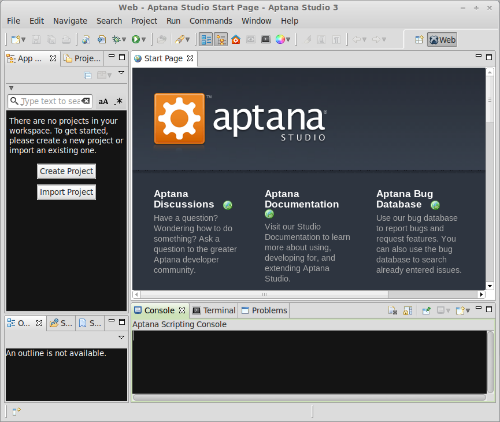
The window is divided into sections. The largest section is where you will edit your files. Initially it contains a Start Page with information about Aptana. You can investigate this screen if you want, but once you start working, you won't need it. To close the Start Page, click on the small "×" next to the name "Start Page" at the top of the page.
Aptana Studio has an immense number of features, most of which you will never use. Don't worry that you don't understand most of the menu commands; you won't need them. There are also, unfortunately, a few problems. For example, with the default settings on our computers, there is some important text that is almost invisible because it is drawn in very light gray on a white background. This problem, at least, can be fixed by changing the "theme." To do that, select the "Preferences" command from the "Window" menu. Click the small triangle next to "Aptana Studio" on the left, then click "Themes". Change the theme to "Aptana Studio 2.x", as shown in this picture:
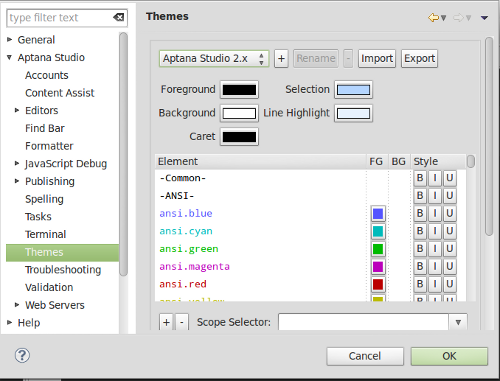
This also has the advantage of using a white background for edit text instead of a black background, which I prefer. You don't have to change the theme -- you can wait until you have a problem (and maybe you prefer the black background). The point is that there are lots of options in Aptana, and you can explore them if you want.
Setting Up Your WWW Folder as an Aptana Project
Apatana Studio has a notion of "project." A project is basically a folder that contains a web site, or part of a web site. Usually, a project is just a "local working copy" of a web site. That is, it's not actually on the web, and you have to copy it somewhere else to publish it on the web. Next week, you will make a project of this type.
However, it will be convenient for this course to make your actual WWW folder into a project. This will be a "live" project because any changes that you make to it will be immediately visible to other people on the web.
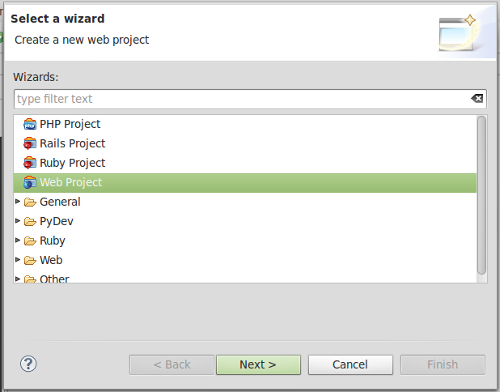
To begin, click the "Create Project" button on the left side of the window. This will show the following window where you have to select the type of project. Click "Web Project", then click "Next":
On the next screen, fill in the "Project Name" with a name for your project. Use any name you like. In the picture below, I used "MyWebSite" as the project name. You also need to set up the project to use your www folder. To do that, uncheck the box labeled "Use default location." Then click the "Browse" button and select your www folder in the pop-up window. The window will look like this, with your user name instead of xtest, and with a scary-looking warning:
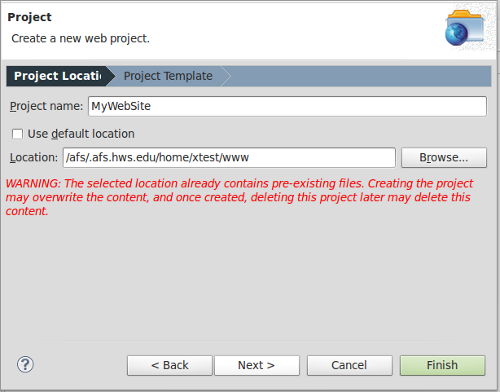
Ignore the warning and click "Finish". (The warning would only apply if you clicked "Next" instead of "Finish" and made some other changes.)
The contents of your www folder should appear in a list in the pane on the left edge of the Aptana window. Click the arrow next to a folder name to show the contents of that folder. Try double-clicking an HTML file. It will open in the large central panel of the window, where you can edit it. Click the × next to its name to close it.
Starting Your Web Portfolio
An ongoing project in this course is to make a portfolio to showcase the work that you do for the course. Your potfolio will receive a grade at the end of the corse, which is separate from your grade on the individual labs. This overall portfolio grade counts for 10% of your grade in the course. You will want to work on and improve your Web portfolio throughout the course.
Your portfolio needs a main index.html page to serve as the entry point to your web site. The index page should have links to all the work — or at least most of the work — that you do for the course. It's time to create that page.
Create an index.html file in your project. To do this, right-click in the panel where the contents of your web site are listed. Go to "New" then to "File" in the pop-up menu, and click on "File."
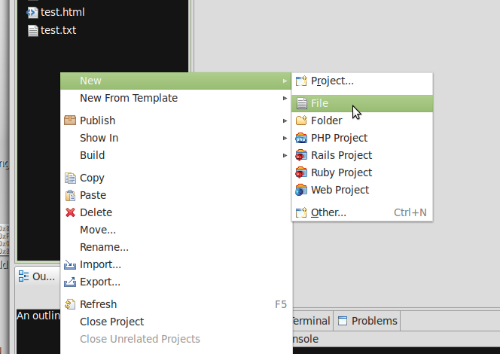
In the pop-up window, enter index.html as the "File Name", and click "Finish." (Remember that the name must be all lower-case letters.) A file named index.html will be added to the list of files in your project, and the file will be opened for editing in the large central pane of the Aptana window.
Editing HTML With Aptana Studio
It's when you start editing that you see some of the advantages of using Aptana. Click in the edit window for index.html. Type <html> and you'll see that the close tag, </html>, is added automatically. Press return while the cursor is between the start and the end tags, and Aptana will add some indentation and formatting for you. (It adds more indentation than I like, in fact, but it's probably best to just go with its formatting.)
Enter a <head> section, with a <title>, and start the <body>. As you type, you will notice that Aptana pops up a box containing possible completions for what you are typing. To select one of the completions, Use the down and up arrow keys to move the item you want, and press return. (This is the point where you might not be able to see the text of the items while using the default theme. To fix the problem, change the theme as described earlier in this lab.) This feature is called content assist.
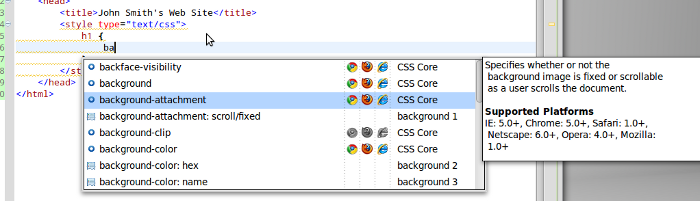
Here is an example, showing possible completions for "ba" while typing in a <style> section. I've selected "background-attachment", and pressing return at this point will add it to the document. Note that a short description of the background-attachment property is shown to the right:
Content assist does not pop up automatically in every case where it would be useful. To make it pop up, hit Control-Space. (That is, hold down the Control key and hit the Space bar.) For example, if you have typed <style type=""> and the cursor is inside the quotes, hitting Control-Space will show a list from which you can select type/css. If you have typed text-decoration: in the style section and hit Control-Space, you will get a list of possible values for text-decoration.
Try this to add a DOCTYPE to your page: Create an empty line before the <html> start tag in your file. On that line, type a < and a list of possibilities pop up. DOCTYPE is the first on the list, so you just have to press return to accept it. Then immediately press Control-Space. A list of possible DOCTYPEs will pop up. Use the arrow keys to highlight "HTML 4.01 transitional", and press return. You now have a correct DOCTYPE for your page.
(Actually, I don't really like having Content Assist pop up automatically as I type. If you feel the same, use the "Windows" / "Preferences" command to open the Aptana preferences window. Click on "Content Assist" under "Aptana" on the left, and Then set "Auto-Display content assist" to "Off". You will still be able to call up Content Assist any time you like by hitting Control-Space.)
Note, by the way, that lines in your file can be marked by error (![]() )
and warning (
)
and warning (![]() ) symbols in the left-hand margin. Hover your mouse
over one of these symbols to see the error or warning message. Note that some error and warning
symbols will go away as you continue to type, so you don't have to respond to them immediately.
Furthermore, even when you finish your page, there might still be some warnings. Warnings are not
necessarily errors. As for the error symbols, however, you should eliminate them before you finish with
your page.
) symbols in the left-hand margin. Hover your mouse
over one of these symbols to see the error or warning message. Note that some error and warning
symbols will go away as you continue to type, so you don't have to respond to them immediately.
Furthermore, even when you finish your page, there might still be some warnings. Warnings are not
necessarily errors. As for the error symbols, however, you should eliminate them before you finish with
your page.
Working on Your Portfolio
Your web portfolio is more than just the collection of web pages that you write for the labs in this course. The portfolio organizes, presents, and possibly explains the work that you have done.
One way to organize your portfolio is to have a link on the index page to each page that you create for lab, along with some explanatory text about the page. If you have created several pages for one lab, you might want to create a separate index page just for that lab, and link that to your main index page.
As we go through the course, you will want to improve your portfolio by applying new techniques. You will find that easiest to do if you keep the content of your page separate from the presentation. The content should be plain HTML, possibly with some divs, ids, and classes to refer to sections of the page. The CSS should be separate, and possibly even in a separate file if you want to use similar style on several pages. Eventually, you might even want to add some JavaScript, but not until you've learned more about it.
And when I find problems with your work for a lab, or when I offer suggestions about how the work could have been better, you might want to make some changes before linking your work into the main page of your portfolio.
For today's lab, your assignment is to create the main index page for the web portfolio, to link your work from the first three labs into that page, and to make that page look reasonably attractive. To check your work, I will access your page through the link on http://math.hws.edu/eck/cs120. Make sure that your page is accessible through that link.