CS 120, Fall 2012, Lab 5:
CSS Explorations
In today's lab, you'll explore a variety of things that can be done with CSS. You will work on three web pages, adding styles that showcase some CSS features. At the same time, you will learn a little more about Aptana Studio.
This lab is due next Friday. In the lab, you will create a new Aptana project. This project will not be visible on the web. In next week's lab, I will show you how to add the project to your web portfolio. From now on, you should not publish your work until after it is due.
Geting Started
 To begin
the lab, start up Aptana Studio. Start a new Web Project and name it lab5:
You can do this either by using the "File" menu or by right clicking
in the pane at the right side of the window. In either case, go to
the "New" submenu, and select "Web Project." In the popup window,
enter lab5 as the Project Name, and click "Finish." The
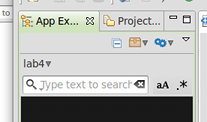
empty project will open in the "App Explorer" pane. Note that there is
a drop-down menu at the top of the "App Explorer" pane that lists all
the projects that you have created. In the picture, the menu
shows "lab4" as the currently selected project. You can use this drop down menu
to move from one project to another. (By the way, if you ever
lose some of the panes in the Aptana window, you can easily restore the
window to its original configuration. Just use the "Restore Perspective"
command in the "Window" menu.)
To begin
the lab, start up Aptana Studio. Start a new Web Project and name it lab5:
You can do this either by using the "File" menu or by right clicking
in the pane at the right side of the window. In either case, go to
the "New" submenu, and select "Web Project." In the popup window,
enter lab5 as the Project Name, and click "Finish." The
empty project will open in the "App Explorer" pane. Note that there is
a drop-down menu at the top of the "App Explorer" pane that lists all
the projects that you have created. In the picture, the menu
shows "lab4" as the currently selected project. You can use this drop down menu
to move from one project to another. (By the way, if you ever
lose some of the panes in the Aptana window, you can easily restore the
window to its original configuration. Just use the "Restore Perspective"
command in the "Window" menu.)
You will need to copy several files into your lab5 project. It's easy; you just have to copy-and-paste them from a file browser window. The files are in the folder /classes/cs220/lab5_files. After you copy them, they should all be listed in the App Explorer—the left pane—of the Aptana window. (Open a file browser window—by double-clicking the "Home" icon on the Desktop, for example. Find the files by clicking "File System", then "classes", then "cs120", then "lab5_files". Select all the files, right-click and select the "Copy" command. Then right-click in the left pane of the Aptana Window and select "Paste". You can copy them all at once, as long as you select them all by dragging the mouse to make a box that encloses all the file icons; then right-click any one of the icons to get the pop-up menu with the "Copy" command.)
Multicolumn and More
One of the files that you copied into your project is called multicolumn.html. Double-click the file name to open the file in Aptana's editor. The file is plain HTML, with no CSS styling. It is broken up into five sections by <div>, and each div has an id. The main text on the page consists of paragraphs of "Lorem ipsum" text. (This is a kind of latin nonsense that is used by printers to fill space. You can read about it on Wikipedia.) In this section of the lab, you will work on adding style to this page
Add a <style> section to multicolumn.html. You should mke absolutely no changes to the page outside of the style section. Do everything with CSS! You should complete the following exercises. Some of the exercise introduce new aspects of CSS.
- All headlines (h1, h2, and h3 elements) on the page should be centered.
- Using float: left as we discussed in class, to convert the page to a multicolumn format. The columns are the div's that have id #one, #two, and #three. The middle column should be wider than the other two columns, and there should be some space between the columns. Check out the page in a browser to make sure that it worked! (This use of float is also discussed on pages 279—290 in the textbook.)
- Put visible borders around the div's with id #head and #foot. After adding the CSS rule to do this, you will see that the border for #foot actually includes the three floating columns! (Be sure to check in a browser that this is true!) This is because of the float, but it is undesirable. To fix the problem, add the rule clear: both; to the CSS for #foot. This rule forces an element to drop down to a new line following all floating elements. (Check out the page after making the change to see that it worked.)
- It is possible to apply a style just to the first line of a paragraph using the selector p:first-line. This can be combined with "selection in context" so that it only applies to a <p> that is inside of another element. For example, the selector #two p:first-line applies only to paragraphs inside the element with id="two". Use this fact to apply the CSS rule font-variant: small-caps to the first lines of paragraphs in the middle column.
- The selector p:first-letter applies only to the very first letter in a paragraph. Use this fact to apply a style to the first letters of paragraphs, in the left column only. Make the letters big and brightly colored.
- Make each of the three column headlines a different color.
- Use a different font-family for each of the three columns and for the main headline. You might try cssfontstack.com to get the CSS code that you need. Just click "Copy to clipboard" on that site and then paste into your code. (A "font stack" just means a list of fonts that can be used as the value for font-family. Remember that only the first available font in the list is actually used.)
A Translucent Overlay
 In this section of the lab,
you will work with the file overlay.html. Open it in Aptana's editor.
The page has a lot of Lorem ipsum text, with a button at the top. Clicking
the button makes an initially-hidden div visible.
In this section of the lab,
you will work with the file overlay.html. Open it in Aptana's editor.
The page has a lot of Lorem ipsum text, with a button at the top. Clicking
the button makes an initially-hidden div visible.
As a first small exercise, add an onclick attribute to the div, with JavaScript to make the div invisible again. This means clicking the button will make the div visible, and clicking on the div—once it is visible— will hide it.
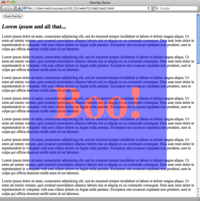
The main exercise is to turn the div into a translucent overlay that covers most of the page. (Translucent means you can see the page through the overlay.) A greatly reduced picture of the effect is shown here. Do not make any further changes to the page, except in the style section. Here are the steps. Again, there is some new CSS here.
- Give the div a background color. (I used blue.)
- Apply style to the h2 inside the div to make it very large and colored. (I used 2in for the size and red for the color.)
- To make the div occupy the same part of the page that also contains other elements, you have to set the CSS position property of the div to have the value absolute or fixed. The difference is that with absolute, the div will scroll with the rest of the page, while with fixed, the div will occupy a fixed position in the window. Try both of the rules position:fixed and position:absolute before going on. The effect is interesting! For the final version, used fixed.
- The change the default position you have to give values to the left and top CSS properties. For this example, you can specify them as percentages; the percentages are relative to the width and height of the window. To change the default size, you can give values either to the right and bottom properties or to the width and height properties. Set all these properties so that the div overlays most of the window. Check the effect!!
- Finally, you need to make the div partly transparent. This is easy to do, using the CSS opacity property. The value of this property is a number between 0 and 1 that says how opaque an element should be. (Opaqueness is the opposite of transparency.) A value of one gives fully opaque element, which you can't see through at all. A value of 0 gives a completely transparent element, which would be invisible. Values strictly between 0 and 1 give different levels of transparency, bigger values make the element less transparent and more opaque. Set a value for opacity somewhere between 0 and 1 that gives a good effect.
Backgrounds? Check!
This section of the lab is about backgrounds, especially background images. You will work on the file backgrounds.html. Open that file in an Aptana Editor. The web page has four div's, and there is a style section that already applies some style to the divs. They have a fixed width, a border, padding and margin, and they are centered on the page. To make things even more interesting, I added a box-shasow, which makes it look like the divs are casting shadows on the page. (An interesting point is the max-height property, which sets the maximum allowed height for an element. This is used with the rule overflow: auto which adds a scroll bar to the div when the height of the content is larger than the specified minimum height.)
You will add a background to the page as a whole, and you will add a different background to each div on the page. You should not make any changes outside the <style> section of the page. There are some images in the project that will be used as backgrounds.
First, use the image marble.gif as a background for the entire page. This background image is "tileable." This means that its left edge matches up with its right edge and its top edge matches up with its bottom edge, so that when copies of the image are lined up to fill the window, the result is a "seamless" image that has no discontinuity between the copies. This "seamless" property is desirable for small background images that have to be repeated to fill the browser window. To use marble.gif as the background for the whole page, apply the rule
background-image: url("marble.gif");
to the body element. To make things more interesting, also apply the following rule to the body element:
background-attachment: fixed;
This means that the background image will not scroll when you scroll the contents of the page. The contents seem to move over a fixed background, which can give an interesting effect. Take a look! (The other possible value for background-attachment is scroll, which is the default value.)
(By the way, it's suggested that one should always specify a background-color when specifying a background-image, just in case the background image can't be loaded for some reason. The background color will also be used while the background image is being loaded, which can take a while if the image file is big.)
Second, add the image fadeout.jpg as a background for the div with id="head". This image fades out to white towards the left end of the image, so it looks OK behind fairly short headlines. It's important that the text in front of any background image should be readable! This image will look best if it stretched to fill the entire div. To do that, add the following rule:
background-size: 100%;
This will stretch the image so its width just fits the div, and the height is scaled in proportion to the width. (You can add a second size to the value to specify the height.) However, note that background-size is a relatively new CSS property. In particular, it won't work in Internet Explorer 8 or earlier.
Third, you will apply a translucent color as the background for the div with id="one". This requires the use of a CSS "RGBA" color, which again is something that will only work in newer browsers (so not in Internet Explorer 8 or earlier).
RGBA colors can be used to specify colors in CSS, in the same way that you would use blue or #DD80FF. Examples of RGBA color are: rgba(255,0,0,0.7), rgba(150,150,200,0.3), and rgba(255,255,0,0.5). The value includes four numbers in parentheses, separated by commas. The first three numbers give the red, green, and blue components of the color, as integers between 0 and 255. So, 255,0,0 is pure red, 150,150,200 is light blue, and 255,255,0 is yellow. The fourth number is a decimal between 0.0 and 1.0 that specifies the degree of transparency, where 0.0 means fully transparent, and 1.0 means fully opaque. For example, 0.5 would be half transparent. Try some values, and make sure that you have a transparent color that lets the page background show through to some extent.
Fourth, work on the background for the div that has id="two". Start by using the image boo.png as a background. The image is a picture of the word "Boo!". Outside that word, the image is transparent, so the page background will show through.
However,... I just want one "Boo!" behind the text. For that, you have to set the value of the background-repeat property to no-repeat. (Other values include repeat-x or repeat-y, which repeat the image in the horizontal or vertical direction only.)
Furthermore, I would like the image to be centered in the div. For that, you have to set the background-position property. I think I'll let you look that one up on w3schools.com
The background will look better if you also apply a background color to the div. In the end, the background color overlays the page background, and the background image overlays the background color. If the background image is partly transparent, then the background color shows where the image is transparent. Try to find a background color that looks OK.
Fifth and finally, use the image wavy-edited.png as a background image for the div with id="three." This is an image that fades from opaque to transparent as you go from left to right in the image. (To make this image, I downloaded a background from http://www.patterncooler.com/, which seems like a useful place to get seamless images, and I edited the image to add transparency.) Set the background-repeat to repeat-x so that you get just one horizontal copy of the background, at the left edge of the div.
You should also apply some appropriate background color to the div, to underlay the background image. As a final touch, you should add a margin of about 100px to the left of the <h1> and <p> elements in the div. You need to do this because text over the opaque part of the background image will not be very readable. Here is what my version of this exercise looked like:
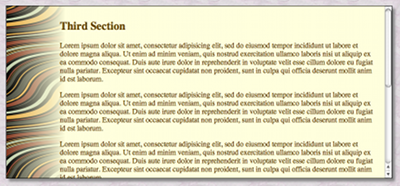
If you want, you can change the text colors on the page to make the text look better on the various backgrounds, as I did for the above picture.