CS 120, Fall 2012, Lab 9:
HTML Canvas Graphics
This lab introduces the <canvas> element, a recent addition to HTML that allows JavaScript to draw pictures on a web page. You can expect this lab to work in reasonably recent versions of Firefox, Chrome, and Safari. It should work in Internet Explorer 9, but not in earlier versions.
This lab also introduces animation. A computer animation consists of a sequence of "frames." Each frame is a picture. When the frames are drawn one after another in rapid succession, the viewer can see the result as a moving image. In this case, the frames of the animation are produced by drawing on a canvas.
The directory /classes/cs120/lab9-files contains three HTML files that will serve as starting points for this lab's exercises. To begin the lab, you should start a new Aptana web project named lab9, and you should copy the files from /classes/cs120/lab9-files into that project. Note that these files contain JavaScript code that you will not fully understand. For this lab, you will only have to fill in the definitions of some functions and add a few variables.
For most of the exercises in this lab, you will be creating original pictures. Your work on those exercises should not be the same as anyone else in the class. And for the one exercise where you are given detailed specifications of what to draw, you should still not copy anyone else's code!
The lab is due next Friday, as usual.
The Graphics API
A <canvas> element on an HTML page represents a rectangular area on which you can draw using JavaScript commands. This section describes the API that you will use for drawing on a canvas. The API uses a "graphics context object." This object is created by code that has already been written in the three pages that you will work on. The graphics context object is stored in a variable named graphics. (The variable can have any name; "graphics" is just the name that has been used on the three pages.)
The graphics context is an "object." An object is a collection of variables and functions. The graphics object contains variables and functions related to drawing on the canvas, such as graphics.strokeStyle and graphics.fillRect().
Canvas graphics works with paths, shapes, strokes, and fills. You can "stroke" a path or the outline of a closed shape such as a rectangle or circle. You can "fill" a closed shape. You can also work with text: The outlines of the characters are considered to be closed shapes, and you can either stroke or fill them.
The graphics API that you will use has three parts: variables in the graphics context, functions in the graphics context, and extra functions that I have written to make drawing certain things easier.
Graphics Context Variables: The following variables store values that affect drawing operations, such as color of fill and width of strokes. The values affect drawing that is done after you set the value, and it remains in effect until you change the value by assigning a new value to the variable. Variables include:
- graphics.fillStyle -- Set the color to be used for fill operations. The value is a string that specifies a CSS color value. For example: graphics.fillStyle = "red";
- graphics.strokeStyle -- Set the color to be used for stroke operations. The value is a string that specifieds a CSS color value. For example: graphics.strokeStyle = "#AAB030";
- graphics.lineWidth -- Set the width of the lines used for stroke operations. The value is a positive number. For example: graphics.lineWidth = 5;
- graphics.font -- Set the font that is used for graphics.fillText and graphics.strokeText. The value is a string specifying a CSS font, which can include styles like italic and bold, size, and font-family. For example: graphics.font = "italic bold 60px monospace"; or graphics.font = "20px sans-serif";
- graphics.globalAlpha -- Set the degree of transparency for all drawing operations. The value is a number in the range 0 to 1. For example: graphics.globalAlpha = 0.6;
Built-in Drawing Functions: To actually draw something on the canvas, you need to call a drawing function, such as graphics.fillRect(). Many drawing functions have parameters that specify the "coordinates" to be used in the drawing operation. The canvas is made up of rows of columns of "pixels". The width of the canvas gives the number of columns of pixels. The height of the canvas gives the number of rows. A point in the canvas is specified by coordinates (x,y) where x is the number of pixels over from the left edge of the canvas and y is the number of pixels down from the top edge of the canvas. The upper left corner of the canvas has coordinates (0,0). The x-coordinate increases to the right, and the y-coordinate increases downwards. (It's OK to draw figures that lie completely or partly outside the canvas -- you will just see the part the intersects the canvas.) So, here are some of the drawing functions that you can use. Keep in mind that when you use these functions, the actual parameters that you put in the parentheses can be numbers, variables, or even complicated expressions that compute a value.
- graphics.fillRect(x,y,w,h); --- fills in the rectangle with upper left corner (x,y), width w, and height h. To make a square, use the same value for w and for h. (w is the horizontal size of the rectangle, and h is the vertical size; w and h must be positive numbers.)
- graphics.strokeRect(x,y,w,h); --- strokes the outline of the rectangle with upper left corner (x,y), width w, and height h. To make a square, use the same value for w and for h.
- graphics.clearRect(x,y,w,h); --- erases the inside of the rectangle with upper left corner (x,y), width w, and height h. The background of the canvas will show through in that area. This sets pixels in the canvas image to be "transparent," so the background shows through. (When the canvas is first created, all the pixels are transparent.)
- graphics.strokeText(string,x,y); --- strokes the outline of each of the characters in a string of text. The first parameter, string, is the string of text, such as: "Hello World". The left endpoint of the string's baseline is at the point with coordinates (x,y). The baseline is the line on which the string rests, so the string extends above and to the right of (x,y), but parts of some characters, such as "y" and "g", can extend below the baseline.
- graphics.fillText(string,x,y); --- like graphics.strokeText, but fills in the characters instead of stroking their outlines.
Extra Drawing Functions, defined in the script: The drawing canvas has only limited support for drawing shapes -- basically just text and rectangles. It is possible to draw other shapes, but it's more complicated. So, I have written several drawing functions that fill or stroke various shapes. These functions are NOT built into the graphics context, so you don't call them by saying graphics.fuctionname(...). Instead, you call them using just the function name, and you use the graphics context as the first parameter: functionname(graphics,...). For example, I have defined a function fillCircle(g,x,y,r) that fills in the circle with center at (x,y) and radius r, using the graphics context g for drawing. When you call this function, you pass graphics as the first parameter, for example: fillCircle(graphics,100,200,50). Here are the extra drawing functions that I have provided:
- strokeLine(g,x1,y1,x2,y2); --- strokes the straight line segment from the point (x1,y1) to the point (x2,y2). Example: strokeLine(graphics,100,50,200,300);
- strokeCircle(g,x,y,r); --- strokes the outline of the circle with center (x,y) and radius r. Example: strokeCircle(graphics,300,300,100)l
- fillCircle(g,x,y,r); --- fills the circle with center (x,y) and radius r.
- strokeOval(g,x,y,r1,r2); --- strokes the outline of the oval (ellipse) with center (x,y), horizontal radius r1, and vertical radius r2. Example: strokeOval(graphics(300,300,200,100);
- fillOval(g,x,y,r1,r2); --- fills the oval (ellipse) with center (x,y), horizontal radius r1, and vertical radius r2.
- strokePoly(g, x1,y1, x2,y2, x3,y3, ... ); --- strokes the outline of the polygon with vertices (x1,y1), (x2,y2), (x3,y3), ... Can be used with 7 or more parameters. (You don't actually type the "..."; it just means that you can have more actual parameters.) Use 7 parameters, including the graphics context and 6 numbers, to make a triangle. With 9 parameters, you can draw a diamond shape, as is done as an example in FirstDrawing.html. Example: strokePoly(graphics,200,300,600,300,300,100);
- fillPoly(g, x1,y1, x2,y2, x3,y3, ... ); --- fills the polygon with vertices (x1,y1), (x2,y2), (x3,y3), ... Can be used with 7 or more parameters.
In addition to the drawing functions, I have provided several functions for making random colors and random numbers. These functions return a value, which should ordinarily be assigned to a variable or used in an expression:
- randomColor() --- Returns a randomly created color. This is meant to be used in an assignment statement such as: graphics.strokeStyle = randomColor();
- randomGray() --- Returns a randomly created shade of gray. This is meant to be used in an assignment statement such as: graphics.fillStyle = randomColor();
- randomSpectralColor() --- Returns a randomly created color, which is one of the "colors of the spectrum." Spectral colors are bright, saturated colors. For example, pink, brown and gray are not spectral colors. This is meant to be used in an assignment statement such as: graphics.strokeStyle = randomColor();
- randomInt(A,B) --- Returns a randomly created integer in the range A to B inclusive. For example, randomInt(4,7) returns one of the numbers 4, 5, 6, or 7. This is meant to be used in an assignment statement such as: graphics.lineWidth = randomInt(4,10);
You will find definitions for all these extra functions in the HTML files that you will work on today. You don't have to understand the functions' definitions, and you should not make any changes to them. However, you should understand how to use them, and you should use them in your drawing.
Animation
One of the major characteristics of client-side programming for the web is that it is largely event-driven. That is, the programming consists largely of saying what will happen when certain events occur. You have already worked with one kind of event: The event that is generated when the user clicks a button. But there are several other kinds of events, such as events that occur when the user presses a key on the keyboard, or when the user drags the mouse form one point to another.
Most events are triggered by actions taken by the user, but one important type -- timer events -- are generated internally by the computer. A timer event is set at one point in time, and it "goes off" later, after some specified interval. It's like an "alarm." You can set up a function to be called when the alarm goes off. Timer events are used for animation. A sequence of timer events is generated, separated in time by some small time interval. Each time a timer event occurs, the function that responds to the event creates one frame in the animation.
The last exercise of the lab uses timer events to make an animation. For this lab, the timer events are all set up -- you just have to write the code to do the drawing.
Exercises
Exercise 1. For the first exercise, work in the file FirstDrawing.html. Do your work entirely inside the definition of the function draw(). The definition of this function is empty; you have to fill it in to draw some picture. Put some effort into it! Try to draw a picture of something real, such as a snowman, a house, a sailboat, or a spaceship. (It will, of course, be a very cartoonish picture.) Use at least a dozen drawing commands, and use several colors. You should draw at least one string in your picture. You might want to use graphics.fillRect to draw sky and ground in different colors. You might want to use some randomness in the picture, so that you get a somewhat different picture when you reload the page, but that is not the main point of the exercise. An example can be found in the file exercise-1-example.html. This is the example that I showed in class. You might be able to copy some code from it, but you should draw a completely different picture.
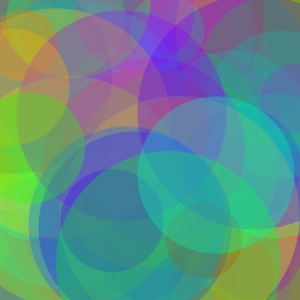
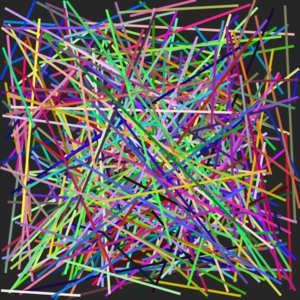
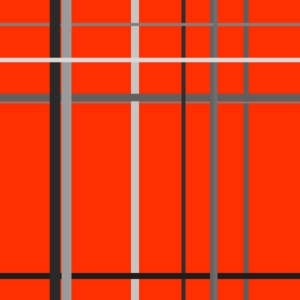
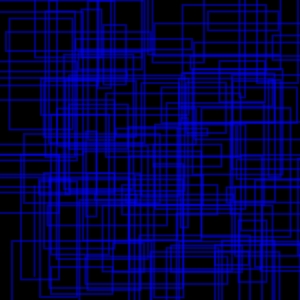
Exercise 2. For the second exercise, you will work on LoopyArt.html The draw() function in this file is called each time the user clicks a button, and it should draw a different picture each time it is drawn. Each picture should be a work of random "art". You should draw at least three different types of art. You should randomly decide which type of art you are going to draw. Furthermore, you should use randomness in the drawing, preferably a lot of randomness. Finally, you are required to use a counting loop in each picture; for example, you can use a loop to draw a lot of lines or a lot of circles. (This is why it's called "loopy" art.) The program currently draws two types of really boring art, with no loops. You should delete the code that is there now. You might get some ideas from it, but your work will be much more complicated than the examples. Some images of more compicated "art" are shown below.
Exercise 3. For the third and final exercise, you will work on Animate.html. That file has a draw() function that is called approximately 30 times per second (while the animation is running). You should complete this function so that it produces an animation like the one shown at the bottom of this page. Each time the draw() function is called, it should add just one circle to the picture. It does not clear the picture before drawing the circle, so all the circles from previous calls to draw() are still there. The center of the circles is selected at random, and the first circle has a radius equal to 1. The circles get bigger; the radius increases by 2 or 3 each time draw() is called. However, sometimes the center of the circles moves to a new random point, and the size of the circles returns to 1. To implement this, you will need to define some variables outside the draw() function, so that they keep their values between calls to draw(). In particular, you need variables to represent the current center and the radius of the circles. What you do with color is up to you. You might choose a random color for each circle, or for each group of circles (as I do in the animation on the bottom of this page). However, drawing all the circles in white also looks nice. You might also try having several growing circles at the same time. The file exercise-3-example.html defines an animation as an example, but it's not very similar to what you need to do.
For Some Extra Credit: Design and implement your own animation. Start with another copy of Animate.html. Remember that your work should be original and not the same as anyone else in the class.
Art Examples
Here are samples of the "art" produced by my version of the "LoopyArt" program, shown at half-size. You are not required to duplicate these particular types of "art", but you might get some ideas from them. I would be happy to discuss the techniques that I used.
 |
 |
 |
 |
 |
 |
Animation Example
Here is the type of animation that you should write for Exercise 3. This version is written in Java rather than JavaScript, so you can't look at the code. The animation draws circles of increasing size radiating out from some center. Sometimes, the center moves, and the radius of the circles goes back to 1. The color changes at the same time the center moves. What you do with the colors in your version is up to you. In this version, I clear the screen every so often, which is somethign that you do not have to do, since there is a button to do that.