CPSC 120, Fall 2014
Lab 1: Introduction to HTML
Welcome to the first lab for CPSC 120. In this lab, you will create your first web pages. You will also be introduced to the Linux operating system. You are not expected to complete the lab during class. The assignment should be complete before class next Friday.
As you work through the instructions for the lab, there are likely to be things that you don't understand. Ask for help! You are also encouraged to come in for help during office hours.
Note on turning in your work: For the first few labs, the work that you do will be visible to the whole world as soon as you do it. You won't have to do anything special to turn it in. Of course, this also means that you can look at other students' work. Since you will be working on your own personal project, and since you can look at anyone's work on the web to see how it's done, being able to look at other students' work doesn't really matter. In fact, for this first project, I encourage you to look, and to talk to other students about their work.
| Before leaving the Gulick lab, remember to restart the computer. Use the icon on the bottom left of the Start menu. The computer will boot into Windows; you do not have to wait for the process to complete. If you work in the Lansing lab, be sure to log out when you are done. Use the icon next to the bottom on the left of the Start menu. |
Getting into Linux
The computers in Gulick 208 are usually running the Windows operating system, but they are also set up to run Linux. There are actually many versions of Linux. The one we are using is called "Linux Mint." You can read more about Linux on the About Linux page. http://math.hws.edu/about_linux
To get into Linux, restart the computer, or start it if it is turned off. (To restart, hit Control-Alt-Delete to get to the login screen. Then, use the small "power button" menu on the bottom-right of the login screen and select "Restart.") As the computer starts up, there is a point where you are given a choice between "Windows" and "Linux Mint". Press the down-arrow key once to select "Linux Mint", and press return. You have about 30 seconds to do this. After a couple minutes, you will see a Linux login screen.
Log in using the Linux user name and password that were assigned to you. (Your Linux user name is the same as your user name for email and for the campus network, but the password is different.) Your Linux desktop will have a menu at the bottom left of the screen. You can explore some of the applications in that menu, when you have time. For now, you should select "Text Editor" from the "Accessories" section of the menu. The Text Editor is a program called gedit. You can use it to write files that are made up of plain text. The HTML source of a web page is written as a plain text file.
The default preference settings in gedit are not ideal for HTML or other web files. For improved editing, you need to make some changes to the preferences. In any gedit window, select the "Preferences" command from the "Edit" menu. Change the settings in the "View" pane and in the "Editor" pane as follows:
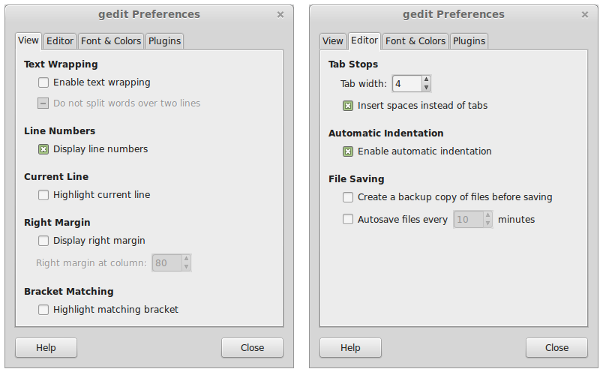
In particular, you want to turn off "Text Wrapping" and turn on "Line Numbers" in the "View" pane; and you want to set "Tab Width" to 4, turn on "Insert Spaces Instead of Tabs," and turn on "Automatic Indentation." All of these changes make gedit more suitable as a programmer's editor. The most important change is to turn off "Text Wrapping," which means that you will have to press return to start a new line when typing; you will not automatically get a new line when you reach the end of the current line. (For programming, you need strict control over where lines end.)
The Project
Today, you will begin work on your first web site. Your task is to create several web pages devoted to some topic. You should already have given some thought to the topic. Some possibilities include: yourself, a group or organization that you belong to or support, a social cause, some historical event, a band or a performer or a writer, a sport or sports team, a favorite product or company, science, jokes, health tips, recipes, hobbies, ....
For your project, the minimal requirements are: You should create at least four related web pages. One of the pages should be a main or front page—the one that you expect to be the first page that a reader will visit. You should have links from the main page to the other pages. You should also have some external links to other web sites. Your pages should use several images and at least one list. (The list could be a list of links.) You should use at least two different sizes of headlines. And of course you should have some plain paragraphs. (Note that meeting the minimal requirements in a minimal way is only good for about a C+.)
For now, your pages will use only HTML. They will be rather plain, or even ugly. In the next two labs, you will use CSS and just a little bit of JavaScript to add some style and interest to your pages.
Creating and Viewing HTML Files
To create a web page, all you need to do is start with a new window in gedit, type some HTML code, and save your work. We've gone over the basic outline of an HTML page. As a starting point, you can type the following into a gedit window, substituting your own text. Or open this page in a web browser and copy-and-paste the code into the gedit window:
<!DOCTYPE html>
<html>

<head>
<title>Your Title Goes Here</title>
</head>

<body>

<h1>A Major Headline Goes Here</h1>

<p>Paragraphs and other text goes here...</p>

</body>
</html>
You should save your work often! Use the "Save" command in the "File" menu. When you save the file, the name of the file must end with ".html". It's a good idea to avoid using spaces or funny characters in the name. Hyphen (-), underscore (_), and numbers are fine. Save your work into the folder named www. Anything that you save into your www folder is immediately visible on the web.
You can see the web page that you have created by opening the file in a web browser. Your Desktop has an icon named "Home." Double-click that icon to open a file browser window, where you can see the folders and files in your Linux account. Double-click the www folder. You should see your HTML file inside. To open the file in a web browser, just double-click the icon, as usual. (Note: When you want to work on a file, you need to open it in gedit, not in a web browser. To open a file in gedit, right-click the icon in a file browser window, and use the "Open With" submenu to open the file with "Text Editor." Alternatively, you can start up gedit and use its "Open" command to open your file.)
Your page is also available on the web for anyone to see. Suppose that the file is named page.html and that your user name is zz9999. The your page can be found at this URL:
http://math.hws.edu/~zz9999/page.html
The character just before zz9999 is a squiggle ("~"), which you will find in the upper left corner of the keyboard. Of course, you have to replace "zz9999" with your own user name, and you have to replace "page.html" with whatever name you used for the file. To use the URL, type it into the location box at the top of any web browser window. (When you do this, you can leave out the "http://" part of the URL—but it really is part of the URL, and you need to use it when you add external links to your pages.)
Adding Links and Images
Remember to add some links and some images to your pages! Links and images are covered in this week's reading from HTML & CSS. A link is written using an <a> element of the form
<a href="URL">PAGE TEXT</a>
where URL is the location of the page that you are linking to, and PAGE TEXT is the text that actually appears on the web page. A URL can be either relative or absolute (see pages 79 and 80). Relative URLs are used to link from one page to another page on your site. For this project, a relative URL is just the name of a file. An absolute URL starts with "http://". To get an absolute URL for a web page, visit that page in a web browser, and copy-and-paste the URL from the browser's location box into your file. An image is added to a page using an <img> element of the form
<img src="URL" width="xxx" height="yyy">
where URL is the address of the image and xxx and yyy are numbers that give its size. It is possible to link to a page that is on another site, using an absolute URL, but it is usually preferable to place a copy of the image into your www folder and use a relative URL. You can grab images from the web, by right-clicking the image in a web browser window and choosing a command such as "Save Image As"—but make sure that it's an image that you have permission to use! You can find the size of an image by viewing it in a web browser, or by double-clicking its icon if it is a local file on your computer. The window that displays the image will have the size noted somewhere.
It is possible to specify any values for the width and height of an image on a web page, and the image will be scaled to fit. However, as noted in the textbook, it is better to resize the image so that the actual image has the exact size that you want it to be on the web page. Here is one way to do it: Right-click the image icon and select "Open With / Gimp image Editor". In the Gimp window, select "Scale Image" from the "Image" menu. Enter the Width and Height that you want, and click "Scale." Then select the "Overwrite" command from the "File" menu to replace the original file, or use "Export As" from the file menu to save the modified image to a different file. (Gimp is a very capable image editing program. You might want to play with it. Try applying some "Filters" to your images. Use Control-Z to Undo a change.)
And don't forget that you have to add at least one list and several different headline sizes to your site.
Working Outside of Lab
You will need to work on your web pages outside of lab. You have several options for working on your own.
- You can work on the computers in the Math/CS lab, Lansing 310. These computers are always running Linux and do not have to be rebooted; otherwise, they work the same as the computers in Gulick 208. There might be a student TA there who can offer you some help with Linux and text editors, and maybe even with web site development. (However, most of our TAs don't know about writing web pages.)
- Gulick 208 is open in the evenings, so you can work on the computers there.
- You can work on the files on your own computer and use sftp to move files between your computer and your account on the math server. See http://math.hws.edu/about_linux/sftp.html. for information on using sftp. If you plan to work on your own computer, it will be useful to have Firefox or Chrome web browser on your computer. If you have Firefox, you should consider using FireFTP for SFTP file transfers. See http://math.hws.edu/about_linux/FireFTP.