CS 124, Fall 2009
Lab 11: Components and Layout
For the exercise in this lab, you will construct a simple GUI, including
a variety of components. In the next lab, you will add functionality
to the GUI. (The program will be a basic network chat room client.)
The lab is mostly tutorial in nature. Most of the code can be copy-and-pasted
from this web page. However, you should do more than simply copy it blindly.
You should read it carefully and try to understand what is going on.
This lab is due, as usual, at the beginning of lab next week. Copy it to your
homework folder by that time.
Remember that the Minesweeper project will be due on Tuesday, November 17.
It will be collected from your homework directory for grading on Wednesday morning.
You should also be getting ready to start in on your final project for the
course. I will ask you to set up a meeting with me sometime in the next week
to discuss the project. You should be prepared to come in with several ideas
for projects that you would like to work on. Although you don't need to come in with
a general design, you should have some ideas about what
the user interface will be and how the program should work.
About Layout
Graphical user interfaces are built up out of components such as
buttons, checkboxes, and text input boxes. Layout refers to determining
how big to make the components and where to put them. Components are placed in
a container, usually a JPanel. Since a JPanel is itself a
component, you can make complex layouts by nesting JPanels inside other
JPanels. In Java, a layout manager
is usually used for this purpose. A layout manager implements some policy about how to
lay out components in a container.
 There are several different kinds of layout manager,
which implement different layout policies. The default layout manager for a component
is a FlowLayout, which simply lines up components from left to right in the panel.
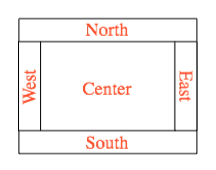
In this lab, you will also use BorderLayouts. A BorderLayout arranges
up to five components in a container, with one component in the center and one component
along each edge. (All the components are optional; often, you only have the center
component and one or two edge components.) The edge positions are referred to as
north, south, east, and west, and they are arranged as shown at the right.
There are several different kinds of layout manager,
which implement different layout policies. The default layout manager for a component
is a FlowLayout, which simply lines up components from left to right in the panel.
In this lab, you will also use BorderLayouts. A BorderLayout arranges
up to five components in a container, with one component in the center and one component
along each edge. (All the components are optional; often, you only have the center
component and one or two edge components.) The edge positions are referred to as
north, south, east, and west, and they are arranged as shown at the right.
The center component of a border layout can shrink or expand to fill the available
space. Sometimes, a border layout can be used in creative ways, such as to make a long,
narrow JPanel with an expandable text box in the center position and a button
in the east position.
You can read Section 6.7 for
more information on layout.
Starting the Program
To begin, you should create a project or directory named lab11.
Create a new class in this project named ChatRoom. This class will
extend JPanel. To get easy access to the JPanel class and
other GUI classes that you will need, you have to add some import statements
at the top of the file. So, you should modify the file to read:
import java.awt.*;
import java.awt.event.*;
import javax.swing.*;

public class ChatRoom extends JPanel {

}
An object of type ChatRoom will hold the GUI components that are
needed for the program. But to have a program at all, you will need a
main() subroutine. The main routine has to create a window,
place the panel in the window, and show the window on the screen. The question is,
where to put the main routine? You cold put it in a separate class, and that
would probably the best place for it stylistically, but you could also put it
in the ChatRoom class itself, for convenience. (Just remember that the
static main subroutine has no relation to the behavior of ChatRoom objects.)
Here is a main subroutine that you can use:
public static void main(String[] args) {
   JFrame window = new JFrame("Chat Room");
   ChatPanel room = new ChatPanel();
   window.setContentPane(room);
   window.pack();
   window.setLocation(20,50);
   window.setDefaultCloseOperation(JFrame.EXIT_ON_CLOSE);
   window.setVisible(true);
}
Ultimately, the GUI that you create will look something like this:
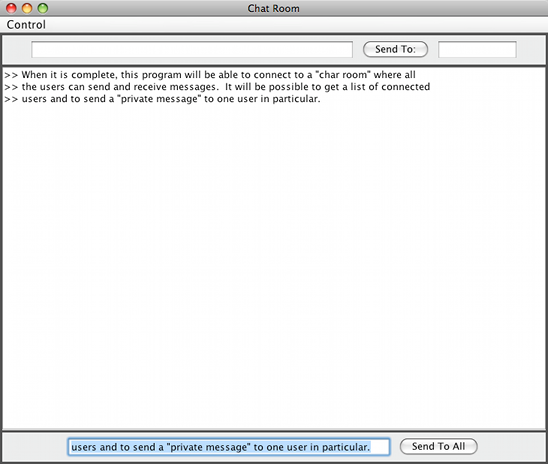
This interface contains one large JTextArea in the center of the
window. A JTextArea can display multiple lines of text and (optionally)
allow the user to enter and edit the text. There are two JButtons, which
are buttons that the user can click. And there are three JTextFields,
which are input boxes that can contain one line of text. (There is also
a "Contol" menu at the top; we'll worry about that later.) You will need
instance variables to represent all these components. You can add the following
instance variable declarations to your class:
private JTextArea transcript;

private JTextField messageInput;
private JButton sendButton;

private JTextField privateMessageInput;
private JTextField recipientInput;
private JButton sendPrivateButton;
Laying out the GUI
The constructor for the ChatPanel class will create all the component
objects and set up the layout of the panel. Start writing the constructor.
The first task in the constructor is to install an appropriate layout manager
for the panel. You can do this with the statement:
setLayout( new BorderLayout(3,3) );
The parameters, "3,3", in the BorderLayout constructor specify gaps between
the components where the background color of the panel can show through. I like to
have a visual boundary between the components, so I often set the background color
to be a dark gray:
setBackground(Color.DARK_GRAY);
Next, you can start creating components and adding them to the panel. Look at
the row of components across the top of the panel. There is a text field, a button,
and another text field. To get all three components into the north position of the
border layout, you have to first put them into a small panel and then add that
panel to the main panel. Here is the code that creates the small panel, containing
the three components, and adds it to the north position of the main
panel.
JPanel top = new JPanel();  // subpanel for top of main panel
privateMessageInput = new JTextField(35);  // space for 35 chars
top.add(privateMessageInput);
sendPrivateButton = new JButton("Send To:");
top.add(sendPrivateButton);
recipientInput = new JTextField(8);  // space for 8 characters
top.add(recipientInput);
add(top,BorderLayout.NORTH);  // add subpanel to main panel
Add this code to the ChatRoom constructor. Then write similar code
to create a "bottom" subpanel containing the messageInput and the
sendButton, and add it to the south position of the main panel.
The JTextArea, transcript, will occupy the center position
of the main panel. A JTextArea generally needs some configuration, and
must be put into a "scroll pane" to provide it with a scroll bar. This is all
a little complicated. Here is the code that will create the transcript,
configure it, and add it to the center position of the main panel:
transcript = new JTextArea(30,60);  // 30 lines, 60 columns
transcript.setWrapStyleWord(true);
transcript.setLineWrap(true);
transcript.setEditable(false);  // user can't edit transcript
add(new JScrollPane(transcript), BorderLayout.CENTER);
Once you have added this code to the constructor, you should be able to run
the program and see the window containing all the components in their correct
positions.
Adding Action
A nice GUI interface is useless if it doesn't do anything. To program it to
do something, you have to work with events and event handlers. For now, we
will add just a bit of event handling, with the main work to come next week.
Buttons generate ActionEvents when they are clicked. Text fields generate
action events when the user presses return while typing in them. And menu commands
generate action events when the user chooses them from the menu. It looks like
we want to handle some action events. To respond to action events, you need
an ActionListener object. For us, it will be easiest to let the ChatRoom
object be the ActionListener. ActionListener is an interface,
and the ChatRoom class must "implement" this interface. Change the first
line of the class definition for ChatRoom to:
public class ChatPanel extends JPanel implements ActionListener {
This interface requires you to add a method "public void ActionPerformed(ActionEvent evt)"
to the class. Here is a method that you can use for now. When the user clicks the
sendButton or presses return in the messageInput box, this
event handler method will post the user's input from the input box to the
transcript. It also selects and hilites all the text in the input box, which is
convenient, since it allows the user to just keep typing:
public void actionPerformed(ActionEvent evt) {
   Object source = evt.getSource();
   if (source == sendButton || source == messageInput) {
      transcript.append(">> " + messageInput.getText() + "\n");
      messageInput.selectAll();
      messageInput.requestFocus();
   }
}
As a final step in setting up event-handling, you have to "wire" the object
that produces the event to the object that will handle the event. This is part
of setting up the GUI and should be done in the constructor. To make sure that
action events from the sendButton get to the ChatRoom, you
can add the following line to the constructor (some time after you have
created the button object):
sendButton.addActionListener(this);
In this command, "this" refers to the object that the constructor is creating,
that is to the ChatRoom object itself.
You can add similar lines to set up event-handling for messageInput,
sendPrivateButton, and privateMessageInput.
If you've done all this, you should be able to run the program, type
something in the message input box, click the "Send" button, and see the
text that you typed in the transcript.
Adding a Menu Bar
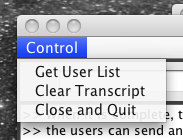 Most GUI programs have menu bars that the user can use to control the
program. The commands in a menu bar are represented by objects of type
JMenuItem. A JMenuItem works much the same way as a button:
It generates action events and can be wired to an action listener that will
handle the events. Our final goal is to add a simple menu bar to the program.
It will have three commands in a "Control" menu, as shown in the picture at
the right.
Most GUI programs have menu bars that the user can use to control the
program. The commands in a menu bar are represented by objects of type
JMenuItem. A JMenuItem works much the same way as a button:
It generates action events and can be wired to an action listener that will
handle the events. Our final goal is to add a simple menu bar to the program.
It will have three commands in a "Control" menu, as shown in the picture at
the right.
One thing that is different about menu bars is that they are not
added to panels. A menu bar has to be added to a window (or applet) separately
from the panel or other components that occupy the main content area of the
window. This makes things more complicated.
One simple way to implement a menu bar, which we will use here,
is to write a method that creates and returns the
menu bar. The main program will call this method to fetch the menu bar when it
is building the window.
So, first, you will need three more instance variables in the ChatRoom
class to represent the menu commands. You can declare them as:
   private JMenuItem closeCommand;
   private JMenuItem clearCommand;
   private JMenuItem getUserListCommand;
You will need a method to create and return the menu bar. A menu bar is represented
by an object of type JMenuBar. Each menu in the menu bar is represented by
an object of type JMenu. (In our program, there is just one menu.)
You just have to add JMenuItems to the JMenus and add the
JMenus to the JMenuBar. Here is a method that adds just
one of the three commands to the menu bar:
private JMenuBar createMenuBar() {

   JMenu control = new JMenu("Control");

   closeCommand = new JMenuItem("Close and Quit");
   closeCommand.addActionListener(this);
   control.add(closeCommand);

   JMenuBar menus = new JMenuBar();
   menus.add(control);
   return menus;

}
Add this to your ChatRoom class, and complete the method with code for
adding the other two commands to the menu.
Finally, you have to add the menu bar to the window. You just have to
add one line to the main routine:
public static void main(String[] args) {
   JFrame window = new JFrame("Chat Room");
   ChatPanel room = new ChatPanel();
   window.setContentPane(room);
   window.setJMenuBar(room.createMenuBar());
   window.pack();
   window.setLocation(20,50);
   window.setDefaultCloseOperation(JFrame.EXIT_ON_CLOSE);
   window.setVisible(true);
}
To test that events from the menu items have been wired correctly,
you can add some code to the actionPerformed method to handle
an event from the "Close and Quit" command. In response to this command,
you can call System.exit(0). If you've done all this, you
should be able to run the program and use the "Close and Quit" command
to exit.