CS 124, Fall 2011
Lab 12: More Events and Components
Last week's lab introduced mouse events and mouse listeners
and showed how to use them in a program that contains nothing but a large drawing area.
This week, you'll learn more about events and you will see how to add other components, such
as buttons, to the drawing area. Once again, the lab is more tutorial than usual
In the lab, you will work on a rather pointless demo program named Pulsar, which is meant to
illustrate some new event-handling tasks. It uses animation, the keyboard, and some buttons.
Here is an applet version of the completed program:
The applet shows an animated pulsing "sun" in a drawing area, with three control buttons
below. The "Start Animation" and "Stop Animation" buttons start and stop the animation.
Note that the "Start Animation" button is disabled if the animation is already playing,
and the "Stop Animation" button is disabled if the animation is already stopped.
The "Back to Center" button moves the sun to the center of the drawing area, if it is not
already there.
If you click the drawing area, then that panel gets the input focus, meaning that
it can respond to keyboard events. To give the user a visual indication of the focus, the
color of the border changes to cyan when it has the input focus, and is gray when it
does not have the focus. If the drawing area
does not have the input focus, keyboard events have no effect. If the drawing area
does have the input focus, then
the arrow keys can be used to move the sun left, right,
up, and down. And hitting the R, G, B, Y, or K key sets the color of the sun.
To start the lab, create a folder or project named lab12. Add a copy of
the file Pulsar.java, which you can find in /classes/cs124.
This contains a main() routine, so that it can be run as a program. When you run
it, you will see the sun, but there is no animation, no event handling, and no buttons.
You will add those features though a series of exercises.
You should take some time to look through what is already in Pulsar.java.
This file defines a subclass of JPanel that "implements ActionListener, KeyListener,
FocusListener, MouseListener." This means that the panel can respond to lots of different
kinds of events. All of the event-handling routines that are required by these interfaces
are defined at the bottom of the file. There are eleven such routines. Five of them will
be used in this lab; six of them play no role but have to be in the file to satisfy the
requirements of the interfaces.
The class has a nested subclass named Display. This means that the Display
class is defined inside the Pulsar class. Display is a subclass of JPanel
that is used to define the drawing area of the program. This class contains only a paintComponent
method that draws the sun. In the Pulsar, there is an instance variable named display
of type Display to represent the drawing area. The display is actually created
and configured in the constructor of the Pulsar class. I use a separate display class
in this program because I want the main panel to contain other things besides the display.
In addition to the display, the completed Pulsar panel will contain a row of buttons.
The appearance of the sun is controlled by several instance variables in the Pulsar class:
The position of the sun is given by centerX and centerY. It's color is given by
color. And the size of the sun and the positions of its rotating rays are determined by
the value of phase. In the complete version of the program, the values of these "state"
variables are changed in response to various events. When the display is redrawn, the appearance
of the sun will reflect the new values. To make this happen, you only have to program the
responses to the events.
Part 1: Animation
Animation in Java can be controlled by a Timer, defined by the class
javax.swing.Timer. (There are several timer classes in the Java API; when doing
GUI programming, you should be sure to use the one in the package javax.swing.)
Add an instance variable of type Timer to the pulsar class. (Remember that
an instance variable is defined in the class but not inside any method. The timer has to
be an instance variable so that you can use it to start and stop the animation.)
The purpose of a timer is to emit a series of events at some specified fixed time interval.
(It can also be configured to emit just one event and then stop.) The events are of type
ActionEvent. To respond to such events, you need an object that implements the
ActionListener interface, which specifies the actionPerformed method.
To implement animation, you make a Timer and write an actionPerformed
method to respond to the events that the timer emits. In the actionPerformed method,
you only need to update the values of the state variables for the next frame in the
animation, and repaint the display.
Create the timer in the Pulsar constructor.
A timer can be created with the constructor
"new Timer(delayTime,listener)". The delayTime is the time,
in milliseconds, between frames of the animation. The listener must be an
object that implements the ActionListener interface. A reasonable delay time for
animation can be anything from 20 to 100 milliseconds, and in this program, the
listener object can be specified as this (the special variable that refers to the
panel object itself). So, you can create the timer with
timer = new Timer(50,this);
where timer is the instance variable. For the timer to run and start
generating events, you also have to call
timer.start();
There is already an actionPerformed method in the Pulsar class, and it
is this method that will be called in response to an event from the timer.
You just have to say what happens in that actionPerformed method. For this simple
example, it's only necessary to add 1 to the value of pulsar (which controls
the animation of the sun), and tell the display to repaint itself:
pulsar++;
display.repaint();
In a more sophisticated program, the actionPerformed method could be more more
complicated than this.
At this point, you should be able to run the program and see an animated sun.
Part 2: Focus
When you click the mouse on a component, it's clear what component you're interested
in: the one you clicked on. When you press a key on the keyboard, it's not immediately
clear which component on the screen is the target of that key press. The answer is that
at any given time, just one component can have the "keyboard focus," and it is the component
with the keyboard focus that is the target of the event. The focussed component might be,
for example, a text-input box or a full-window text editor. But it could also be a button
or any other component. Usually, the fact that the component has the focus is indicated by
some visual change in the component, such as the blinking cursor in a text input box.
In the Pulsar program, the drawing area must have the input focus before
keyboard events will have any effect.
To get the keyboard focus, a component should "request" it. In this case, for the
display to receive the focus, you should call display.requestFocus(). The question
is, when to do this. Typically, the user has to click on a component to request that
it get the focus. The way to handle this is: Have a MouseListener to listen
for mouse press events on the display. When such an event occurs, call
display.requestFocus(). We already have a MouseListener, namely
this. So, to set up the mouse listener, just add the line
display.addMouseListener(this);
to the Pulsar constructor. There is already a mousePressed method
in the Pulsar class, which will now be called in response to a click on the display.
You still have to say what happens in this method. The correct response is simply to
request focus for the display:
display.requestFocus();
It's important for the user to have some visual feedback about which
component has the keyboard focus. In this case, when the display gets the focus,
you should change the color of the display's border. When the display loses the
focus, you should change the color of the border back to gray. You can
tell when these things happen because they cause events of type FocusEvent
to be emitted by the component that is gaining or losing focus. To react
to such events, you need an object that implements the FocusListener
interface, which specifies event-handling methods named focusGained
and focusLost. Once again, this will play the role of the
listener. Set up the focus listener by adding this line to the Pulsar
constructor:
display.addFocusListener(this);
Then, you should program the focusGained and focusLost methods
to change the border of the display. Here is how you can set the border of the
display to be a 4-pixel wide line with color equal to a Color
value borderColor:
display.setBorder( BorderFactory.createLineBorder( borderColor, 4 ) );
If you run the program now and click the display, the color of the border
should change. If you click away from the Pulsar window, the color of the
border should change back to gray.
Part 3: Key Events
Now that the display can get the input focus, you can program a response
to keyboard events. You have to set up a KeyListener. As usual, this
means adding a line
display.addKeyListener(this);
to the Pulsar constructor. The KeyListener interface defines several
methods. The one that we want to use here is keyPressed, which is called
when the user presses a key. The keyPressed method has a parameter, evt,
which includes information about the event, including the identity of the key that
was pressed. The method evt.getKeyCode() returns an integer code number that
identifies the key. Possible values of this code number are given by constants
in the KeyEvent class. For example, if the user presses the left-arrow
key, the value of evt.getKeyCode() will be KeyEvent.VK_LEFT. If the
user presses the "A" key, the value of evt.getKeyCode() will be KeyEvent.VK_A.
Note that pressing a key is not the same as typing a character: Pressing the "A" key can
type either a lower-case or an upper-case "A", depending on whether the SHIFT key
is also down. In the keyPressed method, you get information about the
key that was pressed, not the character (if any) that was typed.
You have to define the keyPressed method to respond appropriately to various key
presses. The response, if any, should be to adjust the values of one of the instance
variables centerX, centerY, or color, and call display.repaint().
The key presses that you want to respond to are the arrow keys
(KeyEvent.VK_LEFT, KeyEvent.VK_RIGHT, KeyEvent.VK_UP, KeyEvent.VK_DOWN)
and certain letter keys (KeyEvent.VK_R, KeyEvent.VK_G, KeyEvent.VK_B,
and KeyEvent.VK_Y).
Once you've done this, you should be able to move the sun and change its color by
hitting certain keys (but only, of course, when the display has the keyboard focus).
Part 4: Buttons And Layout
Next, you have to add a row of buttons under the display area
A button is represented by an object of type
JButton. Start by adding three instance variables of type JButton
to the Pulsar class to represent the three buttons used in the program.
When you create a button, you specify the
text that will appear on the button in the constructor. For example: new JButton("Start Animation").
Create the three button objects.
Now, you have the problem of how to get the three buttons onto the screen. To do this,
you need to know something about layout. Layout is the process of determining the
sizes and locations of the components that make up the GUI for a program. In Java, layout
is usually handled by LayoutManager objects. A JPanel can act as a "container"
for other components. Those components have to be "added" to the panel. The JPanel
has a layout manager that decides how to arrange the components inside the panel. Panels
are themselves components. It's possible for one JPanel to hold another JPanel
that in turn holds other components.
In the Pulsar constructor, you should create a new JPanel object to
hold the buttons:
JPanel bottom = new JPanel();
Then add the three buttons to that panel, using statements such as
bottom.add( button );
Finally, add the bottom panel to the main Pulsar panel by calling
add(bottom, BorderLayout.SOUTH);
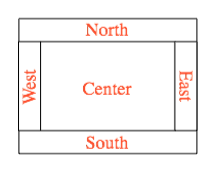 The parameter BorderLayout.SOUTH is necessary here because the main panel uses
a type of layout manager called a BorderLayout. This type of layout manager
supports up to five components, arranged as shown in the image at the right.
There are four optional components arranged around the edges in the NORTH, SOUTH,
EAST, and WEST positions, as shown. There is one CENTER component that fills the
leftover space. In the Pulsar panel, the display has been added in the CENTER
position. Saying "add(bottom,BorderLayout.SOUTH)" adds bottom
in the SOUTH postion. If you wanted the buttons above the display area,
you would say "add(bottom,BorderLayout.NORTH)". Or you might put a
JLabel in the NORTH position and use it to show messages to the user.
The bottom panel that you created above, by the way, is using the default layout manager, called a
FlowLayout, which simply lines up the components that have been added to
the panel. In this case, it's a little more attractive to use a GridLayout
on the bottom panel. A GridLayout arranges components in rows and columns.
In this case, a GridLayout with one row and three columns can be used.
To do so, add the following statement:
The parameter BorderLayout.SOUTH is necessary here because the main panel uses
a type of layout manager called a BorderLayout. This type of layout manager
supports up to five components, arranged as shown in the image at the right.
There are four optional components arranged around the edges in the NORTH, SOUTH,
EAST, and WEST positions, as shown. There is one CENTER component that fills the
leftover space. In the Pulsar panel, the display has been added in the CENTER
position. Saying "add(bottom,BorderLayout.SOUTH)" adds bottom
in the SOUTH postion. If you wanted the buttons above the display area,
you would say "add(bottom,BorderLayout.NORTH)". Or you might put a
JLabel in the NORTH position and use it to show messages to the user.
The bottom panel that you created above, by the way, is using the default layout manager, called a
FlowLayout, which simply lines up the components that have been added to
the panel. In this case, it's a little more attractive to use a GridLayout
on the bottom panel. A GridLayout arranges components in rows and columns.
In this case, a GridLayout with one row and three columns can be used.
To do so, add the following statement:
bottom.setLayout( new GridLayout(1,3) );
At this point, you should see the buttons when you run the program, but they don't
yet do anything.
Part 5: Buttons Events
Finally, you need to program what happens when the user clicks on each button.
When a button is clicked, it emits an ActionEvent. To respond to the event,
you need an object that implements the ActionListener interface, and you
must add that object as an action listener to the button. As usual, we use this
(that is, the Pulsar object itself) as the listener. Add this as
an action listener for each of the buttons, using commands such as
button.addActionListener( this );
Note that the action listeners are added to the buttons, not to the display, since
it is the buttons that generate the action events!
You then have to program the response to each button in the actionPerformed
method. This method already responds to events from the timer, and it has to respond
to events from three different buttons. To do this, when an event occurs, you have to
be able to tell which object is responsible for the event. The evt parameter
of the actionPerformed method contains the information that you need. The method
evt.getSource() returns the source of the action event. If the source came
from a button, then the source will be the JButton object. So, for example,
you can test whether the event came from button by saying
if ( evt.getSource() == button ) { ...
Add handlers for the three buttons to the actionPerformed method. The
"Stop Animation" button should start the timer running by saying timer.stop(), where
timer is the instance variable that refers to the Timer. The
"Start Animation" button should restart the timer by saying timer.start().
The "Back to Center" button should move the sun back to the center of the display.
The actionPerformed method still has to handle events from the timer as well!
If the timer generated the event, evt.getSource() is equal to the timer object.
This should make the buttons work. But one last nice touch is to disable
buttons when they are not applicable. This helps make the state of the program apparent
to the user.
In this program, the "Start Animation" button
should be disabled when the animation is running, and the "Stop Animation" button
should be disabled when the animation is not running. The "Start Animation" button
should be disabled at the beginning, in the Pulsar constructor. When you
stop and start the animation in response to clicks on the buttons, you should
also enable/disable the buttons appropriately.
You can disable a button, btn by saying
btn.setEnabled(false);
and you can enable it with
btn.setEnabled(true);
Part 6 (optional): Just for Fun
The Pulsar class defines methods mouseEntered and mouseExited
even though they have nothing to do in this program. These method are called when the
mouse enters/leaves the display. For fun, give them something
to do: When the mouse enters the display, change the display's background color,
by calling display.setBackground, and when the mouse leaves the display, change
the background color back to white.