FOR THE SECOND LAB IN COMPUTER SCIENCE 124, you will write a few short programs using Visual J++. You'll also learn how to create a Visual J++ project from scratch and learn more about Visual J++ in general.
As far as programming goes in this lab, you'll use variables, assignment statements, if statements, and while statements. You'll also use a few basic "console" commands. The full story about these program elements can be found in Chapter 2 of the text. However, most of what you need to know to do the lab is reviewed in this lab worksheet or has been covered in class.
The exercises at the end of the lab are due in class on the Monday following the lab. Remember that you can work with a lab partner and turn in a single lab report if you want. You can also turn in an individual report.
In general, you will begin every project for this course by copying a starter folder from the cpsc124 folder that can be accessed on PCCommon, on the campus network. However, it is also possible to create a Visual J++ project from scratch. In this part of the lab, you will create a stand-along console application from scratch.
In the Gulick lab, to start up Microsoft Developer Studio directly, click to the Start button. From there go to Programs and then to CourseWare. In the CourseWare submenu, click on DevStudio. This will launch the Microsoft Developer Studio.
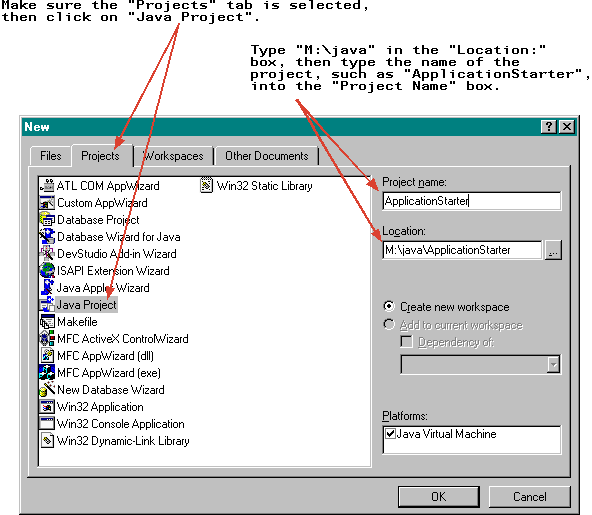
Since you have not opened an existing project, you have to begin by creating a project. To do this, choose New from the File menu. The New command opens a dialog box that you can use to create an extraordinarily large number of things. You want to create a Java project:
After you set up the dialog as illustrated, click on the OK button to create the project. If you use the name "ApplicationStarter" for your project, as illustrated, you will find that a new project folder named ApplicationStarter has been created in your M drive.
The next step is to add Java source code files to your project. You can add existing files to the project, and you can create new files. To create a new Java source code file, use the New command again. You will get the same dialog box, but this time it should have the File tab selected:
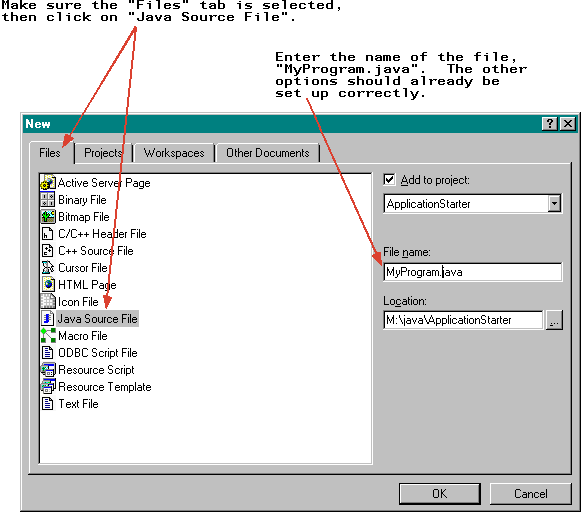
If you set up the dialog as illustrated and click on the OK button, a new file named "MyProgram.java" will be created in the project folder. (You could, of course, use a different name.) The file will be opened and ready for you to type. You should type the Java source code for your program into this file. As a simple example, enter the following program. If you are reading this worksheet in a Web browser, you can save yourself the typing by using copy-and-paste to copy the program from the browser to Developer Studio. Note that the name of the class, MyProgram, should be the same as the name of the java file that contains the class:
            public class MyProgram {
              // A simple program that multiplies two numbers input by
              // the user and displays the answer.
              public static void main(String[] args) {
                 Console console = new Console();
                 double x,y;   // numbers input by user
                 double ans;   // answer computed by program
                 console.put("Enter your first number: ");
                 x = console.getlnDouble();
                 console.put("Enter your second number: ");
                 y = console.getlnDouble();
                 ans = x * y;
                 console.putln();
                 console.putln("The product of your numbers is " + ans);
                 console.close();
              } // end of main()
            } // end of class MyProgram
Once you've typed the program in, you can try to run it. However, you will get at least one error: The Console class is undefined. Remember that the Console class is not a standard part of Java. If you want to use it, you must add two files to your project: Console.java, which defines the Console class, and ConsoleCanvas.java, which defines another class that is used by the Console class in turn. From the first lab, you should already have copies of these files in a folder called "Lab 1 Starter" on your M drive. You should copy them from that folder to your new "ApplicationStarter" folder. (If you don't remember how to do this, ask for help.)
After copying Console.java and ConsoleCanvas.java to the ApplicationStarter folder, you still have to tell Developer Studio that they are part of the project. To do this, go to the Developer Studio Project menu, select Add to Project, and from there select Files. You will get a dialog box from which you can select the two files that you want to add:

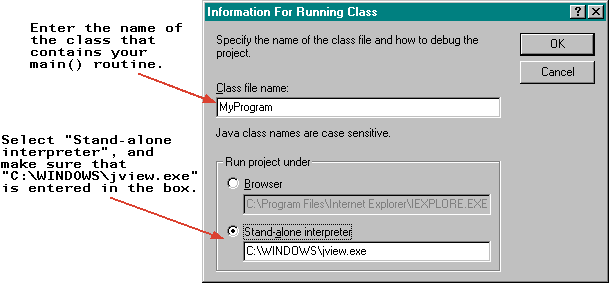
After adding the files to your project, you should be able to compile your program (unless there are other errors introduced by bad typing). Once your program compiles without error, there is still one more hurdle. You have to tell the computer which class to execute and whether it should be run as an applet or as a stand-alone project. Since you have not set up this information already, the computer will ask you to enter it before it runs the program. It will display this dialog box:
This should, finally, allow the program to run. Congratulations! You have created a complete, working Visual J++ project! Fortunately, this is not something you need to do regularly. The next time you have to write a program, you can just make a copy of your ApplicationStarter folder, open the .dsw file in the copied folder, and rewrite the MyProgram class to do something new. You will also find a "Console Application Starter" folder in the cpsc124 folder that you can use as a starting point for programs.
The program you worked with in the preceding section did nothing but multiply two numbers and then quit. Programs that do more complicated tasks must have to ability to repeat the same task over and over and the ability to make decisions among alternative courses of actions. Here is an improved -- though still pretty simple -- program in which the user can tell the computer to add, subtract, multiply, or divide two numbers. The program decides among these alternatives based on the user's choice from a list of available options. Furthermore, the program repeats the process of getting the user's input and computing the output over and over, as long as the user wants to continue. The program is shown here as a "console applet" that runs on the page. As an exercise, you will be writing the same program as a stand-alone application. You can do this by modifying your ApplicationStarter project.
As a first step, modify the program from the preceding section so that it prints out the list of choices, reads the user's choice, and computes the answer by applying the operation requested by the user. Assuming that choice is declared to be a variable of type int, you can read the user's choice with the statement:
choice = getlnInt();
Then, to do the computation requested by the user, you can use this if statement:
                         if (choice == 1)
                            ans = x + y;
                         else if (choice == 2)
                            ans = x - y;
                         else if (choice == 3)
                            ans = x * y;
                         else
                            ans = x / y;
Here, the condition "choice == 1" tests whether the value of the variable, choice, is 1. If it is, then the associated statement, "ans = x + y;", is executed. The other two conditions work in the same way. The last statement, "ans = x / y" is a default case that is executed if none of the three preceding conditions is true. You can copy this statement exactly as it appears into your program, but you should note how the statement is formed since later in the lab you will have to write your own if statement.
Before proceeding, you should make sure that your program can be successfully compiled and run. Correct any errors that the computer finds when you try to run it. Ask for help if you need it.
To complete the program, you have to introduce repetition. One way to do this in Java is with a while loop. A while statement has the form:
                        while (condition) {

                            statements to be repeated

                        }
The condition can be replaced by any test that can have the value true or false. In this case, you can use a loop that looks like:
                         boolean again = true;
                         while (again) {
                             .
                             .  // statements to be repeated
                             .
                            console.putln("Do you want to go again? ");
                            again = console.getlnBoolean();
                         }
Here, the boolean variable again is initialized to be true so that the while will be executed at least once. At the end of the while loop, a new value for again is read from the user. The command "console.getlnBoolean()" allows the user to answer yes or no. If the user answers yes, then again will be true, and the loop will be repeated. If the user answers no, then the loop will end.
To introduce repetition into your program, all you have to do is put most of the statements that the program already contains inside the { and } of the while loop. Complete the program now, and make sure that it can be correctly compiled and run.
Programs are meant to be read by computers. But they are also meant to be read by people. For this reason, programs should be written so that they are as easy as possible for human readers to read and understand. Good programming style means writing programs that satisfy this requirement. Although there is some room for taste, there are definite rules of good style, and every program that you turn in for this course should follow those rules. This includes the programs that you turn in for this lab. Grading will be based on style as well as on correctness.
Here are some rules that I expect every program to follow:
I will probably add other style requirements as the course proceeds.
One fun program that I like to have my students write early in their programming career is a guessing game program, in which the user tries to guess a number picked by the computer. Such a program uses both loops and branches. You can try out such a guessing game program in this applet:
One of your exercises for this lab is to write such a game as a stand-alone application. As a starting point, you can copy the "Console Application Starter" that is in the "cpsc124" folder into the "java" folder on your M drive. (As an alternative, you could use a copy of your own "ApplicationStarter" folder.) One more thing that you will have to know is how to tell the program to choose a random number between 1 and 100. Assume that you have a variable named randomNumber of type int. Then the following statement tells the computer to choose a random integer between 1 and 100 and to store that random number in the variable randomNumber:
randomNumber = (int)(100 * Math.random()) + 1;
Once it has this random number, your program can read in guesses from the user and compare them to randomNumber using the operators ==, >, <, and !=. (The != operator means "not equal to".) The most natural way to write this program uses a do loop instead of a while loop. The loop you need takes the form:
                    do {
                        .
                        .
                        .
                    } while (guess != randomNumber);
where guess is the number guessed by the user. This loop repeats until the guess is equal to the random number.
On this lab worksheet, you've seen two "console applets" that provide console-style interaction in an applet running on a Web page. Since you will be writing several console-style applets, you might be interested in knowing how to write such applets so that you can publish your work on the World Wide Web. This section of the lab explains how to write such an applet. As one of your assignments for the course, you are asked to convert your stand-alone guessing game program into a console applet and to publish that applet in your WWW directory on the Campus VAX.
To write a console applet, you should start by copying the folder "Console Applet Starter" from the "cpsc124" folder into the "java" folder on your M drive. Open your copy of the folder and double-click the .dsw file that it contains. You will create your console applet by editing the file "MyApplet.java" in this project.
You only need to do a few things. First, change the title of the program in the applet's init() method. Second, copy all the code from the main() routine of your stand-alone program except for the lines "Console console = new Console();" and "console.close();". Paste this code to the program() method of the applet, and remove the line "console.putln("Hello World");. That's it! When this applet is used on a Web page, it will run your program. Try executing the program to make sure that it works.
To publish your console applet on the Web, use FTP to transfer the following files into the WWW directory of your account on hws3.hws.edu: TestMyApplet.html, MyApplet.class, ConsoleApplet.class, ConsolePanel.class, and ConsoleCanvas.class. The URL of your page on the web will be
http://hws3.hws.edu/~username/TestMyApplet.html
where "username" should be replaced by your own username.
A problem with this is that the name of your applet will be "MyApplet". It would be nice to give it a better game, such as "GuessingGameApplet". This will be especially important if you ever want to publish more than one console applet. Unfortunately, it is rather complicated to change the name of an Applet in Visual J++. Here are all the things you have to do in your Visual J++ project to rename MyApplet to GuessingGameApplet:
It's too bad that this is so complicated, and you are welcome to leave the name set to "MyApplet" for this assignment.
From time to time, I will ask you to publish applets on the Web so that I can look at them. You can always do this by using FTP to copy a few files into your account on hws3.hws.edu. You will not need to learn any more about HTML and Web publishing in order to do this. However, if you want to be more serious about Web publishing and to create a nice home page on the Web, I encourge you to do so. This is not a required part of this lab or of the course, but I'd be happy to help you get started and to answer some of your questions.
If you want to be serious about Web publishing, I suggest that you create a folder called "WWW" on your M drive (or on your own computer, if you prefer). Do all your work on the Web site in this directory. When you have something ready to publish, use FTP to copy all the files that you've added or modified over to your account on the campus VAX. This will make your work visible to everyone on the Web.
If you want to view one of the HTML files in the WWW folder on your M drive, you can simply drag it onto the Netscape icon. You can make modifications to the page using the Composer component of Netscape Communicator 4.0. All you have to do is open the page with Netscape, then choose "Edit Page" from the File menu. You can edit the page much like you would in a word-processor. It's easy to add hypertext links to the page, set font and background colors, and drag images -- such as those found at http://www.iconbazaar.com -- onto your page. You can read the instructions in Netscape's help, or you can ask me for a demonstration.
Netscape composer does not make it easy to add an applet to a page. One solution to this is to leave your applets on html pages copied from your Visual J++ projects. You can edit those pages in Netscape Composer, and you can make links to the pages from your home page. If you want to add an applet to an existing page, you can edit the html file with a text editor, such as NotePad, and add the html commands that place the applet on the page. For example, the following commands would be used to center an applet named MyApplet on a page and to set its size to 520 pixels by 300 pixels:
     <center>
     <applet code="MyApplet.class" width=520 height=300>
     </applet>
     </center>
By the way, you can also edit HTML pages using word processors like WordPerfect or Microsoft Word. Like Netscape, they allow you to edit the page visually. If you are willing to work with the raw HTML codes, you can edit the page in a plain text editor such as NotePad. If you want to create quality pages, you should consider learning the basics of HTML so that you can directly creatly edit HTML files in a text editor.
Exercise 1. Complete the simple program described above, which can add, subtract, multiply, or divide numbers entered by the user. The program should have the same behavior as the sample console applet. Your program should obey the style rules discussed above. Turn in a printout of your working program.
Exercise 2. Write the guessing game program described and illustrated above. Make sure that it follows the rules of good programming style. Turn in a printout of your working program.
Exercise 3. Create a console applet version of your guessing game, as described above, and publish it in your WWW account on hws3.hws.edu. Tell me the URL of the page containing the applet. I will check to see whether it is there and is working properly. You might want to beef up your program to make it more interesting than the sample guessing game applet given above. If you make it nice enough, turn in a printout of the source code, and maybe you will get some extra credit.)
Exercise 4. Section 5 of the text discusses the use of stepwise refinement and pseudocode to develop algorithms. For this final exercise, you should pretend that you have not already written your guessing game program. Read Section 5 carefully and use the methods discussed in that section to develop an algorithm for a guessing game program. Write up a description of the development process. You can imitate the discussions in the text. Your answer should include at least five pseudocode outlines of the algorithm. Each outline should be more detailed and complete than the previous outline. Also include some discussion between stages, as is done in the examples in the text. This exercise will certainly require at least one full page, and it might take several pages to do it right.