CS 124, Spring 2014
Lab 6: Eclipse (and Subroutines)
The main point of this lab is to introduce you to the Eclipse IDE (Integrated Development Environment). Eclipse and IDEs in general are discussed in Section 2.6 of the textbook. An IDE can simplify many aspects of programming. It will almost certainly make you more productive.
The lab also includes a significant programming exercise that requires you to use subroutines.
Your work for this lab is due at the beginning of lab next Tuesday, as usual. There are instructions at the bottom of this web page for turning in the work that you have done in Eclipse.
Running Eclipse
This section discusses Eclipse. The work that you actually have to do for the lab is in the next section.
![]() Eclipse is an "Integrated Development Environment" (IDE) for Java programming,
as well as for programming in other languages. It is one of the most popular
professional development environments. It is already installed on our Linux
computers. You can install it on your own computer, too, if you want.
Eclipse is itself written in Java, and your computer needs Java to run it.
(It does not need a Java compiler, since it includes its own compiler,
but it does need the Java "runtime", which is used to run Java programs.)
Eclipse is an "Integrated Development Environment" (IDE) for Java programming,
as well as for programming in other languages. It is one of the most popular
professional development environments. It is already installed on our Linux
computers. You can install it on your own computer, too, if you want.
Eclipse is itself written in Java, and your computer needs Java to run it.
(It does not need a Java compiler, since it includes its own compiler,
but it does need the Java "runtime", which is used to run Java programs.)
If you want to use Eclipse on your own computer, you can download it from eclipse.org. There are several versions of Eclipse; you want to get the "Eclipse IDE for Java Developers." Note that you have to choose between a "64-bit" and a "32-bit" version of the program, which corresponds to whether you are running a 64-bit or a 32-bit version of your operating system. Almost all newer computers are 64-bit, and that is most likely the version that you need. However, old computers are more likely to be 32-bit. If you don't know which version you need, ask for help, or just try both. Note that we are not using the newest version of Eclipse in our lab, but the new version should be fine on your own computer.
To use Eclipse in the lab, select "Programming" / "Eclipse" from the Application menu. The first time you use Eclipse, it asks you to select a "workspace". This is where Eclipse will store your programming projects. By default, the name of the workspace will be a directory named "workspace" in your home directory. You should probably use a different location or name. This will make it easier to use different workspaces for different courses, if you ever want to do that. I suggest using a workspace named "workspace" in your cs124 directory. To do that, replace "workspace" with cs124/workspace in the select-a-workspace dialog.
An Eclipse workspace can contain many "projects." A project, in turn, contains Java programs. A project can contain many Java programs or just one. In this course, I will ask you to create a new project for each lab.
All of the stuff in an Eclipse workspace is stored in a directory in your account. (That directory is the workspace.) Each project is a subdirectory inside the main workspace directory. These project directories hold all the files that are used by your programming projects, including Java source code files and compiled class files. Usually, you should let Eclipse have complete control over the workspace and project directories, and you should not directly change any files that are stored in them. Access them only through the Eclipse window.
The first time that you run Eclipse, its window will be filled with a "Welcome" screen. The icons on this screen link to a large amount of information about Eclipse. You can browse through this information some time, if you like, but for now, just close the "Welcome" screen by clicking the "X" next to the word "Welcome" near the top-right corner of the window. If you want to get back to the "Welcome" screen, just select "Welcome" from the "Help" menu.
Eclipse uses the terms view and perspective to describe the way that information is organized and presented in its window. The window typically contains several views. Each view contains a certain type of information. All the views that are visible in the window constitute a perspective. A perspective is meant to contain all the views that are used in some particular activity. For now, you will just use the Java perspective, which is used for Java programming. Later, you might use the Debug perspective, which is for debugging programs. Each perspective is highly customizable. You can add and delete views and move them around. If you ever delete a view accidently, you can get it back by selecting it from the "Show View" submenu in the "Window" menu. And you can restore the whole perspective to its initial default state with the "Reset Perspective" command in the "Window" menu.
After you have closed the Welcome screen, the window will show the Java perspective. Initially, all the views are empty. Here is what the Java perspective might look like after a little work has been done:
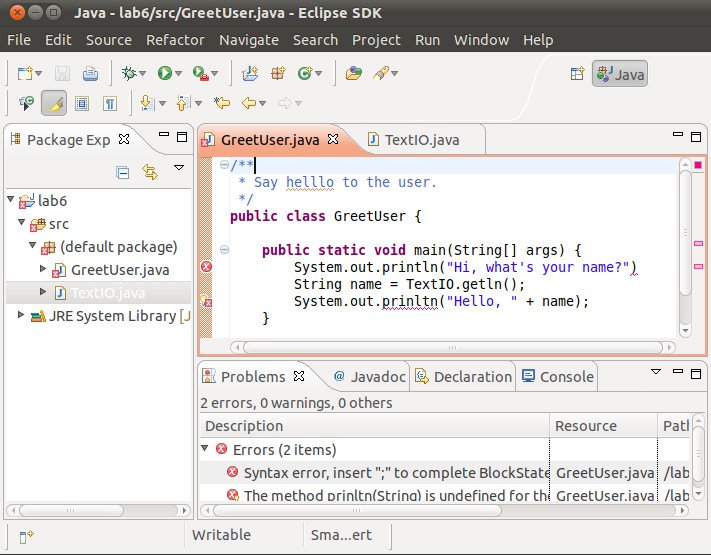
In this window, I have closed a couple of the views that I never use, the "Outline" view and the "Task List" view. You will probably want to do the same thing to give you more space in the window. Remember that a view can be closed by clicking the small "X" next to the name of the view.
The Package Explorer view, on the left, is central to much of the work that you do in Eclipse. It contains a list of your programming projects and the Java files and resources that are contained in those projects. In the above picture, there is just one project, lab6. Clicking on the small triangle next to the project name will show/hide the resources contained in the project. The main thing in the project is the src folder, which holds Java source code files. Use the triangle next to "src" to show and hide the list of files that it contains. The triangle only appears after you have added some files to the project.
The lower right section of the window contains several views. Currently, the "Problems" view is showing. It contains a list of errors and warnings from the Java compiler (but only those in files that have been saved). To see one of the other views, such as "Console" or "Javadoc", just click on the tab that contains the name of the view. Sometimes, another view will pop up automatically in this area to show the output of some command. When you run a program, standard input and output are done in the "Console" view.
The central area of the window is occupied by editor views. Here, I've opened two Java files, GreetUser.java and TextIO.java, for editing. Currently, GreetUser.java is showing; to see TextIO.java instead, click its name.
The view of GreetUser.java shows several of the nifty features of
the Java editor. The source code that you type is checked for syntax errors
as you type. Errors are marked with a small squiggle at the bottom of the line,
like the one at the end of the first line in the main() routine. The
error is also marked by a red rectangle in the right margin of the editor and
sometimes by a marker in the left margin; if you
hover your mouse the error marker in either margin, you see an error message for the error.
In this case, you would be told that a semicolon is missing. In the third line of
main(), the word "prinltn" is underlined with an error squiggle.
(It's a misspelling of "println".)
This second error has an error light bulb (![]() )
in the left margin of the editor. The light
bulb means that Eclipse is not just telling you about the error but is offering
you some ideas for fixing it. If you hover the mouse over the error,
prinltn, a list of possible fixes comes up. In this case, the list is
)
in the left margin of the editor. The light
bulb means that Eclipse is not just telling you about the error but is offering
you some ideas for fixing it. If you hover the mouse over the error,
prinltn, a list of possible fixes comes up. In this case, the list is
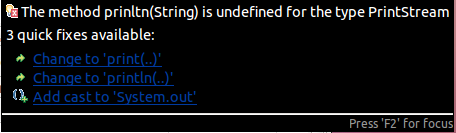
Clicking on an action, such as "Change to println()", will apply
that action automatically. Sometimes, you will see a warning light bulb
(![]() )
instead of an error light bulb.
A warning indicates a potential problem, but not an error. Warnings will not
prevent the source code from being compiled successfully.
)
instead of an error light bulb.
A warning indicates a potential problem, but not an error. Warnings will not
prevent the source code from being compiled successfully.
In fact, Eclipse might be too enthusiastic in marking warnings and errors. You do not necessarily have to fix every warning. And you certainly do not have to fix every error as soon as it appears! In fact, it's impossible to do so, and in some cases the error will go away by itself after you've typed in more of your program. And please remember that the fix for a programming error does not always go at the location of the error; sometimes the problem is elsewhere in the file. Furthermore, Eclipse's error system is only effective if you routinely get most of your program correct in the first place -- don't expect Eclipse to make solid Java programming skills unnecessary!
Note by the way that the misspelled word helllo is also underlined with error markers in the window. Eclipse will spell-check your comments! Hover the mouse over the misspelled word to get a list of possible corrections. To select one of the corrections, click on it.
Exercise 1: Your First Project in Eclipse
It's time for you to start using Eclipse. Your first exercise is to create a project in Eclipse and write your first, very short Java program in it.
Start up Eclipse, as described above. Close the "Welcome" screen (and probably the "Task List" and "Outline" view as well).
To create your first project, select "File" / "New" / "Java Project" from the menus at the top of the Eclipse window (or right-click in the "Project Explorer" view and use the pop-up menu). A "Create Java Project" wizard will pop up. All you have to do is enter a name for the project: In the box labeled "Project Name", enter lab6. Please exactly "lab6" as the name for the project. The project name will also be used as the name of a directory inside your workspace directory. (It's a good idea to avoid spaces and other special characters in project names.) After entering the project name, click the "Finish" button. The project will be added to "Project Explorer", and a directory of the same name will be created in your Eclipse workspace directory.
Now, you need to create a new Java file in your project. In Eclipse's terminology, you are creating a "Class" (even though it's really the .java file that gets created). To create a new class, right-click the project name in the "Package Explorer" view. In the pop-up menu, go to the "New" submenu, and then select "Class". A class creation dialog box will pop up. If you got to the dialog box, as instructed, by right-clicking the project name, the "Source Folder" box in the dialog is already filled in with "lab6/src." (Otherwise, you might have to fill in this box by hand.)
Now, you just have to fill in the name of the class, and click the "Finish" button. Note that you have to enter the name of the class, not the name of the file, so don't try to add a ".java" extension to the name! The name must be a valid Java class name. Use "GreetUser" (or any name you like). The class will be added to the src folder in the "Package Explorer" view, and the Java file will be created in the project directory. Furthermore, a Java editor will open, showing you the initial contents of the file. As you can see, Eclipse has already added the declaration of the class. All you have to do is fill it in! Note that you can close the editor in the usual way, by clicking the X next to the file name. To open the file again, just double-click its name in the "Project Explorer."
As you can see in the "Package Explorer," the class is added to something called the "default package." This just means that the class is not declared to belong to any package. Eventually, you will have to work with packages, but for now the default package is OK, even though the Eclipse class creation dialog will display a warning that "use of the default package is discouraged."
Eclipse often has alternative ways of doing things. An easier way to create projects and classes is to use the "create" buttons in the toolbar. These are a group of three small buttons at the top of the Eclipse window:
![]()
Click on the left button in this group to create a new Java project. Click the right button to create a new class. The middle button is for creating packages. (Note that when you create a class using the button, you should first click in the Package Explorer to select the location of the class that you are creating. Otherwise, you'll have to enter the location by hand in the class creation dialog box.)
Now, to create and run a program! Add a simple main() routine to the class that you created above, containing nothing but an output statement, such as
    public static void main(String[] args) {
        System.out.println("Hello World");
    }
Programs in Eclipse are compiled automatically. All you have to do is run them! To run your program, right-click either on the name of the class in the "Project Explorer" or in the editor window that contains the program. In the pop-up menu, go to the "Run As" submenu, and select "Java Application" from the submenu. The program will start. The output from the print statement appears in the "Console" view in the bottom area of the Eclipse window.
You can also run a program simply by clicking on the "Run"
button (![]() ) in
the toolbar. Before clicking the Run button, click in the window containing the program
that you want to run, or click the name of the file in the "Project Explorer," so that
Eclipse will know which program you want to run.
(Note that if you click the little black triangle to the right of the Run button, you'll get a list
of all the programs that you have run recently, and you can select
the program that you want to run from this list.)
) in
the toolbar. Before clicking the Run button, click in the window containing the program
that you want to run, or click the name of the file in the "Project Explorer," so that
Eclipse will know which program you want to run.
(Note that if you click the little black triangle to the right of the Run button, you'll get a list
of all the programs that you have run recently, and you can select
the program that you want to run from this list.)
When you run your program, the output from the program appears in the "Console" view at the bottom of the Eclipse window. When your program does input, you will have to type your input into the "Console" view. (This can be a little annoying, since you have to remember to click in the "Console" before typing there.)
Next, you should learn how to use TextIO in your project. Since TextIO is not a standard class, you have to add TextIO.java to your project. To do this, open a file browser window and locate a copy of TextIO.java, either in your own home directory or in /classes/cs124/lab6-files. Right-click the file icon and select "Copy". Now, in the "Project Explorer" in the Eclipse window, right-click the src folder where you want to include TextIO.java, and select "Paste". TextIO.java will be added to the folder, ready to use in your project. (Be sure to paste Java files into the src folder, not just into the project. Only files in src are actually part of the program, and only files in that folder can be run.)
To test this, add an input statement to your program (for example to ask the user's name), and use the user's response in the output. Run the program, and see how input works with the "Console." Don't forget to click in the Console view before typing there!
You have surely already noticed that the Java editor in Eclipse does a certain amount of work for you. It automatically inserts indentation. When you type a "{" and press return, the matching "}" is inserted in the correct position. Furthermore, when you type a period, a list of things that can follow the period will pop up after a short delay, and you can select an item from the list instead of typing it in. This is called Content Assist. You can invoke Content Assist at any time while you are typing by pressing Control-Space. If you do this in the middle of a variable name or subroutine name, pressing Control-Space will either complete the name or offer a list of possible completions. It can be used in other ways as well. For example, if you press Control-Space after typing the "(" at the beginning of a subroutine's parameter list, you will get information about the parameters of the subroutine. By the way, when Content Assist pops up a list, you can get rid of the list by pressing the Escape key.
Content Assist is a good thing, but I find the way it pops up automatically while I am typing to be very annoying. You can turn off this feature in the Eclipse Preferences. Select the "Preferences" command from the "Window" menu. In the Preferences dialog box, click the little triangle next to "Java" to open the list of Java preferences (if necessary), then click the triangle next to "Editor", and finally click "Content Assist." In the Content Assist preferences, uncheck the box labeled "Enable Auto Activation" and click "OK". (Note that if you are working on Mac or Windows, the "Preferences" command may be in another menu.)
(Eclipse has a huge number of preference settings that can be used to customize the environment. Most of the default settings are OK, but there are a few that I usually change. For example, go to Java / Compiler / Errors/Warnings / Potential Programming Problems." You will see a setting for "Empty Statement." Change that setting from Ignore to Warning. This will protect you from accidently having a stray semicolon in your program be treated as an empty statement. Also, I'd advise changing "Serializable class without serialVersionUID" from Warning to Ignore, since that will avoid some annoying meaningless warnings in future labs.)
Eclipse has a lot of other useful features. We will encounter more of them as time goes on, and you can undoubtedly discover a few new ones on your own. But here are a few of the most useful:
- Eclipse can fix the indentation of your source code!! Just hilite a segment of code and press Control-I. To fix the whole program, use Control-A to select everything, then Control-I. Note that besides making the program look better, fixing the indentation can help you find mis-matched braces and incorrectly nested blocks of code in your program. (With this feature available, there is really no excuse for badly indented programs!)
- Hilite a segment of code and hit Control-/ to "comment out" that code by adding "//" to the beginning of each line. If the code was already commented out, it will be commented back in, by removing the //'s.
- If you hover your mouse over a subroutine or variable name (that is not an error), Eclipse will pop up a window that contains the documentation for the subroutine or variable.
- In an editor, if you double click just after a "{" or "}", the entire block will be hilited, making it easier to figure out just where the block begins or ends.
- Hilite the name of a class, subroutine, or variable and hit F3. You will be taken to the declaration of the hilited name, even if it is in another file.
- When an un-caught exception occurs in your program, the stack trace of the exception appears in the Console view. The stack trace contains links to lines in the program, and clicking on a link will take you to that line in an editor view. (The list also contains links to code that is not part of your program -- these links are not very useful, and you should only use the links that lead into code that is part of your project.)
- Eclipse can do smart renaming. When you rename a variable, for example, all references to that variable will automatically be changed to use the new name. To do a smart rename, just hilite the name, and select the "Rename" command from the "Refactor" menu. (Refactoring is a general term that refers to rearranging or modifying code to improve it or make it more general.) The same thing works for renaming subroutines and classes.
- When you modify a file, Eclipse saves old versions of the file. So, if you do something really bad, you can get back an older version. To see a list of old versions, right-click in the editor window, and go to "Replace With" / "Local History". If you double-click one of the old versions in the list, you will see a side-by-side comparison of that version with the current version. If you just click the name and hit the replace button, the current version is replaced with the old version. (Don't worry -- the current version just goes into the history list, so you can get it back again if necessary.)
A few last words about Eclipse... You will notice that in addition to src, your project directory contains a folder named bin. The bin folder contains the compiled .class files for your project. If you want to run a program on the command line in a Terminal, you could use commands like:
cd cs124/workpace/lab6/bin
java GreetUser
The Eclipse Package Explorer view acts much like a file browser window, and you can copy-and-paste files between the Package Explorer and the Desktop or a regular file browser window. If you copy files from another computer into your Linux account, you can easily add them to the Eclipse window. As I said above, it's probably better not to make any changes directly to the project directory in the workspace folder. However, if you do make any direct changes to the .java files in the project directory, Eclipse should notice them the next time you start Eclipse. If it does not, just right-click the project name in the Package Explorer and select "Refresh." This will force Eclipse to reload the project contents and find the changes that you made.
Exercise 2: A Program with Subroutines
The first exercise of the lab was to create the lab6 project in Eclipse, to write your first tiny program, and to add TextIO.java to the project and use it in your program. For the second exercise, you will write a program from scratch that uses subroutines. The program that you will write is a basic spell checker.
For this program, you have to add two files to your lab6 project in Eclipse, Words.java and words.txt. You can find the files in /classes/cs124/lab6-files. To get them, open a file browser window and click on "File System," on the left. Open the classes folder, then cs124 then lab6-files. Copy and paste the files Words.java and words.txt into the src folder in your lab6 project. Be sure that they are in the src folder! Words.java will be listed under "default package" inside src.
The file words.txt contains a list of 72875 correctly spelled English words (some of them quite obscure). It is used as a "resource file" by Words.java. A resource file is a file that is part of a program, but it not a Java file. You do not have to do anything with words.txt except put it in the right place. The Java file Words.java defines a single public static method
public static boolean exists(String word)
You can call Words.exists(word) to test whether a string word is in the list of words. Note that only lower case strings are in the list of words, so you should make sure that the parameter is all lower case before calling Words.exists.
The idea of the spell check program is that you get a word from the user. You use Words.exists to check whether it is a correctly spelled word. (This is not perfect, since the word list is not really a complete list of legal English words, but all common words should be in the list.) However, if it is not correctly spelled, you should present the user with a list of correctly spelled words that are similar to the user's input. This is the meat of the program. The program should generate strings that are similar to the user's input and test each generated string with Words.exists. When it finds a word that exists, it should output it. For example, here is a subroutine that tries substituting a letter for one of the letters in the word. It does this in all possible ways:
private static void checkForSubstitutions(String word) {
   String w;  // A generated string, to be tested.
   int i;     // For-loop variable for positions in the word.
   char ch;   // For-loop variable for letters of the alphabet.
   for (i = 0; i < word.length(); i++) {
       for (ch = 'a'; ch <= 'z'; ch++) {
           // Make a string that is a copy of word, except that ch
           //    is substituted for character number i in the word.
           w = word.substring(0,i) + ch + word.substring(i+1);
           if ( Words.exists(w) ) {
               System.out.println("         " + w);
           }
       }
   }
}
You can use this subroutine in your program. You should also write similar subroutines to check for the following possible errors in the user's input string.
- Omitted characters — Try inserting an extra letter into the string (in all possible ways!). Example: frind −> friend
- Inserted characters — Try deleting one of the letters from the string. Example: frind −> rind
- Transposed characters — Try swapping two letters. (That is, change the order of the two characters in positions i and i+1.) Example: freind −> friend
- Double Words — Try inserting a space into the string to get two legal words. Example: allclear −> all clear
Requirements for your program: You should start by creating a new Java class for your program. Do not make any changes to Words.java! The main routine should run a loop. Each time through the loop, read a word from the user and spellcheck it. The loop should end when the user presses return without entering a word. There should be a subroutine for spellchecking a word, and the main routine should call that subroutine to check each word. That subroutine will, in turn, call on other subroutines such as the checkforSubstitutions routine given above to perform all the individual kinds of checks. When the user enters a correctly spelled word, the program should tell the user that it is correct. When the user enters an incorrect word, the program should tell the user that it is not correct and should print out all the similar correctly spelled words that it finds.
Here is the input/output from one run of my version of the program. The user's input is underlined. You don't have to follow the exact format, but your program should have similar functionality.
Enter words to be checked, press return to end.

>>> freind
    freind is NOT a valid word.
    Possible alternatives:
         friend

>>> toggle
    toggle IS a valid word.

>>> grcck
    grcck is NOT a valid word.
    Possible alternatives:

>>> alternatve
    alternatve is NOT a valid word.
    Possible alternatives:
         alternative
         alternate

>>> wate
    wate is NOT a valid word.
    Possible alternatives:
         bate
         date
         fate
         gate
         hate
         late
         mate
         pate
         rate
         sate
         wite
         wade
         wage
         wake
         wale
         wane
         ware
         wave
         watt
         waste
         water
         ate

>>> allclear
    allclear is NOT a valid word.
    Possible alternatives:
         all clear

>>>
Turning in Your Work
The work that you did for this lab is stored in a directory named lab6 inside your Eclipse workspace directory. To turn in your work, you should copy the entire lab6 directory to your homework folder in /classes/cs124. This is no different from what you have been doing for previous labs.
You can copy the folder by using Copy-and-Paste in two file browser windows. Or you can copy the folder on the command line. For example, if your Eclipse workspace is named workspace and is in your cs124 directory, as suggested above, then you can open a new Terminal window and use commands like:
cd cs124/workspace
cp -r lab6 /classes/cs124/homework/YOUR-USERNAME