Setting up Your Computer for CPSC 124
CPSC 124 is an introduction to programming using the Java programming language. For Spring 2021, the recommended environment for Java programming is the Eclipse IDE. (IDE stands for Integrated Development Environment, which means that Eclipse is a complete programming environment that lets you write, compile, and run your Java programs.)
This web page explains how to set up Eclipse. Most people will use it on their own computer, and it is recommended that you should do that if possible. However, if you don't want to do that, or if it is not possible for you, you should be able to use Eclipse the Colleges' public Windows and MacOS computers.
Download and Copy Eclipse to your Computer
Assuming that you plan to run Eclipse on your own computer, you need to download it from the web. If you plan to use the Colleges' public computers, you do not need to download it, but you will still need to do the setup that is covered on the rest of this page.
To begin, you should go to the web page https://www.eclipse.org/downloads/packages/. You want to download the "Eclipse IDE for Java Developers." (I do NOT recommend using the "installer"!) Click on the link labeled x86_64 next to your operating system name (Windows, MacOS, or Linux):
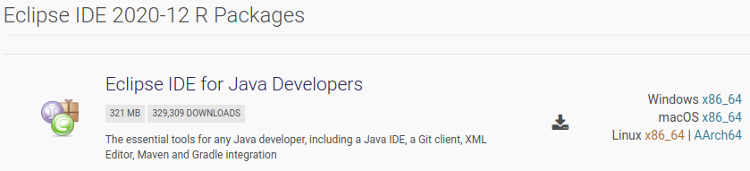
For MacOS: You will download a .dmg file. You can simply open it, and drag the Eclipse application into your Applications folder, or wherever you want to put it on your computer. You only need to double-click the Eclipse application to run it. (After you have copied Eclipse onto your computer, you do not need to keep the .dmg file.)
For Windows: You will download a .zip file. When you open that file, you will see an "eclipse" folder, which you can copy-and-paste into any location on your computer (such as your Desktop). (Alternatively, you should see an "Extract" button that you can click to extract the eclipse folder from the .zip file.) The eclipse folder contains several files, including the Eclipse application itself, which is also named "eclipse", (or maybe "eclipse.exe" depending on the settings on your computer). You can run Eclipse by double-clicking the application. (After you have copied Eclipse out of the .zip file onto your computer, you do not need to keep the .zip file.)
For Linux: In the unlikely event that you use Linux on your computer, you can download the .tar.gz file from the web site, and extract it to get a folder that contains the Eclipse application. Alternatively, you should be able to install Eclipse from your Linux distribution's software manager -- you might get an older version of Eclipse if you do that, but is should still be usable for this course. (This document is meant mostly for users of Windows and MacOS. If you are using Linux, please let me know.)
Starting your Eclipse Workspace
When you start Eclipse, it will ask you to select a Workspace. An Eclipse Workspace is a folder on your computer where your Java work will be stored. You can have more than one workspace, but you will definitely need at least one for this course. By default, it will be a folder named eclipse-workspace and will probably be stored in your Documents folder:
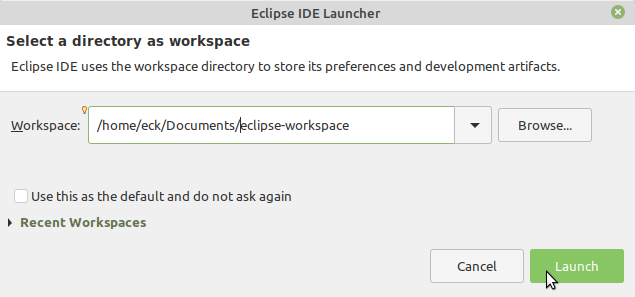
You can select a different name and location, if you want. (If you are using the Colleges' public computers, you should store the workspace on your network drive — the "M drive" — so that you will have access it no matter which computer you use.) In any case, you should be sure that you know where it is and how to find it. When the time comes to submit your work for this course, you need to be able to find your Java files inside the workspace.
The first time that you use a workspace, the window will be filled with a "Welcome" screen. You should close this screen by clicking the "X" next to the word "Welcome":

You will then see the main Eclipse screen, which is divided into several sections. We will not use the section labeled "Outline", on the right, so you might want to close that section by clicking the "X" next to the word "Outline".
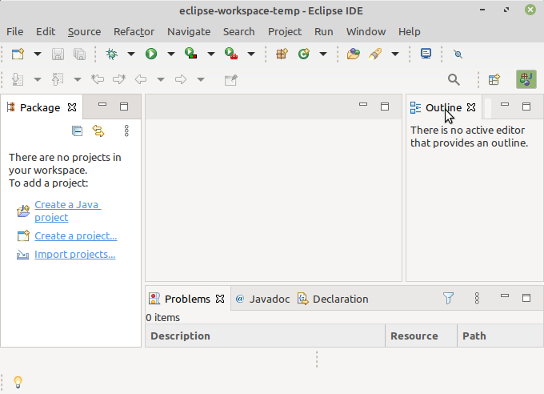
The section on the left is the "Package Explorer", where you will be able to browse your Java projects. A Java project is really just a folder inside the workspace folder. It will hold one or more or more of your Java programs. You will probably create a new project for each lab in this course. In a new workspace, you will see a clickable link, "Create Java project" in the Package Explorer, but normally, you will create a project by selecting a command from a menu. You should create a test project, either by clicking the link or choosing the "Java project" command from the "File" / "New" menu. You will see a project creation dialog. For your first project, you only need to enter a Project name, such as "My First Project", and click the "Finish" button:
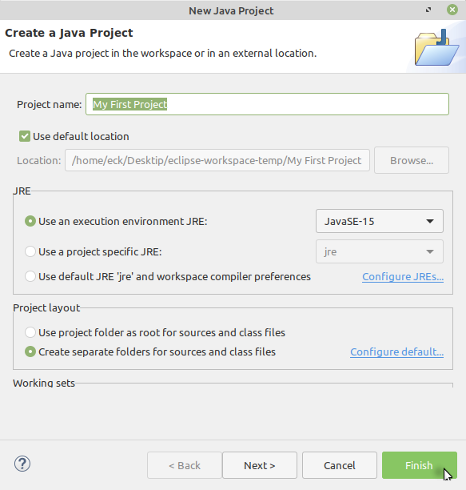
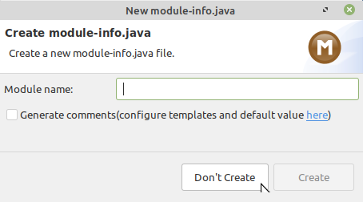
You should see a "New module-info.java" dialog box. Just click "Don't Create". We do not use modules in this course. If you ever create a module-info.java file by mistake, you can just delete it from your project.
Write and Run a Java Program
 As a test of your Eclipse installation, you can write and run the traditional
first Java program, which simply tells the user, "Hello World." In Java, a program
is a "class", and you create a program by creating a new class. Create a
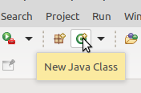
class by using the "Class" command from the "File" / "New" menu or by clicking
the New Class button, which can be found at the top of the window, as shown in
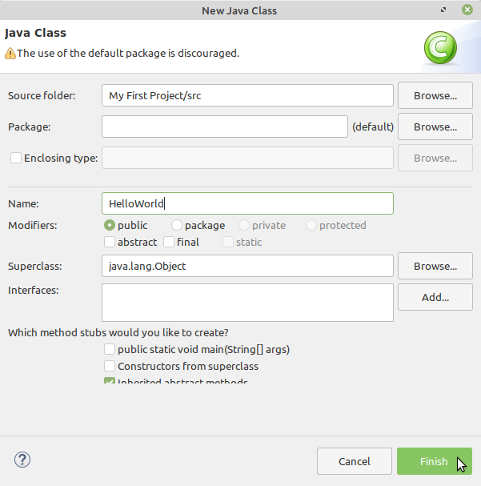
the picture at the right. You will see a "New Java Class" dialog. Enter
HelloWorld as the Name of the class, and click "Finish":
As a test of your Eclipse installation, you can write and run the traditional
first Java program, which simply tells the user, "Hello World." In Java, a program
is a "class", and you create a program by creating a new class. Create a
class by using the "Class" command from the "File" / "New" menu or by clicking
the New Class button, which can be found at the top of the window, as shown in
the picture at the right. You will see a "New Java Class" dialog. Enter
HelloWorld as the Name of the class, and click "Finish":
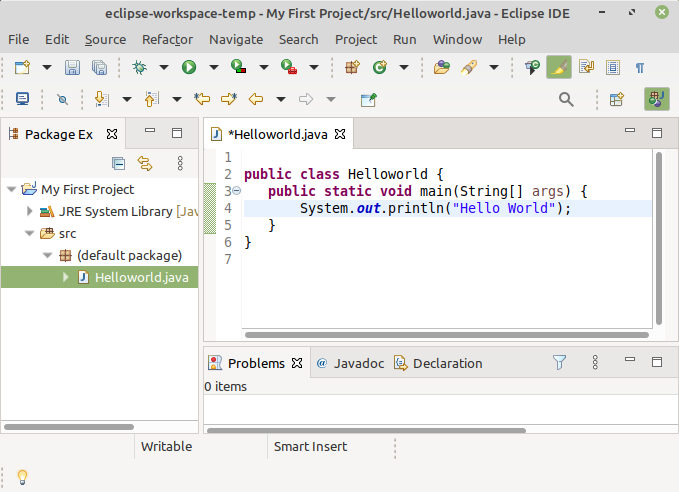
You have actually created a file named "HelloWorld.java". You will see it listed in the Package Explorer section on the left of the window, and you will see the contents of the file in the large central section of the window:
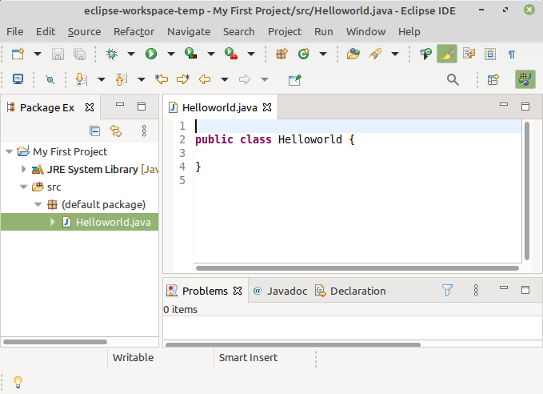
The central section of the window is for editing your files. It already contains part of the required outline for any Java program. Type the following code into the editor, or copy-and-paste it from this web page. Put it after the line that says "public class Hello World":
       public static void main(String[] args) {
          System.out.println("Hello World");
       }
Your window should now look like this:
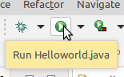 You are now ready to run the program. The easiest way to do that is to click the small
Run button, which you can find at the top of the window as shown at the right. Unless
you have already saved your work, you will be asked whether it should be saved before
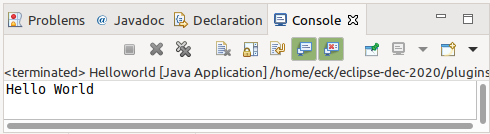
the program is run. (Say yes!) When the program is run, it outputs Hello World. The output
is shown in the bottom section of the Eclipse window, in a tab named "Console", as shown here:
You are now ready to run the program. The easiest way to do that is to click the small
Run button, which you can find at the top of the window as shown at the right. Unless
you have already saved your work, you will be asked whether it should be saved before
the program is run. (Say yes!) When the program is run, it outputs Hello World. The output
is shown in the bottom section of the Eclipse window, in a tab named "Console", as shown here:
Using TextIO for User Input
In order to interact with a computer, you need a program that can react to input from the user. A simple kind of interaction is the command-line interface (CLI), where the computer can output lines of text and the user can provide input by typing a line of text and pressing return. For at least the first few labs, you will use something called TextIO to read user input into your programs.
A Java program is not always made up of just one class. It is possible for the main class of a program to use other classes. TextIO is a class for reading user input. Since it is not a standard part of Java, it has to be added to your project before you can use it in a program. Adding TextIO means adding a file named TextIO.java, which you can download from the web.
You should add TextIO to the project that you created, using the following instructions: First, download TextIO.java onto your computer using this link:
http://math.hws.edu/javanotes/source/chapter2/textio/TextIO.java
 (For example, right-click the link and choose a command to save the file.) The file must be
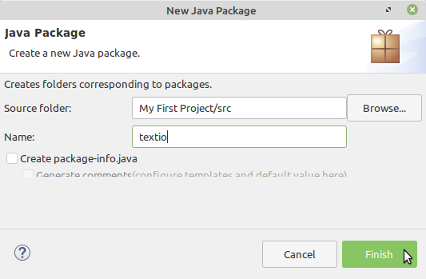
copied into your Eclipse project, and it must be inside a "package", or folder, named textio.
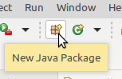
To create that package, click the New Java Package button at the top of the window, as shown
in the picture at the right. You will see a package creation dialog. You only need to enter the
package name, which must be textio, and click Finish:
(For example, right-click the link and choose a command to save the file.) The file must be
copied into your Eclipse project, and it must be inside a "package", or folder, named textio.
To create that package, click the New Java Package button at the top of the window, as shown
in the picture at the right. You will see a package creation dialog. You only need to enter the
package name, which must be textio, and click Finish:
You should see textio listed in the Package Explorer section of the Eclipse window. Now you need to add TextIO.java to that package: Open a file browser window, and find the icon for TextIO.java. (In Windows, it might be labeled just "TextIO" if you have file extensions turned off in the file explorer view settings.) Copy-and-paste the file from the file browser window into the textio package in the Eclipse window. That is, right-click the TextIO.java file icon in the file browser, select "Copy", go to the Eclipse window, right click textio, and select "Paste." (Alternative, you should be able to drag the file from the file browser window into the textio package in the Eclipse window; if you do that, you will get a dialog asking whether you want to copy or link to the file; you should select copy.)
You should see TextIO.java listed inside the textio package in the Eclipse window. (If you accidentally place it somewhere else in the project, you can simply drag it onto the textio package.)
To test TextIO, create a new program that uses it: Create a new class named SayHello, by clicking the New Java Class button, just as you did for the HelloWorld program. Completely replace the text in the SayHello.java editor with the following text:
import textio.TextIO;

public class SayHello {

    public static void main(String[] args) {
        String name;
        System.out.print("What's your name? ");
        name = TextIO.getln();
        System.out.println("Hello, " + name);
        System.out.println("Nice to meet you.");
    }

}
You can then run the program by clicking the "Run" button. The computer will output "What's your name" to the Console at the bottom of the window. Click the Console window so that what you type will go to that window, type a response, and press return. The computer will output two more lines of text, and then the program will end. The Eclipse window at that point should look more or less like this:

Setting up JavaFX
When we move from programming the command-line interface to programming for a graphical user interface (GUI), we will be using JavaFX. JavaFX is a large collection of classes that let you write GUI programs. Unfortunately, it is not a standard part of Java, which means that you must configure your Eclipse workspace to use it. Even more unfort unately, the configuration is somewhat complicated. You do not need to do this until we need JavaFX in a lab. But if you want to get a head start, you can follow the instructions here to configure and test JavaFX at any time.
Start by downloading JavaFX from this web page:
https://gluonhq.com/products/javafx/
You want to download Version 15 of the "JavaFX Windows x64 SDK" for Windows or "JavaFX Mac OS X SDK" for MacOS, from the middle of the page. The full version number will be 15.0.1 or 15.0.2 or something similar. Be sure to download the SDK, not the jmods, for your operating system. (If you are using the Colleges' public computers, you should store the SDK on your network drive — the "M drive" — so that you will have access it no matter which computer you use.)
The download will be a .zip file. You need to extract the contents of the .zip file, which will give you a folder with a name similar to javafx-sdk-15.0.1. You need to remember where that folder is saved! Note that once you have finished the Eclipse configuration, you should not move the javafx folder, since doing so will break the Eclipse setup.
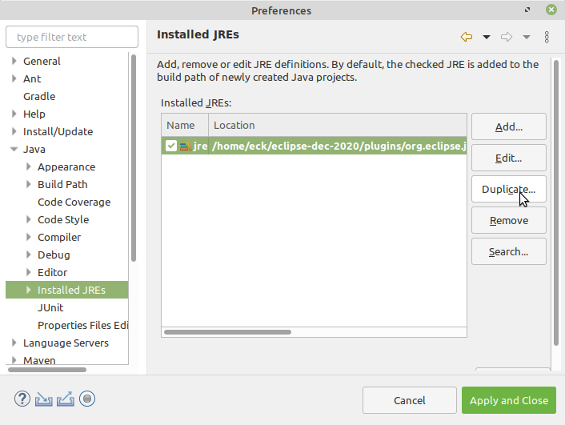
Now you need to make it possible for Eclipse to use the JavaFX SDK. Start up Eclipse as usual. Open the Preferences dialog using the "Preferences" command, which in MacOS is in the "Eclipse" menu and in Windows is in the "Window" menu. Click the small arrow next to "Java" on the left of the Preferences dialog, and then click "Installed JREs to select that item. You should see a list of Installed JREs containing only one item. Click that item to select it and then click the "Duplicate" button:
You will see an "Edit JRE" dialog box. I suggest changing the JRE name to something like "JRE with JavaFX". Click the "Add External JARs" button:
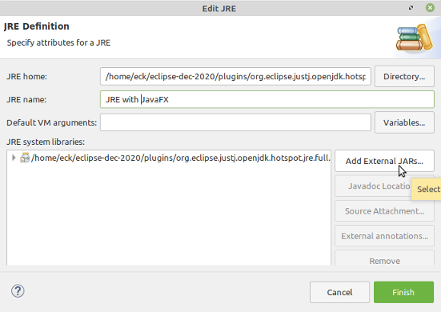
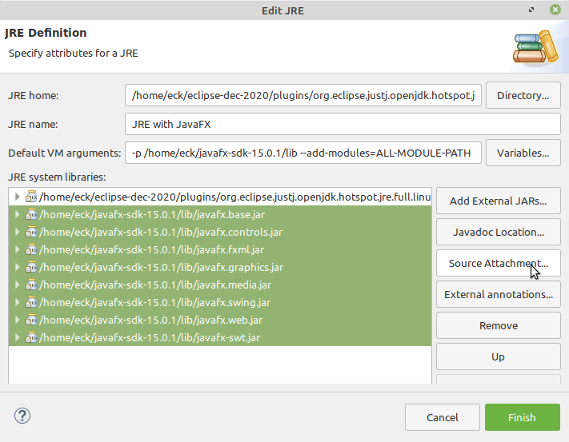
This will pop up a file browser window. You need to navigate to the JavaFX SDK folder that you extracted from the JavaFX .zip file. Then go into the lib folder inside that folder. You should see seven .jar files, plus some other files. (In Windows, if you have not enabled display of file extensions, you will not see the .jar extension on the file names; the .jar files will have names like javafx.base and javafx.controls.) Select all the .jar files and click "Open". (You should be able to select multiple files by control-clicking, shift-clicking, or command-clicking them; if you can't do that, you will have to add them one at a time.) You should see the seven jar files listed under "JRE system libraries" in the Edit JRE dialog box. Select all seven jar files, and click "Source Attachment":
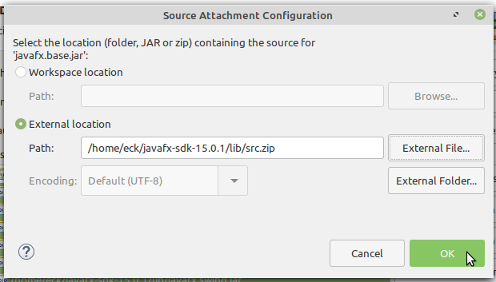
This will open a "Source Attachment Configuration" dialog box. Click "External location", and then click the "External File" button. You will get a file browser window, where you should select the file src.zip (or possibly just src in Windows) from the JavaFX src folder. The "Path" will be filled in to show the full path to src.zip file. Click "OK":
Finally, you need to fill in the "Default VM arguments" in the "Edit JRE" dialog box. The contents of that box must be something like
-p /home/eck/javafx-sdk-15.0.1/lib --add-modules=ALL-MODULE-PATH
as shown in the picture above, but with "/home/eck/javafx-sdk-15.0.1/lib" changed to the full path to the lib directory of your own JavaFX SDK folder. You can copy that full path name from the names of the seven JavaFX .jar files that you added to the configuration. Note that on Windows, it is likely to look more like this:
-p C:\Users\eck\javafx-sdk-15.0.1\lib --add-modules=ALL-MODULE-PATH
Also note that if your path contains spaces or or other special characters, you will need to enclose it in quotation marks. For example
-p "/Users/eck/My Java Work/javafx-sdk-15.0.1/lib" --add-modules=ALL-MODULE-PATH
When you have everything set up, click the "Finish" button in the Edit JRE dialog box, then click the "Apply and Close" button in the Preferences dialog box. If you've done everything correctly, JavaFX should be ready to use in your workspace.
Creating a Project that Uses JavaFX
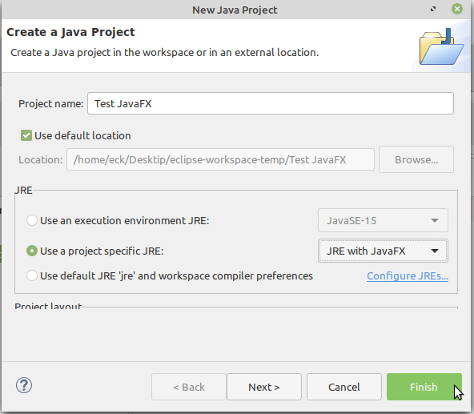
When you create a Java project that uses JavaFX, you need to specify that that project should use the JRE that you have configured with JavaFX.
Create a new Java project in your Eclipse workspace, for example by using the "Java Project" command from the "File" / "New" menu. In the "JRE" section of the "New Java Project" dialog box, select "Use a project specific JRE", and, from the popup menu on the right, select the JRE that you have configured with JavaFX. The entry in the popup menu is the same as the name that you specified in the Edit JRE dialog box.
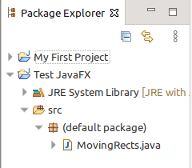
To test your configuration, you will need a program that uses JavaFX. Download the file MovingRects.java from this link onto your computer:
http://math.hws.edu/javanotes/source/chapter3/MovingRects.java
Copy-and-paste the MovingRects.java file from a file browser window into the src folder of the JavaFX project in the Eclipse window. If you don't see the src folder, you need to click the small triangle next to the name of the project to reveal it:
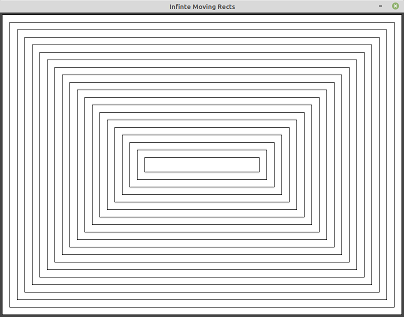
Run the program. (Click MovingRects.java in the Package Explorer to select it, then click the Run button at the top of the window.) You should see a new window displaying a simple animation of moving rectangles. The animation will run until you close the window.
If you can't run the MovingRects program, there are several things that could have gone wrong. Did you remember to select the correct JRE when you created the project? (In that case, try again with a new project.) Did you add all seven .jar files to the JRE configuration, and did you fill in the correct "Default VM arguments"? (If not, you can go back to the Installed JRE preferences and edit the JRE configuration.) If all else fails, you can ask for help!