CPSC 220, Fall 2018
Lab 4: First ARMv8 Programming
We will be using the DS-5 Development Studio Community Edition for ARMv8 assembly language programming. This is a free version of a professional IDE, based on Eclipse. It was demonstrated in class. It is really much more powerful than we need, and we will use it in only a limited way, for writing subroutines in assembly language. I would probably not have been able to figure out how to use it on my own. Fortunately, I found some basic instructions and downloadable DS-5 projects at Harry Broeders' LEGv8 Wiki.
Your assignment for this lab will be to write three short assembly language subroutines. This lab will guide you through the necessary DS-5 setup. This is the last that you will see of assembly language for while. The next few labs will be about logic circuits. However, you will be using DS-5 again when we return to assembly language later in the semester.
This lab is due next Thursday, October 4. You will be working in a file named lab4.S. To turn in your work, you can simply copy the completed file into your homework folder in /classes/cs220/homework.
Lab 3 is due at noon on Tuesday, September 25. You can spend some time in this week's lab period working on it, but first you should at least make sure that you have DS-5 working, and that you can build the lab4 project and run it under the debugger.
First-time Setup
You will find DS-5 in the Programming submenu of the application menu, under the name "ARM IDE for DS-5-CE v5.29.1". The first time you start it, it will take longer than it usually does, because it will be creating some files in your account. It will ask you to select a workspace for your projects, just like Eclipse does. You can use the default workspace name or enter a different name.
When the DS-5 window opens, it shows a "welcome screen", which you will want to close. The window will then look much like the standard Eclipse window that you are used to, with a Project Explorer pane on the left and a large space for editors in the center.
To work with ARMv8, you need to install a "toolchain," which includes the compilers, assemblers, and hardware simulator for ARM development. You only need to do this once. To install the toolchain:
- Select "Preferences" from the "Windows" menu.
- Click the triangle next to "DS-5" on the left to reveal the DS-5 settings.
- Click "Toochains" in the DS-5 settings.
- Click the "Add" button next to the empty list of toolchains.
- In the new dialog box that appears, click the "Browse" button.
- Locate the toolchain: Go to "File System", then into the "arm" directory, and click on gcc-linaro-7.3.1-2018.05-i686_aarch64-elf to select it, and click OK.
- Click "Next"; you will see a list of the tools in the toolchain.
- Click "Finish".
- Click "OK"; you will be prompted to restart Eclipse. You should allow it to be restarted.
You might want to check under "Windows" / "Preferences" / "DS-5" / "Toolchains" again, to make sure that the toolchain is actually listed. Assuming that it is, you are ready to start ARM development.
Importing and Running a Project
For each of the ARM assignments in this course, I will provide a DS-5 project as a starting point. You will need to begin work for the assignment by importing the project into DS-5. You can find DS-5 projects in the directory /classes/cs220/For_ARM_IDE. For this lab, you need to import the project named lab4 from that directory into your DS-5 workspace. (Note: Alternatively, you can get a .zip archive of the project through this link; unzip the file into a location that is not in the workspace directory.) To import the project:
- Right-click in the Project Explorer pane at the left of the DS-5 window.
- Select "Import..." form that menu.
- In the dialog box that pops up, click the triangle next to "General" to reveal the general import options, if they are not already visible.
- Click "Exiting Projects into Workspace".
- Click "Next".
- Click "Browse" near the top of the window to "Select root directory".
- In the file browser window, click "File System" then browse to "classes" / "cs220" / "For_ARM_IDE" (or to the location of the downloaded project).
- Click the project directory, "lab4" in this case, and click "OK".
- Important: Make sure that the option "Copy projects into workspace" is selected.
- Click "Finish".
The project should appear in the Project Explorer pane. Click the triangle next to the project name to see the files that it contains.
A project must be "built" before it can be run. Building the project means compiling the individual files that contain the source code for the project and linking the components into a complete executable program. (Building is controlled by a "Makefile" which specifies how the project is to be built. Makefiles are commonly used for building C and C++ projects.)
To build the project, press Control-B, or select "Build All" from the "Project" menu. For the lab4 project, assuming that there are no errors, this will create files named main.o, lab4.o, and lab4.afx. These are, respectively, the compiled code from main.c, the compiled code from lab4.o, and the complete executable program.
Important: Whenever you make a change to one of the source files, in a project you should be sure to save the file and build the project. DS-5 does not automatically recompile files that have been modified. If you forget to build the project, you might find yourself running an old version of the program, even though you are looking at the new source code!
Because the program has been compiled for ARM, you can't actually run it on our computers. It has to be run on an ARM hardware simulator. In DS-5, the simulator runs under the Eclipse debugger. This means that you have to run the program by debugging it.
The projects that I will give to you include a ".launch" file. For the lab4 project, the launch file is named lab4.launch. To run the program in the debugger, you can right-click on lab4.launch in the Project Explorer pane, go to the "Debug As" submenu in the popup menu, and select "lab4". (After you have run the program once, it will also appear in the drop-down menu next to the little debug icon in the toolbar at the top of the window, and you can debug the program by selecting it from that menu.)
When you debug a program, DS-5 will want to switch to the "Debug Perspective", which has information and controls relevant to debugging. The first time you use the debugger, you will be asked whether you want to switch to the Debug Perspective. You should check the box that says that you always want to switch perspectives, and say yes.
When the debugger starts, it will also start up the ARM hardware simulator and "connect" to it. This will take a little time. There's a lot of stuff in the debug perspective; you will certainly want to maximize the window.
The main controls for the debugger are in the "Debug Control" pane in the top left corner of the window. There are buttons for running the program and for stepping through the program line by line. "Step over" executes the current line in the program. "Step into" will step into the subroutine, if there is a subroutine call on the current line. "Step out" will run until the current subroutine returns:
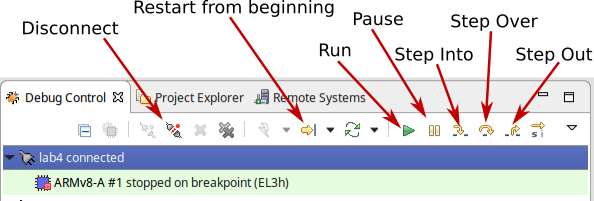
Note that you can add a breakpoint to the source code by double-clicking in the left margin next to a line of code. When the program is run using the Run button and it reaches a breakpoint, the execution will be paused. You can then step through the program from that point.
Before switching back to the usual "C" perspective, you will want to disconnect from the simulator by the clicking the "Disconnect" icon in the Debug Controls. If you forget, you will be asked to do so later. There are small icons for switching perspectives at the right end of the toolbar at the top of the DS-5 window. Just click the "C/C++" icon to get back to the perspective where you can edit and build your project. (But in fact, you could also edit and build right in the Debug perspective.)
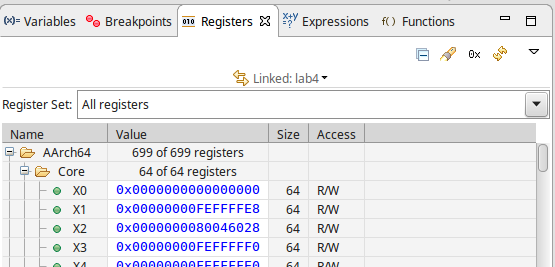
The output from the program will go to the "Target Console" in the lower right corner of the DS-5 Debug Perspective. Just above that is a panel where you can see the disassembled machine code that is being executed. And above that is a panel where you can view the current values of program variables and ARM registers. To see, the usual ARM 64-bit registers in that panel, click the "Registers" tab, open the "AArch64" list by clicking the + sign next to "AArch64", and then under that, open the "Core" list:
The Assignment for Lab 4
The file main.c declares four functions, but does not provide definitions for them. (I will start using the term "function" instead of subroutine when talking about C programs. All subroutines in C are commonly referred to as functions, whether or not they return a value.)
The definitions of the four functions are meant to be written in assembly langauge, in the file lab4.S. However only one of the four, arraysum, has an actual definition. (This is an example we did in class.) The functions muladd and countchar are defined to return -1 as their value, and arraycopy is defined to do nothing at all.
Your assignment is to provide assembly language definitions for muladd, countchar, and arraycopy. You can read main.c to understand what they are supposed to do.
I suggest that you start with muladd, which is very trivial. Getting it to work will mean that you have learned how to edit, build, and run the program. Then, you can work on the two more difficult problems.