The programming project for the second lab is an exercise in using exceptions. The program that you will be working on does not do anything interesting in itself, although it does illustrate a technique for using images in a program (and it could be seen as giving a few ideas about interface design for a sort of text-based "adventure" game with some limited two-dimensional graphics).
This lab also introduces you to CVS, a system that has support for saving multiple versions of a project and support for team projects. In this lab, you will create a CVS "repository" in your home directory where you will store a copy of today's project. You will give me access to this repository so that I can check your work. Make sure that you get started on CVS before the end of the lab.
At the beginning of Lab 2, you should have a Random Math Quiz program ready to turn in. I would like you to print out and turn in copies of your source code files for that program. I would also like you to demonstrate your Random Math Quiz program to me some time during the lab.
Unfortunately, the current Linux version of Eclipse does not have a functional print command. (Printing does work on other platforms and will work for Linux in the next version of Eclipse.) To print the Java source code files that you've created, you'll need to use a command-line print command. To do this, open a Terminal, cd into your eclipse workspace directory and then into the directory that has the same name as your project. The Java source code files from your project are just ordinary text files stored in that directory. You can print a file using the a2ps command:
a2ps FileName.java
This command sends the printout to the default printer for the computer that you are working on. To send the printout to another computer, add an option of the form -P printername to the command. For example,
a2ps -P gul208 FileName.java
If you are like me, you might have a lot of overly long lines in your file, which can make the output from a2ps look ugly. There are a lot of options that you can add to the a2ps command to get nicer output of long lines. I use the following:
a2ps --landscape --columns=1 --lines-per-page=65 --tabsize=4 --line-numbers=1 FileName.java
Actually, of course, I don't type all this. My ".bashrc" file contains the line
alias a2pslong='a2ps --landscape --columns=1 --lines-per-page=65 --tabsize=4 --line-numbers=1'
which allows me to abbreviate the above command as a2pslong FileName.java. Add this line to the end of the .bashrc file in your home directory if you want to be able to do the same thing. (The alias only comes into effect the next time you open a Terminal window.)
(Remember that you should not make any changes to an Eclipse workspace directory or to the files that it contains. Looking at the files or printing them is OK, but don't make any changes. The same applies to the directory that holds a CVS repository directory.)
To begin work on this lab's programming project, open Eclipse and create a new Java project. Name it "Lab 2" or something similar. Copy the files from the directory /classes/f07/cs225/files_for_lab_2 into your Eclipse project. (To do this, open a file browser or the konqueror web browser, and enter /classes/f07/cs225/files_for_lab_2 into the location box. Select the entire contents of this folder, right-click one of the icons, and select "Copy" from the pop-up menu. Go to the Eclipse window, right-click the name of the project in the Package Explorer View, and select "Paste" from the pop-up menu. This should paste four Java files into the default package, and it should also add the folder named "icons" to the project.) The files are also available in a zip file at http://math.hws.edu/eck/cs225/f07/lab2/files_for_lab_2.zip.
(Note: you might want to start the CVS part of the lab at this point, and "share" the project into CVS before you make any changes.)
The main program for the project is in the file GameWindow.java. Run this file now by right-clicking the file name and selecting "Run As / Java Application". The program is a GUI application with an 8-by-8 playing board and an input box where the user can type commands. The board can hold "entities" or characters that are represented by icons. The icons come from image files in the icons directory: star.png, tux.png, dice.png, and so on. The names of the entities are the same as the names of these files, without the ".png": star, tux, dice, and so on. Initially, the board contains the characters tux and star. ("Tux" is the name of the Linux penguin mascot.)
The user can enter command such as tux up, star right, and add dice. Try entering these commands. Press return after typing a command to make it take effect. A command of the form <entity-name> <direction> is used to move an entity on the board. The <direction> can be up, down, left, or right. A command of the form add <entity-name> adds an entity to the board in row 3, column 3. The <entity-name> should be a valid entity name, with an associated image file, and it should not name an entity that is already on the board.
All this works. The only problem is that the program does no error checking. The command add banana, for example, doesn't work because there is no such image file as banana.png. When you give this command, an exception occurs -- you can see the stack trace from the exception in the Console view. However, in the program itself, nothing seems to happen. This is because the exception is caught by Java's event-handling thread, and it is not allowed to crash the program. Similarly, the command dice up will cause an exception if there is no dice entity on the board. The command tux fly will fail silently because fly is not a legal direction.
Your assignment is, first of all, to add some decent exception-handling to this program and, second, to add a couple of small enhancements.
The user's commands are processed in the method carryOutCommand() in the file GamePanel.java. The first thing you should do is as to add a try..catch statement to this method that will catch any exceptions that occur and report them to the user. Since this is a GUI program, the natural way to report the error to the user is with the method JOptionPane.showMessageDialog, and the try..catch statement can take the form:
         try {
           .
           .  // ... process command ...
           .
         }
         catch (Exception e) {
            JOptionPane.showMessageDialog( this,
               "Sorry, your command can't be carried out because of an error:\n"
                      + e.getMessage() );
            e.printStackTrace();  // TODO: remove this line in production version.
         }
After adding such a statement to the carryOutCommand method, run the program again and see how it handles some illegal commands. You'll find that the error messages are not very useful, and that some bad commands, such as tux fly, still fail silently without generating an exception.
So, next, you should improve the error handling. You want an exception to be thrown whenever the user gives an illegal command, and you want the error message in that exception to contain useful information about the error for the user.
You can start by throwing some exceptions inside the try part of the try..catch statement. For example, you can handle the illegal tux fly command in this way. By adding some tests to the code in the try statement, you can handle other errors, such as adding a duplicate entity to the board.
Other errors, such as an unknown name in an add command, are best handled by throwing exceptions elsewhere in the program. (To help you locate the point in the program where the error actually occurs, you can look at the stack trace that generated by the exception.)
Note that I am not giving you a complete list of errors that you have to handle. Investigate the program and decide for yourself what you want to do.
In addition to handling exceptions, you should add two features in the program. Add support for a remove <entity-name> command that can be used to remove an entity from the board. And change the add command so that it specifies the row and column where the entity is to be placed on the board. For example:
add bell 2 7
Professional programmers need a way of keeping track of changes that they make to a programming project. When several people are working on a project, they also need a way of combining changes made by various individuals into the shared "official" version of the project. Both of these needs can be met by a version control system. One common such system is CVS. CVS keeps a record of all versions of every file that is added to a CVS project. It is possible to compare the current version of any file with a previous version. It is possible to retrieve copies of files that have been deleted. It is possible for several programmers to access the same project so that they can all work on it.
CVS, or something like it, is an essential tool for team programming, and it is also useful for individual programmers. Eclipse has excellent support for CVS, and I would like you to use it for the projects that you work on in this course. (Because of certain limitations in CVS, many people have started using a newer system named SVN, or "SubVersion", that is designed as an improved replacement for CVS. Since CVS's limitations won't matter in this course, and since SVN is not built into Eclipse, we will stick with CVS.)
To use CVS, you need a repository where CVS will store all the information about your projects. The repository is just an ordinary directory, and for this course you can use a directory inside your home directory on the department's file server. I would like you to use a directory named cvs-cs225 for your CVS repository, and I would like to have access to that directory for purposes of grading your work. (It's possible to have additional repositories if you need them for other purposes.)
To create your repository, open a Terminal window and, working in your home directory, enter the following sequence of commands, replacing zz9999 with your own user name:
    mkdir  cvs-cs225
    fs  setacl  cvs-cs225  -acl  eck  all
    cvs  -d  /home/zz9999/cvs-cs225  init
The first command makes the directory that will hold your CVS repository. The second line gives me access to that directory. This will allow me to see your projects and test them for purposes of grading. (The fs command works only with the "AFS file system," which is the networked file system where your home directory is stored; the AFS file system turns out to be very convenient for managing access to CVS repositories.) The third command initializes the directory, turning it into a CVS repository.
You only have to give these commands once. From now on, you will only use your CVS repository through Eclipse. You should never directly make any changes to the cvs-cs225 directory or to its contents.
The first thing that you need to understand about CVS is that it keeps a separate copy of your projects, in addition to those that are stored in Eclipse. The copy that is in CVS can be shared by several programmers, and it can be accessed by you from several different Eclipse workspaces. This allows a team of programmers to work on the same project, and it allows you to work on the same project from several different Eclipse workspaces. To use CVS, you have to know how to copy projects from Eclipse to CVS and from CVS to Eclipse, and you need to know how to keep the different copies of the project in sync.
The first step in using CVS with an Eclipse project is to "Share" the project, which copies the project into CVS. (You only have to do this once for each project that you want to store in CVS.)
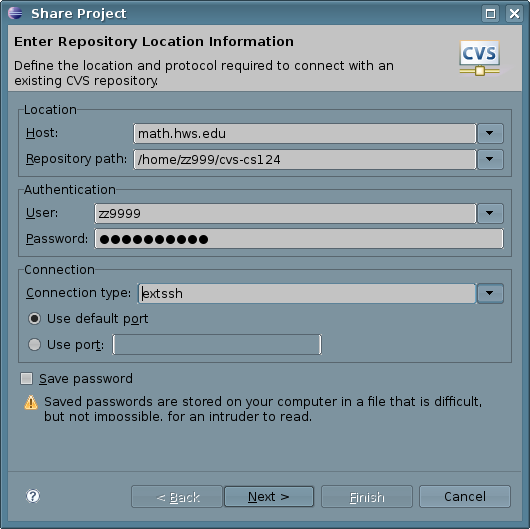
To share your project into CVS, right-click the project name in the Package Explorer view. In the pop-up menu, go to "Team", and select "Share Project" from the Team sub-menu. The first time you share a project, you will have to input information about your CVS repository (which you should have already created, as described above). Fill in the dialog box as shown here, replacing zz9999 with your own user name:
Note that you should use math.hws.edu as the "Host" for your repository location. Your home directory, where the repository is located, is accessible on any of the department's computers; math.hws.edu is one of those computers, and it is accessible from off-campus as well as on. Be sure to set the "Connection type" to extssh. You can check the "Save Password" box, if you want.
When you have filled in all the information, click "Next". On the next screen, you can accept the default setting, "Use project name as module name", and click "Next" again. (The "module name" is the name for the information about your project that is stored in the CVS repository. It does not necessarily need to be the same as the name of the project in Eclipse, but using the same name will avoid confusion.) On the next screen, you can just click "Finish." This will create the project in CVS.
The final step is to copy the files that are in your project into CVS. You need to do this when you first create the CVS module, and you will need to do it when you have made changes to your project and want to save them to CVS. After you click "Finish" in the "Share Project" dialog, the "Commit Files" dialog will pop up. This dialog box tells you which files are being saved or modified in CVS, and it has a space where you can enter a comment that describes the changes. Enter a comment such as "Initial commit" if you want, and click "Finish". Your files will be copied into CVS.
Before you leave lab today, Use the "Commit" command in the "Team" menu to save all the work that you have done on your project to the CVS repository.
Let's say that you want to work on your project on another computer, such as your personal computer in your dorm room. To do that, you can run Eclipse on that computer and import the project from CVS. This will copy the project from CVS into Eclipse. To import a project into an Eclipse workspace, right-click in the Package Explorer view and select "Import" from the pop-up menu. In the "Import" dialog box, select "Projects from CVS", as shown here:
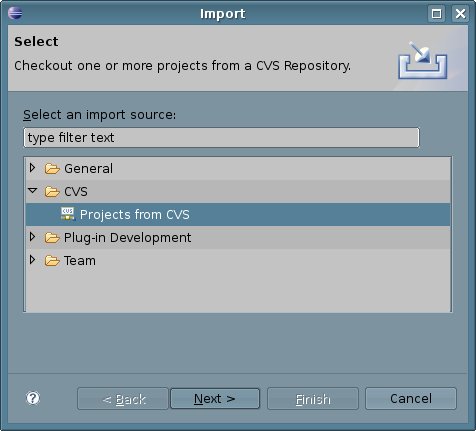
Click "Next". If this is the first time you are using CVS in this workspace. you will have to set up CVS repository information, as described above. Once you've done that (or selected an existing repository), click "Next" again. On the next screen, you have to enter the name of the CVS module that you want to import. This is the same name that you used when you "Shared" the project. After filling in or selecting the module, click "Finish". This will copy the project from CVS into Eclipse.
Now, you can work on the project and commit any changes that you make back to CVS. The only remaining question is, how will those changes get into other Eclipse workspaces, such as the one in your account on the computer science network? For this, you need the update command. When changes have been made to a CVS module from one Eclipse workspace and you want to get those changes into another Eclipse Workspace, just right-click the project name in the second workspace and select "Update" from the "Team" sub-menu.
To summarize, there are four basic things that you can do with CVS in Eclipse:
If you are using CVS only for backup from a single Eclipse workspace, you will only need the "Share" and "Commit" operations.
Sharing and importing are things that are done only once (for a given project). If you are using CVS, you should always remember to commit your changes before quitting Eclipse. If you work on your project from more than one Eclipse workspace, you should always update your project before you start working on it, to make sure that you will be working on the most current version. Remember that changes that you make in Eclipse don't automatically get into CVS; you have to commit them. And changes that are committed to CVS don't automatically get into other Eclipse workspaces; you have to do an update to get the changes.