CPSC 225, Fall 2016
Lab 1: Eclipse / Spellcheck
The first programming assignment of the semester is a basic spell checker. But first, the lab introduces the Eclipse IDE, along with a short warm-up exercise. Remember that you are not expected to complete the entire lab during the lab period!
You should turn in your complete Eclipse Lab1 project by the beginning of lab next Thursday. The procedure for doing so is given at the end of this web page.
Running Eclipse
![]() This section introduces you to the Eclipse IDE. This section just describes Eclipse; the next
section will tell you how to use it for a programming project. Eclipse is a widely used
professional environment for program development. Note that Eclipse and IDEs in general
are also discussed in Section 2.6
of the textbook. The most recent version of
Eclipse is already installed on the Linux computers that you will
use during the lab. You can access it in the "Programming" sub-menu
of the application menu. You might want to add an "Eclipse" button
to the panel at the top of the screen to make it easier to get to.
To do that, simply right-click the "Eclipse Neon" item in the menu, and
select "Add to Panel".
This section introduces you to the Eclipse IDE. This section just describes Eclipse; the next
section will tell you how to use it for a programming project. Eclipse is a widely used
professional environment for program development. Note that Eclipse and IDEs in general
are also discussed in Section 2.6
of the textbook. The most recent version of
Eclipse is already installed on the Linux computers that you will
use during the lab. You can access it in the "Programming" sub-menu
of the application menu. You might want to add an "Eclipse" button
to the panel at the top of the screen to make it easier to get to.
To do that, simply right-click the "Eclipse Neon" item in the menu, and
select "Add to Panel".
Although it is not required for the course, I encourage you to consider running Eclipse on your own computer as well. It is available for Linux, Windows, and Mac OS. You can download the most recent version of Eclipse from the Eclipse downloads page at eclipse.org. You should get the "Eclipse IDE for Java Developers". Note that you need to have Java on your computer before you install Eclipse, since Eclipse is itself written in Java. If you would like some help installing Java or Eclipse on your computer, ask for it.
Eclipse organizes your programming projects into "workspaces." A workspace is really just a directory, and a project is a subdirectory inside that directory. A project holds the files relevant to a given programming project, such as Java source code files, compiled class files, and data files. You should let Eclipse have complete control over the workspace directories, and you should not directly change any files that are stored in them. It is possible to have as many workspaces as you want, but for this course, you will probably keep all of your projects in the same workspace. (In fact, you can keep all the programs that you ever write in one workspace, if you want.)
When Eclipse starts up for the first time, it asks you to select a workspace. (There is a box that you can check if you don't want to be asked to select a workspace each time you run Eclipse.) By default, the name of the workspace will be "workspace", but I usually change the default name. If you expect to devote a workspace to CS225 only, for example, you might name it "workspace-cs225".
When the Eclipse window first opens, it will be filled with a "Welcome" screen. The icons on this screen link to a large amount of information about Eclipse. You can browse through this information some time, if you like, but for now, just close the Welcome screen by clicking the "×" next to the word "Welcome" near the top left corner of the window. If you want to avoid seeing the Welcome screen every time you start Eclipse, uncheck the box labeled "Always show Welcome at startup" at the bottom left corner of the Welcome screen.
Eclipse uses the terms view and perspective to describe the way that information is organized and presented in its window. A "view" is one of the panels in a "perspective." The window typically contains several views. Each view contains a certain type of information. All the views that are visible in the window constitute a perspective. A perspective is meant to contain all the views that are used in some particular activity. For now, you will just use the Java perspective, which is organized for Java programming. Later, you will learn about the Debug perspective, which is for debugging programs. Each perspective is highly customizable. You can add and delete views and move them around. If you ever delete a view accidentally, you can get it back by selecting it from the "Show View" submenu in the "Window" menu. If you mess up a perspective, you can get back the original, default setup with the "Reset Perspective" command in the "Perspective" submenu of the "Window" menu.
After you have closed the Welcome screen, the window will show the Java perspective. Initially, all the views are empty. Here is what the Java perspective might look like after a little work has been done:
In this window, I have closed a couple of the views that I don't use: the "Task List" and "Outline" views, which originally appeared on the right edge of the window. Remember that a view can be closed by clicking the small "×" next to the name of the view, and it can be reopened using the "Window" / "Show View" menu.
The "Package Explorer" view, on the left, is central to much of the work that you do in Eclipse. It contains a list of your programming projects and the Java files and resources that are contained in those projects. In the above picture, there is just one project, named Lab1. Clicking on the small triangle (or plus sign) next to the project name will show/hide the resources contained in the project. In a new project, there will be a directory named src where the source files for the project will be stored. Inside the src folder, you will see Java files organized into packages. In general, we will only use the "default package," as shown in this example.
The lower right section of the window contains several views. In the picture, the "Console" view is showing. To see one of the other views, such as "Problems" or "Javadoc", just click on the tab that contains the name of the view. Sometimes, another view will pop up automatically in this area to show the output of some command. When you run a program, standard input and output are done in the "Console" view. Errors and warnings from the Java compiler are displayed in the "Problems" view.
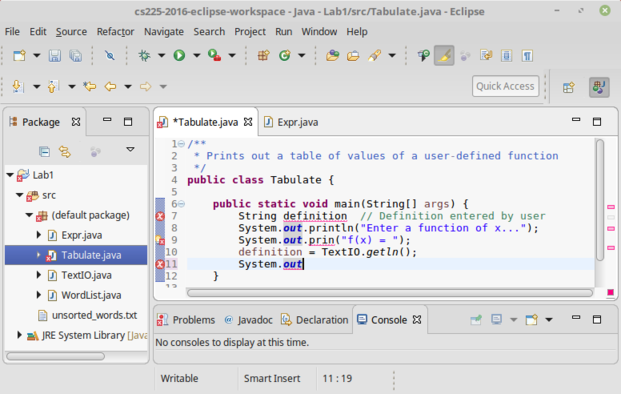
The central area of the window is occupied by editor views. Here, I've created a Java file, Tabulate.java, and have opened it for editing. Another source file, named Expr.java, has also been opened and is in another tab.
The view of Tabulate.java shows several of the nifty features of
the Java editor. The source code that you type is checked for syntax errors
as you type. Errors are marked with small red carets at the bottom of the line. The
error is also marked by a red rectangle in the right margin of the editor and sometimes
by an icon in the left margin of the editor; if you
hover your mouse over any error or error marker, you see an error message for the error.
For the first error in the picture, for example, you would be told that a semicolon is missing.
In the third line of
main(), the word "prin" is underlined with error markers.
(It's a misspelling of "print".)
This error has an error light bulb (![]() )
in the left margin of the editor. The light
bulb means that Eclipse is not just telling you about the error but is offering
you some ideas for fixing it. If you click the light bulb, you get a list of
actions that can be taken to fix the problem. You will also see the list if you
hover the mouse over the underlined error itself. For the example, here is what I get
when I hover the mouse over the incorrect word "prin":
)
in the left margin of the editor. The light
bulb means that Eclipse is not just telling you about the error but is offering
you some ideas for fixing it. If you click the light bulb, you get a list of
actions that can be taken to fix the problem. You will also see the list if you
hover the mouse over the underlined error itself. For the example, here is what I get
when I hover the mouse over the incorrect word "prin":
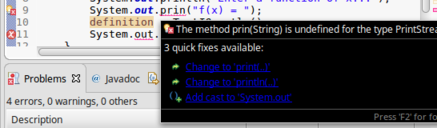
Clicking on an action, such as "Change to print()", will apply
that option automatically. Sometimes, you will see a warning light bulb
(![]() ).
A warning indicates a potential problem, but not an error. Warnings will not
prevent the source code from being compiled successfully.
).
A warning indicates a potential problem, but not an error. Warnings will not
prevent the source code from being compiled successfully.
In fact, Eclipse might be a little too enthusiastic in marking warnings and errors! You do not necessarily have to fix every warning. And you do not have to fix every error as soon as it appears. In fact, it's impossible to do so. In some cases the error will go away by itself after you've typed in more of your program. And remember that the fix for a programming error does not always go at the location of the error; sometimes the problem is elsewhere in the file. Furthermore, Eclipse's error system is only effective if you routinely get most of your program correct in the first place — don't expect Eclipse to make solid Java programming skills unnecessary!
In fact, many of the fixes that Eclipse will offer will do things to your code that you won't understand. Not every fix is a good idea! Don't let Eclipse fix your code unless you understand what it wants to do and why!
Note that Eclipse will even spell-check your comments. It will mark a misspelled word in a comment with a red underline. If you hover the mouse over a misspelled word, you will get a list of possible corrections. Click an item in this list to apply the correction to the word.
Your First Eclipse Project
It's time for you to start using Eclipse. Start up Eclipse, as described above. Close the "Welcome" screen (and probably the "Task List" and "Outline" views as well). You will create a project just like the one shown in the above illustrations.
To create your project, right-click in the "Project Explorer" pane. In the pop-up menu that appears, go to the "New" submenu, and select "Java Project." (Alterntively, select "New" / "Java Project" from the "File" menu.) A "New Project" wizard will pop up. All you have to do is enter a name for the project, in the box labeled "Project Name". Enter Lab1 as the name of the project. (The name "Lab1" is required when you turn in your project!) After entering the project name, click the "Finish" button. The project will be added to "Project Explorer", and a directory of the same name will be created in your Eclipse workspace directory.
In general, you will create some new Java classes, and you will also import some existing files into your project. For this example, you should create a new "Tabulate" class, and you should import the files from the directory /classes/cs225/Lab1-files into your project.
To import the files: Click the triangle next to the project name, "Lab1", so that you can see the folder labeled "src". Open a file browser window (for example by double-clicking the "Home" icon on your desktop), and browse to the folder /classes/cs225/Lab1-files. You should see the files Expr.java, TextIO.java, WordList.java, and unsorted_words.txt.Drag the four individual files from the file browser window onto the "src" folder in the Eclipse window. You will be asked whether you want to "Copy" or "Link" the files. Choose "Copy." Copies of the files will be added to the project. If you click the triangle next to "src", you should find unsorted_words.txt directly in the "src" folder, while the three Java files have been placed into the "(default package)". To open a file in the Eclipse editor, just double-click its name in the Package Explorer view.
To create a new Java class file in your project: Right-click the project name in the "Package Explorer" view. In the pop-up menu, go the "New" submenu again, and select "Class":
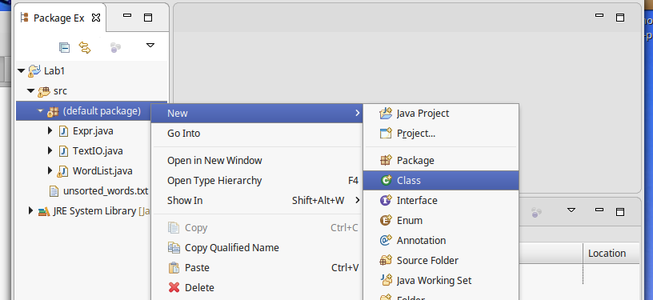
A class creation dialog box will pop up. Again, you just have to fill in the name of the class, and click the "Finish" button. Note that you have to enter the name of the class, not the name of the file, so don't try to add a ".java" extension to the name. The name must be a valid Java class name. For this example, use "Tabulate" as the class name. The Java file will be added to the src folder in your project, in the "default package." Furthermore, a Java editor will open, showing you the initial contents of the file. As you will see in the editor window, Eclipse has already added the declaration of the class. All you have to do is fill it in! Note that you can close the editor in the usual way by clicking the little ×. To open the file again, double-click its name in the "Project Explorer."
Eclipse often has alternative ways of doing things. Another way to create a class is with a button in the toolbar. Look for the group of two small buttons at the top of the Eclipse window:
![]()
Click on the left button in this group to create a new Java package. Click the right button to create a new class. (When you create a class using the button, you should first click in the Package Explorer to select the location of the class that you are creating. Otherwise, you'll have to enter the location by hand in the class creation dialog box.)
Now, to create and run a program. Add the following main() routine, or something similar, to the Tabulate class that you created above:
public static void main(String[] args) {
   System.out.println("Enter a function of x...");
   System.out.print("f(x) = ");
   String definition = TextIO.getln();
   Expr function = new Expr(definition);
   System.out.println("f(1) = " + function.value(1));
}
The program is compiled automatically. To run it, right-click either on the name of the class in the "Project Explorer" or on the editor window that contains the program. In the pop-up menu, go to the "Run As" submenu, and select "Java Application" from the submenu. The program will start. The output from the print statements appears in the "Console" view in the bottom right area of the Eclipse window. In order to type a response, you must first click the Console window! Type in your response and press return. The last line of the program will be executed, and the program will end. For example, one run of the program produced the following I/O in the Console window, when the user entered sin(x) as the value of definition:
Enter a function of x...
f(x) = sin(x)
f(1) = 0.8414709848078965
For another way to run a program, if an editor window for the program is currently the selected view,
you can run the program by clicking on the "Run"
button (![]() ) in
the toolbar. If you click the little black triangle to the right of the "Run" button, you'll get a list
of all the programs that you have run; select a program from this list to run it.
) in
the toolbar. If you click the little black triangle to the right of the "Run" button, you'll get a list
of all the programs that you have run; select a program from this list to run it.
You have surely already noticed that the Java editor in Eclipse does a certain amount of work for you. It automatically inserts indentation. When you type a "{" and press return, the matching "}" is inserted in the correct position. Furthermore, when you type a period, a list of things that can follow the period will pop up, and you can select an item from the list instead of typing it in. This is called Content Assist. You can invoke Content Assist at any time while you are typing by pressing Control-Space. If you do this in the middle of a variable name or method name, pressing Control-Space will either complete the name or offer a list of possible completions. It can be used in other ways as well. For example, if you press Control-Space after typing the "(" at the beginning of a method's parameter list, you will get information about the parameters of the method. By the way, when Content Assist pops up a list, you can get rid of the list by pressing the Escape key.
Content Assist is a good thing, but I find the way it pops up automatically while I am typing to be rather annoying. You can turn off this feature in the Eclipse Preferences. Select the "Preferences" command from the "Window" menu. In the Preferences dialog box, click the little triangle next to "Java" to open the list of Java preferences (if necessary), then click the triangle next to "Editor", and finally click on "Content Assist." In the Content Assist preferences, uncheck the box labeled "Enable Auto Activation" and click "OK".
Eclipse has a huge number of preference settings that can be used to customize the environment. Most of the default settings are OK, but there are a few that I usually change. If you want to do the same: Under "Java / Editor / Mark Occurrences", turn off "Keep marks when the selection changes". Under "Java / Compiler / Errors/Warnings / Potential Programming Problems", change "Serializable class without serialVersionUID" from Warning to Ignore, and change "Possible accidental boolean assignment", "'Switch' case fall-through" and "Null reference" from Ignore to Warning.)
Eclipse has a lot of other useful features. We will encounter more of them as time goes on, and you can undoubtedly discover a few new ones on your own. But here are a few of the most useful:
- Eclipse can fix the indentation of your source code. Just highlight a segment of code and press Control-I. Note that fixing the indentation can help you find mis-matched braces and incorrectly nested blocks of code in your program. (With this feature available, there is really no excuse at all for badly indented programs. I suggest that you apply this to all the source code files that you submit for grading in this course!)
- Highlight a segment of code and hit Control-/ to "comment out" that code by adding "//" to the beginning of each line. If the code was already commented out, it will be commented back in, by removing the //'s.
- In an editor, if you double click just after a "{" or "}", the entire block will be highlighted, making it easier to figure out just where the block begins or ends.
- Highlight the name of a class, method or variable and hit F3. You will be taken to the declaration of the highlighted name, even if it is in another file.
- When an un-caught exception occurs in your program, the stack trace of the exception appears in the Console view. The stack trace contains links to lines in the program, and clicking on the link will take you to that line in an editor view. You should always look for the first line in the stack trace that refers to one of the classes that you wrote, rather than to one of Java's built-in classes.
- Eclipse can do smart renaming. To do a smart rename, just highlight the name, and select the "Rename" command from the "Refactor" menu. When you rename a variable, method, or class in this way, all references to that item will be changed to use the new name. (Refactoring is a general term that refers to rearranging or modifying code to improve it or make it more general.)
- The "Source" menu offers several options for automatically generating code. I probably use "Generate Getters and Setters" most often, but the commands for overriding methods and for generating constructors are also useful.
- As you edit a file, Eclipse keeps many old versions of each file in a "history", and you can revert to earlier versions from this history if you need to. To see the history for a file, right-click the file and choose "Replace With / Local History".
A First Programming Exercise
To remind you how to program in Java—and to give you some time to get used to Eclipse—you should modify the Tabulate class so that instead of just printing out f(1), it will print out a table of values of f(x) for values of x increasing by tenths from 0.0 to 10.0 (that is, for x = 0.0, 0.1, 0.2, 0.3, ..., 9.9, 10.0). The definition of f(x) should still be entered by the user. Arrange the output in a neat table, such as
        x                f(x) = x^2
      -----            ------------------
       0.0                  0.0000000
       0.1                  0.0100000
       0.2                  0.0400000
         .
         .
         .
      10.0                100.0000000
Furthermore, you should catch and handle the error that occurs if the function definition that the user enters is not legal. Note that the constructor new Expr(definition) throws an IllegalArgumentException if the definition is not legal.
Javadoc
Javadoc is a standard syntax for comments in Java source code. Javadoc was introduced in Section 4.5.4 of the textbook, and you can read about it there. Javadoc comments can be processed to produce documentation of your code's API in the form of web pages.
Javadoc is thoroughly integrated into Eclipse. If you highlight the name of a class, method, or variable, its Javadoc documentation (if any) appears in the "Javadoc" view. If you just hover your mouse over a name, the Javadoc documentation appears in a pop-up window. When Content Assist shows a list of variable or method names, it will also show Javadoc documentation for items in the list. This makes it very worthwhile to use Javadoc comments in your code, even if you don't plan to generate web pages from the comments.
Furthermore, Eclipse will generate the outline of a Javadoc comment for you. To have it do this, just position the cursor on the line before a declaration, type /** (the first three characters of a Javadoc comment), and press return. An outline of the comment, including any appropriate Javadoc tags (such as @author, @param, @return, and @throws) will appear.
Some things to keep in mind: A Javadoc comment always comes before the declaration that is being commented. Javadoc comments should only be used for classes, methods, and instance variables. Any Javadoc tags, such as @param and @return, must come at the end of the comment, after any other text in the comment. Javadoc comments can contain HTML markup tags such as <p> or <b>...</b>. This means that you should not use the characters "&" or "<" in a Javadoc comment; Write them as "&" or "<" instead.
In this course, you are required to use Javadoc comments for any non-private classes, member variables, and methods that you write. This requirement starts now, with the Spellcheck programming assignment.
Programming Assignment: Spellchecking
To to help you get back into programming at the start of a new semester, this lab includes a moderately complex programming assignment. The assignment is due next Thursday, before the start of the next lab, along with the rest of this lab. Remember that your program will be graded for style as well as for correctness. It should follow all the rules in the style guide that was handed out on the first day of class, including the use of Javadoc comments.
This assignment is to write a basic "spell checker" program that can check words entered by the user. The program will use a long list of correctly spelled words. Your program should read a word from the user and convert it to lower case. It should check whether the word is in the list of correctly spelled words. If it is, you should tell the user that the word is OK. If it is not, you should show the user a list of similar words that are in the list (if there are any).
You should start by creating a new class named Spellcheck in your Lab1 project. This class should contain the main method for your program.
The program will let the user input words, one at a time, and it will spellcheck each of the words. If the word is valid, the program should say so. If not, it should print out a list of valid words that are similar to the user's input word, as discussed below. For extra credit, when your program presents a list of alternative words to the user, it should not include any duplicates in the list, and the list should be in alphabetical order. (Hint: Look ahead in the textbook for "TreeSet".) The program should be nice to the user: Prompt for inputs, label the output, and format the output nicely. The program should break up its task into subroutines. And follow all the other rules of good style!
The program requires the files WordList.java and unsorted_words.txt, which you have already added to your Lab1 project. The WordList class represents a list of correctly spelled words. Your program will use an object of type WordList, which has an instance method
public boolean contains(String lowerCaseWord)
that tests whether a given word is in the list. The parameter must be in lowercase. The file unsorted_words.txt contains the list of words and is automatically read by WordList.java. You will not need to edit these two files.
The hard part of the program is finding correctly spelled words that are "similar" to an incorrectly spelled word. The idea is to modify the incorrectly spelled word in certain ways, and look up the result in the list of correctly spelled words. Any correctly spelled words that you can find in this way go into the output list of possible corrections.
You should implement the following ways of modifying the incorrectly spelled word:
- Delete a character. Try this for each character in the original word.
- Add a character. Try putting each of the 26 letters of the alphabet in each of the possible positions in the original word.
- Change a character. Try substituting each of the 26 letters of the alphabet for each of the characters in the original word.
- Swap two characters. Try reversing the order of each consecutive pair of characters in the original word.
- Insert a space. Try inserting a space into each possible position in the original word, breaking it into two words. In this case, you have to check that both of the words that you make are in the list of correctly spelled words.
A few more hints: Consider using the StringBuilder class instead of String for some operations. Remember that a char variable can be used as the loop control variable in a for loop. And review the String/StringBuilder API for working with substrings.
Turning in Your Work
You have a homework folder in the directory /classes/cs225/homework, identified by your last name. You will turn in most assignments by copying them into that folder.
For this lab, I would like you to turn in a complete copy of your Lab1 project folder. You can find the project folder inside your Eclipse workspace folder. You can submit it either on the command line or using file browser windows. On the command line, cd into your Eclipse workspace directory, and use a command of the form
cp -r Lab1 /classes/cs225/homework/YOUR_NAME_HERE
The src folder in your project should contain files named Tabulate.java and Spellcheck.java. If you did not use the exact correct name for the project folder or either Java file, please rename them before turning in your work. You can rename projects and classes using the "Refactor" / "Rename" command from the appropriate menu inside Eclipse.