CPSC 225: Spring 2003
Assignment 6: Game Of Life, Part 2
THIS assignment is an introdution to GUI programming with KDevelop. KDevelop is an integrated programming environment for writing C++ programs. It has a huge number of features, and we will not cover it in any detail. There is an abundance of on-line documentation that you can look at if you want to know more. The program that you will be writing is a GUI version of Life, the program that you worked on in part 1 of this assignment. This web page contains a series of steps that will lead you to a complete program. The point of the assignment is not to do any original programming. The point is to get some experience with using an integrated development environment. You will be working through a sort of "tutorial" that tells you exactly what to do. You will begin this work in the computer lab in Gulick 208 on Wednesday, March 19. The completed program is due next Wednesday, March 26. I will ask you to demonstrate your working program to me.
Start by logging on to one of the cslab computers using xWin-32.
Step 1: Starting KDevelop
To start KDevelop, use the "KDevelop 2.1.2 command in the "Development" sub-menu of the Start menu. The first time you run KDevelop, you will be asked to configure it. I recommend that you accept all the defaults, except for one thing: Hit the "Next" button two times to get to the screen where you can select a user interface mode. Change the setting on this screen to "Tab Page Mode". Hit "Next" a few more times until you get to a screen with a "Finish" button, and hit that. KDevelop will start up and open a window. This window is the KDevelop workspace. It contains three main panes. The large area on the top right is for viewing and editing files, including C++ programs and the KDevelop documentation.
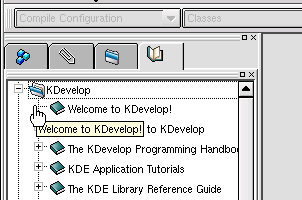
On the left is a pane that can be used to select files to show in the edit pane. Click the book icon at the top of this pane to see the available on-line documentation. The KDevelop documentation contains information about using KDevelop. The "QT Library" discusses the basic GUI classes, while the remaining libraries include classes that are specific to KDE.
The bottom-right pane is for displaying various types of output, such as compiler error messages and output sent by a program to stdout (that is, to cout).
I suggest that you maximize the KDevelop window so that if fills the whole screen.
Step 2: Creating a Project
When you write a program using KDevelop (or most any integrated development environment), you work on a "project." A project contains all the files that are needed. In KDevelop, this includes many extra files in addition to the C++ source code files of the program. However, you will not have to deal with these other files. To begin work on the Life program, you must create a new project.
Select the "New" command from the "Project" menu to create a new project. Click "Next" in the dialog box that pops up, accepting the default "KDE Normal" project type. In the next screen enter Life as the Project Name and /home/username/life as the Project Directory (with username replaced by your own user name). Click the "Create" button, and wait a while while the project is created. When this is finished, an "Exit" button will be enabled. Click the "Exit" button to finish.
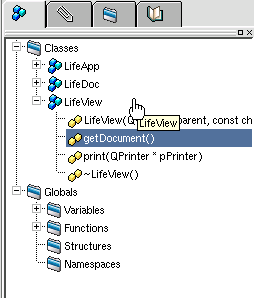
At this point, KDevelop's left pane will show the program's classes (LifeApp, LifeDoc, and LifeView) and its Globals. (See illustration at right.) If you click a class name, such as "LifeView", you will see the header file for the class in the edit window. Click on the little "+" sign next to "LifeView" and you will see a list of the members of the class. If you click on one of the class members, such as "getDocument()" you will see the definition of that member. This allows you to easily get to any member function so that you can edit its definition.
To see the main() function, click the "+" sign next to "Function" under "Globals", then click on "main". You won't need to modify the main() function, except perhaps for the "aboutData" at the beginning of the function definition.
Step 3: Compiling and Running
To compile the program, choose the "Make" command from the "Build" menu. You can also invoke this command by pressing F8. The first time you use Make, it will take a while. Messages will be displayed in KDevelop's bottom-right pane. Once the compilation is complete, you can run the program by selecting "Execute" from the "Build" menu, or by pressing F9. A small window will open. This is the program. It comes complete with some menu commands, but they won't do anything. Exit from the program by closing this window.
It is important that you know what will happen when an error occurs during compilation. Open one of the C++ files and introduce some error, for example by deleting a semicolon. Click to another class (so the one with the error is no longer visible), and then use the "Make" command again. The messages in the bottom-right pane will end with "***failed***" because of the compilation error. The error will be shown in a previous message, in red. You will have to scroll back to see it. Just click on the error message to be taken to the error in the source code file. (Note that there will also be some warning messages. As always, warnings are not errors -- you want to look for the actual error message.) Fix the error before going on to the next step.
Step 4: Adding Files
The program that you are writing will need the LifeBoard class from part 1 of the assignment. You need to add the files LifeBoard.h and LifeBoard.cc to the project. You can use my version of the class, or you can use your own if you prefer. Here is how to add my versions to the project:
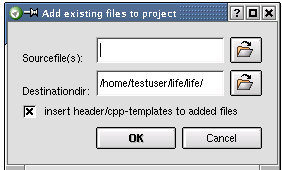
Select the "Add Existing File(s)" command from the "Project" menu. A small dialog will pop up where you can select the files you want to add. Click on the little folder button to the right of the Sourcefiles input box. This will allow you to select the files using a file browser. Go to the directory /home/cs225/life1 which contains the files. Select the files "LifeBoard.h" and "LifeBoard.cc". You can use Control-click to select both files at the same time. Click OK in the file browser, then click OK in the add files dialog. The files will be copied into your project directory and added to the project.
You should see that LifeBoard has been added to the list of classes in the project. Click LifeBoard in this list to view the header file. In this file, you should change the values of the constants ROWS and COLS so that they are both set to 50. The rest of this web page assumes that you are using this value for both the number of rows and the number of columns on the board.
Step 5: Add Life to the Program
You have to modify the program so that it uses a LifeBoard. To do this, you need to know a little about how the program is organized. It has three main classes, LifeApp, LifeDoc, and LifeView. The LifeApp class represents a window of the program. We will be modifying this class to define existing menu commands and to add new commands. The LifeView class represents the large display area that fills most of the window. We will add a function to this class for drawing the life board, and we will also program it to respond to mouse inputs. The LifeDoc class represents the "document" that is being edited in the window. For us, this document will be the actual LifeBoard object, so we will have to modify this class to include a LifeBoard. (If you were writing the program yourself, you might use a single class that combines the function of the LifeDoc and LifeView classes. However, you don't have that choice here. The idea is to keep the data separate from the view of the data. Unfortunately, this will make accessing the data when we need it more complicated.)
Click "LifeDoc" in the list of classes. Add #include "LifeBoard.h" at the top of the header file, and add LifeBoard *board; to the public: section near the bottom. Now, LifeDoc includes a pointer-to-LifeBoard variable.
Click the "+" sign next to "LifeDoc". Click on the constructor, the first item in the list of functions. Add the line board = new LifeBoard; to the constructor to create the board. Go to the destructor, ~Lifeboard(), and add the line delete board; to take care of deleting the board when the window is closed. Go to the newDocument() method, where it says "TODO: Add your document initialization code here" and add the lines:
              board->randomFill(0.5);
              slotUpdateAllViews(0);
This code will be executed when the window is first opened and when the user chooses "New" from the program's "File" menu. The slotUpdateAllViews function will see that the "view" of the board that is displayed in the window is redrawn. Later, you should come back and change board->randomFill(0.5) to board->clear(). The "randomFill" is just to give us something to see for now.
You also have to modify the LifeView class to make it show the board. First, go to the LifeView constructor and add the line setFixedSize(500,500);. This will give us a drawing area of known size for drawing the board. Each row and column will take up 10 pixels. (It might be nicer to allow resizing of the window, but a fixed size will keep things simple.)
When the window needs to be redrawn, the system calls a function named "paintEvent" in the LifeView class. You need to add this function to the class. KDevelop makes it easy to add member functions to a class. Right-click the class name, LifeView, in the left pane, and select "Add member function" from the pop-up menu. In the dialog that pops up, enter void as the "Type" box and paintEvent(QPaintEvent *evt) in the "Declaration" box. Then click "Apply" at the bottom of the dialog box to add the function. You will be taken to the definition of the function in the edit pane. You should define this function to draw a small circle to represent each living cell in the life board. The board data is actually in another class. To get the board data, we have to call getDocument()->board. Drawing is done with an object of type QPainter. Here is the complete code that you need for the definition of paintEvent. The first line and final "}" have already been added. You must fill in the inside of the function:
            void paintEvent(QPaintEvent *evt) {
               QPainter paint(this);
               LifeBoard *board = getDocument()->board;
               for (int row = 1; row <= 50; row++) {
                  int y = (row-1)*10;
                  for (int col = 1; col <= 50; col++) {
                     if (board->get(row,col)) {
                        int x = (col-1)*10;
                        paint.drawEllipse(x,y,9,9);
                     }
                  }
               }
            }
If you now "Make" and "Run" the program, the window should show a random Life board, and selecting "New" from the program's "File" menu will produce a new random pattern.
(By the way, you might want to go the the main() function and add a command for initializing the random number generator, srand(time(0)). Otherwise, your program will always generate the same random boards. You will also have to add the appropriate #includes to main.cc.)
Step 6: Add Menu Commands
We need a way of getting the program to compute the next generation. For this, we must create a new menu command. We will put the command in the "Run" menu, along with a couple of other commands. KDevelop uses something called a "SLOT" to implement menu commands. A slot is a kind of member function. This is not standard C++, but something added by the the people who made the KDE desktop. We will have to add some slots to the LifeApp class -- one for each menu command that we want to implement.
Right-click "LifeApp" in the list of classes, and select "Add slot" from the popup menu. In the dialog box that appears, change the name of the function, under Declaration, from new_slot() to next_gen(), and click the "Apply" button. This will add the next_gen() function to the class. Repeat the process to add a slot named random_fill().
Define next_gen() to say:
         doc->board->nextGeneration();
         doc->slotUpdateAllViews(0);
This will call the board's nextGeneration function and redraw the representation of the board on the screen. Define random_fill() as:
         doc->board->randomFill(0.5);
         doc->slotUpdateAllViews(0);
At this time, you might want to go back to the newDocument() function in the LifeDoc class and change "randomFill(0.5)" to "clear()", so that we can start with an empty board.
Now, we need to create the menu. Write a function to do this. Right-click LifeApp in the list of classes and select "Add member function" from the popup. Define a function with type void and declaration makeRunMenu(). Define the function as:
    void LifeApp::makeRunMenu();
       QPopupMenu *runMenu = new QPopupMenu;
       menuBar()->insertItem("Run",runMenu);
       runMenu->insertItem("Random Fill", this, SLOT(random_fill()), CTRL+Key_F);
       runMenu->insertItem("Next Generation", this, SLOT(next_gen()), CTRL+Key_G);
    }
Then go to the constructor and add the line makeRunMenu(); immediately after the call to initActions().
If you "Make" and "Execute" the program, you should now have working "Random Fill" and "Next Generation" menu entries.
Step 7: Mouse Input
It would be nice to have a way to design a board, rather than just filling one at random. We will make it possible to turn cells on and off using the mouse. Left-clicking on a cell will turn it on; right-clicking will turn it off.
When the user clicks the view area of the program's window, the system will call a function in the LifeView class named mousePreseEvent. You need to add this function to the class. Right-click LifeView in the list of classes and select "Add member function" from the popup menu. Define the function to have Type void and Declaration mousePressEvent(QMouseEvent *evt). The definition of this function must check the point where the user clicked (given by evt->x() and evt->y()) and which button the user clicked (given by evt->button()). The x and y coordinates can be used to determine which column and row the user clicked, and the button determines whether to make that cell alive or dead. Here is the definition:
        void mousePressEvent(QMouseEvent *evt) {
           int row = evt->y() / 10 + 1;
           int col = evt->y() / 10 + 1;
           if (row < 1 || row > 50 || col < 1 || col > 50)
              return;   // (values out of range)
           if (evt->button() == LeftButton)
              getDocument()->board->set(row,col,true);
           else
              getDocument()->board->set(row,col,false);
           update(); // Make sure it's redrawn.
         }
Step 8: Moving On
Obviously, there is a lot that could still be done with this program: Savind and loading files, making it possible for the game to run continuously without having to press Control-G for each generation, responding to mouse drags as well as to mouse clicks, selecting regions of cells and doing cut-and-paste, printing the board, making it possible for the user to change the number of rows and columns, torus mode, improved graphics,.... None of this is covered here. If you want to be a serious GUI programmer, you could start by exploring the on-line documentation.