This week's lab will introduce you to two programming tools: The CVS version control system and the Eclipse debugger. The homework for Part 1 of the lab will consist of creating a CVS repository to which I have access and putting a copy of your "20 questions" lab in that repository. You will also have to access a repository that I have created and add a file to it. You should do Part 1 in lab today.
The homework for Part 2 of the lab will be to turn in a written or typed lab report about your experience with the debugger; this part of the lab is due next Thursday.
Professional programmers need a way of keeping track of changes that they make to a programming project. When several people are working on a project, they also need a way of combining changes made by various individuals in the shared "official" version of the project. Both of these needs can be met by a version control system. One common system is CVS. CVS keeps a record of all versions of every file that is added to a CVS project. It is possible to compare the current version of any file with a previous version. It is possible to retrieve copies of files that have been deleted. It is possible for several programmers to access the same project so that they can all work on it.
CVS, or something like it, is an essential tool for team programming, and it is also useful for individual programmers, since CVS makes it easier to work on your projects on your own computer as well as in the computer labs. Eclipse has excellent support for CVS. You will have to use it for the team programming project in the next two labs, and you might want to use it for other labs and your final project as well. (Because of certain limitations in CVS, many people have started using a newer system named SVN, or "SubVersion", that is designed as an improved replacement for CVS. Since CVS's limitations won't matter in this course, and since SVN supposrt is not a built-in part of Eclipse, we will stick with CVS.)
To use CVS, you need a repository where CVS will store all the information about your projects. The repository is just an ordinary directory, and for this course you can use a directory inside your home directory on the department's file server. I would like you to use a directory named cvs-cs225 for your CVS repository, and I would like to have access to that directory for purposes of grading your work. (It's possible to have as many repositories as you want.)
To create the repository, open a command-line window and, working in your home directory, enter the following sequence of three commands, replacing zz9999 with your own user name:
    mkdir  cvs-cs225
    fs  setacl  cvs-cs225  -acl  eck  all
    cvs  -d  /home/zz9999/cvs-cs225  init
The first command makes the directory that will hold your CVS repository. The second line gives me access to that directory. This will allow me to see your project and test it for purposes of grading. The third command initializes the directory, turning it into a CVS repository. (You need to grant me access to the directory before initializing the CVS repository.)
You only have to give these commands once. From now on, you will only use your CVS repository through Eclipse. You should never directly make any changes to the cvs-cs225 directory or to its contents.
(Note: The "fs setacl" command works only with the "AFS file system," which is the networked file system where your home directory is stored; the AFS file system turns out to be very convenient for managing access to CVS repositories. If you are working with other people on a project, you can give them all permission to access the repository, but note that you should do this on a newly created directory, before calling cvs init.)
The first thing that you need to understand about CVS is that it keeps a separate copy of your project, in addition to the one that is stored in Eclipse. The copy that is in CVS can be shared by several programmers, and it can be accessed by you from several different Eclipse workspaces and on several different computers. This allows a team of programmers to work on the same project, and it allows you to work on the same project from several different locations (that is, on lab computers or on your own computers). You can even access your CVS directory from off-campus. To use CVS, you have to know how to copy projects from Eclipse to CVS and from CVS to Eclipse, and you need to know how to keep the different copies of the project in sync.
Sharing a Project: The first step to start using CVS with an Eclipse project is to "Share" the project, which copies the project into CVS. (You only do this once for each project that you want to store in CVS.)
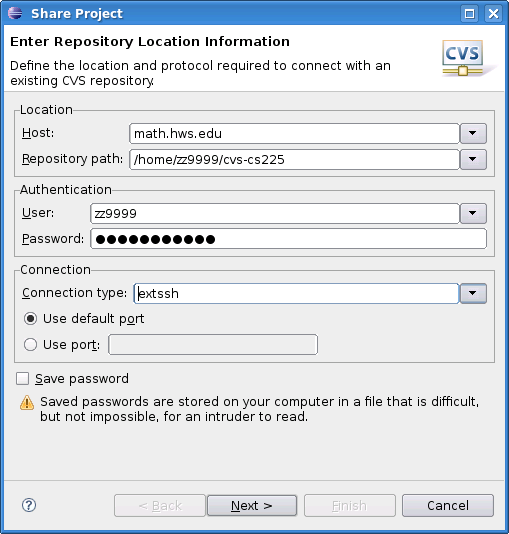
To share your project into CVS, right-click the project name in the Package Explorer view. In the pop-up menu, go to "Team", and select "Share Project" from the Team sub-menu. The first time you share a project, you will have to input information about your CVS repository (which you should have already created, as described above). Fill in the dialog box as shown here, replacing zz9999 with your own user name:
Note that you should use math.hws.edu as the "Host" for your repository location. Your home directory, where the repository is located, is accessible on any of the department's computers; math.hws.edu is one of those computers, and it is accessible from off-campus as well as on. Be sure to set the "Connection type" to extssh. You can check the "Save Password" box or not, as you prefer.
When you have filled in all the information, click "Next". On the next screen, you can accept the default setting, "Use project name as module name", and click "Next" again. (The "module name" is the name for the information about your project that is stored in the CVS repository. It does not necessarily need to be the same as the name of the project in Eclipse, but using the same name will avoid confusion.) On the next screen, you can just click "Finish." This will create a "module" in CVS to hold a copy or your project -- but the files from the project still need to be copied into the CVS module.
After you click "Finish" in the "Share Project" dialog, the "Commit Files" dialog will pop up. The same "Commit" dialog will also appear later, when you copy new or modified files to CVS. This dialog box tells you which files are being saved or modified in CVS, and it has a space where you can enter a comment that describes the changes. Enter a comment such as "Initial commit" if you want, and click "Finish". Your files will be copied into CVS.
You should use this process to Share your lab5 Twenty Questions project into your CVS repository. Check with me during lab to make sure that I can see it.
Importing a Project: Let's say that you want to work on a project that someone else has shared into a CVS repository. To do that, you need to import the project into your Eclipse workspace. Importing a project means copying the project from CVS into Eclipse. (You can do the same thing when you want to work on a project in two different Eclipse workspaces -- if you "share" it from one workspace, you can "import" it into another workspace. The second workspace might be in a copy of Eclipse on your own laptop, for example.)
To start work on the second part of the lab, you will need to import a project from a CVS repository in my home directory. The name of the project is lab6, and it is in a directory named /home/eck/cvs-cs225. Here is what you need to do to import the project into your Eclipse workspace...
To import any project into an Eclipse workspace, right-click in the Package Explorer view and select "Import" from the pop-up menu. In the "Import" dialog box, select "Projects from CVS", as shown here:

Click "Next". On the next screen, select "Create a new repository location", and click "Next" again. You will see the same dialog box for entering repository that you used above, when you shared your project. Fill it out as before, but this time, use /home/eck/cvs-225 as the "Repository path." (Other fields are the same: Use math.hws.edu as the "Host". Enter your own user name and password, and set the "Connection Type" to "extssh".) Click "Next" again. Enter lab6 under "Use specified module name", and click "Finish". (You also have the option to browse the available modules on the repository.)
When you click "Finish" the "lab6" project should be added to your workspace. This project is where you will do Part 2 of the lab. Please show me during lab that you have managed to import the project.
Commit and Update: Once you have a CVS module associated with an Eclipse project (either by Sharing or Importing), there are two things that you need to do to work with CVS. First of all, after you make any changes in the Eclipse project, you will want to copy those changes into CVS. This is called committing the changes. As you make changes in your Eclipse project, you will note that any resources that you modify are marked with a ">" in the "Project Explorer." This is to remind you that the changes need to be committed to CVS. To commit them, right-click on the project name in the "Package Explorer". In the popup menu, go to "Team", then select "Commit" from the next popup. You will see the Commit dialog window, where you can enter a comment to describe the changes that you have made, if you want.
Now, suppose that you are working with other people on a project, or that you work on the project from several computers. The remaining question is, how will the changes that are committed from one Eclipse workspace get into other Eclipse workspaces? For this, you need the update command. When changes (might) have been made to a CVS module from one Eclipse workspace and you want to get those changes into another Eclipse Workspace, just right-click the project name in the second workspace and select "Update" from the "Team" sub-menu. If you have worked on the same file as someone else (or as yourself on another computer), there might be conflicts where the two sets of changes that have been made are incompatible. These conflicts will show up as strange notations in the files, which will probably introduce Java syntax errors, and you will need to fix the conflicts somehow. The moral is to avoid making incompatible changes. To help avoid them, you should generally update a project before working on it, and don't forget to commit your changes. If you are working with another person, it's a good idea to agree on which files you will each work.
As an exercise in "committing" a file to a repository, do the following: In the lab6 project that you have imported from my repository, run the program named Threadtest. This program runs an experiment using threads, and we will discuss it in class tomorrow. Create a file in the lab6 project, using the "New"/"File" command, and use your own name (such as Fred) for the name of the file. Copy the output from the ThreadTest program into the file you have created. Then do a "Commit" on the project. This will add the file that you have saved to the repository. I will look for it there.
You should take a minute to read the output from the Threadtest program. In this program, two threads each add 1 to the same variable 1,000,000 times, but the final value is probably less than the 2,000,000 that you would expect. As we start studying threads, you'll learn how this could happen.
(Note that you have committed the Threadtest output in the lab6 project, you are done with CVS as far as that project is concerned. In fact, you could "disconnect" the project from CVS, if you want, by using the "Disconnect" command in the "Team" submenu.)
To summarize, there are four basic things that you can do with CVS in Eclipse:
If you are using CVS only for backup from a single Eclipse workspace, you will only need the "Share" and "Commit" operations.
Sharing and importing are things that are done only once (for a given project). If you are using CVS, you should always remember to commit your changes before quitting Eclipse. If you work on your project from more than one Eclipse workspace, you should update your project before you start working on it, to make sure that you will be working on the most current version. Remember that changes that you make in Eclipse don't automatically get into CVS; you have to commit them. And changes that are committed to CVS don't automatically get into other Eclipse workspaces; you have to do an update to get the changes.
The lab6 project that you have imported from CVS contains the file BuggySearchAndSort.java
BuggySearchAndSort defines a search subroutine that is supposed to check whether or not a given integer occurs in a given array of integers. It also contains three different sorting subroutines that are supposed to be able to sort an array of integers into non-decreasing order. There is also a main program that tests the four subroutines (along with a sorting subroutine from one of Java's standard classes that is there to remind you that you don't necessarily need to write your own subroutines to perform common tasks).
If all the subroutines that are defined in BuggySearchAndSort were correct, then running the program would produce output that looks something like this (though with different numbers each time you run it):
    The array is: 4 3 6 9 3 9 5 4 1 9
    This array DOES contain 5.
    Sorted by Arrays.sort():   1 3 3 4 4 5 6 9 9 9
    Sorted by Bubble Sort:     1 3 3 4 4 5 6 9 9 9
    Sorted by Selection Sort:  1 3 3 4 4 5 6 9 9 9
    Sorted by LinkedListSort:  1 3 3 4 4 5 6 9 9 9
Unfortunately (or fortunately, for the purposes of this lab), each of the four subroutines in BuggySearchAndSort has a bug that can either produce incorrect results or an infinite loop. The methods might give the correct results in some cases, but they do have bugs, and they do fail in other cases. If you run the buggy program without modifying it, it will go into an infinite loop. Remember that to stop a running program in Eclipse, you can click the Stop button that looks like a small red square in the part of the window where the Console view appears:
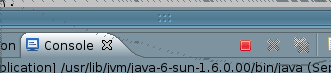
(If this button is gray instead of red, it means that no program is currently running in the visible console. However, there might be other consoles that are still running programs; to avoid having a bunch of programs, all running in infinite loops at the same time, you should make sure that a program has been terminated before starting another program run.)
Your job in this lab is to use the Eclipse debugger to find each of the four bugs. In the written lab report that you will turn in, you should describe each bug, say how you fixed it, and explain briefly how you used the Eclipse debugger to find the bug.
(Note: It's possible that you could find some or all of the bugs just by inspecting the code. However, the main purpose of this part of the lab is to get some experience with the debugger, so I would like you to do that rather than simply eyeball the code!)
To debug a program in Java, you have to start the program using a "Debug" command instead of a "Run" command. There is a "Debug As..." command in the same pop-up menu as the "Run As..." command. You can also click the "Debug" button to debug the program that you have run or debugged most recently. The "Debug" button is just to the left of the "Run" button in the toolbar, and it looks like a bug:
![]()
The main point of the debugger is that it allows you to pause the execution of a program and inspect the values of variables. Once the program has been paused, you can also through the program line-by-line to see what is going on. The program will not pause, however, unless you have added a breakpoint to the program source code. If you run a program that has no breakpoints under the debugger, it behaves just as it would if it were run normally.
To add a breakpoint, simply double-click in the left margin of the source code,
next to one of the lines of code. (By left margin, I mean the same part of the
window where the error and warning "light bulbs" appear.) The breakpoint appears
as a small dot: ![]() .
You can remove the breakpoint by double-clicking this dot. There is also
a "Remove All Breakpoints" command in the "Run" menu. I should
also note that you can use the "Add Java Exception Breakpoint" command in the
"Run" menu to set up a breakpoint that is triggered whenever an exception of
a given type occurs.
.
You can remove the breakpoint by double-clicking this dot. There is also
a "Remove All Breakpoints" command in the "Run" menu. I should
also note that you can use the "Add Java Exception Breakpoint" command in the
"Run" menu to set up a breakpoint that is triggered whenever an exception of
a given type occurs.
When a program is running in Eclipse under the debugger, and the execution gets to a line that contains a breakpoint, the execution is paused. If Eclipse is showing the regular Java perspective when this happens, Eclipse will want to switch to the Debug perspective -- another screen full of views (or panes) that are useful for debugging. The first time this happens, Eclipse will put up a dialog box that asks whether you want to switch to the Debug perspective. I suggest that you check the box that says "Remember my decision" and say "Yes".
Debugging is complicated, and so is Java's Debug perspective. The most important view is the "Variables" view in the top-right corner. Here, you can inspect the values of variables. An array or object variable has a small triangle next to its name; you can click this triangle to open and close the variable so that you can inspect its contents. If a variable is selected (by clicking it), its value is also shown at the bottom of the view.
The "Debug" view in the top right contains a list of currently active subroutines. Click on a subroutine to inspect its variables. The title bar of the "Debug" view contains some useful buttons:
![]()
The green triangle means "Resume" and can be used to resume normal execution of the program (until it next encounters a breakpoint). There is a red "Stop" button that can be used to terminate the program. Most important are the three "arrow" buttons for the "Step Into", "Step Over", and "Step Out" commands. "Step Over" is easiest to understand -- clicking it causes one line of code to be executed. "Step In" is similar, except that if the line of code contains a subroutine call, it takes you to the first line of the subroutine so that you can continue from there. "Step Out" continues execution until the current subroutine returns, and it stops at the line to which the subroutine returns. Note that these "Step" commands can also be found in the "Run" menu, and that the F5, F6, and F7 keys can be used as keyboard equivalents for the step commands.
(You will want to avoid using the "Step Into" command to step into one of Java's built-in subroutines. If you do that, you will just get a message saying that the source code for the subroutine is not available.)
In the left center area of the Debug perspective, you'll find an edit view where the source code files for the program are displayed. The current line is marked in this view with an arrow in the left margin, and you can watch this arrow move as you step through the program. There is a Console pane at the bottom of the window where program I/O is done. You can even edit your program in the Debug perspective, although I don't recommend it.
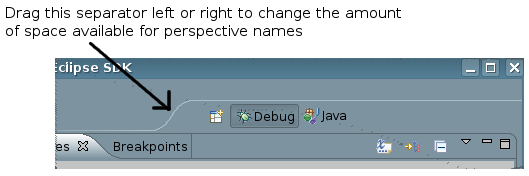
One final remark: There is a list of open perspectives on the right end of the toolbar at the top of the Eclipse window. You can move from one perspective to another by clicking on the name of one of the perspectives in this list. So, when you want to get out of the Debug perspective and back to the normal Java perspective, just click "Java" in the list of perspectives: