The first part of this lab introduces an important program development tool, CVS. The second part is an exercise in working with binary trees.
You should complete the first part by the end of the lab period today. This will include making your work for Lab 4 available in a CVS repository to which I have access. Remember that you should have Parts 1, 2, and 3 of that lab complete at this time. I will look for your work in that repository. I will not look for it in the usual homework folder.
Before next week's lab, you should complete Lab 4 and commit the final version of the "Percolation" project to your CVS repository. You should also complete the second part of Lab 5 by that time.
(There is a test on Wednesday of next week, so there might be some delay in the due date for completing labs 4 and 5.)
Professional programmers need a way of keeping track of changes that they make to a programming project. When several people are working on a project, they also need a way of combining changes made by various individuals in the shared "official" version of the project. Both of these needs can be met by a version control system. One common system is CVS. CVS keeps a record of all versions of every file that is added to a CVS project. It is possible to compare the current version of any file with a previous version. It is possible to retrieve copies of files that have been deleted. It is possible for several programmers to access the same project so that they can all work on it.
CVS, or something like it, is an essential tool for team programming, and it is also useful for individual programmers. Eclipse has excellent support for CVS. (Because of certain limitations in CVS, many people have started using a newer system named SVN, or "SubVersion", that is designed as an improved replacement for CVS. Since CVS's limitations won't matter in this course, and since SVN support in Eclipse requires installation of a plugin, we will stick with CVS.)
To use CVS, you need a repository where CVS will store all the information about your projects. The repository is just an ordinary directory, and for this course you can use a directory inside your home directory on the department's file server. In my examples here, I will assume that the name is cvs-cs225 and that it is in your home directory. You are not required to use this setup, but I will need to know the full path name of the directory that you use. (You can store many projects in the same directory, but it's possible to have more than one repository, perhaps to give different people access to different projects.)
To create the repository, open a command-line window, and enter the following sequence of commands, replacing zz9999 with your own user name (and replacing the directory name with another name, if you prefer):
    mkdir  cvs-cs225
    fs  setacl  cvs-cs225  -acl  eck  all
    cvs  -d  /home/zz9999/cvs-cs225  init
The first command makes the directory that will hold your CVS repository. The second line gives me access to that directory. This will allow me to see your projects and test them for purposes of grading. You must give this command before the next command; it is possible to give someone access to a repository after that repository has been initialized, but it's not so easy. The third command initializes the directory, turning it into a CVS repository.
You only have to give these commands once. From now on, you will only use your CVS repository through Eclipse. You should never directly make any changes to a CVS repository directory or to its contents; only CVS should modify it.
(Note: The fs command works only with the "AFS file system," which is the networked file system where your home directory is stored; the AFS file system turns out to be very convenient for managing access to CVS repositories. If you are working with other people on a project, you can give them all permission to access the repository, but note that you should do this on a newly created directory, before calling cvs init.)
The first thing that you need to understand about CVS is that it keeps a separate copy of your projects, in addition to those that are stored in Eclipse. The copy that is in CVS can be shared by several programmers, and it can be accessed by you from several different Eclipse workspaces and on several different computers. This allows a team of programmers to work on the same project, and it allows you to work on the same project from several different computers. To use CVS, you have to know how to copy projects from Eclipse to CVS and from CVS to Eclipse, and you need to know how to keep the different copies of the project in sync.
Sharing a Project: The first step to start using CVS with an Eclipse project is to "Share" the project, which copies the project into CVS. (You only have to do this once for each project that you want to store in CVS.)
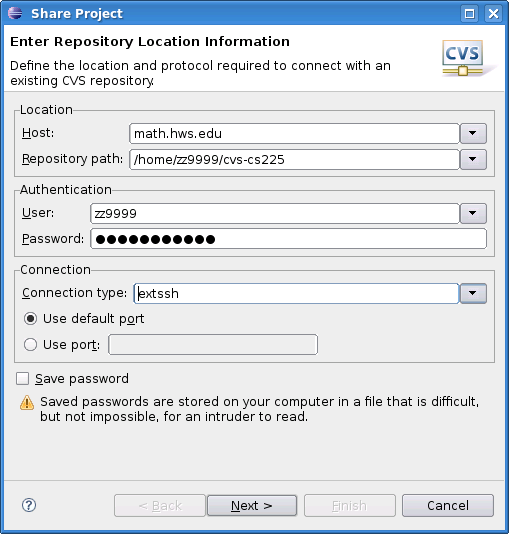
To share your project into CVS, right-click the project name in the Package Explorer view. In the pop-up menu, go to "Team", and select "Share Project" from the Team sub-menu. The first time you share a project, you will have to input information about your CVS repository (which you should have already created, as described above). Fill in the dialog box as shown here, replacing zz9999 with your own user name:
Note that you should use math.hws.edu as the "Host" for your repository location. Your home directory, where the repository is located, is accessible on any of the department's computers; math.hws.edu is one of those computers, and it is accessible from off-campus as well as on campus. Be sure to set the "Connection type" to extssh. You can check the "Save Password" box or not, as you prefer.
When you have filled in all the information, click "Next". On the next screen, you can accept the default setting, "Use project name as module name", and click "Next" again. (The "module name" is the name for the information about your project that is stored in the CVS repository. It does not necessarily need to be the same as the name of the project in Eclipse, but using the same name will avoid confusion.) On the next screen, you can just click "Finish." This will create a "module" in CVS to hold a copy of your project -- but the files from the project still need to be copied into the CVS module.
After you click "Finish" in the "Share Project" dialog, the "Commit Files" dialog will pop up automatically. The same "Commit" dialog will also appear later, when you copy new or modified files to CVS. This dialog box tells you which files are being saved or modified in CVS, and it has a space where you can enter a comment that describes the changes. Enter a comment such as "Initial commit" if you want, and click "Finish". Your files will be copied into CVS.
You should use this process to Share your "percolation" project into your CVS repository.
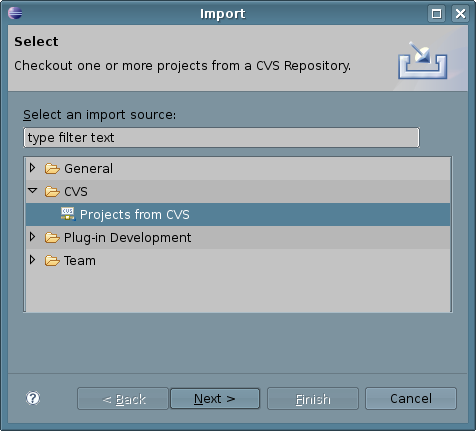
Importing a Project: Let's say that you want to work on your project on another computer, such as your personal laptop. (You will not have to do this to complete this lab!) To do that, you can run Eclipse on that computer and import the project from CVS. This will copy the project from CVS into Eclipse. To import a project into an Eclipse workspace, right-click in the Package Explorer view and select "Import" from the pop-up menu. In the "Import" dialog box, select "Projects from CVS", as shown here:
Click "Next". If this is the first time you are using CVS in this workspace, you will have to set up CVS repository information, as described above. Once you've done that (or selected an existing repository), click "Next" again. On the next screen, you have to enter the name of the CVS module that you want to import. This is the same name that you used when you "Shared" the project. After filling in or selecting the module, click "Finish". This will copy the project from CVS into Eclipse.
Commit and Update: Once you have a CVS module associated with an Eclipse project (either by Sharing or Importing), there are two things that you need to do to work with CVS. First of all, after you make any changes in the Eclipse project, you will want to copy those changes into CVS. This is called committing the changes. As you make changes in your Eclipse project, you will note that any resources that you modify are marked with a ">" in the "Project Explorer." This is to remind you that the changes need to be committed to CVS. To commit them, right-click on the project name in the "Package Explorer". In the popup menu, go to "Team", then select "Commit" from the next popup. You will see the Commit dialog window, where you can enter a comment to describe the changes that you have made, if you want.
When you have completed work on your percolation project, you can commit it to the CVS repository in this way. You can try it now by making a small change in your percolation project and committing it to CVS.
Now, suppose that you are working with other people on a project, or that you work on the project from several computers. The remaining question is, how will the changes that are committed from one Eclipse workspace get into other Eclipse workspaces? For this, you need the update command. When changes (might) have been made to a CVS module from one Eclipse workspace and you want to get those changes into another Eclipse Workspace, just right-click the project name in the second workspace and select "Update" from the "Team" sub-menu.
To summarize, there are four basic things that you can do with CVS in Eclipse:
If you are using CVS only for backup from a single Eclipse workspace, you will only need the "Share" and "Commit" operations.
Sharing and importing are things that are done only once (for a given project). If you are using CVS, you should always remember to commit your changes before quitting Eclipse. If you work on your project from more than one Eclipse workspace, you should update your project before you start working on it, to make sure that you will be working on the most current version. Remember that changes that you make in Eclipse don't automatically get into CVS; you have to commit them. And changes that are committed to CVS don't automatically get into other Eclipse workspaces; you have to do an update to get the changes.
(Note: If you try to commit conflicting changes to a CVS module, or to update your code when there are conflicting changes already in CVS, bad things will happen. Conflicting changes are multiple changes made by different CVS users to the same lines in the same file. You should try to avoid this by making sure that you know who is working on what parts of the project. If it happens anyway, you might see both versions of the conflicting lines in your file. In that case, you should edit the file to fix the conflict and commit the conflict-free version.)
For the programming part of this lab, you will write a program for a "Twenty Questions" game in which the user thinks of an animal and the computer tries to guess the animal by asking a series of yes/no questions. A possible dialog between the computer and the user might go like this:
    Computer:  Is it commonly kept as a pet?
        User:  No

    Computer:  Is it a farm animal?
        User:  No

    Computer:  Does it live in the ocean?
        User:  Yes

    Computer:  Is it a kind of fish?
        User:  No

    Computer:  Does it have a hard shell?
        User:  No

    Computer:  Is it an octopus?
        User:  No

    Computer:  You win.  What were you thinking of?
        User:  A whale
At this point, it would be nice if the computer could do some kind of learning, by getting the user to enter a question that could have been asked to distinguish a fish from a whale. However, that is not part of the assignment for today.
The data that is used by the computer for this game can be represented by a binary tree. The tree really contains two kinds of nodes: One kind represents a final guess by the computer of some particular kind of animal; this kind of node is a leaf in the binary tree. The second kind of node represents a yes/no question; it has two subtrees, corresponding to the answers "yes" or "no." When the computer has asked a question and gotten the user's response, it follows the link to one or the other subtree, depending on which answer the user gave.
Although it is not the prettiest way to do it, you can represent all the nodes in the tree using the same class:
     class QuestionTreeNode {

         boolean isQuestionNode; // true if this node represents a question;
                                 // false if it represents a final answer.

         String data;  // the question for a question node, or the name of
                       // a type of animal for a final answer node.

         QuestionTreeNode yes;  // pointer to the tree to use for a "yes" answer
         QuestionTreeNode no;   // pointer to the tree to use for a "no" answer
     }
For this assignment, your program should read a file that contains all the data for the binary tree, and it should construct the tree. Once you've done that, the program should use the tree to play some games against the user.
The data file contains one line per node. The first token on each line is either true or false. This is the value of the isQuestionNode field for the node. If the value is true, then the left and right subtrees will follow in the file. A simple recursive method can be used to read the data and construct the tree.
An unfortunately short data file can be found at /classes/s11/cs225/TwentyQuestions.dat. Your program can read the file directly from this location, or you can make a copy of it to another location if you prefer. TextIO and Scanner can both be used to read from files, as well as from the user. You can use either class. To create a Scanner for reading from a file, you can say:
     Scanner dataFile =
          new Scanner( new File("/classes/s11/cs225/TwentyQuestions.dat") );
The File class can be found in the package java.io. Whether you are using Scanner or TextIO, the process of opening and reading the file can generate exceptions. If an exception occurs, your program should output a reasonable error message, such as "Can't read the data file!", and exit.