CPSC 324, Fall 2002
Lab 4: Gimp Colors and Selections
GIMP WAS INTRODUCED in Lab 2, which covered some of the basic Gimp drawing tools. We continue in this lab with a look at some of Gimp's tools for manipulating colors and for selecting regions of an image. These are large topics that we will continue next week in our third and final lab on the Gimp.
Some images that I used for the examples in this lab can be found in the folder named pics_for_lab_4 in the cpsc324 folder on PCCommon. A copy of the folder is also available under Linux in the /home/cs324 directory. You will use some of these images in your exercises, but you can find some images of your own for some of the exercises.
Note that the exercises for this lab are scattered throughout this page.
Color Tools
In class, we have looked at the RGB, RGBA, CMY, CMYK, grayscale, and indexed color models. Gimp can work with all of these to some extent. Every image in Gimp has a "mode" which can be RGB, Grayscale, or Indexed. You can convert from one mode to another. For example, you might want to convert a 24-bit RGB image to an indexed image so that it can be displayed reliably on the Web, even on 8-bit color monitors. The problem is that you lose a lot of information when you go from 24 bits per pixel to 8 bits per pixel. To some extent, this can be counteracted by dithering. When you convert an RGB image to indexed mode in Gimp, you have the option of applying various types of dithering. Also, you have a choice of palette. The palette is the set of colors that is used in the image. You can let Gimp choose the best palette based on the actual colors in the image, or you can use a predefined palette. The palette named "Web" contains the so-called Web-safe colors which should work OK in any Web browser.
To find the commands for changing the mode of an image, right-click the image to pop up a menu, select "Image", then select "Mode". Note that conversion to Indexed mode has the keyboard equivalent ALT-I.
Exercise 1. Start with a fairly small RGB image, such as hws.jpg, and convert it to an indexed image in two ways. In one image, use no dithering at all. In the other use "Floyd-Steinberg Color Dithering." Save both images in PNG format (which can use indexed color mode). Add the images to your Web site, along with an explanatory paragraph.
You will find two more commands in the "Image/Mode" menu, "Compose" and "Decompose." The Decompose command applies only to RGB images. Decompose lets you separate an image into several "channels." Each channel is an 8-bit grayscale image that encodes one of the color components in the original image. You can decompose an image in several ways. For an RGB decomposition, you get three grayscale images that show the red, green, and blue components of the image. In an HSV decomposition, the grayscale images represent the hue, saturation, and value. And similarly for a CMY decomposition. The Compose command allows you to put the channels back together. It is only available if a grayscale image is selected. It gives you an opportunity to compose a color image from several grayscale images. You can select which grayscale image is used for each channel in the color image. Now, the thing is that you can decompose the image one way and then compose a new image another way. For example, you could mix up the R, G, and B channels. Or you could combine the channels from an RGB decomposition into an HSV composition. For example, here is an image I made by mixing up the R, G, and B channels in hws.jpg:

Things can get much weider than this.
Exercise 2. Make a surrealistic (that is, weird) image by decomposing an image one way and then re-composing it another way. Add the image to your Web page, along with an explanation of how you made it.
Selection Tools
One of the most important operations in Gimp is selecting a regions of an image, and Gimp has many tools that can be used in doing this. The first thing to understand is that a selection is not simply a set of pixels. A pixel can be partially selected. If you do a cut-and-paste, a partially selected pixel will be partially transparent, so that some of the original color will show through the pasted image. Effectively, a selection is an alpha channel that assigns a degree of transparency to each pixel in an image, and this assignment can be done in a completely arbitrary way. For most selection tools, pixels along the boundary are partially transparent by default. This is meant to provide anti-aliasing for cut-and-pasted images.
![]() The first five tools in Gimp's Toolbox window are selection
tools. The rectangular selection tool lets you select
rectangular or square regions by clicking and dragging. The
elliptical selection tool lets you select elliptical or
circular regions by clicking and dragging. The lasso, or
freehand selection tool, lets you draw a freehand curve around
the region you want to select. The magic wand tool is used
simply by clicking; it selects pixels that are similar in color to
the pixel you click. (It's just like the bucket tool, except that
instead of filling a region, it selects a the region.) The
Bezier select tool let's you create an editable path around
the region you want to select. I will return to the Bezier tool below.
The first five tools in Gimp's Toolbox window are selection
tools. The rectangular selection tool lets you select
rectangular or square regions by clicking and dragging. The
elliptical selection tool lets you select elliptical or
circular regions by clicking and dragging. The lasso, or
freehand selection tool, lets you draw a freehand curve around
the region you want to select. The magic wand tool is used
simply by clicking; it selects pixels that are similar in color to
the pixel you click. (It's just like the bucket tool, except that
instead of filling a region, it selects a the region.) The
Bezier select tool let's you create an editable path around
the region you want to select. I will return to the Bezier tool below.
For the first four selection tools, you can use the SHIFT key and the CONTROL key to modify the action of the tool. They allow you to modify an existing selection by adding a new region to the selection or by subtracting a region from the selection. If a selection already exists, and if you hold down the SHIFT key as you click the mouse, then the newly selected region will be added to the previous selection. If you hold down the CONTROL key as you press the mouse, the region that you select will be subtracted or deleted from the previous selection. (This only has an effect if the new region and the old region intersect. The intersection is deleted from the selection.)
For the rectangular and elliptical selection tools, it's confusing because SHIFT and CONTROL have an additional, entirely different meaning. If you are using the rectangular selection tool and you hold down the SHIFT key as you drag the mouse, then the rectangle is constrained to be a square. So: If you want to add a rectangle to a selection, press the SHIFT key before you click the mouse, then release the SHIFT key. If you want to make a new, square selection, click the mouse, then press the SHIFT key and hold it down while dragging. And if you want to add a square to a selection, you can hold down the SHIFT key the whole time. Similarly, if you are using the elliptical selection tool and you hold down the SHIFT key as you drag the mouse, then the ellipse is constrained to be a circle. The effect of the CONTROL key while dragging is this: The point where you first clicked the mouse will be the center of the rectangle or ellipse, instead of one of the corners. It's usually easier to draw an elliptical selection from its center point instead of from a corner.
 Once you've made a selection, there are several operations that
you can perform on it. Some of them can be found in the "Select"
sub-menu of the pop-up menu that appears when you right-click an
image. For example, the "Invert" command turns a selection into its
exact opposite: What was outside is now inside, and what was inside is
now outside. This is useful if it's easy to select the part of the
image that you don't want in a selection. Just select the
part you don't want, then invert. There are commands for shrinking
and growing a selection by a specified number of pixels. The
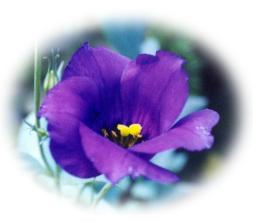
"Feather" command has an especially interesting effect. It makes
a border around the selection in which the amount of transparency
increases gradually. You don't actually see the effect until you
cut the image and paste it somewhere else. For the flower image,
I scaled flowers.jpg to about 0.6 of its original
size, made an elliptical selection,
feathered the selection by 25 pixels, did a copy and then a paste
onto a white background.
Once you've made a selection, there are several operations that
you can perform on it. Some of them can be found in the "Select"
sub-menu of the pop-up menu that appears when you right-click an
image. For example, the "Invert" command turns a selection into its
exact opposite: What was outside is now inside, and what was inside is
now outside. This is useful if it's easy to select the part of the
image that you don't want in a selection. Just select the
part you don't want, then invert. There are commands for shrinking
and growing a selection by a specified number of pixels. The
"Feather" command has an especially interesting effect. It makes
a border around the selection in which the amount of transparency
increases gradually. You don't actually see the effect until you
cut the image and paste it somewhere else. For the flower image,
I scaled flowers.jpg to about 0.6 of its original
size, made an elliptical selection,
feathered the selection by 25 pixels, did a copy and then a paste
onto a white background.
The grab tool (which looks like arrows pointing left, right, up, and down) can be used to move selections and other things. If you use it to drag a selection, it will actually move the contents of the selection. This is probably a stupid default. If you hold down the ALT key while you drag with the grab tool, you can move the selection around on the image, without changing the image. (Note: ALT-drag won't work in Linux under KDE, since KDE by default intercepts ALT-dragging and uses it to move the entire window.)
Since selections are often used with cut-and-paste, you have to know something about how Gimp does cut-and-paste. In Gimp, pasting is strongly tied into the ideas of layers. When you paste something, the pasted image is placed into a new layer, so that the original image is still there, below the pasted image. This allows you to drag the pasted image into position, without messing up the original image in the underlying layer.
The layers are shown in the "Layers, Channels, and Paths" dialog box. When you are doing cut-and-paste, or otherwise working with layers, you want to have this dialog box open. You can open it by hitting CONTROL-L. When you do a paste, you will see that a new layer is added to the list of layers in the "Layers, Channels, and Paths" dialog.
A newly pasted layer is actually something special called a floating layer. Before you can proceed with any other editing of your image, you have to decide what to do with the floating layer. You can either "anchor" it, which will merge it into an existing layer, or can make it into a new, separate, normal layer. Normally, you will want to do the latter, so that you can come back and move or otherwise edit the layer later. To do this: Right-click the floating selection in the "Layers, Channels, and Paths" dialog and select "New Layer" from the pop-up menu. To merge the pasted selection into an existing layer, select "Anchor Layer" from the menu instead.
To summarize, to do cut-and-paste: Make a selection. Use the "Cut" or "Copy" command. Use the "Paste" command. Drag the pasted selection into the desired position. Open the "Layers, Channels, and Paths" dialog with CONTROL-L if it is not already open. Right-click the floating selection in the list in the dialog box, and select "New Layer" or "Anchor Layer" from the pop-up menu.
(Note: When you drag a selection with the grab tool, without holding down the ALT key, it is the same as Cutting it and Pasting it into a new floating layer in the same image.)
Exercise 3. Use a feathered selection and cut-and-paste to make an image similar to the flower image shown above. Use a different image as a starting point. If you want, you can make your image from pieces of several different images. Post the image on your Web site.
More Advanced Selections
Getting a selection just right can be difficult, you should understand that an artist might spend hours and hours just making a selection. One way of increasing the quality of a selection is to work on a magnified view of an image. The "=" and "-" keys can be used to quickly zoom in or out on an image. The "1" key will restore it to 100%. But you also need some more advanced and accurate selection tools: the Bezier selection tool and masks.
A Bezier curve is determined by a set of points that it passes through and by the tangent or direction of the curve at each of those points. The curve can have a "corner" at a point if it has two tangent lines at that point. Between the points, the curve is smooth. Bezier curves often show up in drawing programs, since they are relatively easy to work with. In Gimp, they are used for the Bezier selection tool.
The Bezier tool is used to make a path around the border of the region you want to select. Simply click at a series of points along the border, and finish by clicking back on the starting point. Then you can edit the curve. You can move one of the points by CONTROL-clicking and dragging it. Initially, all the points are "corners." However, if you click and drag a point (without holding down the control key), two "handles" will emerge from the point. Dragging one of these handles changes the direction of the tangent line at the point and affects the shape of the curve between that point and its neighboring points. Ordinarily, the handles are locked so that there is only one tangent direction. But if you SHIFT-drag one of the handles, it will move independently of the other handle.
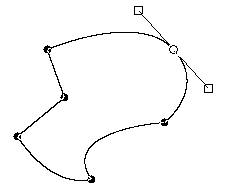 Once you have the Bezier path set up exactly as you want it,
click inside the path to convert it into a normal selection.
Once you have the Bezier path set up exactly as you want it,
click inside the path to convert it into a normal selection.
The picture at the right shows the bezier tool in use. I began by clicking on six points, and then clicked again on the first point. The handles on the point at the upper are being modified. The handles were created by clicking and dragging on the point. I also edited the handles of the point at the bottom of the image. By shift-clicking the handles, I was able to drag the handles independently and make a sharp point. To make the path into a selection, I would click inside it.
Ordinarily, the bezier tool would be used to select some irregularly shaped object out of an image.
Masks are a completely different sort of tool for making selections. A mask is just an alternative way of looking at a selection. A selection is really an "alpha channel" that specifies a degree of transparency for each pixel. The mask corresponding to a selection is just a grayscale image that represents this alpha channel. That is, pixels that are black in the mask are completely outside the selection, pixels that are white are completely inside, and pixels that are gray are partly in the selection.
 Gimp has a cool way of visualizing and editing the mask corresponding to
a selection. A pair of small buttons at the lower left of a Gimp image window
allows you to convert a selection into a mask, and vice versa. The small button
with the red border turns on the "quick mask". The mask is displayed as
a translucent red overlay on the image. (To change the color or degree of
transparency, double-click the quick mask button.) This is just another
view of the selection. If there is no selection, the red film covers the entire
image. If there is a selection, the region inside the selection has no
red overlay. The neat thing is that you can edit the mask.
When the quick mask is on, all the usual paint tools will work on the mask,
not on the image. You can add to the selection by erasing part of the
red film (or by drawing on it in white). You can removepixels from
the selection by painting them (with black). If you paint with an anti-aliased
brush or with gray paint, you will get partially transparent pixels in the
selection. To change back from the mask view to the selection, click the
small button just to the left of the quick-mask button.
Gimp has a cool way of visualizing and editing the mask corresponding to
a selection. A pair of small buttons at the lower left of a Gimp image window
allows you to convert a selection into a mask, and vice versa. The small button
with the red border turns on the "quick mask". The mask is displayed as
a translucent red overlay on the image. (To change the color or degree of
transparency, double-click the quick mask button.) This is just another
view of the selection. If there is no selection, the red film covers the entire
image. If there is a selection, the region inside the selection has no
red overlay. The neat thing is that you can edit the mask.
When the quick mask is on, all the usual paint tools will work on the mask,
not on the image. You can add to the selection by erasing part of the
red film (or by drawing on it in white). You can removepixels from
the selection by painting them (with black). If you paint with an anti-aliased
brush or with gray paint, you will get partially transparent pixels in the
selection. To change back from the mask view to the selection, click the
small button just to the left of the quick-mask button.
To use quick mask effectively, you would generally make a rough selection using the selection tools. Then turn on the mask, and edit the boundary using the paint brush or eraser. Zoom in on the image if necessary.
Here is an image that I made using selection tools and cut and paste. I don't claim that this is a particularly professional job:
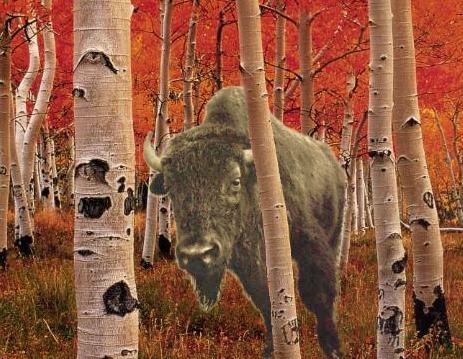
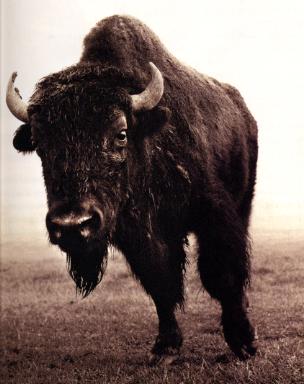
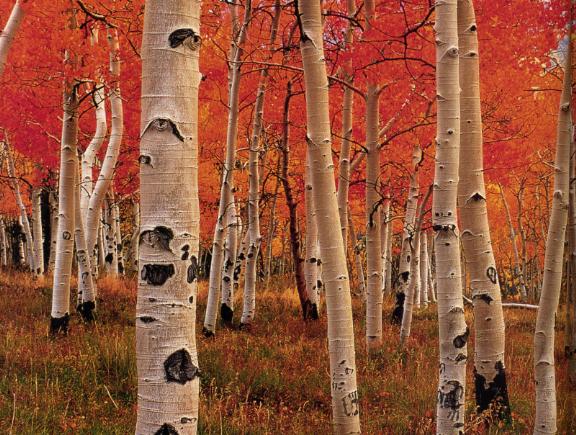
I started with an image of a buffalo and an image of some trees. Since the buffalo image was too dark, I used the Levels dialog to adjust its brightness and colors. I wanted it to look more brown than the original image. I used a combination of selection tools to select everything outside the buffalo in the image (because that seemed easier), and I used quick mask to refine the selection. I then inverted the selection, copied the buffalo and pasted it into the trees image. Using the "Layers, Channels, and Paths" dialog, I made the newly pasted floating selection into a new layer.
At this point, I needed some new layer tools. Right-clicking on a layer in the "Layers, Channels, and Paths" dialog brings up a pop-up menu that includes a "Scale Layer" command. I used that to decrease the size of the buffalo. I dragged the buffalo into position, and then the problem was to make one of the tree trunks appear to be in front of the buffalo. I needed to erase just the right portion of the buffalo. (Actually, it would have been better to "mask" that portion rather than erase it. We will probably return to the editing of "layer masks" later.)
This was actually pretty easy because of the following facts: Painting tools always apply only the layer that is selected in the "Layers, Channels, and Paths" dialog. So I could edit the buffalo layer without having any effect on the trees layer. (To select a layer, click its name in the "Layers..." dialog.) Secondly, you can edit a layer even if it is invisible or nearly so. Toggle a layer visibility by clicking on the eye next to the layer name in the Layers dialog. You can make it partly transparent by adjusting the Opacity slider in that dialog. Doing this let me see the tree trunk. I used the Bezier selection tool to draw a path around the trunk, and then clicked inside the path to make it into a selection. Remember that this selection is actually inside the buffalo layer, although its shape is based on the shape of the tree trunk. A cut operation (CONTROL-X) deletes the part of the buffalo image that lies in front of the trunk, making it look like the tree trunk is in front of the buffalo.
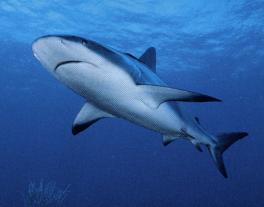
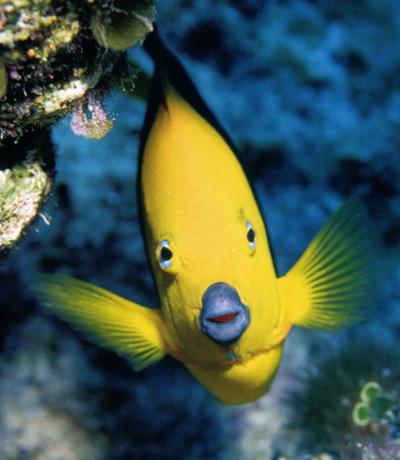
Exercise 4. Put an animal in the trees. Use the same trees.jpg that I used. You can use the buffalo if you want, but you might prefer to use a shark or a fish or some other animal image that you find on your own. Use more than one animal, if you want. Add your image to your web site, along with the original image from which you obtained the animal. (This exercise will probably take you a lot more time than the first three exercises put together.)