CPSC 324, Fall 2002
Lab 6: Blender Modeling
![]() IN THIS LAB, you will learn some new modeling techniques
that can be used in Blender. You might want to review what you've already learned
about Blender in Lab 3. We will look at text, curves,
extrusion, and lathing. Many of the new features use the edit buttons.
To display these buttons in the Buttons Window, click the small icon (shown here) or
hit F9. Different sets of edit buttons are displayed, depending on the type of
object that is selected in the World Window.
IN THIS LAB, you will learn some new modeling techniques
that can be used in Blender. You might want to review what you've already learned
about Blender in Lab 3. We will look at text, curves,
extrusion, and lathing. Many of the new features use the edit buttons.
To display these buttons in the Buttons Window, click the small icon (shown here) or
hit F9. Different sets of edit buttons are displayed, depending on the type of
object that is selected in the World Window.
More Useful Facts
Before beginning the lab, here are a few more little features of Blender that you might like to know about:
Spotlights -- The default type of light emits light in all directions from a point. A spotlight emits a cone of light from a point. After adding a light, you can change it into a spotlight using the Lamp Buttons. Make sure the light is selected, click the little Lamp icon, and click the button that says "Spot". In the World window, you will see a representation of the cone of light coming out from the spotlight. You can rotate the cone to any direction you like by applying a rotation to the light. There is a setting in the Lamp Buttons that adjusts the angular width of the cone. The cone of light actually extends only to a finite distance from the light. You can increase or decrease this distance by applying a scaling operation to the light.
Shadows -- Spotlights are the only type of light that can cast shadows in Blender. And you still won't see them unless you enable them in the Display Buttons (F10). In the Display Buttons, you have to turn the "Shadow" button on (between the big "Render" and "Anim" buttons).
Tracking -- It can be difficult to aim a spotlight at an object. One way to do this is to use "tracking." Select the spotlight by right-clicking it. Then SHIFT-right-click the object that you want the light to shine on. This adds the object to the selection. Hit CONTROL-T. You will be asked to verify that you want to set up tracking. This will make the light point at the object. Whenever you move the object, the light will turn to follow it. You can clear the tracking by selecting the spotlight and hitting ALT-T. If you don't want the light to track a visible object, you can add an "Empty" to the scene, and make the light track that. (You can make a camera track an object in the same way. However, you will have to clear the camera's pre-set rotation in order to get it to point directly at the object. To clear its rotation, select the camera and hit ALT-R.)
Layers -- You can use layers to organize your work in blender. These are not layers in the sense of being stacked up to make the final view. Objects in different layers are all mixed together in the final image. Layers in blender are used to organize your work. You might set up your lights in one layer and your objects in another layer, for example. You can turn layers on and off using the group of 20 little buttons near the left end of a World Window. Use a SHIFT-click to activate more than one layer at a time. You can also activate layers with CTRL-1, CTRL-2, etc -- or with SHIFT-CTRL-1, SHIFT-CTRL-2, etc to activate multiple layers. To move an object to a particular layer, select the object and hit the "m" key. (I mention this partly because I "lost" my work a couple of times by accidently activating a different layer, before I realized how layers work.)
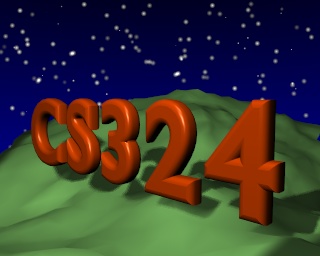
Simple Landscapes -- Here is how to make a simple "hilly" landscape like the one in the picture below: Add a Mesh/Plane object to the scene, and scale it up to be fairly large. Make sure that you are in Edit Mode and that all four vertices of the plane are selected. Go to the Edit Buttons, and find the button named "Fract Subd" (meaning "Fractal Subdivide"), and hit it a few times. (You will be asked to confirm a "Rand Fact" of 10 each time.) Then, hit the "Set Smooth" button to avoid having a jagged landscape. I used a landscape of this kind in the picture that you see below. Try adding a smooth blue plane that cuts through the landscaped plane, to get an appearance of land and water!
Text
You can add text to a Blender scene by using the "Text" command in the "Add" menu. The text object will show up as the word "Text" displayed in Blender's default font. As with any object, it is in edit mode when it is first added. When a text object is in edit mode, you can edit it by typing characters. You can add lines by hitting return. You can delete characters with the backspace key. You can use the arrow keys (but not the mouse) to move around inside the text. Don't forget to hit TAB to get out of Edit Mode! Once out of edit mode, you can scale, rotate, and translate a text object just like any other object. You can also add materials and textures. When a text object is selected, the Edit Buttons will include a variety of buttons that can be used to modify the text:
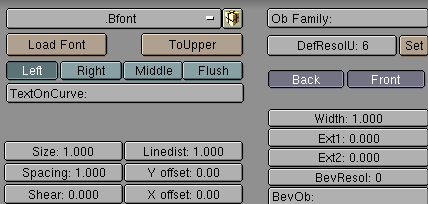
 The buttons on the lower right of this picture can be used to make the text into a 3D-object.
The number button labeled "Ext1" can be used to add thickness to the text object. (This might not
be visible in the World Window, if you are still looking at text straight on, but it will be
visible if you rotate the view.) The button labeled "Ext2" will add a "bevel" along the
edges of the letters. (Adding a bevel also adds to the thickness.) If you have a bevel,
the button labeled "BevResol" will increase the resolution, or smoothness, of the bevel.
(Hint: To get a better idea of the effect of these buttons, hit the "Z" key in the World Window
to get a "solid" view of the objects in the scene. Hit the "Z" key again to return to the standard
wireframe view.) The "Width" button in this group of buttons controls the width of individual
characters.
The buttons on the lower right of this picture can be used to make the text into a 3D-object.
The number button labeled "Ext1" can be used to add thickness to the text object. (This might not
be visible in the World Window, if you are still looking at text straight on, but it will be
visible if you rotate the view.) The button labeled "Ext2" will add a "bevel" along the
edges of the letters. (Adding a bevel also adds to the thickness.) If you have a bevel,
the button labeled "BevResol" will increase the resolution, or smoothness, of the bevel.
(Hint: To get a better idea of the effect of these buttons, hit the "Z" key in the World Window
to get a "solid" view of the objects in the scene. Hit the "Z" key again to return to the standard
wireframe view.) The "Width" button in this group of buttons controls the width of individual
characters.
In the group of six buttons to the left, the "Spacing" button controls horizontal distance between letters. The "Linedist" button controls vertical spacing between lines, if there are multiple lines in the text object. The "Shear" button is used to slant the letters. Looking higher, the "Left", "Right", "Middle", and "Flush" buttons control the justification of multiple lines of text. For example, "right justification" means that the lines are moved so that their right ends line up.
Above the justification buttons, you will find the "Load Font" button, which can be used to load new fonts. Blender can use any Postscript font. I have made some fonts available in the folder fonts_for_blender (in /home/cs324 under Linux or in the cpsc324 folder under Windows). When you click the "Load Font" button, the World Window will change to a File Window. Find the font file, click it, and hit return (or just click it with the middle mouse button). Fonts that have already been loaded can be selected from the pop-up-menu-button above the "Load Font" button.
Curves
Blender supports two types of curves: Bezier curves and NURBS curves. For now, we will stick with Bezier curves. Blender always fills in the interiors of closed curves. Just as with text objects, you can give the curve object a thickness in the third dimension. Text objects are actually very similar to curves. In fact, you can convert a text object into a curve and then edit it the same way you would any curve. (However, there is no way to convert it back to a text object.)
To get a curve to work with, you can just add a Bezier curve to your scene, using Add/Curve/Bezier Curve. You will get a short curve with a point on each end. Each point has two attached handles. You can select and drag the point to move the point itself. You can also select and drag a handle to change the shape of the curve. Remember: Use right-click to select and shift-right-click to add to a selection. Use the "B" key followed by left-click-and-drag to "box select" a group of points. Use the "G" key to initiate a drag operation -- even when the thing you want to drag is one of the handles of a Bezier curve. (Note: You see the points and handles only when the curve is in edit mode.)
To extend the curve, select one of the points at the end of the curve by right-clicking it. You can then CONTROL-click with the left mouse button to add new points joined onto that end of the curve. After adding as many points as you want, hit the "C" key to close the curve by connecting the endpoints. Then, you can shape the curve by moving the points and adjusting the handles. Handles come in several styles. Select a control point and hit the "H" key. You will now be able to drag each handle separately to make corners on the curve. Hit "H" again to return to the default mode, in which the two handles are forced to make a straight line. If you select a control point and hit the "V" key, it will turn into a corner vertex, where the handles always point along a line to the next control point (like the initial state of points on Gimp Bezier curves). If you select two or more control points in a row, and go to the Edit Buttons, you can use the "Subdivide" button to add new control points between the selected points.
 If you have a closed curve and hit the "Z" key for a shaded view, you will see
that the curve is filled in. (You also have to leave edit mode to see the shading.)
Now, while you are in edit mode, try adding a Bezier Circle
to the scene. When you add a new curve while you are in edit mode for another curve, it
is not added as a separate object. Instead, it becomes part of a single, multi-part curve.
Position the circle so that it lies entirely within your original curve.
Scale it if necessary. Now, when you leave edit mode and hit the z key, you will see
that Blender only fills in the area between the curves. So, using multi-part curves,
it's possible to create fancy shapes with holes in them.
You can add a third dimension to a curve. Leave edit mode.
Make sure that the curve is selected. Go to the Edit buttons, and use the buttons
named "Ext1", "Ext2", and "BevResolv". For the curve object shown, "Ext1" has been used
to add thickness, but there is no beveling.
If you have a closed curve and hit the "Z" key for a shaded view, you will see
that the curve is filled in. (You also have to leave edit mode to see the shading.)
Now, while you are in edit mode, try adding a Bezier Circle
to the scene. When you add a new curve while you are in edit mode for another curve, it
is not added as a separate object. Instead, it becomes part of a single, multi-part curve.
Position the circle so that it lies entirely within your original curve.
Scale it if necessary. Now, when you leave edit mode and hit the z key, you will see
that Blender only fills in the area between the curves. So, using multi-part curves,
it's possible to create fancy shapes with holes in them.
You can add a third dimension to a curve. Leave edit mode.
Make sure that the curve is selected. Go to the Edit buttons, and use the buttons
named "Ext1", "Ext2", and "BevResolv". For the curve object shown, "Ext1" has been used
to add thickness, but there is no beveling.
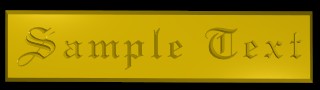 Although a text object is not a curve, you can convert it to a curve. To do this,
select the text object and hit ALT-C. You will get a pop-up that lets you convert the text to a curve.
One reason for doing this is that you can then enter edit mode and edit the vertices on
the individual letters. Also in Edit mode, you can add more curves that become part of
the same multi-part curve object. For example, for the picture shown at the left,
I started with a text object (using the "linotext" font), and converted it into a curve.
I entered edit mode and added a Bezier curve. I added two points to this curve before
hitting "C" to close it. I selected each point on the curve and hit "V" to make it into
a simple corner vertex. I dragged the four points to make the new curve into a rectangle
that surrounded the text. I then added some thickness and beveling. The beveling closes
off the hole made by the text in the rectangle, so it looks engraved.
Although a text object is not a curve, you can convert it to a curve. To do this,
select the text object and hit ALT-C. You will get a pop-up that lets you convert the text to a curve.
One reason for doing this is that you can then enter edit mode and edit the vertices on
the individual letters. Also in Edit mode, you can add more curves that become part of
the same multi-part curve object. For example, for the picture shown at the left,
I started with a text object (using the "linotext" font), and converted it into a curve.
I entered edit mode and added a Bezier curve. I added two points to this curve before
hitting "C" to close it. I selected each point on the curve and hit "V" to make it into
a simple corner vertex. I dragged the four points to make the new curve into a rectangle
that surrounded the text. I then added some thickness and beveling. The beveling closes
off the hole made by the text in the rectangle, so it looks engraved.
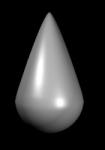 (By the way, you can make nice, smooth solid shapes with "Nurbs Surfaces." These are referred
to simply as Surfaces in Blender, and are found in the Add/Surface menu. A Nurbs surface
has control points that are similar to the handles on a Bezier curve -- that is, they are not
points on the surface, but they control the shape of the surface. You can change the shape
of a surface by dragging the control points in edit mode. It can be best to select a group
of control points and drag or scale them as a group. For example, I made the teardrop shape
from a Nurbs Sphere by selecting all the control points at the top of the sphere, dragging them
upwards, and then scaling them down almost to a point. The heart shape in the previous lab
was also made from a Nurbs Sphere.)
(By the way, you can make nice, smooth solid shapes with "Nurbs Surfaces." These are referred
to simply as Surfaces in Blender, and are found in the Add/Surface menu. A Nurbs surface
has control points that are similar to the handles on a Bezier curve -- that is, they are not
points on the surface, but they control the shape of the surface. You can change the shape
of a surface by dragging the control points in edit mode. It can be best to select a group
of control points and drag or scale them as a group. For example, I made the teardrop shape
from a Nurbs Sphere by selecting all the control points at the top of the sphere, dragging them
upwards, and then scaling them down almost to a point. The heart shape in the previous lab
was also made from a Nurbs Sphere.)
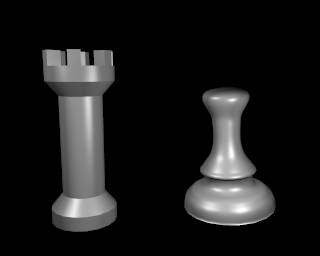
Rook and Pawn
We finish with two useful techniques for modeling: extrusion and lathing. As examples, I will show you how to make two chess pieces.
 Before you do that, though, try a simpler extrusion.
Start with a new scene and add a cube. In edit mode, select
all the vertices on one face of the cube. Hit the "E" key. You will get
a pop-up where you can confirm that you want to extrude. When you do this,
the selected vertices are duplicated, and you will find yourself in grab mode.
Move the mouse (or use the arrow keys) to position the new vertices, then left-click or hit return to
end grab mode. At this point, use the "S" key to scale the selected vertices.
Then hit the "E" key to extrude again. Move the new vertices and scale them.
You might want to rotate the view and use shaded mode ("Z" key) to see the full effect.
Now, you could go back and select a different set of four vertices and extrude them
once or twice. If you do this a few times, you can get an interesting branching
structure. (Aside: For a cool effect, select this object, go to the Edit buttons
and click the "SubSurf" button. Now, the mesh you have created is used to
establish the basic shape for a more nicely curved surface inside the mesh.
In effect, the mesh acts as a set of control points for this surface, and it's only the surface
that is drawn. You can get a smoother geometry by increasing the value on the "Subdiv"
button, just below the "SubSurf" button. Also, use the "Set Smooth" button to get
a smooth rather than faceted appearance.)
Before you do that, though, try a simpler extrusion.
Start with a new scene and add a cube. In edit mode, select
all the vertices on one face of the cube. Hit the "E" key. You will get
a pop-up where you can confirm that you want to extrude. When you do this,
the selected vertices are duplicated, and you will find yourself in grab mode.
Move the mouse (or use the arrow keys) to position the new vertices, then left-click or hit return to
end grab mode. At this point, use the "S" key to scale the selected vertices.
Then hit the "E" key to extrude again. Move the new vertices and scale them.
You might want to rotate the view and use shaded mode ("Z" key) to see the full effect.
Now, you could go back and select a different set of four vertices and extrude them
once or twice. If you do this a few times, you can get an interesting branching
structure. (Aside: For a cool effect, select this object, go to the Edit buttons
and click the "SubSurf" button. Now, the mesh you have created is used to
establish the basic shape for a more nicely curved surface inside the mesh.
In effect, the mesh acts as a set of control points for this surface, and it's only the surface
that is drawn. You can get a smoother geometry by increasing the value on the "Subdiv"
button, just below the "SubSurf" button. Also, use the "Set Smooth" button to get
a smooth rather than faceted appearance.)
Now that you've had some experience with extrusion, you can try to make a rook. Start with a Mesh circle with 18 vertices. (The number is important.) In edit mode, make sure all the vertices are selected, and do an extrude by hitting "E". But then hit Return immediately, since you don't want to move the vertices. Instead, hit the "S" key and scale the new vertices to get a flat ring shape made up of 18 little quadrilaterals. We will first use this ring to make the six blocks on the top of the rook. (At first, I tried doing this as the last step, but I had trouble selecting the right vertices after the rest of the rook was made.)
Deselect all the vertices, then select the vertices that will be extruded to make the six blocks: Select four vertices around one of the quadrilaterals. Then skip the next two vertices in the ring. Then select another four vertices. And so on. Switch to a side view (Keypad-3) and do the extrude. Move the new vertices upwards about 1 unit. (Hold down the control key or click the middle mouse button to make sure the vertices are moved directly upwards, with no sideways displacement. Alternatively, use the arrow keys to move the vertices instead of the mouse.) Rotate the view to see what you've made, if you want.
Now, you should select just the original vertices in the ring. (This is easy to do with a box select in the side view.) Still working in the side view, extrude them directly downwards five times. After the second extrude, scale the vertices down to make a smaller circle, and after the fourth extrude scale them back up. You have your rook!
Now, you might wonder why my rook has nice smooth sides while yours is faceted. If you use the "Set Smooth" button on the rook, it will look really terrible, because blender will try to smooth edges that should really look sharp. For my rook, I first turned on the "Auto Smooth" option in the Edit buttons and then hit "Set Smooth". Blender will then smooth only those faces that meet at a relatively small angle, without trying to smooth the sharp edges between faces that meet at a large angle. Unfortunately, you will only see this smoothing in the final rendered image, not in the preview, and whether it works well depends on the exact shape of your rook -- the angles between the "layers" on the rook must be larger than the cut-off angle.
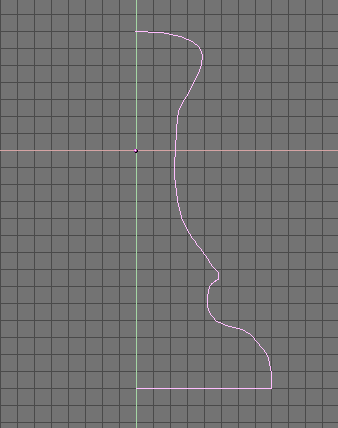 Next, you can try to model a pawn.
Start working in the top view (Keypad-7). Hit SHIFT-C, which will move the 3D cursor to
(0,0,0). It's important that the 3D cursor lie in the xy-plane, since we need to draw
a curve that lies exactly in that plane. Add a Bezier curve. Extend it (by selecting one endpoint and using
CONTROL-left-mouse)
and shape it into half of the outline of a pawn -- something like the picture. I used
snap-to-grid (SHIFT-S) to get the two endpoints exactly on the y-axis -- select the endpoint
and hit SHIFT-S. (This is also
important!) To make the sharp corner at the bottom right, I selected a control point
there and hit the "v" key to make it into a corner.
We are going to spin this curve around the y-axis to make
the pawn. This process is known as "lathing".
Next, you can try to model a pawn.
Start working in the top view (Keypad-7). Hit SHIFT-C, which will move the 3D cursor to
(0,0,0). It's important that the 3D cursor lie in the xy-plane, since we need to draw
a curve that lies exactly in that plane. Add a Bezier curve. Extend it (by selecting one endpoint and using
CONTROL-left-mouse)
and shape it into half of the outline of a pawn -- something like the picture. I used
snap-to-grid (SHIFT-S) to get the two endpoints exactly on the y-axis -- select the endpoint
and hit SHIFT-S. (This is also
important!) To make the sharp corner at the bottom right, I selected a control point
there and hit the "v" key to make it into a corner.
We are going to spin this curve around the y-axis to make
the pawn. This process is known as "lathing".
Exit from edit mode. Select the curve and hit ALT-C. You will be asked if you want to convert the curve into a mesh. Confirm this. This is important, since lathing only works on meshes.
Now, left-click near the y-axis and use snap-cursor-to-grid (SHIFT-S again) to make sure that the 3D cursor is exactly on the y-axis. The 3D cursor specifies the line that we will spin the curve around.
Select the curve and go back into edit mode. Select all the vertices in the curve. Switch to a front view (Keypad-1) so that the y-axis will be perpendicular to the screen, and go to the Edit buttons. Find the button labeled "Spin". In the row of buttons beneath the Spin button, change the Degr to 360 and steps to 20. (The 360 says you want to spin the curve in a complete circle. The 20 says you want to make 20 copies of the curve as it spins.) Now you are ready to do the lathing: Click the spin button. If all has gone well, you will now have a nicely shaped 3D pawn. (If you have more than one World Window, then when you click the "Spin" button, the cursor will change to a question mark and you will have to click on the World Window where you want to do the lathing.)
There is one problem with lathing in blender: You get an extra set of vertices at the final position, and this can make an unsightly seam in the object. To eliminate this, in edit mode, select all the vertices in the pawn. Then click the "Rem Doubles" button in the Edit buttons. This will remove the extra vertices by combining any pair of vertices that are very close together.
As a final step, hit the "Set Smooth" button to give the pawn a smooth rather than faceted appearance. (This might work better if "Auto Smooth" has been selected. I forgot to do this, so the base of my pawn is not quite right.) That should do it. As you can see, lathing is a complicated affair, but the results can be very nice.
Exercises
For these exercises, don't forget to turn on "OSA" in the Display Buttons to get a nice, anti-aliased image. Add the rendered images to your Web site, along with a short explanation of how you made each image.
Exercise 1. Make a Blender scene that uses a text object. For full credit, use a spotlight and shadows.
Exercise 2. Make a Blender scene that uses one or more curves. If you like, you can make an engraved logo similar to my example.
Exercise 3. Make either the rook or the pawn, as described above, and show it in a well-lighted scene. The shape should be very similar to the one in my image, but you can add a material and texture if you want.