CPSC 324, Spring 2004
Lab 13, Option 1: Blender Production
FOR THE LAST TWO LABS of this course, there is no out-of-class assignment. You will receive six points for showing up and completing the required parts of the lab. Outside of class, you should be working on your final project. You can add a page for the lab to your web site, but that is not required. (Of course, it might help with your final Web site grade.)
For Lab 13, you have two options: Option 1, described on this page, deals with Blender. Option 2 deals with POV-Ray. You can do either option.
The Blender option is a tutorial on "Blender Production." Production here refers to creating several scenes and combining them into a single animation. Movies are assembled from scenes with a "sequencer." Blender has its own simple built-in sequencer, so you don't need a separate program to do sequencing. Blender also has the ability to save several scenes in one .blend file, so you can keep an entire project in one file. The first part of the lab shown you how to create and work with scenes. In the second part, you will assemble scenes into a movie.
For this lab, you will work with a copy of the file /home/cs324/lab13_blender/cones_starter.blend. Copy this file into your account. The folder home/cs324/lab13_blender also contains a finished movie file, invasion.avi, which you can view with xanim. Your goal in this lab is to duplicate this movie and add an additional scene at the end.
To complete this lab, you have to do the steps marked Step 0, Step 1, and so on.
Note about CPU time limits: Your computer account is set up with a 10-minute limit on the CPU processing time that can be used for one program. If a program exceeds this limit, it is terminated without warning. This limit is meant to protect us all from runaway programs that would loop forever. However, if you do a long Blender animation, it might require more than 10 minutes of CPU time. You can remove the CPU limit by typing the command:
ulimit -t unlimited
on the command line. The time limit is removed only for programs run in the same command window, so you must start blender from the same command line where you gave the ulimit command.
Multiple Scenes in Blender
Step 0: Make a copy of the file /home/cs324/lab13_blender/cones_starter.blend and open it with Blender.
You should remember that there is a "SCR" menu at the top of the blender window that lets you select one of several "screens." These screens allow you to have different views of the same scene. Next to the "SCR" menu is an "SCE" or scene menu. This menu allows you to have several different scenes. Each scene is a complete world that can have its own objects, animation, cameras, and so on. You can also have several scenes that share some or all of this data. You can, for example, define a background that is shared by several scenes and then add different foreground objects to each of those scenes.
You can select the scene that you want to view or work on using the small browse button -- with the tiny white rectangle -- just to the left of "SCE". This is a menu button that lets you select from the existing scenes or make a new scene.
The starter file has already defined several scenes. The scenes named title and title2 are very simple; they just contain some text. The top line of this text is shared between the two scenes; if you modify it in one scene, it is modified in the other. The scenes named arrival and theMoon contain a bunch of sinister cone-shaped objects heading towards the moon and the earth. (The cones are done with a particle system example from the previous lab.) These two scenes share everything except one of the cameras and the start and end frame settings in the Display buttons. Essentially, these two scenes just provide two different views of the same action. I will not discuss how these scenes were created. If you are interested in knowing how some of the effects were done, ask me about them.
You can create a new scene by using the "Add New" command from the browse menu. When you select this command, you will get an "Add Scene" menu with four options: Empty, Link Objects, Link ObData, and Full Copy. You have to select one of these options to make the scene. Here is what they mean:
- Empty creates a completely empty scene containing no objects, not even a camera. (It's easy to add a camera, of course.)
- Link Objects creates a scene that shares all the objects with the currently selected scene. The objects are not copied; the new scene contains pointers to the same objects that are in the original scene. If you change the object in one scene, it also changes in the other. Use this option if you want to make a different view of an existing scene. It could also be used to make a shared, unchanging background that you want to use for several scenes.
- Link ObData creates a new scene that shares the "object data" of the objects in the current scene. The object data is what you change in Edit mode. You can transform/animate the objects separately in the two scenes, but if you edit the object in one scene, the changes also apply to the other scene.
- Full Copy, as you might expect, makes a complete copy of the current scene, so that changes made in one scene have no effect on the other.
Step 1: Create a "Full Copy" of the scene named title: Make sure that title is the currently selected scene. Use the "Add New" command in the scene browsing menu, and select "Full Copy" from the popup menu. Edit the text in the new scene to say "The End?". Since you made a full copy, the text does not change in the original scene. If you had selected "Link Objects" or "Link ObData," the text would also change in the title scene. Your new scene will be named title.001. To change the name, SHIFT-click the title and type the new name. Later, you will put this scene at the end of the movie.
The Sequencer
Step 2: Now, create a new, empty scene to use for the sequencer. This scene will represent the entire movie, and you will work in this scene for the rest of the lab. You want to work with the sequencer screen, so select sequencer from the "SCR" (not "SCE") menu. You will see a large work area in the center of your computer screen. This is where you will build the movie. The top-right area is for previewing frames of the movie. (I don't actually know what the top-left area is for.)
The sequencer work area is a time line, with time flowing from left to right. The horizontal scale at the bottom is in seconds. (This scale is controlled by the "Frs/sec" setting in the Display buttons.) You just have to add the elements of the movie to this work area.
Step 3: Add the scene named title to the movie as follows: Make sure that the cursor is over the work area. Hit SHIFT-A. This calls up a menu for adding items to the movie. Select "Scene" from this menu. This pops up a menu that allows you to select one of the scenes from your Blender project. A little bar appears that represents the time extent of the scene (10 frames in this case). Drag this bar so that the first frame of the scene is positioned at frame 1 of the movie. The vertical position doesn't matter. You will see the frame number in the little triangle on the left end of the bar. Left-click the mouse when the scene is where you want it. I want this scene to last for more than ten frames. Right-click the right triangle on the bar to select it, then drag it in the usual way to frame 75. (Hit "G", move the mouse, left-click when it is in position.) You can stretch or shrink the time scale on any scene in the same way. (Note: This scene is really just a still image; you could have used an external image file instead of a scene for this. There is an "Images" option in the "Add Frame" menu.)
Step 4: Add the scene named title2 to the movie in a similar way. Make it stretch from frame 51 to frame 125. This overlaps the extent of title, but you just have to put the second scene in a different vertical strip from the first one.
Where the two scenes overlap, the bottom one is by default the one that is shown. However, you can add something called a "gamma cross" to make one scene fade into the other.
Step 5: Add a gamma cross from title to title2 as follows: Select both scenes by first right-clicking on title and then SHIFT-right-clicking on title2. (The order is important because it tells which scene will fade into the other.) Then hit SHIFT-A and select "GammaCross" from the menu. Drag the Gamma Cross bar that appears into place; you can only move it vertically. Your work area should look something like this:
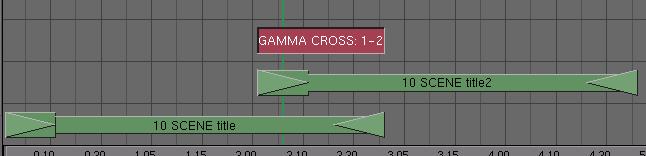
The green line in this image appears where you click on the work area. It marks one frame in the animation. This frame is rendered and shown in the preview area at the top left; it might be necessary to move the mouse over the preview area to get it to update. You can click at various points along the gamma cross to see how one scene fades into the other.
It can be annoying if a frame starts rendering when you are trying to do something like drag a scene into position. I suggest that you move the gree line out of the way while you are working.
Step 6: Add the scene named arrival to the movie and position it so that it starts after the end of title2 Maybe leave a small gap, so that the movie will blank out for a fraction of a second between scenes. You could, of course, also do a cross.
You can drag the work area back and forth with SHIFT-middle-mouse, and you can scale it up or down with the KEYPAD + and - keys. You will have to do this to continue with the next step.
Step 7: Add the scene named theMoon after arrival. (If you look at the Display buttons for this scene, you'll notice that it is set to animate from frame 150 to frame 400. Not every scene has to show the same frames.)
Step 8: Finally, add the scene that you created in Step 1 at the very end. Stretch it out to a larger number of frames. My own movie doesn't include this scene. (Note: An alternative here would be to render a still image showing the arrival of the cones at the Earth. Add this at the end of theMoon, and do a gamma cross from this image to the "The End?" scene.)
Step 9: The final step is to render your complete animation. As usual for an animation, you will have to change some settings in the Display buttons. While still working in the sequencer scene, go the the Display buttons. Set the name for your output file, such as "mymovie.avi". Make sure that the file type is "AVI Jpeg". (You could, by the way, turn down the Quality to 70 or less to save some disk space.) The starting and ending frame numbers should be set to the start and end frame of the complete movie. The start frame is 1. The end frame is the last frame of the last scene in the movie. (To find out what that is, right-click the small triangle at the right end of the bar that represents the scene.) Finally, make sure that you turn on the "Do Sequence" button, which can be found just below the ANIM button. This is what tells Blender to render the scenes that are in the sequencer. When all this is done, clicking the ANIM button should create the animation.