CS 424: Computer Graphics, Fall 2013
Lab 10: Three.js
In this lab, you will work with three.js, the fairly high-level JavaScript API for 3D Web graphics. Before beginning the lab, you need to know the basics of three.js as covered in Section 15 of the notes.
You will need copies of all the files from the directory /classes/cs424/lab10-files. You will be editing JavaScript code in .html files. You can use Komodo Edit, if you like it, or you can use a plain text editor. Komodo Edit has the advantage that it will catch some JavaScript syntax errors. When you view your work in a web browser, don't forget to use the Web Console (in Firefox) or the JavaScript Console (in Chrome) to help you find errors in your JavaScript code!
You should copy your work for this lab into your homework folder in /classes/cs424/homework by the beginning of the next lab. It should be in a folder named lab10 or something similar.
Exercise 1: Getting started with three.js
The file Exercise1.html shows a disk. The disk was created as a three.js cylinder. It has a radius of 12. Its top is parallel to the xz-plane, and it has been translated so that the top of the disk is at y = −3. The arrow keys rotate the camera around the disk. There is one dim light that moves with the camera and two additional lights that are fixed with respect to the disk.
Your assignment for this exercise is to create at least three additional objects and arrange them neatly on top of the disk. You should use three.js Mesh objects, with various geometries and materials. Use some variety! At least one of the objects should have a texture. For the texture, you can use an image from the lab10-files folder, or you can add your own image.
Exercise 2: Knobby Cube
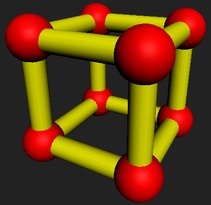
The file Exercise2.html uses three.js to draw a simple cube. You should modify it so that it draws the hierarchical object shown at the right below, consisting of eight spheres and twelve cylinders. The vertices of the spheres are at the points (±5,±5,±5). The spheres and cylinders must be part of a single hierarchical object, so that it can be rotated as a whole using the arrow keys. You should set the global variable cube to refer to that object. The only changes that you have to make in the file are in the createWorld() function.
Note that three.js objects have a clone() method that makes a copy of the object, and that it works for hierarchical objects. It is used like this:
var copy = original.clone();
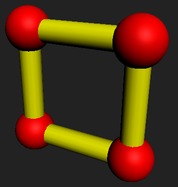
So you only need to make one sphere and one cylinder, and you can get the rest by cloning. Furthermore, you can make simpler hierarchical objects and clone them to get pieces of the final object. So, you can work in stages. I built the object shown on the left below, used it to build the object in the middle, and then used that to build the cube. Try to use as few commands as you can!
Exercise 3: Animation
Your job for exercise 3 is to write a three.js animation, using some hierarchical graphics. You can start with the file Exercise3.html, which is a copy of the file from Exercise 1, except that I have added support for animation and a stupid animated cube that just slides back and forth. (You have to check the "Animate" checkbox to run the animation.)
You will need to work in function createWorld() to add object to the scene—and get rid of the cube. You also need to add to function updateForFrame(), which should modify properties of the animated objects based on the frame number or on the elapsed time since the start of the animation. You will also need to add some global variables to refer to objects that are to be animated.
You can be as original as you like, and your scene does not necessarily have to imitate anything in the real world. However, you might just want to port your hierarchical graphics animation from Exercise 3 in Lab 7. Remember to do something hierarchical. That is, you want a three.js object that has other three.js objects as children.