CS 424: Computer Graphics, Fall 2013
Lab 12: WebGL Shading Language Basics
This is our first lab on WebGL. In this lab, you will concentrate on learning how to use attribute variables, uniform variables, varying variables, and samplers in the WebGL GLSL shading language, and you will see how to manipulate those variables from JavaScript. The lab is somewhat tutorial in nature. You will add a series of features to an existing WebGL program.
For this lab, you will need a copy of the file Lab12.html, which you can find in /classes/cs424. You will also need an image file to use as a texture; you can use any image that you want (except that it should have width and height that are powers of two). Put the image file, along with Lab12.html, into the folder that you will turn in for this lab.
You should copy your work for this lab into your homework folder in /classes/cs424/homework by the beginning of the next lab. It should be in a folder named lab12 or something similar. Please include your texture image in the folder.
Exercise 1: Adding and Using a Uniform Variable
Open the file Lab12.html in Komodo Edit or some other text editor. All of the exercises for this lab will be done on that file. You should take a look at the file in a web browser. (Note that the graphics for this lab is 2D. We'll get back to 3D graphics and lighting in the next lab.)
A uniform variable is a variable in the shader program that has the same value for all the points in a primitive. Lab12.html uses just one primitive, which consists of all the points in the image, drawn as a primitive of type gl.POINTS. Right now, the points are drawn as disks. You will add a uniform variable to control how the points are displayed. In particular, the user will be able to choose between displaying the points as disks and displaying them as squares. In later exercises, you will make other display styles possible, so you should use an int value to represent the display style. The variable will be used in the fragment shader, so you should add the following variable declaration to the fragment shader source code, near the top of the html file:
uniform int style;
Now, the value for style has to come from the JavaScript side. To make that possible, you need a JavaScript variable to represent the "location" of the uniform, which you can get using the function gl.getUniformLocation, and you need to set the value of the variable using gl.uniform1i. So, following my naming convention, create a global JavaScript variable
var uStyle;
and get a value for the variable by adding the following statement to function setupVars(), around line 80 in the program:
uStyle = gl.getUniformLocation(prog, "style");
In the same function, you should give an initial value to the style. The value 0 will correspond to drawing the points as disks, and that should be the initial value for style:
gl.uniform1i(uStyle, 0);
Note that we are using the "1i" version of gl.uniform* because we are providing 1 int value.
Whenever the user selects a new value from the style popup, the function setPointRendering will be called with a parameter that gives the new style value. You should modify the function so that it sets the value of the style uniform accordingly.
Finally, you should implement the style choice in the fragment shader program. You want to modify the fragment shader program so that when style is 1, a square is drawn instead of a disk. Remember that the fragment shader is drawing one pixel and that gl_PointCoord gives the position of that pixel within the square that represents the point, with possible coordinate values ranging from 0 to 1. To draw a disk, I "discard" the pixel if the distance of gl_PointCoord from the center is larger than 0.5. When drawing a square, you should not discard any pixels.
Remember that when you test your work in Firefox or Chrome, you can look for JavaScript errors in the Console. If there is an error in the shader program, that error will be reported on the web page itself, including a statement of the error and the line in the shader program where the error occurred.
Exercise 2: More Style
For fun, add a third way of rendering points. (You can come back to this later if you want.)
To do that, you should first add another option to the popup menu, which is defined by the <select> in the HTML near the bottom of the file. Add an <option> with value="2".
Now, implement the new style in the fragment shader. Do something that involves the alpha component of the color. Alpha blending is enabled in this program, so using an alpha value less than one will make a translucent pixel. My suggestion is to make the alpha component of the color depend on the distance of the pixel from the center.
You could add a couple different styles, if you want, but don't mess with the RGB components of the color; you'll work on that in the next exercise.
(Note: One of the annoying things about GLSL is that it will not do any numeric conversions automatically. If a is a float variable, and you try to do 2*a, you will get an error because GLSL won't convert the 2 into a float. You have to say 2.0*a.)
Exercise 3: Adding an Attribute Variable
Attribute variables can be used only in the vertex shader. An attribute is a value that can be different for each vertex in a primitive. The most common example is the vertex coordinates. When the primitive is drawn, the values for an attribute are pulled from a "buffer." The JavaScript side is responsible for creating the buffer and transferring data into it. The data must be transferred from a JavaScript typed array, for example of type Float32Array, so you also also have to create that array and fill it with data. It all seems very complicated!
As an example, you will use an attribute to specify the RGB color components of the points. That can be done with an attribute of type vec3. You should add it to the vertex shader program:
attribute vec3 color;
You will need three variables on the JavaScript side: one for the location of the attribute, one for the buffer, and one for the Float32Array. Again using my naming convention, these are:
var aColor;
var aColorBuffer;
var color = new Float32Array( 3*POINT_COUNT );
Note that you need three numbers for each point, so the length of the color array is 3*POINT_COUNT. The first three numbers in color give the color of the first point, the next three numbers give the color of the second point, and so on.
These variables can be assigned values as part of initialization, in the setUpVars() function. You need to get the location of the attribute, and you need to create a buffer:
aColor = gl.getAttribLocation(prog, "color");
aColorBuffer = gl.createBuffer();
You can fill the color array with random values in the range 0 to 1.
It remains to transfer the data from the color array into the buffer and to configure WebGL to use the values in that buffer to provide values for the color attribute in the shader program. This is done with the following four lines:
gl.enableVertexAttribArray(aColor);
gl.bindBuffer(gl.ARRAY_BUFFER, aColorBuffer);
gl.bufferData(gl.ARRAY_BUFFER, color, gl.STATIC_DRAW);
gl.vertexAttribPointer(aColor, 3, gl.FLOAT, false, 0, 0);
Because the colors won't be changed once they have been set up, you can do these four lines as part of initialization (and use gl.STATIC_DRAW on the third line). If you want to change the colors, you could put these lines in draw() (and use gl.STREAM_DRAW on the third line); that's what done for the coords attribute that gives the coordinates of the points.
Exercise 4: Using a Varying Variable
Now, it's time to implement colored points. We have a problem: the color attribute is in the vertex shader, but the color of the point is set in the fragment shader. (Remember that attributes can only occur in the vertex shader.) This means that we have to get information about the color from the vertex shader to the fragment shader. For that, you need a varying variable
A varying variable must be defined in both the vertex shader and in the fragment shader, and its declaration must be the same in both. The vertex shader must assign a value to the varying variable. That value is than passed to the varying variable with the same name in the fragment shader. (In general, the values for the fragment shader are interpolated from the values at the vertices, but for points, there is no interpolation because there each point has only a single vertex. The value for the fragment shader will be the same as the value assigned in the vertex shader.) You should add the following declaration in both shaders:
varying vec3 vColor;
The vertex shader should simply copy the value of color into vColor. The fragment shader should use vColor for the RGB components of gl_FragColor. Note that the components of vColor can be referred to as vColor.r, vColor.g, and vColor.b. Note, by the way, that varying variables are completely independent from the JavaScript side; unlike uniforms and attributes, they are purely internal to the shader program.
When you run the program after making these changes, you will have randomly colored points instead of all red. (You might want to have randomly colored points as one and red points as another style in your program.)
Exercise 5: Sampler Variables
In the last two exercises, you will apply a texture image to the points. Add another style named "Texture" to the pop-up menu on the web page. When the user selects that style from the pop-up menu, each point should be shown as a copy of a texture image (or maybe as a disk cut out of the image). In this exercise, you will program the fragment shader to use the texture.
To use texture images in GLSL, you need a uniform variable of type sampler2D. The only thing that you can do with such a variable is to use it to get a color (or "sample") from a texture image. The image and the value of the sampler variable have to be set up in JavaScript. So, add the variable declaration to the fragment shader:
uniform sampler2D texture;
To get a sample from the image, use the function texture2D(). This function takes two parameters: the sampler variable and a vec2 containing the texture coordinates. It returns a vec4 containing the color from the texture. In most other programs, the texture coordinates will come from an attribute variable through a varying variable, but in this program, you can simply use gl_PointCoord as the texture coordinates, so the command for getting the color becomes:
vec4 texColor = texture2D( texture, gl_PointCoord );
Next, you should modify the fragment shader code so that if the "Texture" style is selected by the user, then the color of the pixel will be set to texColor. Before you will see the texture, though, you have to set things up on the JavaScript side.
Exercise 6: Using a Texture Image: The JavaScript Side
On the JavaScript side, a texture is loaded from an object of type Image (a predefined type that also represents img elements on a web page). The data from the image has to loaded into a WebGL texture object. The texture object has to be created with the JavaScript function gl.createTexture(). The return value of this function is actually just an identifier for the texture object, which exists on the WebGL side. You will need a variable to hold the ID, so define a global variable texID for that purpose.
When the user selects the image style for the first time, you should load the texture image. You can use code similar to the following. The if statement will test whether the image has already been loaded. You should replace "filename.jpg" with the name of the image file that you want to use.
if ( ! texID ) {
   texID = gl.createTexture();
   var img = new Image();
   img.onload = function() { // called when image has finished loading
       gl.bindTexture(gl.TEXTURE_2D,texID);
       gl.texImage2D(gl.TEXTURE_2D, 0,
                           gl.RGBA, gl.RGBA, gl.UNSIGNED_BYTE, img);
       gl.generateMipmap(gl.TEXTURE_2D);
       gl.texParameteri(gl.TEXTURE_2D, gl.TEXTURE_WRAP_S, gl.REPEAT);
       gl.texParameteri(gl.TEXTURE_2D, gl.TEXTURE_WRAP_T, gl.REPEAT);
       draw(); // draw after loading the image.
   }
   img.src = "earth.jpg"; // Triggers loading of the image.
}
else {
   draw(); // we already have the image; draw now
}
When a value is assigned to img.src, the browser starts the process of loading the image. However, the loading is done asynchronously, which means that the loading will complete at a later time. When that happens, an onload event occurs. Here, the code sets up an event handler function for the onload event. When the event handler is called, the image has been loaded and can be copied into a WebGL texture object. You should be familiar with most of what is done in the handler from OpenGL 1.0. The function gl.generateMipmap is new. It tells WebGL to create a set of mipmaps for the texture.
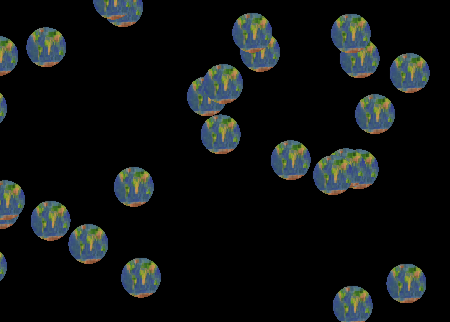
Your image style might work at this point, but remember that uniform sampler variable? It really should be assigned a value. The value that we want to assign is 0, and this seems to be the default value in browsers that I tested. However, in general, you will need to set the value. To do that, you will need a variable to represent the uniform location, and you will have to get the location of the uniform. Then, use gl.uniform1i to set the value of the uniform to 0. After all that, my own textured points look like this: