CS 424: Computer Graphics, Fall 2013
Lab 7: Textures
This is our final lab on old-fashioned OpenGL. For this lab, you will apply textures to some objects, and you will implement texture animation using texture transformations. There is also a final exercise that asks you to apply what you have learned in a more complex, hierarchical animation. You should be familiar with the material in Section 10 of the notes before doing the lab.
The files that you will need for C can be found in the directory /classes/cs424/lab7-glut. The files for use with JOGL are in /classes/cs424/lab7-jogl. You will also need a copy of your solution to Exercise 1 from Lab 5, which draws a colored, lit pyramid.
This lab is due at the beginning of lab in two weeks. (There is no lab next Tuesday because of Fall break.) You should copy your work into your homework folder in /classes/cs424/homework. Your work should be in a folder named lab7 or something very similar.
Exercise 1: Textures and Texture Coordinates
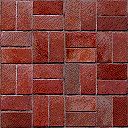
For this exercise, start with a copy of your colored, lit pyramid-drawing program from Lab 5. (That program also needs the camera support files; copies are in this week's lab directory.) You will modify the pyramid program to add texture coordinates for the pyramid, and to apply the texture brick001.jpg. (And don't miss the second part of the exercise, which is to program some keyboard interaction!)
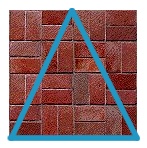
For the texture coordinates, you should apply the entire image to the base of the pyramid, which is a square. For each of the four sides, you should apply the triangular region from the brick image that is shown outlined in cyan here, with the top of the triangle mapped to top of the pyramid:
To make the texture appear, you will have to load the texture image into your program and enable texturing, as discussed in Section 10. Subroutines that you can use for loading a texture image both in C and in Java are given later on this page.
Once you've gotten the texture to appear on the pyramid, you will see that the brick texture is "tinted" with the color of the pyramid. This is because the default technique for applying a texture to a surface blends the color of the texture image with the color of the surface to which the texture is applied. To see an untinted texture, you should apply it to a white surface.
As the second part of this exercise, you should program the space bar to switch between a white pyramid and a colored pyramid. (If you removed the keyboard-handling code from the program, you might need to look back at the very first version of the program, from Lab 4, to see how it's done. For the C version, note that you need to use glutKeyboardFunc(), not glutSpecialFunc() to respond when the user types a space.)
The easy way to switch between white and colored is to disable and enable the GL_COLOR_MATERIAL option. Recall that when this option is enabled, OpenGL uses colors specified by glColor* as the material color. When it is disabled, OpenGL ignores glColor*. Note: before disabling GL_COLOR_MATERIAL, you can use glColor* to set the color to white.
Exercise 2: Texture Transformations
For the second exercise of the lab, you will add texture transformations to the texture demo program that is used as an example in Section 10 of the notes. Texture transformations are also discussed in that section, but no there are no sample programs that use it. Be sure to read that discussion before trying to do this exercise!
The texture demo program already makes it possible to view a variety of objects with a variety of textures applied to them. The arrow keys are used to select the object and texture. The mouse can be used to rotate the object.
The JOGL program is TextureDemo.java, and it uses TexturedShapes.java as well as Camera.java. The C program is texture-demo.c, and it uses textured-shapes.c and camera.c, along with their header files, textured-shapes.h and camera.h. Of course, both programs also require the folder of texture images.
Your assignment is to add the option of animation to the program, where it is the texture transform that is animated. In particular, you should implement three different texture transformations, one that uses translation, one that uses rotation, and one that uses scaling. The animation can base the amount of rotation, scaling, or translation on frameNumber. Some requirements:
- Scaling must be done relative to the center of the texture, (0.5,0.5), not relative to (0,0).
- Rotation must be done about the center point of the texture, (0.5,0.5), not about the point (0,0).
- The user can hit the space bar to start and pause the animation.
- The user can hit the "t", "r", and "s" keys to select the type of animation. Alternatively, or in addition, the user can use the page-up and page-down keys to select the animation type.
Note: The texture demo program does not have support for animation. You will want to copy animation support from an old program such as glut-animation.c or JoglAnimation.java from Lab 4. For the C version, you will also have to use glutKeyboardFunc() to install a handler for ordinary keys such as the space bar; currently, the texture demo only uses glutSpecialFunc(), which is for special keys such as the arrow keys.
Here, for example, is a screenshot of a cylinder with a brick texture to which a rotation transformation has been applied:

Exercise 3: Freedom
As a final exercise in OpenGL, write a program that draws a more complex animated scene, using hierarchical graphics. As an example, you might do something like this, where the car's wheels rotate and the car drives around the track:
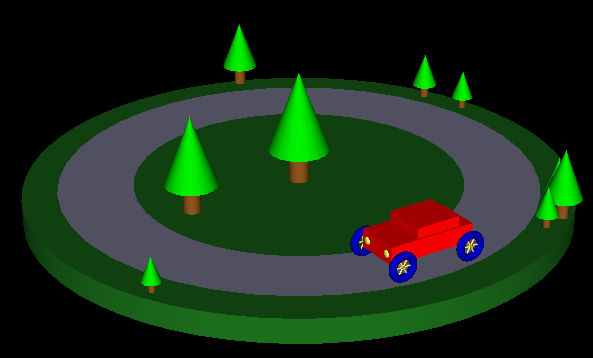
Of course, it would be nice if you would add a couple of textures and maybe some extra lights.
Using Textures With JOGL for Exercise 1
JOGL makes it pretty easy to use textures. You just have to load the texture as an object of type Texture. Then, when you want to apply the texture image, use the Texture object to bind and enable the texture. You should add the texture image file as a resource in your program. (For example, add it to your Eclipse project.) You can use the following method to load a texture image from a resource:
private Texture loadTextureFromResource( String resourceName ) {
    try {
        URL textureURL;
        textureURL = getClass().getClassLoader().getResource(resourceName);
        if (textureURL == null)
            throw new Exception("Could not find resource.");
        BufferedImage img = ImageIO.read(textureURL);
        ImageUtil.flipImageVertically(img);
        Texture tex = AWTTextureIO.newTexture(GLProfile.getDefault(), img, true);
        System.out.println("Loaded texture from " + resourceName);
        return tex;
    }
    catch (Exception e) {
        System.out.println("Falied to lad texture from " + resourceName);
        System.out.println("   Exception:  " + e);
        return null;
    }
}
One note about this method: It will only work if called from one of the GLEventListener methods, such as init(). Once you have the image loaded into an object texture of type Texture, you can tell OpenGL to use it on objects by calling
texture.bind(gl);
texture.enable(gl);
Calling texture.enable(gl) is the same as calling gl.glEnable(GL2.GL_TEXTURE_2D).
Using Textures with C for Exercise 1
It's not so easy to use textures in C, and there are a number of issues that you have to deal with. Here, I'll give explicit instructions that will work on our Linux installation. We use the FreeImage library to load the images; this library is installed on our lab computers.
To use FreeImage, you have to add the directive #include "FreeImage.h" to the top of your program, and when you compile, you need to add the freeimage library to the list of libraries in the gcc command. For example, assuming that your program also uses my camera library:
gcc myprogram.c camera.c -lglut -lGLU -lfreeimage
To use FreeImage to load a texture from an image file, you can use the following loadTexture function, which is taken directly from the course notes. The parameter should be a string giving the name of an image file that is in the same directory as the executable (or a path to the file). The function stores the information that you need in global variables:
void* imgPixels;  // Pointer to raw RGB data for texture.
                  // (Note:  void* is a standard C type representing
                  //  a pointer that can point to anything at all.)
int imgWidth;   // Width of the texture image.
int imgHeight;  // Height of the texture image.

void loadTexture( char* fileName ) {
        // Loads a texture image using the FreeImage library, and stores
        // the required info in global variables imgPixels, imgWidth, imgHeight.
        // The parameter fileName is a string that contains the name of the
        // image file from which the image is to be loaded.  If the
        // image can't be loaded, then imgPixels will be set to be a null pointer.

    imgPixels = 0; // Null pointer to signal that data has not been read.

    FREE_IMAGE_FORMAT format = FreeImage_GetFIFFromFilename(fileName);
         // FREE_IMAGE_FORMAT is a type defined by the FreeImage library.
         // Here, the format is determined from the file extension in
         // the file name, such as .png, .jpg, or .gif.  Many formats
         // are supported.

    if (format == FIF_UNKNOWN) {
        printf("Unknown file type for texture image file %s\n", fileName);
        return;
    }

    FIBITMAP* bitmap = FreeImage_Load(format, fileName, 0);
          // FIBITMAP is a type defined by the FreeImage library, representing
          // the raw image data plus some metadata such as width, height,
          // and the format of the image data.  This actually tries to
          // read the data from the specified file.

    if (!bitmap) {
        printf("Failed to load image %s\n", fileName);
        return;
    }

    FIBITMAP* bitmap2 = FreeImage_ConvertTo24Bits(bitmap);
          // This creates a copy of the image, with the data represented
          // in standard RGB (or BGR) format, for use with OpenGL

    FreeImage_Unload(bitmap);
          // After finishing with a bitmap, it should be disposed.
          // We are finished with bitmap, but not with bitmap2, since
          // we will continue to use the data from bitmap2.

    imgPixels = FreeImage_GetBits(bitmap2);  // Get the data we need!
    imgWidth = FreeImage_GetWidth(bitmap2);
    imgHeight = FreeImage_GetHeight(bitmap2);

    if (imgPixels) {
        printf("Texture image loaded from file %s, size %dx%d\n",
                         fileName, imgWidth, imgHeight);
    }
    else {
        printf("Failed to get texture data from %s\n", fileName);
    }

} // end loadTexture
Once the image has been loaded, there is still a certain amount of work that you need to do to apply the texture to objects that you draw. Here is some typical code:
if (imgPixels) {
    int format; // The format of the color data in memory
    if ( FI_RGBA_RED == 0 )
       format = GL_RGB;
    else
       format = GL_BGR;
    glTexImage2D(GL_TEXTURE_2D, 0, GL_RGBA, imgWidth, imgHeight, 0,
            format, GL_UNSIGNED_BYTE, imgPixels);
    glEnable(GL_TEXTURE_2D);
    glTexParameteri(GL_TEXTURE_2D, GL_TEXTURE_MIN_FILTER, GL_LINEAR);
    glTexParameteri(GL_TEXTURE_2D, GL_TEXTURE_WRAP_S, GL_REPEAT);
    glTexParameteri(GL_TEXTURE_2D, GL_TEXTURE_WRAP_T, GL_REPEAT);
}