CS 424: Computer Graphics, Fall 2013
Lab 8: Blender Modeling
Class will meet in the lab on Friday, October 11 and on Friday, October 18 for a two-part lab on Blender Modeling. Blender is a free 3D modeling and animation program. You can find it on the lab computers in the "Graphics" section of the applications menu, and you can download it from blender.org for use on your own computer.
For the first day of the lab, you should familiarize yourself with Blender's basic modeling and animation features, as described in Section 12 of the notes. Blender has an unconventional interface that takes some getting used to.
For the second day of the lab, you will try some of the more advanced modeling techniques, as described in Section 13.
There will be one more Blender lab, on Tuesday, October 22. All of your Blender work from the labs will be due at the beginning of the lab on Tuesday, October 29. You should create a folder named something like blender or lab8-and-9 to hold your Blender work. For each lab exercise, you should save a .blend file in that folder along with any rendered images or animations that you are asked to produce. To turn in your work, copy the entire folder of blender work to your homework folder in /classes/cs424/homework. Remember that your work from Lab 7 is due on Tuesday, October 22.
To begin, you should copy the files from /classes/cs424/lab8-files into your blender work folder.
Exercise 1, for Friday, October 11
For the first part of lab 8, you should concentrate on becoming familiar with Blender. Learn how to use the mouse and keypad to change the view; how to add objects to the scene and materials and textures to objects; how to transform objects and modify them in edit mode; and how to render an image and save it to disk. (Do not attempt to do this without reading Section 12!)
For something definite to work on after you have played with Blender for a while, copy the file /classesc/cs424/Lab8-files/lab8-Ex1.blend to your Blender work folder. Open it in Blender. (You can do that from inside Blender or by double-clicking the file in a file browser window.) The scene in this file shows a "stage" made up of two mesh Plane objects, with a cone resting on the stage. The exercise is to add at least three more objects of various types to the stage; to add a material to every object, including the floor and backdrop of the stage; and to add textures to at least some of the objects. I'd like to see one of the objects leaning against the back wall of the stage. You should use both image textures and procedural textures. You can find some images to use as textures in the directory /classes/cs424/textures-for-blender. You can tell Blender to access the images directly from that folder, or you can copy them into your blender work folder. Once you have everything set up as you want it, you should render an image of the completed scene. And don't forget to save your work!
Your completed Lab8-Ex1.blend file and the image that you rendered from it should be in your Blender work folder when you turn it in.
Exercise 2, October 18
Before the second part of the lab, you should be sure to read Section 13, which covers a variety of Blender modeling techniques. For this exercise, you will make three objects using specific techniques from that section. You can save your work in three separate .blend files named Lab8-Ex2a.blend, Lab8-Ex2b.blend, and Lab8-Ex2c.blend. Alternatively, you can use a single .blend file named Lab8-Ex2.blend; in that case, you should consider putting the objects in separate "scenes" to make it easier to work on them separately. You should also make a rendered image of each object.
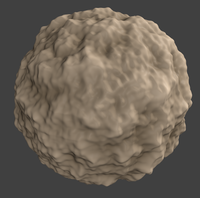 The first object should be a lumpy shpere, something like the one shown
at the right, created using a Display Modifier. Start with a Mesh Icosphere,
and when you add the icosphere to the scene, set the number of subdivisions
to 7. (You can only do this just after adding the isosphere, in the
panel to the left of the 3D View window.) Using 7 subdivisions gives you
a sphere with a lot of vertices. You can find the instructions for using
a Display modifier in Section 12.
The first object should be a lumpy shpere, something like the one shown
at the right, created using a Display Modifier. Start with a Mesh Icosphere,
and when you add the icosphere to the scene, set the number of subdivisions
to 7. (You can only do this just after adding the isosphere, in the
panel to the left of the 3D View window.) Using 7 subdivisions gives you
a sphere with a lot of vertices. You can find the instructions for using
a Display modifier in Section 12.
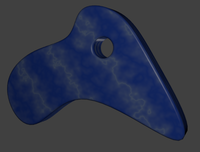 The second object should be made by creating a curve object with a hole cut out
of it and then extruding and beveling the curve. Apply a nice marble texture
to the object. An example is shown at the left. Your object does not have
to be exactly the same shape. The basic procedure is described in the notes:
Start with a NURBS curve, make it 2D, extend it by adding some points to one end
in Edit mode, close it by hitting ALT-C. While still in edit mode, add another
curve, such as a Bezier circle, scale it if necessary, and move it inside the original curve;
the two curves are considered to be one object, and the circle will cut a whole out
of the big curve. Use the extrude and bevel controls to extend the curve into
3D. Don't forget to add the material and texture!
The second object should be made by creating a curve object with a hole cut out
of it and then extruding and beveling the curve. Apply a nice marble texture
to the object. An example is shown at the left. Your object does not have
to be exactly the same shape. The basic procedure is described in the notes:
Start with a NURBS curve, make it 2D, extend it by adding some points to one end
in Edit mode, close it by hitting ALT-C. While still in edit mode, add another
curve, such as a Bezier circle, scale it if necessary, and move it inside the original curve;
the two curves are considered to be one object, and the circle will cut a whole out
of the big curve. Use the extrude and bevel controls to extend the curve into
3D. Don't forget to add the material and texture!
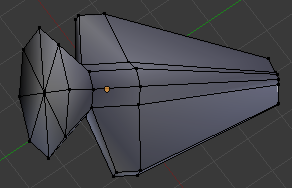
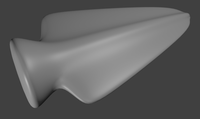 Finally, I would like you to make an object by extruding a mesh object and then applying
a Subdivision Surface modifier. In the example shown at the right, I started with
an eight-sided mesh cylinder. A mesh cube can also be a good place to start. Follow
instructions from the notes for extruding faces of the object. You do not have to try
to imitate my shape. Once you have a shape that satisfies you, apply a Subdivision
Surface modifier, with several subdivisions. Finally, you should hit the "Smooth" button
in the Object Tools panel to the left of the 3D View to get a completely smooth-looking
object. Here's what the extruded cylinder looked like, in edit mode:
Finally, I would like you to make an object by extruding a mesh object and then applying
a Subdivision Surface modifier. In the example shown at the right, I started with
an eight-sided mesh cylinder. A mesh cube can also be a good place to start. Follow
instructions from the notes for extruding faces of the object. You do not have to try
to imitate my shape. Once you have a shape that satisfies you, apply a Subdivision
Surface modifier, with several subdivisions. Finally, you should hit the "Smooth" button
in the Object Tools panel to the left of the 3D View to get a completely smooth-looking
object. Here's what the extruded cylinder looked like, in edit mode:
Your completed .blend file(s) for Exersise 2 and the three rendered images should be in your Blender work folder when you turn it in.
Exercise 3, October 18
As a final exercise, create a more complex object in Blender, made up of several sub-objects. Try to make it look at least a little like some real thing. It could be a snowman, boat, car, spaceship, house, flower, chair, clock, ... (If you don't want to try for realism, discuss your plans with me.)
Save your work in a file named Lab8-Ex3.blend, and make a rendered image of your object. You will probably want to use more than one light to get a good picture. You might want to have some ground for the object to stand on.
Your completed Lab8-Ex3.blend file and the rendered image that you make with it should be in your Blender work folder when you turn it in.