CS 424, Fall 2010
Lab 2: Introduction to GIMP
GIMP, the Gnu Image Manipulation Program,
is a free painting program that has many of the capabilities of the
commercial program, Photoshop. Gimp can be used both for creating images
from scratch and for modifying existing photographic images. This
lab is a basic introduction to some of the painting tools and other
features of the GIMP. The lab discusses GIMP version 2.6. I will
demonstrate Gimp in class on the day before the lab.
(GIMP, by the way, started as a student project in a graphics course...)
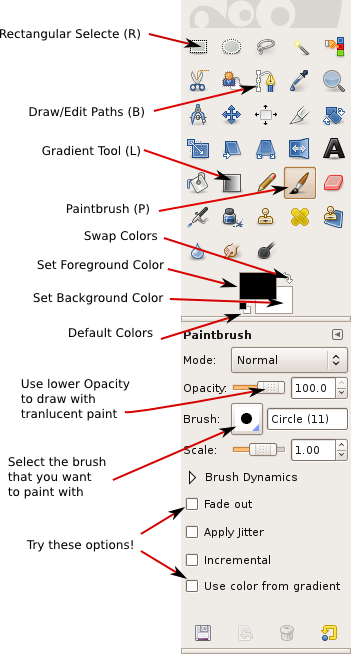 When Gimp starts, you will see several windows, including at least
an image editing window and the "Toolbox" window. The Toolbox is
shown at the right, with some of its features labeled. It has icons
for the various painting tools and for setting the foreground and
background colors. Below the icon area are the tool options for
the currently selected tool. In the actual toolbox, you can point
your mouse at an icon to see a tooltip description.
When Gimp starts, you will see several windows, including at least
an image editing window and the "Toolbox" window. The Toolbox is
shown at the right, with some of its features labeled. It has icons
for the various painting tools and for setting the foreground and
background colors. Below the icon area are the tool options for
the currently selected tool. In the actual toolbox, you can point
your mouse at an icon to see a tooltip description.
Gimp also displays an image-editing window, which will be empty if
you haven't yet created or opened an image. Note that closing the
image-editing window when it is empty will exit from the program.
Closing the Toolbox will also close the program. There is a menu
bar at the top of the image window. The same set of menus is available
by right-clicking on an image in the window.
In addition to image windows and the Toolbox, the Gimp has a multitude
of dialog boxes. Gimp will remember which dialog boxes you have open from
one run of the program to the next. The first time you run GIMP, there will
be a window that contains some of the important dialog boxes, including
the very important Layers dialog. You can also open dialogs in individual
windows. Some are in the "Windows" / "Dockable Dialogs" submenu.
Others are under the "Colors" menu.
To create a new image, use the "New" command
in the File menu. You will see a dialog box where you can select the
size of the new image. Use the "Open" command from the File menu to
open an existing image that you want to edit. To apply a painting tool
to an image, first click on the tool in the toolbox to select it, then
click or click-and-drag on the image. The Paintbrush is the
most basic painting tool. I suggest that you get acquainted with it.
To change the current foreground color or background color,
click on the color in the Toolbox window. When the Paintbrush is the
selected tool, you can change the brush
(that is, the "nib" on the brush that you are using) and other
properties of the Paintbrush tool in the tool options section of
the Toolbox.
You will need a couple of photographic images to work on for this
lab. You can use some of your own. Or, you might try downloading
images from the Wikipedia Commons, http://commons.wikimedia.org/.
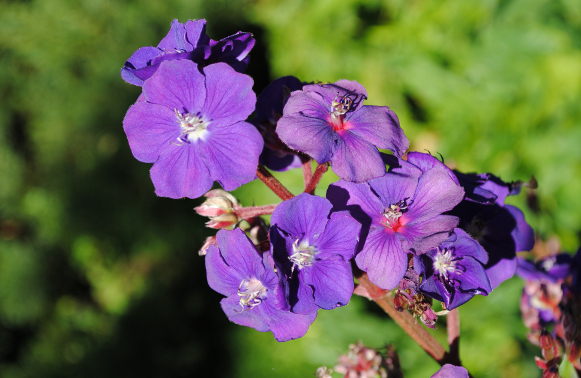
For example, I made the background image for this page from a
picture I got from http://commons.wikimedia.org/wiki/File:PurpleFlowerCluster.jpg.
That picture has been placed by the owner into the public domain. Other images from the commons might require
attribution or have other restrictions. Please respect the copyright owner's wishes.
But before trying to do anything serious with Gimp, you need to know
about layers and selections. Start by committing to memory
the golden rule of layers and selections:
When you
paint on an image or otherwise make any modification, the change applies
only to the current layer, which is hilited in the Layers dialog box.
Furthermore, if some region of the image is selected, then the change
is restricted to the selected region. For example, you can't draw or erase anything outside
the selection!
 Layers are images that
are overlaid, one on top of the next, to produce the image that you see.
The overlay works because of transparency. Some parts of a layer can
be transparent, allowing you to see the layer beneath it; in fact the
default color in a non-background layer is transparent. Also, a whole
layer can be set to be partially transparent. The Layers dialog
shows the layers in the current image. When you are working on an
image, you can make a new layer by right-clicking the Layers dialog
and selecting "New Layer" from the pop-up menu; the default settings
for the new layer are usually OK. The layers for the current image
are listed in the Layers dialog box, as shown at the right,
along with a tiny thumbnail of
the layer and an "eye" icon that you can use to hide and show the
layer. The opacity slider controls the transparency of the overall
layer. Suggestion: Open some image for editing. Add a layer and
draw on the layer. Try changing the opacity of the layer.
Try turning the visibility of the layer on and off. Try drawing
on the background layer while the top layer is visible.
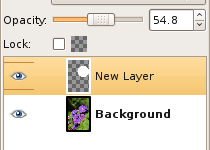
Layers are images that
are overlaid, one on top of the next, to produce the image that you see.
The overlay works because of transparency. Some parts of a layer can
be transparent, allowing you to see the layer beneath it; in fact the
default color in a non-background layer is transparent. Also, a whole
layer can be set to be partially transparent. The Layers dialog
shows the layers in the current image. When you are working on an
image, you can make a new layer by right-clicking the Layers dialog
and selecting "New Layer" from the pop-up menu; the default settings
for the new layer are usually OK. The layers for the current image
are listed in the Layers dialog box, as shown at the right,
along with a tiny thumbnail of
the layer and an "eye" icon that you can use to hide and show the
layer. The opacity slider controls the transparency of the overall
layer. Suggestion: Open some image for editing. Add a layer and
draw on the layer. Try changing the opacity of the layer.
Try turning the visibility of the layer on and off. Try drawing
on the background layer while the top layer is visible.
You also need to understand selections. They are perhaps the most important
tool in the hands of an experienced Gimp user. A selection is just a set of
pixels, such as a rectangular area -- except that in Gimp, a pixel
can be "partially selected." (For example, if you delete a selected region,
then fully selected pixels are converted to the background color while
partially selected pixels are converted to a blend of the background color
and their current color; only part of the pixel's color is deleted.)
When a region is selected, it is outlined with a moving dotted line.
Gimp has a variety of tools for creating selections. The rectangular selection
tool and elliptical selection tool are probably the most commonly used.
Some of them I don't even understand. Perhaps the most interesting option
is to create a selection by drawing a path with the Path tool, as I'll show below.
The "Select" menu has some commands for working with selections that you will
want to investigate. Suggestion: Try selecting an area; then use the Paintbrush and
note that you can only paint within the selection. Try "inverting" a selection.
Try the "Lasso" or "Magic Wand" selection tool.
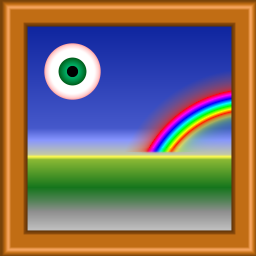 Try some of the other painting tools as well. The picture on the right, for example,
was made entirely with the gradient tool, using, for example, the "Square Wood Frame"
gradient with the shape set to "Square" and the "Radial Eyeball" and "Radial Rainbow
Hoop" gradients with the shape set to "Radial." The Gradient tool can be used for some neat
effects. The background image for this page was prepared from the original
with one application of the Gradient tool, with the foreground color set to white
and the "FG to Transparent" gradient selected. The "Clone" tool is pretty cool, and the
"Eraser" and "Smudge" tools are useful. If you use the "Text" tool, note that it places the
text in a new layer of its own, so that you can move the text around and go back
and edit it later.
Try some of the other painting tools as well. The picture on the right, for example,
was made entirely with the gradient tool, using, for example, the "Square Wood Frame"
gradient with the shape set to "Square" and the "Radial Eyeball" and "Radial Rainbow
Hoop" gradients with the shape set to "Radial." The Gradient tool can be used for some neat
effects. The background image for this page was prepared from the original
with one application of the Gradient tool, with the foreground color set to white
and the "FG to Transparent" gradient selected. The "Clone" tool is pretty cool, and the
"Eraser" and "Smudge" tools are useful. If you use the "Text" tool, note that it places the
text in a new layer of its own, so that you can move the text around and go back
and edit it later.
Once you are starting to feel comfortable with Gimp, you can start work on the
assignments that are listed on the rest of this page.
Assignments
A Course Web Site.
You should start a web site for the course to display the work that you
do for labs and assignments. You should exhibit your work, along with brief discussions
of what you have done. For Lab 1, for example, you should post the applet version
of your animation program. (When you post programs, you can post source code if you
want, but not until after the assignment is due.)
For this lab, you should post the images that you create and you should say
something about how they were created. To make your web site, you can copy
the folder webstart from /classes/s10/cs424 into the www directory
in your home directory. You should rename it to "cs424." This folder contains
a sample web site that you can edit and use as a model.
Click here
to see the sample web site. You are not required to use this folder. If you don't,
you should make sure that you have a folder named cs424 in your www directory,
and that the cs424 folder has an index.html file as its main page.
A Course Logo.
Use one of the commands in the "Files" / "Create" / "Logos" menu in Gimp to
create a logo for the course. When you select one of these commands, a box will
pop up where you can set some options, including the text of the logo. When
you save the image, use ".png" or ".jpg" as the file extension.
Note that the logo image that you create might have several layers. If so, you
will get a message when you save the image that the image must be "flattened"
or "exported" in order to save it in the specified format. Use the
logo on your web site, either on the main page or on your Lab 2 page.
The sample web site already has a bogus logo, which you should replace.
Here's another example that I made, using the "3D Outline" logo command:

Basic Color Mods.
Gimp has several tools for adjusting the colors in an image. You'll find them
in the "Colors" menu. For this exercise, you should apply the "Levels" tool
to a photographic image. Here is an example. I used "Levels" to adjust
the "Values" in the image on the left below, giving the faded image on the
right. You might do this, for example, to turn an image into a background
image for a web page.
Here is how I used the Levels tool to do this. While editing the
original image, I used the "Levels" command in the "Colors" Menu.
Here is part of the Levels dialog box:
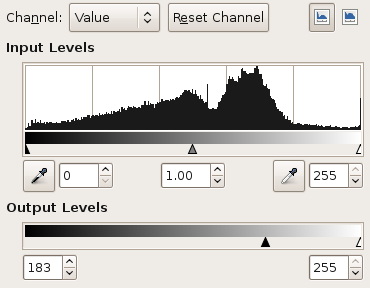
The "Input Levels" area shows data from the original image. The "Output
Levels" area shows how the input data will be mapped onto the data for
the modified image. In this case, I simply slid the small back triangle under
"Output Levels" to the right into the position you see here. This says that
input values between 0 and 255 are mapped onto output values between 183 and 255.
This means, essentially, that all the pixels become whiter.
By choosing different "Channels" in the dialog box, you can work on the red,
green, and blue components of the image separately. You can use this feature
to help you correct the colors in a photograph. As an exercise, you will do
a little magic on this
image
of purple flowers (right-click the image and save it onto your computer):
Open the image in Gimp. The objective is to turn the purple flowers pink,
without affecting the rest of the image. The first step is to select the
purple flowers. Recall that any operation that we apply to the image will only
affect the selected region.
To select the flowers, use the "Select by Color" selection tool. Set its
"Threshold" to be about 90. (It took some playing around to find this value.)
Click on one of the purple petals. This will select regions of similar color.
If you don't have exactly the selection that you want, erase the selection
(with "Select None" from the "Select" menu) and try clicking a different point.
When you are satisfied that you have selected just the flowers, proceed with the
next step.
Open the "Levels" dialog. First, let's reduce the blue components of the
flower's color. To do this, select the "Blue" Channel. Drag the small white
triangle in the "Output Levels" section about a third of the way to the left.
Now, let's increase the amount of red in the flowers. Go to the "Red" Channel.
Drag the small black triangle in the "Output Levels" section two-thirds or more
of the way to the right. Adjust until you are satisfied with the color.
Click OK -- until you click OK, the changes aren't permanent.
Save the image so that you can add it to your web site.
Note that this was an easy example because of the high color contrast between
the flowers and the rest of the image, which made it easy to make the selection.
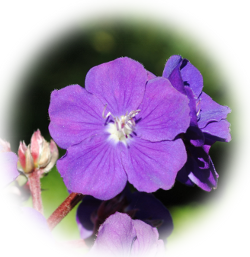 Working with A Selection.
Create an image like the one at the right, which has been cut out of a larger
image using a "feathered" selection. (Don't use the same Purple Flower image
that I did here!)
To do this:
Working with A Selection.
Create an image like the one at the right, which has been cut out of a larger
image using a "feathered" selection. (Don't use the same Purple Flower image
that I did here!)
To do this:
- Open a photographic image in Gimp.
- In the Layers dialog, right-click the Background layer and choose
"Add Alpha Channel" (if it is not already selected). This will allow you
to create an image with transparent sections.
- Make an elliptical selection containing the part of the
image that you want to cut out.)Note: After making the selection with
the Ellipse tool, you can adjust it by dragging the handles in the corners
or by dragging the selection itself.)
- Use the "Feather" command in the "Select" menu to soften the edge
of the selection. Feather the selection by about 40 pixels. This means
that instead of having a sharp boundary, the selection fades from fully
selected to partly selected to not selected over a distance of 40 pixels.
- Invert the selection, using the "Invert" command in the "Select" menu,
so that the outside of the ellipse is selected instead of the inside.
- Use the "Cut" command from the "Edit" menu to erase the selection.
- Draw a rectangular selection around the remaining image.
- Use the "Crop to Selection" command in the "Image" menu to discard the
part of the image outside the selected rectangle.
- Save the image in ".png" format (since jpeg doesn't support transparency).
Working with Paths.
You might wonder why Gimp doesn't have tools for drawing rectangles, ellipses,
or Bezier curves. In fact, it can draw these shapes, using "paths." A Path
in Gimp is an abstract object that can be saved, reused, and manipulated in
various ways. Paths are made up of line segments and Bezier curve segments.
The Paths dialog shows all the paths that have been created.
One of the things that you can do with a path is "stroke" it. When you stroke
the path you have the option of drawing a line of specified thickness along the
path or moving a paint tool along the path.
Given a selection, you can create a path representing the border of the
selection -- just make the selection, then use the "To Path" command in the
"Select" menu. Once you have a path, you can stroke it. For example,
To draw rectangle, create the rectangle as a selection, use the "To Path"
command. Turn off the selection (using the "Select None" command, for example);
otherwise, you can't draw outside the selected area. Go to the Paths dialog,
right-click the path that was created from the selection, and choose "Stroke
Path." This might seem like a strange way to draw a rectangle, but paths
and strokes are very versatile.
More interesting is the fact that you can create paths by hand. A path
goes through a series of points, which are called anchors. To create a path
consisting of line segments, just click at each desired anchor point. Then close the
curve, if desired, by control-clicking back on the starting point.
To make a smooth curve, when you click an anchor point, hold down and drag the
mouse. Control points will emerge from the anchor. Drag the control point to
the desired position and release the mouse. You can also drag an existing anchor
or control point. If you forget any of this, look at the instructions at the
bottom of the image window as you are working. You'll find a lot of other editing
hints there.
You can also convert a path into a selection. You can draw a path around an
object that you want to select, editing it to get it exactly right, at magnification
if necessary. You can convert the path into a selection by right-clicking the path
in the Paths dialog and selecting "Path to Selection." You can then cut out the
selected object or apply some image-editing operation to it.
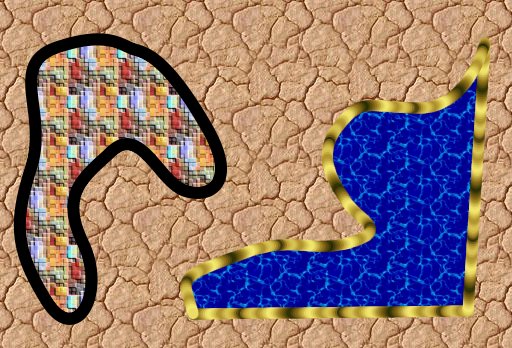
Below is a rather useless picture that I made using paths and the Bucket Fill
tool. I created the path on the left first. In the Paths dialog, I right-clicked
the path and chose the "Path to Selection" command to make a selection with the
same shape as the path. I then used the Bucket tool, set to "Pattern Fill"
and "Fill Whole Selection" to fill the inside of the path with a pattern.
I then inverted the selection and filled the outside of the path with a different
pattern [I could have filled the whole image with this pattern in the first place].
Back in the Paths dialog, I right-clicked the path and used the "Stroke Path"
command to draw the black border along the path. The shape on the right
was similar, but in this case, I set the Paintbrush tool to "Use Color from Gradient",
selected the "Golden" gradient, and stroked the path using the Paintbrush tool.
You should create an image that uses one or more stroked paths. It doesn't have
to be fancy. You might also want to use paths to cut out an object from another
image and paste it into your picture.
Freedom.
Create an image from scratch using Gimp. Not just scribbles -- try to make it nice.
Maybe make it look like something. Use several different tools, including the gradient tool.