CS 424: Computer Graphics, Spring 2012
Lab 2: Basic 2D Drawing in WebGL
Welcome to our first lab on WebGL. In this lab, you will do some two-dimensional drawing with WebGL. In the first exercise, you will use most of the WebGL "primitives" for drawing basic shapes. The second exercise is about change of coordinates and varying variables, and it will force you to do a bit of tinkering with a WebGL shader program. For the third exercise, you will simply draw an original image using WebGL.
This lab is due at the beginning of next week's lab. You should post your solutions to the exercises to your Web portfolio before then. Remeber that it should be easy to find your work through links on the main page of your portfolio.
Getting Started
Although you are not required to use Aptana Studio for writing web pages, I suggest that you at least try it out. It is based on Eclipse, so many features of the environment will be familiar to you. Start it up by selecting "Applications" / "Other" / "Aptana Studio 3" from the sytem menu. By default, Aptana has an "App Explorer" view on the left edge of its window. I prefer to use the "Package Explorer." If you want to do the same, just close the "App Explorer" by clicking on the small "×" next to its name. To start a project in Aptana, use the "New" / "Web Project" command. To add a new file to the project, right-click the project name and select "New" / "File". You can add a new folder to the project in a similar way. To copy existing files into the project, you can use copy-and-paste from the file system in the usual way. If you are editing an HTML file, you can click the Run button to open that file in Firefox. If you make changes to the file after that, it's easiest just to use Firefox's Reload button to see the modified version of the file. (If you don't like Aptana's default black-background theme, ask me how to change it.)
For this lab, you will need copies of the files simpledraw.html and coordsAndColors.html. from /classes/cs424/lab2-files. You can copy and paste them from that directory into your Aptana project.
As you work on your web pages, I sugges that you keep the Firefox "Web Console" open. You can open it with the command "Tools" / "Web Developer" / "Web Console" from Firefox's menu. Note that in JavaScript programs, during debugging, you can use console.log(message) to write message to the Web Console. In particular, when working on the exercises for this lab, you might want to put
console.log( "WebGL Error: " + checkWebGLError() );
at the end of the draw() function. This command will check for WebGL errors and report any error to the console. If no WebGL error has occured, the output will be "WebGL Error: null". In many cases, WebGL will simply fail silently when an error occurs, and you have to explicitely check for the error to find out that it happened. The function checkWebGLError() is not standard; it is defined in the files that I have provided. Please read the comment on this function for more information about what it does.
Exercise 1: Drawing Primitives
The file simpledraw.html is our first example of drawing with WebGL. It uses the default WebGL coordinate system, in which x extends from −1 on the left to 1 on the right, and y extends from −1 at the bottom to 1 at the top. It draws three primitives: a triangle drawn using gl.TRIANGLES, a rectangle drawn using gl.TRIANGLE_FAN, and the outline of the rectangle drawn using gl.LINE_LOOP with line width set equal to 3 pixels. Recall that the remaining primitives are gl.TRIANGLE_STRIP, gl.LINES, gl.LINE_STRIP, and gl.POINTS.
This example uses the minimal shader program that we looked at in class, which allows primitives to be drawn in two dimensions using a uniform color for each primitive. For demonstration purposes, it also uses alpha blending and has a checkbox to enable/disable that feature. It defines a function
function drawPrimitive( primitiveType, color, vertices )
for drawing individual primitives. WebGL has no primitives for drawing circles, but a circle can be approximated by a regular polygon with a large enough number of vertices. The sample file defines but does not use the function
function makeCircleVertices( centerX, centerY, radius, vertexCount )
which creates an arry of vertex coordinates for points evenly spaced along a given circle. The number of vertices that you need to approximate a circle depends on the size of the circle, but 64 vertices should be adequate. (The comments on the definitions of these functions give complete explanations of the parameters)
Your first exercise for this lab is to replace the body of the draw() method in simpledraw.html with code that will draw the following picture, including the black border:
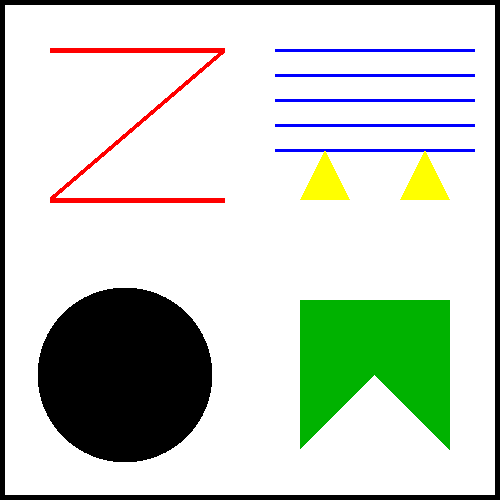
Draw the picture using each of the seven kinds of primitive except gl.POINTS exactly once. (Points are a little harder to work with. You'll encounter them in a later lab.) Use six calls to the drawPrimitive() function. (You have to use gl.TRINAGLE_STRIP for one of the shapes, even though gl.TRIANGLE_FAN would probably be easier.) Note that you will also have to use gl.lineWidth() and makeCircleVertices(). The border of the picture is one of the primitives. The background color of your picture should be white. (You don't need to use alpha blending for this exercise.)
Exercise 2: Varying Variables and Coordinate Transforms
The file coordsAndColors.html is a modified copy of simpledraw.html that introduces a coordinate transformation to the drawing process. This feature allows you to draw using a different range of coordinates, instead of WebGL's default -1 to 1 coordinate range. Coordinate transformations are not built into WebGL. They have to be programmed using a combination of JavaScript and code in the shader program.
A "transformation" is represented mathematically by a matrix. In this case, a 3-by-3 matrix, of type mat3, is defined as a uniform variable in the shader program to represent the transformation. The JavaScript function
function setCoordinateTransform(xmin, xmax, ymin, ymax, ignoreAspect)
is used to set up the coordinate system that you want to use for drawing. (The implementation of this function just sets the value of the matrix uniform variable in the shader program to an appropriate matrix to carry out the transformation.) After calling this function, you can use x-values in the range xmin to xmax and y-values in the range ymin to ymax, instead of the default -1 to 1 range. In coordsAndColors.html, the function is called in the draw() function as setCoordinateTransform(-1,3,-1,0.5,true);. Other than that, the draw() method is exactly the same as in simpledraw.html; the picture is different becasue the range of coordinates shown in the two pictures is different. (The fifth paramter to setCoordinateTransform has to do with the aspect ratio of the picture; read the comment on the function for more information.)
For the second exercise of the lab, you will introduce one more new feature to coordsAndColors.html, and you will then use it to draw the following picture:
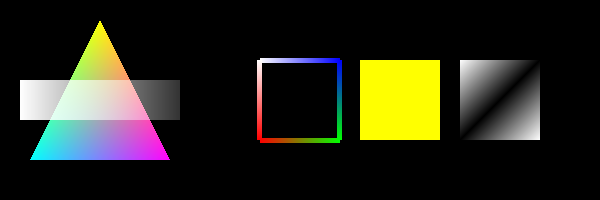
In this picture, primitives do not necessarily have a uniform color. Instead the color can vary from point to point in the primitive. In WebGL, this is implemented using a varying variable in the shader program. To implement this feature, you will have to modify the vertex and fragment shader source code, and you will have to add some JavaScript code.
For your first adventure in modifying shader code, here's a guide to the steps that you need to take to implement color as a varying variable instead of a uniform variable:
- The color uniform variable in the fragment shader source should be changed from uniform to varying. You also have to define color in the vertex shader source, using exactly the same declaration as in the fragment shader.
- Since you want to be able to specify a color for each vertex of a primitive, you need to have an attribute variable in the vertex shader to represent the color specified for the vertex. Add the declaration attribute vec4 vertexColor; to the vertex shader source.
- The vertex shader must assign a value to the varying color variable. In this case, it can simply assign vertexColor to color.
- That completes the modifications to the shaders. At this point, you should run the web page to test whether the shader programs can be compiled without error. If an error occurs during compilation, the error will be reported in an alert dialog. (The program won't draw anything except for the black background, since the drawing code doesn't take the shader changes into account. But a JavaScript syntax error might also cause the program to fail silently, so you should also check that there were no such errors. Check the Web Console. But also note that the canvas will be red rather than black in this case, since not even the black background will be drawn.)
- On the JavaScript side, the WebGL program needs references to all the attribute and varying variables in the shader program. You have deleted one uniform and added one attribute. To account for this, delete the declaration of the variable colorUnifromLocation near the top of the script, and replace it with a declaration of colorAttributeLocation. This variable will be a referenece to the vertexColor attribute in the shader program. Now, find the line in the init() method near the bottom of the script that assigns a value to colorUniformLocation, and replace it with an assignment to colorAttributeLocation. The value of colorAttributeLocation can be obtained as gl.getAttribLocation(prog,"vertexColor").
- Now, you need a buffer for the vertexColor attribute. A buffer is memory that is
use to transfer data from the JavaScript program to the shader program. The following two lines
in the init() method create the buffer for the vertexCoords attribute and enable
the used of that buffer:
    vertexAttributeBuffer = gl.createBuffer();
    gl.enableVertexAttribArray(vertexAttributeLocation);
Declare a similar variable and add similar lines to init() to create and enable the buffer for the vertexColor attribute. - Finally, you should modify the drawPrimitive() function to make it work with all the changes that you have made. One of the parameters to this method is color, which specified the uniform color of the primitive. Now that vertex color has become an attribute, that parameter will have to become an array that specifies one color for each vertex. The parameters will be an array of numbers with four numbers in the range 0.0 to 1.0 for each vertex. Look at the body of the function. It is the last line of the function that actually draws the primitive. The first three lines set up the values for the vertexCoords attribute, and the fourth line was there to set the value of the uniform color variable. You should delete the fourth line and replace it with three lines that will set up the values for the new vertexColor attribute. The lines that you need are similar to the first three lines. (The second parameter of gl.vertexAttribPointer specifies the number of numbers per vertex in the array. For the vertex coordinate attribute, it's 2; for the vertex color attribute, it should be 4.)
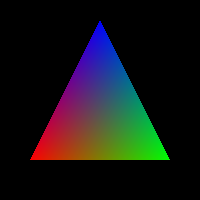
You will also need a new draw() method. Any calls to drawPrimitive() in that method must provide enough data for the color attribute. As an example, the following commands draw the classic color triangle example, shown at the right, in which the colors of the three vertices are red, and green, and blue:
setCoordinateTransform(-1,1,-1,1);
drawPrimitive( gl.TRIANGLES,
              [   1,0,0,1,  0,1,0,1, 0,0,1,1 ],
              [ -0.7,-0.6, 0.7,-0.6,   0,0.8 ] );
Once you have everyting working, you can work on the rest of the exercise, which is to draw the image shown at the top of this section. You should change the size of the canvas to 900-by-300 or 750-by-250, and you should use a coordinate system that will make it easy to draw the required primitives. Note that the above picture was drawn with alpha blending enabled. For the rectangle drawn over the triangle on the left, only the alpha component of the color varies, from 1.0 for the two vertices on the left to 0.2 for the two vertices on the right. If the picture is drawn with alpha blending disabled, the rectangle will be solid white.
Exercise 3: Make a Picture
Now that you have the basics of two-dimensional drawing in WebGL, you can do the obvious first drawing assignment: Draw a picture.
Starting with a copy of your solution to Exercise 2, delete the drawing commands from the draw() method and substitute commands for drawing a picture of your choosing. Something that looks vaguely realistic would be best. (Snowmen, houses, sailboats, and rockets are perennial favorites.) But something abstract would also be OK, as long as it is sufficiently artistic. Grading will be based partly on originality, ambition, and appearance.
Note: You will probably find it painful to draw uniformly-colored primitives with the setup from exercise 2, since you have to provide a color for each vertex even if the colors of all the vertices are the same. In class, we'll discuss some ways around this problem.)