CS 424: Computer Graphics, Spring 2012
Lab 8: Blender Sequencer
In this lab, you will use the Blender sequencer to put several animations and images together into a single video, with transition effects between segments of the video. I demonstrated how to do some of this in class on Monday. During the lab period, you should do the tutorial section at the end of this lab sheet, and you should show it to me. You should then try adding some additional animations to the completed tutorial.
You will need access to several animations and images to use with the sequencer in this lab. You can find the animations and images that I used for my example in the directory /classes/cs225/sequencer. I added a few extra images, the final animation, and the Blender file that I used. There is another blender file, animated_text.blend, that you will use in the tutorial. You can use the animations directly out of this directory; you don't have to copy them. (However, you might get better performance if you copy the whole directory into the /tmp directory on your local machine.)
This lab will not be graded. You will use what you learn in this lab to complete your Blender project, which is due on Friday, April 13. The project should be a short video created using the Blender sequencer. It can be made up of shorter animations that you created for Lab 7. It can use other animations and still images that you create using Blender, and it can use images (but not animations) from other sources as well. The video should include some kind of animated title or credits at the beginning or at the end. You should use some transition effects between segments of the animation. On your web site, you should post some still images from the animation. I will ask you to give me a copy of the completed animation, but you should not necessarily post the full animation on your web site. (We can discuss that after we see how large they are.) The video should be at least one minute long, preferably longer.
Setup
You can work with the Blender sequencer in a fresh Blender file or in one that already has one or more scenes. If you use an old file, you should create a new scene to use for the sequencing work, so that you don't confuse the sequencer settings with the settings for the scene. (To create a new scene, go to the Scene menu at the top of the Blender window. Click the "+" near the right end of the menu, and choose "New" or "Copy Settings" from the pop-up menu. The Copy Settings command will copy things like render and animation settings from the current scene to the new scene.) For the Tutorial section of the lab, you will start with a copy of an existing Blender file and create a new scene using Copy Settings.
Before starting work with the sequencer, set up the render output settings that you want to use (if they were not already copied from another screen). This is done in the Render buttons, selected by clicking the small "camera" icon in the properties panel. For example: Under "Resolution", set X to 400, Y to 300 and the percentage to 100%. Near the bottom of the Render buttons, set the "Output" format to AVI JPEG. Also, you might change the output destination, which is "/tmp/" by default. You can try other sizes and output formats, but I have found only AVI JPEG to be really reliable. And setting the resolution too high will produce a really big file!
Then, it's time to switch to the Blender sequencer screen. Click the icon on the left end of the Screen menu, at the top of the Blender window. Select "Video Editing" from the pop-up menu. This will switch the interface over to the sequencer. Click here for a screen shot of a Blender window showing the sequencer being used to create the video that I showed in class.
Note that when you use an image or animation in the sequencer, the sequencer only stores the location of the animation or image file, not the contents of the file. If you move the .blend file to another machine, it won't be able to find the files unless you also copy the files that it uses and make sure that they are still accessible under the same names. For my example, I had the animations in the same directory as the .blend file, and I used relative path names to the animations. (Relative path names in Blender start with "//".)
Images, Scenes, and Movies
The most important part of the sequence editor is the Video Sequence Editor -- the horizontally striped panel in the bottom half of the window. It's here that you put together the pieces of your video. From left to right, the Sequence Editor is a timeline for the video. The time is shown, in seconds, along the bottom of the editor. Vertically, you stack up animations and other items that are part of the video. Here is a section of the screen shot showing several items stacked up in the sequence editor:
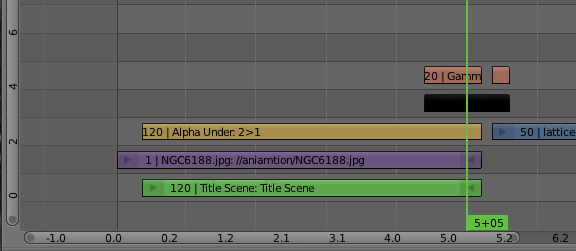
The items are called strips. Each strip extends over some number of frames from left to right, showing the part of the video during which the strip is active. Several strips can be active at once. They will be "stacked up" in the rendered output as well. Ordinarily, this would mean that the top strip will hide the ones under it, but you can make strips translucent, and you can apply various effects that combine the two strips in more complicated ways.
You can select a strip by right-clicking it, and then drag it using the "g" key, just like you would anything else in Blender. You can move it up or down to a different level, and you can move it left or right in the timeline. You can also click the arrow at the left or right end of the stip and drag that separately, which will change the length of the strip.
Use Shift-A (or the "Add" menu at the bottom of the window) to add an item to the sequence editor. There are five different types of strip that you can add. I won't talk about Sounds (although they work similarly to the other types), and we'll get back to Effects in the next section. The other three types are:
- Scene -- This refers to one of the scenes in the Blender file that you are editing. The scene should be an animation that has its own Start and End frame already set. That scene will then be rendered into the video, and its default length will be the number of frames between Start and End. The only problem with this is that rendering the video now requires rendering each frame of the scene, which can take a very long time. On the other hand, when you include pre-rendered animations in the sequencer, the rendered video can be produced very quickly.
- Movie -- This refers to a pre-rendered animation. It can be an AVI JPEG or some other video format supported by Blender. You can use animations that you have previously rendered in Blender.
- Image -- This usually means a single still image. The image will be part of the video for some number of frames, depending on how long the image strip is in the sequencer. You can change the length by dragging the arrow at either end of the strip. You can also add a sequence of images, such as a group of individual frame images produced when you render an animation in JPEG or PNG format. (One reason to do this is that you can use an RGBA format for PNG images, including transparency.) In this case, each image in the sequence occupies one frame. In the Blender file chooser, you can select multiple files by dragging the mouse over their file names, and you can hit the A key to select all the files in a directory.
You can then drag the green line in the video editor and watch a preview in the upper right part of the window. You can scale the entire video editor using the mouse scroll wheel. (You can do the same with the preview pane.) You can also drag the contents of the video editor using the middle mouse button. When you are working on a long video, you will want to use drag and scale to move the part of the video that you are working on into view.
Effects
The "Effect Strip" submenu of the sequencer's Add menu can be used to add effects to the video. The simplest effect is a "Color", which simply represents a solid wall of color for a certain number of frames. You could, for example, use a black Color effect for several frames between segments of the video, to black out the screen between those segments. (Colors are more interesting when combined with other effects.)
Try adding a Color strip to the sequence editor. After doing so, and while the color item is selected, look in the Properties panel to the right of the sequence editor. Look for the section labeled "Effect Strip." This section is present when an effect strip is selected, and it allows you to set properties of the effect. In the case of a color strip, you can change the color by clicking the color patch labeled "Color." The default color is black, which is probably the most common.
All the other effects act on one or more existing strips. Some effects, like "Glow" modify a single strip. Before adding such an effect, you must select the strip to which it will apply. The effect strip will be tied to the strip to which it applies -- you can't move or change the length of the effect strip independently.
Some effects apply to two items that overlap in time. To apply such an effect, you must first select two overlapping strips: Right-click one, then shift-right-click the other. In many cases, the order in which they are selected matters. The effect will apply only to the time period where the two strips overlap. We are mostly interested in Alpha Over, Alpha Under, and the "transition" effects, Gamma Cross and Wipe.
The "Alpha Over" and "Alpha Under" effects allow the alpha component of a strip to be applied, to blend it with another strip. To use them, select two existing strips, then add the effect strip. They are actually equivalent (I think): use Alpha Under if you click the strip with the alpha component first, and use Alpha Over if you click the strip with the alpha component second. In my example, I used Alpha Under to combine a scene with an image. Since the scene had no background color, it was transparent except for the text object in the scene. The effect of the Alpha Under was that the text object was drawn over the image.
Transition effects are used on two strips that only partly overlap, to provide a transition from one strip to the next over the course of several frames. A Gamma Cross transition gradually blends in more and more of the second strip to the first strip. You can use a Gamma Cross from one strip to a black Color strip to make the picture fade to black. A Wipe replaces part of one image with an increasingly large part of the other image until only the second strip is showing. When you apply a Wipe, you should check the "Effect Strip" section of the Properties pane; you will find a pop-up labeled "Transition" where you can select the type of wipe that you want to use, such as "Iris", "Single", "Double", and "Clock." Try them all!
Note that you can apply transitions to effect strips. For example, you can do a gamma cross from an Alpha Under strip to a Color strip.
Tutorial
Get a copy of the file animated_text.blend from /classes/cs424/sequencer. This blender file defines an animation of some text moving across the screen. In this tutorial, you will see how to add this animation on top of an image, along with some other effects. In this file, I have set the size of the output to 400-by-300, the output format to AVI JPEG, and the output destination to //title_exercise (which will put the output file in the current directory). I set the End frame for animation to 100. And I set the "Horizon" color in the World settings to be pure black so that the background behind the text will be completely blank.
Open animated_text.blend in Blender. To work with the sequencer, you should use a new scene. Use the Scene menu at the top of the Blender window to create a scene. In the pop-up menu, select "Copy Settings" so that the animation and render settings from the original scene will be copied to the new scene. Once you're in the new scene, use the Screen menu to go to the "Video Editor" screen.
To add a new item to the sequence, you can use the "Add" menu at the bottom of the window. Alternatively, you can hit SHIFT-A while the mouse is over the sequence editor.
Start by adding an image. You can use one of the images from /classes/cs424/sequencer. Once you've selected the image, you will see a "strip" in the sequence representing the image. It will be selected. Hit the "G" key to grab it, and move it where you want it. Position the image strip so that the left end of the strip is at frame 1. While the strip is in grab mode, the start and end frames are shown at the end of the strip, to help you position it exactly.
An image strip lasts, by default, for 50 frames. In this case, I want the image to stay around for 110 frames. Select just the right end of the image strip, by right-clicking it, use the "g" key to put it into grab mode, and move the right end of the strip to frame number 110.
When the animation starts, I would like to see a fade-in from black to the image over the course of the first 10 frames. Add a "Color" to the sequence from the "Effect Strip" submenu of the Add menu, and position the color strip to start at frame 1. Move the right end of the Color Generator to frame 10.
Now, we want to arrange the "gamma cross" from the black color strip to the image strip. A "gamma cross" is an example of an effect that acts on two strips. Select the color strip by right-clicking it, then shift-right-click the image strip to add it to the selection. Use the "Add" / "Effect Strip" / "Gamma Cross" command to add a cross to the sequence. The Gamma Cross strip must be positioned above the color generator and image strips; the topmost strip controls what is actually rendered. The order in which you selected the strips is important: The crossover starts with the first item selected and ends with the second item. You can drag the vertical green line through the first 10 frames to see what the cross looks like.
Next, add the text animation to the sequence. This animation is in another scene in the Blender file. To add this scene to the sequence, use the "Scene" option in the "Add" menu. You will have to select the scene that you want to add from a submenu-- the one you want is just named "Scene." Position the scene strip starting at frame 11. It will end in frame 110. The scene is 100 frames long because the start and end frames for that scene were set to 1 and 100.
Between frames 10 and 110, there are two strips, the image strip and the scene strip. You have to say how to combine these; otherwise, just the top one will be rendered. Combine them with an "Alpha Under" effect: Right-click the scene strip, and shift-right-click the image strip to add it to the selection. Then add an "Alpha Under" effect. The image will be shown under the scene and the scene is considered to be transparent where there is no geometry, that is, where the background shows. That is, you should see the text rendered on top of the image. (If you don't, maybe you selected the strips in the wrong order?)
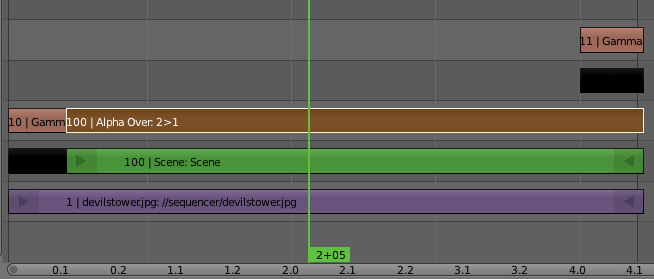
Finally, I'd like the movie to fade to black during the last ten frames. Add another black color generator, extending from frame 100 to 110, or simply duplicate the one that you already have using Shift-D. Add a Gamma Cross from the new color strip to the Alpha Under strip. The sequence editor at this point should look something like this, except that your strips don't have to be in the same vertical positions:
You can use the play button at the bottom of the window to play a preview of the movie. (Change the End frame for the animation to 110.) You could also render the movie, if you want. Show me your animation, playing as a preview in the Blender window. Then, try adding some existing animations to your movie, after the title sequence. And try using "Wipe" transitions between the animations.
(Note: It's not usually a good idea to use a Scene strip in the sequencer, as you did in this tutorial, since every frame of the scene has to be rendered when you render the movie. It's a better idea to render the scene to get an animation file, and add that to the sequencer. I used a scene in this exercise only so that I could use the Alpha Under effect to add the text to an image. If I had saved the scene as an animation, the background would not have been transparent, and Alpha Under wouldn't have worked. An alternative would have been to render the text animation as a set of separate PNG images, using RGBA output. By the way, you can add text over an animation just as easily as we added the text in this example over a still image, by using a movie strip instead of an image strip.)