CPSC 441, Fall 2014
Lab 1: A Server in VirtualBox
You will also get your first experience with the "packet sniffer" program, Wireshark. There are a few exercises in that part of the lab. You should write responses to those exercises to be turned in next week.
Wireshark
Don't start Wireshark now! You can run it while waiting for things to happen during the server installation below and when the installation is complete.
Wireshark is a packet sniffer. That is, it intercepts every network transmission that is seen by the computer on which it is running, and it displays information about them. We will use Wireshark in several labs. For now, you will mostly just play with it to see how it works, but there are three exercises for you to turn in next week.
When you start Wireshark, the first screen asks you to select an interface to be monitored. Click "eth0". Then click "Start". Wireshark will start collecting packets and will continue until you click the "Stop" button. The packets are displayed as they are collected. The display window will have three parts. I suggest that you expand the sizes of the top and bottom sections by dragging the dividing lines. It will look something like this:
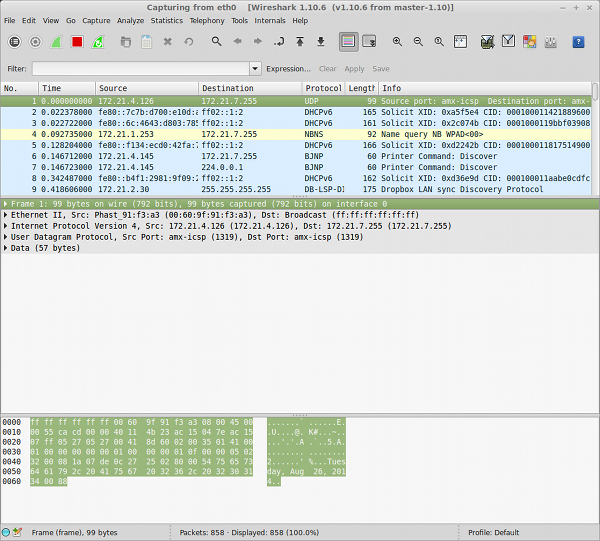
The top section lists all the packets that have been sniffed. The middle section shows information about one selected packet in mostly human-readable form. The bottom section shows the raw content in hexadeximal and ASCII. The "Stop" button is the red square near the top of the window. The shark fin next to it is a "Start" button.
There will be a lot of packets. Above the list of packets is a "Filter" box that can be used to filter the list of packets so that only those matching the filter are displayed. You have to type in a filter and then click "Apply." Here, for example, are a few filters that you might find interestion. Don't forget to click "Apply" after typing in the filter!
- not ip -- See how much network traffic does not use the Internet Protocol.
- ip and not tcp -- See how much IP network traffic does not use TCP.
- ip and not tcp and not udp -- See how much IP network traffic does not use either of the major IP protocols, TCP and UDP.
Now for the actual exercises. You should write up your answers as essays (using complete sentences and paragraphs).
Exercise 1. Open a web browser. Start a new capture session in Wireshark. (If one is in progress, stop it and start a new one.) In the web browser, go to a web site that you haven't visited recently (for example, www.cornell.edu). You can stop the capture after the page is loaded. Set the capture filter to http and tcp.port==80 and click "Apply". This will show ordinary traffic for the web protocol http. Select a couple of the of the packets and browse through the data for those packets. In a fairly long essay, discuss how the Wireshark packet information display reflects the five layers of the Internet protocol stack (application, transport, network, link, and physical).
Exercise 2. Remove http from the Wireshark filter so that it reads tcp.port==80 and click "Apply". This will show all packets for port 80, not just those that are part of the HTTP protocol. This will include that packets seen in the first exercise, plus some more. In a short essay, describe the extra packets, and try to guess what they are for.
Exercise 3. Change the Wireshark filter to read dns and click "Apply." You will see packets for the Domain Name Service protocol. At least one DNS "query" should have been generated when you loaded a web page. (If you don't see any DNS queries, try a new capture.) DNS is a relatively simple protocol, and you should be able to learn something about what it does and how it works just by browsing the information in the DNS packets. Write a short essay discussing your observations and conclusions.
A Virtual Server
VirtualBox is a free program that is available for Linux, Mac, and Windows. It can be used to create and run simulated computers known as virtual machines. The virtual machine is called a "guest," and the main computer, which is running the virtual machine in VirtualBox, is called the "host." A virtual machine can have its own operating system and network connections. For its display, it can use a window on the host computer. For its hard drive, it uses a single large file on the host, but the guest sees that file as a complete disk.
I would like you to use VirtualBox to create a Linux server on which you will have administrative privilege, so that you can do things on the virtual machine that you can't do on the lab machines. You will create the virtual machine on one of the lab machines. Since there is not room on our network file system for the virtual machines hard disk file, you will have to store the virtual machine locally on the lab computer, and it will only be usable on that one computer.
It's time to create your virtual machine! Start up the VirtualBox program. You can find it under "Accessories" in the Start menu.
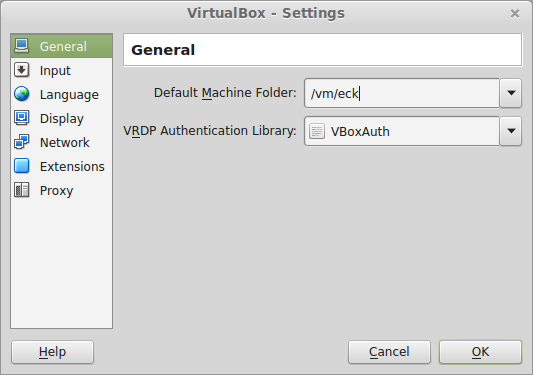
VERY IMPORTANT: Before you do anything else, open the VirtualBox preferences, and change the "Default Machine Folder" to /vm/something. The folder must be inside the directory /vm. The name of the folder can be anything, but use something that will identify you, such as your username or last name. If you forget to do this, you won't be able to complete the creation of the virtual machine because you will run out of space in your home directory. The preferences dialog will something like this:
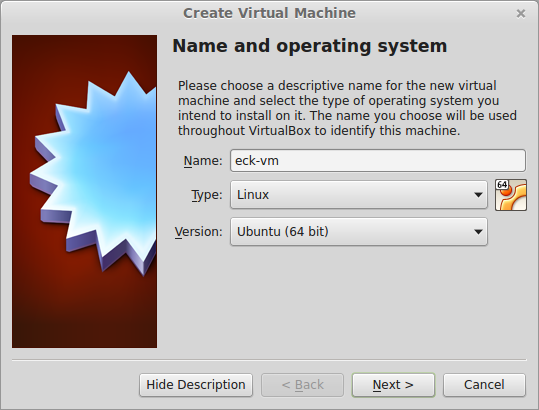
After closing the preferences dialog, click the "New" button in the upper left corner of the VirtualBox window. You will have to go through several dialog boxes. In the "Create Virtual Macine" dialog, set the "Name" to anything you like, and set the "Type" and "Version" as shown here, and click "Next":
In the next dialog box, you set the amount of RAM that is available to your virtual machine. The virtual machine will use a block of RAM of this size in the host computer's RAM. The default is 512MB. You can increase the size to 1024MB or 2048MB. Then click "Next."
You will then go through three more dialog boxes for creating the virtual hard drive for your machine. You can accept all the defaults and just click "Next" each time. (You might want to increase the size of the hard disk from 8GB to 16GB.)
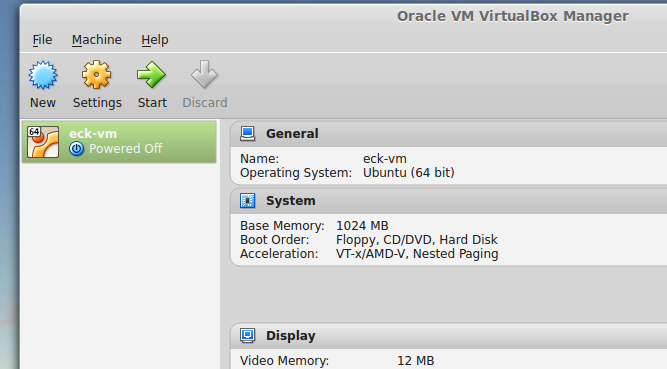
At this point, the virtual machine has been created, but it has an empty hard drive with no operating system. The next step is to install an operating system. You will install Ubuntu Server 14.04. An ISO of the installation CD is available on the lab computer. Your virtual machine should be shown and selected in the VirtualBox window. Click the "Start" icon in the VirtualBox window:
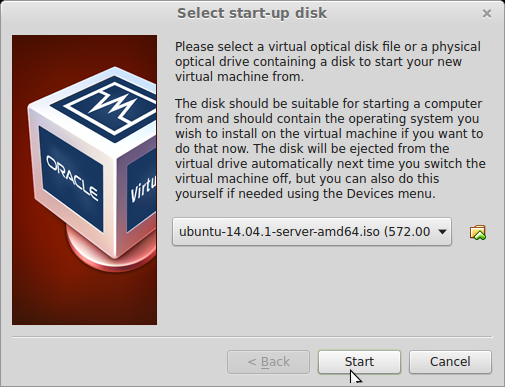
On the first startup, VirtualBox asks you to select a start-up disk from which the operating system can be installed. You will use the Ubuntu installer ISO, which can be found in the directory /iso. To use it, click the little folder icon next to the disk name. This will let you browse to the /iso directory and select the .iso file. After it is selected, click "Start":
The virtual machine will start up. You will see its display in a window. The Ubuntu install will run in the virtual machine. The installer is text-based, and you interact with it using only the keyboard.
The installer will go through a series of screens. Many of them ask you for input, but on most of those you can just press return to accept the default. Some of the steps will take a while (possibly quite a while if the network is slow).
For the first six screens, you can just press return. However, after that, you will have to enter a "host name" for your server and a username and password for your user account on the server. These can be anything you like—but be sure to remember the user name and password! When you get to the "Partition Disk" screen, you should hit up-arrow to change the setting to "Guided -- use entire disk":

When you get to the installation summary, move the selection from "No" to "Yes" and press return. When asked about a "proxy", leave it blank and press return. The installation to the virtual hard disk proceeds and will take some time.
After doing the basic installation, you get to a "Software Selection" screen. For now, you should install "OpenSSH Server" and "LAMP server". The OpenSSH server will allow you to log in to your server remotely. The LAMP server includes an Apache web server and a MySQL database server. Use the arrow keys to move between lines and the space key to select an item:
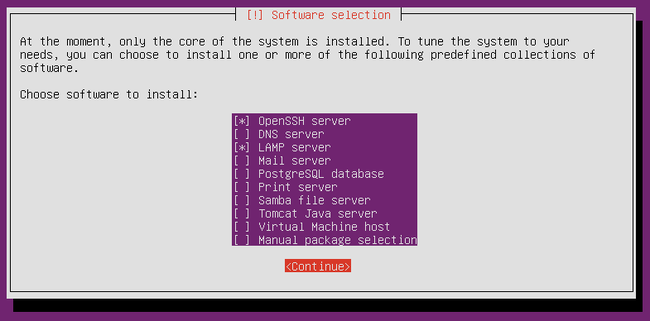
After selecting the two items, press TAB to move the selection to "Continue" and press return. You will be asked for a password for MySQL.
Again, the installation will take some time. After it finishes, accept a couple more defaults and the server will reboot. It will boot into Linux, with a command-line interface but no GUI.
Log in, using the username and password that you set up during installation.
It's a good idea after you install to apply any available updates. It will also be useful to have an easier-to-use editor, so you should install nedit (and xorg which provides basic GUI support). To do this, use the following sequence of commands:
     sudo  apt-get  update
     sudo  apt-get  upgrade
     sudo  apt-get  install  nedit  xorg
The first command gets the most recent lists of available software. The second gets any available new versions of installed software. The third installs the software packages named nedit and xorg. Once again, the installation will take some time. (The sudo command allows you to run a command as administrator. You will be asked to enter your password. The password is valid for a few minutes, so if you use it for several commands in succession, you will only be asked for the password once.)
Better Networking
The network configuration for your virtual machine will have to be changed. Use the command ifconfig in your server to see its network configuration. It will look something like this:
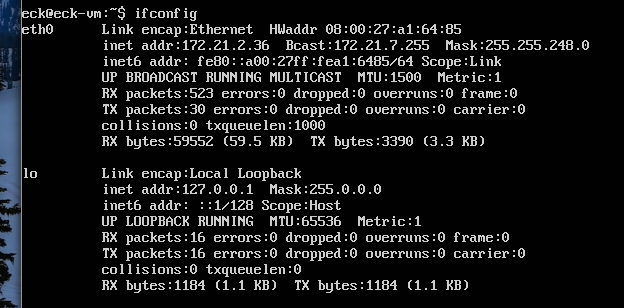
Your server already has an IP address, shown on the second line next to "inet addr." The address was assigned by VirtualBox and is inaccessible to anyone else. To fix this, you have to first make a change in the VirtualBox machine settings. For that, the machine can't be running. Shut down your server with the command:
sudo poweroff
This runs the poweroff command with administrative privilege.
After the machine shuts down, click on "Network" in the VirtualBox window. This opens up a network settings dialog. You want to change the "Attached to" setting from "NAT" to "Bridged Adapter", then click OK:

This means that your server will be visible on the campus network, just as if it were an actual computer. Click the VirtualBox Start button to restart your server. Use the ifconfig command to view the network configuration again. You will see a different IP address. This one was assigned by the campus DHCP server (Dynamic Host Configuration Protocol). You could connect to the server at that IP address from anywhere on campus.
The problem now is that your server can be assigned a different IP address every time you start it. I would like you to use a "static" IP address instead, that is one that is permanently assigned to your computer. Note that you can't just make up an IP address and expect it to work. You will use one of the IP addresses that have been given to the Math/CS department. I will hand out IP addresses during lab; be sure to use the one that is assigned to you!
To set up a static IP address for your sever, you can edit the file /etc/network/interfaces. You could use the vim editor, if you know how to do that. However, let's use nedit. Since your server doesn't have its own GUI, you will have to connect to the server remotely. Open a Terminal and give use a command of the form
ssh -X username@IPAddress
That's an uppercase X. Use the username for your account on your server, and use the server IPAddress that you got from ifconfig. You will be asked whether you really want to connect. (Say yes.) Then you will be asked for the password for your account on the server. Once you are logged in, you can use the command
sudo nedit /etc/network/interfaces
in the Terminal to edit the network configuration file. (Once again, you will have to enter your password.) Modify the file to look like this, except that XXX should be replaced with the value for your server's static IP address:
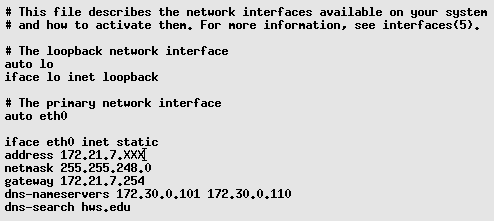
You could copy most of this from the /etc/network/interfaces file on the host computer. You need to get everything exactly right.
Use sudo poweroff to shut down the server, and restart it. Use ifconfig on the server to check the IP address. You might try nslookup math.hws.edu to check that your server can recognize domain names like math.hws.edu. And you can try to ssh to your server using the new IP address.
Running the Server Remotely
OK, so you want to run your server, and someone is using the lab computer that it's on. Or maybe you just don't want to trek up the stairs to the lab. Good news! You can start your computer remotely and then log on to it using ssh. You still need a computer that has ssh. Linux and Mac are OK (or install an ssh client on your cellphone).
You need to know that name of the virtual machine, the one that you gave it when you created it and that is listed in the VirtualBox window, and you need to know the name of the lab machine on which your server is installed. To start your server, use a command of the following form on any computer that has ssh:
ssh -f hwsuser@cslabX.hws.edu vboxheadless --startvm vmname --vrde off
where hwsuser is your HWS user name, cslabX is the computer name, and vmname is the name of the virtual machine.
This will start up your server in "headless" mode, meaning without a window. You can then use ssh to log in to it remotely. The server will continue to run until you shut it down with sudo poweroff, even after you log off.