CPSC 441, Fall 2018
Lab 1: Some Basic Network Tools
On Monday, September 3, the class meets in Rosenberg 009 for our first lab. Ideally, you will have done the setup for your computer accounts. If not, you can do it during the lab.
This lab introduces some basic network tools. There are eight exercises throughout the lab. You should write up or type your responses to those exercises and turn them in at the start of next week's lab. Most of the exercises for this lab are short! Some of them ask you to speculate about things that you can't be sure of.
ssh and ssh-keygen
You should boot one of the lab computers into Linux and log in using your assigned netXX user name and password. For some activities later in the semester, it will be useful to be able to ssh from one lab computer to another without giving a password. This can be done using public and private keys. (It is not possible using your regular Linux account because of security restrictions on the file server the home directories for that account is stored.) You can do this part of the lab later, if you want, since there is nothing to turn in.
The first step is to generate a pair of public and private keys, using the ssh-keygen program. Open a terminal and give the command
ssh-keygen
You will be asked several questions. You can simply press return to accept the default in each case. Note that this includes using an empty "passphrase" for your keys. (If you use a passphrase, then you will have to give the passphrase every time you want to use the keys, which would defeat the idea of doing passwordless logins.)
The ssh-keygen command will have created two files in the hidden directory named .ssh in your home directory. The files are id_rsa and id_rsa.pub, and they hold respectively your private key and your public key. To allow passwordless login to a another computer, your private key must be added to a file named authorized_keys in your .ssh directory on that computer. However, since the home diretory for your netXX user is on a file server, you actually have the same home directory on every one of our lab computers. This means that all you need to do is add the contents of id_rsa.pub to an authorized_key file in the same directory. Since you will have only one authorized key, you can do that with the commands
cd .ssh
cp id_rsa.pub authorized_keys
That's all there is to it. Test that it works by ssh-ing to one of the computers in the CS lab. For example,
ssh cslab7
You will be asked to confirm that you want to connect, but you should not be asked for a password. (When you ssh to the same computer again, you will not be asked to confirm, because the computer will be added to the file .ssh/known_hosts.)
Some Basic Command-Line Utilities
This section introduces a few basic networking commands. You will need some of them for the exercises below. These commands are available on Unix, including Mac OS and Linux (and the first two, at least, are also for Windows, and Windows has a command ipconfig that gives some of the same information as ifconfig). Some parameters or options might differ on different operating systems. Remember that you can use man <command> to get information about a command and its options.
- ping — The command ping <host> sends a series of packets and expects to receieve a response to each packet. When a return packet is received, ping reports the round trip time (the time between sending the packet and receiving the response). Ping can be used to check whether a computer is up and running, to measure network delay time, and to check for dropped packets indicating network congestion. Note that <host> can be either a domain name or an IP address. By default, ping will send a packet every second indefinitely; stop it with Control-C. Unfortunately, the HWS firewall seems to block ping entirely. However, you can still use it with on-campus computers.
- nslookup — The command nslookup <host> will do a DNS query to find and report the IP address (or addresses) for a domain name. Or, if you give it an IP address, it will look up the corresponding domain name. To do this, it contacts a "DNS server." Default DNS servers are part of a computer's network configuration. You can specify a different DNS server to be used by nslokup by adding the server name or IP address to the command: nslookup <host> <server>. In particular, try nslookup <host> 9.9.9.9
- ifconfig — When used with no parameters, ifconfig reports some information about the computer's network interfaces. This usually includes lo which stands for localhost, an interface that can be used for communication between programs running on the same computer. The interface name for an ethernet or wireless card is hard to predict, but the ethernet interface on the lab computers is named eno1. The information is different on Mac OS and Linux, but always includes the IP or "inet" address and ethernet or "hardware" address for an ethernet card. On Linux, you get the number of packets received (RX) and sent (TX), as well as the number of bytes transmitted and received. You might see both an IPv4 and an IPv6 address, but only IPv4 addresses are actually used on campus.
- netstat — The netstat command gives information about network connections. I often use netstat -tn which lists currently open TCP connections (that's the "t" option) by IP address rather than domain name (that's the "n" option). Add an "l" (lower case ell) to the options to list listening sockets, that is sockets that have been opened by server programs to wait for connection requests from clients: netstat -tnl. (On Mac, use netstat -p tcp to list tcp connections, and add "-a" to include listening sockets in the list.)
- telnet — Telnet is an old program for remote login. It's not used so much for that any more, since it has no security features. But basically, all it does is open a connection to a server and allow server and client to send lines of plain text to each other. It can be used to check that it's possible to connect to a server and, if the server communicates in plain text, even to interact with the server by hand. Since the Web uses a plain text protocol, you can use telnet to connect to a web server and play the part of the web browser. When you use telnet in this way, you need to specify both the host and the port number to which you want to connect: telent <host> <port>. (For example you might want to try this: Connect to the web server on math.hws.edu with the command telent math.hws.edu 80 and after you connect, type the command GET index.html and press return.)
Exercise 1: What is the IP address of the computer that you are using? How did you determine it?
Exercise 2: Because the HWS firewall does something called "network address translation," a computer like math.hws.edu or www.hws.edu has a different IP address on campus from the IP address that is visible to the rest of the world. Working on the lab computer, find both the internal IP address and the external IP address for one of those computers. Explain how you found the addresses.
Geolocation
A geolocation service tries to tell, approximately, where a given IP address is located physically. They can't be completely accurate—but they probably get at least the country right most of the time.
You can access a web-based geolocation utility on the command line, using the curl command, which can send HTTP requests and display the response. The following command uses curl to contact a public web service that will look up an IP address for you: curl ipinfo.io/<IP-address> For a specific example:
curl ipinfo.io/129.64.99.200
As you can see, you get back more than just the location. Alternatively, you can use an on-line geolocation service at
https://geoiptool.com/
Exercise 3:Use ssh to connect to math.hws.edu (using your regular user account), and find a few IP addresses that are connected to the web server (port 80) on math.hws.edu right now. Determine where those IP addresses are located. (I'm expecting that there will be several; if not, try again in a few minutes or sometime later.) Try to find one that is far from Geneva, NY. Explain how you found the IP addresses and their locations.
Traceroute
Traceroute is discussed in the textbook (pages 42–43). The command traceroute <host> will show routers encountered by packets on their way from your computer to a the specified <host>. For each n = 1, 2, 3, ..., traceroute sends a packet with "time-to-live" (ttl) equal to n. Every time a router forwards a packet, it decreases the ttl of the packet by one. If the ttl drops to zero, the router discards the packet and sends an error message back to the sender of the packet. (Again, as with ping, the packets might be blocked or might not even be sent, so that the error messages will never be received.) The sender gets the identity of the router from the source of the error message. Traceroute will send packets until n reaches some set upper bound or until a packet actually gets through to the destination. It actually does this three times for each n. In this way, it identifies routers that are one step, two steps, three steps, ... away from the source computer. A packet for which no response is received is indicated in the output as a *.
Exercise 4: Use traceroute to trace the routes from your cslab computer to math.hws.edu and to www.hws.edu. Explain the difference in the results.
Exercise 5: Use traceroute to trace the routes to several off-campus computers such as www.cornell.edu, www.ox.ac.uk, and hobartcollege.education.tas.edu.au. Write up any observations you can make about the routes. (Look at how they all start. And see if you can find some interesting stops along the routes. Use geolocation to find out where some of the routers are located.)
Wireshark
Wireshark is a packet sniffer and packet analyzer program. That is, it can capture all packets that are seen by your network card. It can display them and can analyze them to determine the protocol that they use and, in many cases, their meaning. It understands a huge number of different protocols. We will use Wireshark in several future labs. It can be used from your netXX account but not from your regular user account, since it requires some special permissions. You will find it in the Start menu, under Internet, or you can start it from the command line by entering wireshark as a command. Here is part of the window that you should see when the program starts:
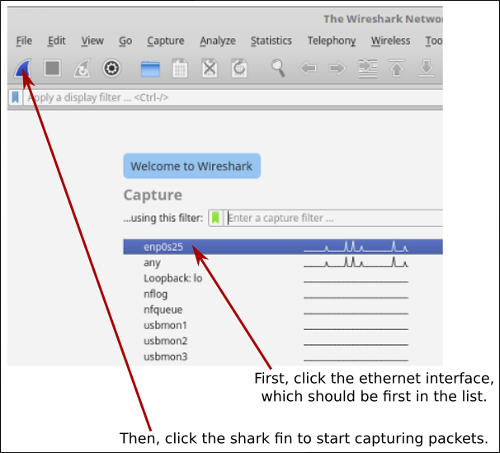
You can click the red square icon, next to the shark fin, to stop the capture session, but you can just leave it running for long periods. Packets will be shown as they are received. (And after stopping a session, you can still analyze the packets that were collected during the session.)
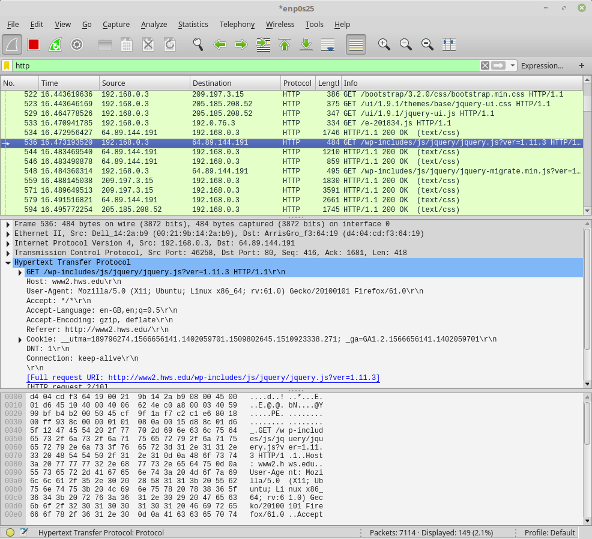
The main content in the window is divided into three large sections. The top section lists all the packets that have been collected. The middle section shows information about one selected packet from the list, in mostly human-readable form. The bottom section shows the raw content of the same packet in hexadeximal and in ASCII.
Just above the three sections is an input box where a display filter can be entered. The display filter is an expression that will match some packets and not others. Only those packets that match the filter are displayed. This does not discard packets; all packets are still collected and retained in the list, but only those that match the display filter are shown. In the picture above, the capture filter input box is green, and it contains "http". This means that only packets that use the http protocol are displayed. Display filters can be complicated, but for this lab, the only display filters that we use will be a single word specifying a protocol.
Exercise 6: Enter dns as the display filter (and press return). DNS is the "Domain Name System," which is used to look up IP addresses corresponding to computer names, among other things. At first, you will probably see only a few packets, if any. Click over to a Terminal window and use the nslookup command. What happens in the Wireshark window? Why? (Scroll to the end of the list of packets, if necessary, to see the newest ones.) Try doing a traceroute to a distant computer in a Terminal window. What happens in the Wireshark window? Why? Look inside some of the DNS packets, in the middle section of the Wireshark window. DNS is a relatively simple protocol. What can you tell about how it works by looking at the contents of the packets?
Exercise 7: The http protocol is used on the web. (If you already have a web browser open, you might want to close it down and start a new capture section in Wireshark, so that you don't have left over http packets when you start this exercise.) With wireshark capturing packets and the display filter set to http, open a web browser and browse to www.hws.edu. Find the first http packet that was sent to www.hws.edu. (It might not be the very first that was captured, since a web browser can send out http packets on its own, with no action on your part.) What was the request that was sent in that first packet? Find the packet that contains the response from the web server. What do you suppose the response meant? What did your web browser do when it received the response? Now, browse to math.hws.edu/webwork2 and find the first packet that was sent and the response. What happened in this case?
Exercise 8: The ssh protocol (Secure Shell) is used to log into a command-line interface on a remote computer. Set the display filter to ssh. How can you generate ssh traffic to view in Wireshark? Can you say anything about what is happening as the connection is made? After logging in, how many packets are generated as you type a word? Can you say anything about what is happening as you type? (You might want to try something similar with telnet, which does not use encryption.)