The assignment for this week is based on two computer programs, Escher Sketch and Tess. Both of these programs deal with symmetry groups in the plane. Escher Sketch is a free program. You can use an on-line version at http://escher.epfl.ch/escher/ (though the "Save" feature won't work in the on-line version). You can also download Escher Sketch for use on your own computer here:
http://math.hws.edu/eck/math110/assg7/escher_sketch.jar
Escher Sketch is a free program that will work on both Windows and Mac OS, but it requires that you have Java installed on your computer. Tess is for Windows only and can be downloaded from its web site at http://www.peda.com/tess/. It is a Shareware program, and if you intend to use it for any length of time, you are supposed to pay for it.
The assignment requires you to turn in several pictures that you make with the programs. To do this, create a new folder to hold your work. Use your own last name as the name of the folder. (To do this: Right-click the Desktop. In the menu, go to "New" and then select "Folder." The Folder will be named "New Folder." Type in your name to rename the folder.) The pictures that you want to submit should be placed in this folder. For the written part of the lab, you can, if you like, type up your answers and save the document in the same folder.
For use in the computer lab, you will find copies of Escher Sketch and Tess on the "PCCommon" network drive: After signing in, open "My Computer" and double-click the "PCCommon" drive. Find the folder named "cpsc120" and double-click that. The programs are inside; just double-click a program icon to run it.
When you are ready to submit your work, open the cpsc120 folder on the "PCCommon" drive again. Inside, there is a folder named "Drop Box." Drag your work folder onto this folder. This will place a copy of your folder inside the "Drop Box" folder. You will not be able to look inside the "Drop Box" folder. Alternatively, if you know how to do it and find it easier, you can send all your work files as attachments in an email message to eck@hws.edu.
The assignment is due no later than class time on Friday, October 17.
Escher Sketch is a program for drawing repeating patterns in the plane using the seventeen Wallpaper Groups. It was written by Nicolas Schoeni, Wes Hardaker and Gervais Chapuis at The Swiss Federal Institute of Technology (EPFL), Switzerland.
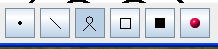
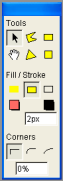
When you first open the program, your will see a large drawing area in the center of the window. Along the top are two rows of buttons that control the type of symmetry that is applied to the image that you draw. Along the bottom right are six buttons for selecting the drawing tool:
You can do everything that you need to do in this lab with two tools: the freehand drawing tool, which is selected in the above image, and the straight line drawing tool, which is just to the left of the freehand tool. There are also several controls along the right edge of the window. You can set the pen size and the pen color using these two controls:
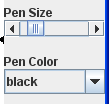
Click once or twice on the right arrow of the Pen Size slider to increase the pen size; this will give thicker lines. Select the straight-line drawing tool by clicking on its button.
To use the program, click on one of the wallpaper group icons to select the type of symmetry. In the drawing area, the basic "lattice cell" for the symmetry type will be outlined in black in the drawing area. (The cell is not really part of the drawing; its display can be turned on and off using the "draw cell" toggle at the upper right.) The drawing as a whole is created by repeating the contents of the basic cell infinitely to the left and right and above and below. Futhermore, in all but one case, the contents of the basic cell are obtained by repeating a smaller area inside the lattice cell. This area is outlined in red (on at least one edge) and is referred to as the fundamental domain or fundamental region. Several copies of the fundamental domain fill the basic cell, and then the cell is copied infinitely to fill the plane. So the entire plain will be tiled or "tessalated" with copies of the contents of the fundamental domain.
You will probably find that the basic cell is too small. To increase its size, click the "Modify cell" button. You will then have to click the drawing area once where you want the upper left corner of the cell and then again where you want the lower right. For the first two wallpaper groups, you will have to click a third time to set the angle in the parallelogram.
To use the straight-line tool, click the mouse button and hold it down while moving the mouse. You will see the line from the intitial point to the current mouse location. You will also see all the symmetric repetitions of that line. The lines will be permanently added to the drawing when you release the mouse. To use the freehand tool, just hold down the mouse and drag it, and a curve will be drawn along the path of the mouse.
You might want to try some other colors besides black and some of the other drawing tools. You can erase an entire drawing, and you can undo just the most recent operation that you performed on the drawing using the "Erase" and "Undo" buttons at the bottom of the window. If you accidently erase the drawing, you can get it back by clicking the "Undo" button before you do anything else.
When you have a picture that you want to save, click the "Save..." button. You will first get a dialog box where you can specify the size of the image that you want to save:
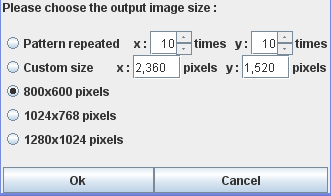
I suggest selecting the relatively small size, 800x600 pixels, as shown in the above image. When you click OK, you will get a regular file-save dialog where you can specify a name for the file and the location where you want to save it. (By the way, do not use the "Submit" button. This button is supposed to send your drawing to the program's web site in Switzerland, but it doesn't seem to work in any case.)
It should be clear to you that the wallpaper groups are related to the work that you've already done on tilings of the plane. In fact, regular and irregular tilings all have symmetry patterns corresponding to wallpaper groups. Here is an example of making a regular tiling by hexagons using the "p3m1" wallpaper group in Escher Sketch:
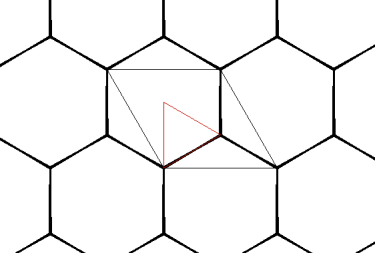
Note that the tiling was made simply by drawing one line segment along one side of the fundamental domain. All the other lines in the image were generated by the program, by applying the symmetry operations of the p31m wallpaper group.
For your first exercise, make a regular tiling by triangles and make a regular tiling by squares in the Escher Sketch program. You do not have to turn in pictures, although you can if you want. If you don't want to turn in pictures, you should turn in a statement of how the tilings were created.
You can also make irregular tilings using Escher Sketch. Here is an example that uses the "cm" wallpaper group.:
Note that this tiling uses a single irregular tile shape. It was made using the freehand tool to draw a curve from the lower left corner of the fundamental domain to the upper right corner. The other four sides of the tile -- and all the other tiles in the pattern -- were made by applying the symmetry operations of the cm group.
For your second exercise, make an irregular tiling. Do not use the cm group; find another one that works. I suggest that you play around a bit and try to come up with something nice. Your tiling should use only one shape. Turn in a file containing a copy of your picture. (Use the "Save..." button to save the picture in the work folder that you created above.)
Symmetry is often associated with beauty, and I hope it's clear that you can make pretty pictures by applying symmetry patterns. An example of a somewhat attractive picture can be found at http://math.hws.edu/eck/math110/assg7/pretty_tiling.png.
For your third exercise, make a pretty picture using Escher Sketch. You might want to use several colors. You might want to start with an irregular tiling and add some drawing inside a tiling. You might want to use straight lines only, as in the example. I suggest that you spend some time playing with the program, and not just submit the first picture you come up with! Grading will be partly competitive, based on aesthetics.
The second program that you will work with is Tess. Like Escher Sketch, Tess lets you draw a basic pattern and then applies a group of symmetry operations to your pattern to produce a complete image. Tess can do the same Wallpaper groups as Escher Sketch (though with different names), but it also supports Cyclic, Dihedral, and Frieze groups. Also, its drawing tools are more sophisticated than those in Escher Sketch.
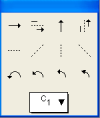
 When you start Tess, you see a drawing window and two small windows. One
of the small windows, shown at the right, controls drawing tools. You select a tool
using the two top rows of buttons in the tools window. Tess can
draw triangles, rectangles, squares, and polygons. The Arrow tool, selected in the picture at the right,
allows you to select and edit shapes that have already been added to the image. The
Hand tool lets you move the entire image around. Note that when drawing shapes,
do not drag the mouse, just click and release. For the rectangle, triangle,
and square shapes, click the mouse at two points. For the polygon shape, click the mouse
at a series of points, and double click to finish the shape..
When you start Tess, you see a drawing window and two small windows. One
of the small windows, shown at the right, controls drawing tools. You select a tool
using the two top rows of buttons in the tools window. Tess can
draw triangles, rectangles, squares, and polygons. The Arrow tool, selected in the picture at the right,
allows you to select and edit shapes that have already been added to the image. The
Hand tool lets you move the entire image around. Note that when drawing shapes,
do not drag the mouse, just click and release. For the rectangle, triangle,
and square shapes, click the mouse at two points. For the polygon shape, click the mouse
at a series of points, and double click to finish the shape..
In the "Fill / Stroke" section of the tools window, you can select whether you want to outline the shape only, or draw the inside only, or draw both. The default (shown here) is to do both. The red and black squares show the colors that will be used for the inside and outline of the shape; click one of these squares to change the color. The text box below the color squares give the width of the line drawn around the shape. Finally, at the bottom of the tools window are some controls where you can specify whether the corners of shapes should be sharp or rounded.
 The second small window determines which group of symmetries will be applied to
the basic pattern that you draw. At the bottom of the window is a pop-up menu
that contains all the supported groups. The default is C1, which means
that no symmetry operations at all are applied. Note that in the list, "C" stands for
the cyclic groups, "D" for the dihedral groups, "F" for the Frieze groups, and "W" for
the wallpaper groups. The other buttons in the window represent particular symmetry
operations that can be applied. (But note that not all possible symmetry operations are
represented, and the groups is not completely determined by the set of buttons that
are pressed.)
The second small window determines which group of symmetries will be applied to
the basic pattern that you draw. At the bottom of the window is a pop-up menu
that contains all the supported groups. The default is C1, which means
that no symmetry operations at all are applied. Note that in the list, "C" stands for
the cyclic groups, "D" for the dihedral groups, "F" for the Frieze groups, and "W" for
the wallpaper groups. The other buttons in the window represent particular symmetry
operations that can be applied. (But note that not all possible symmetry operations are
represented, and the groups is not completely determined by the set of buttons that
are pressed.)
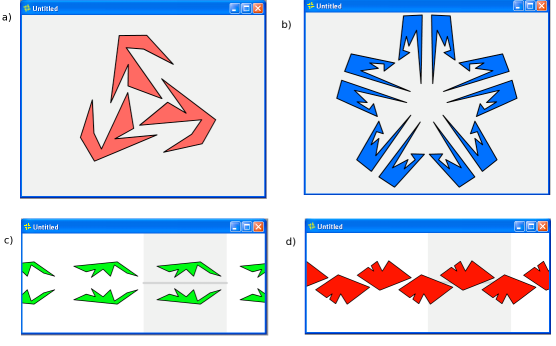
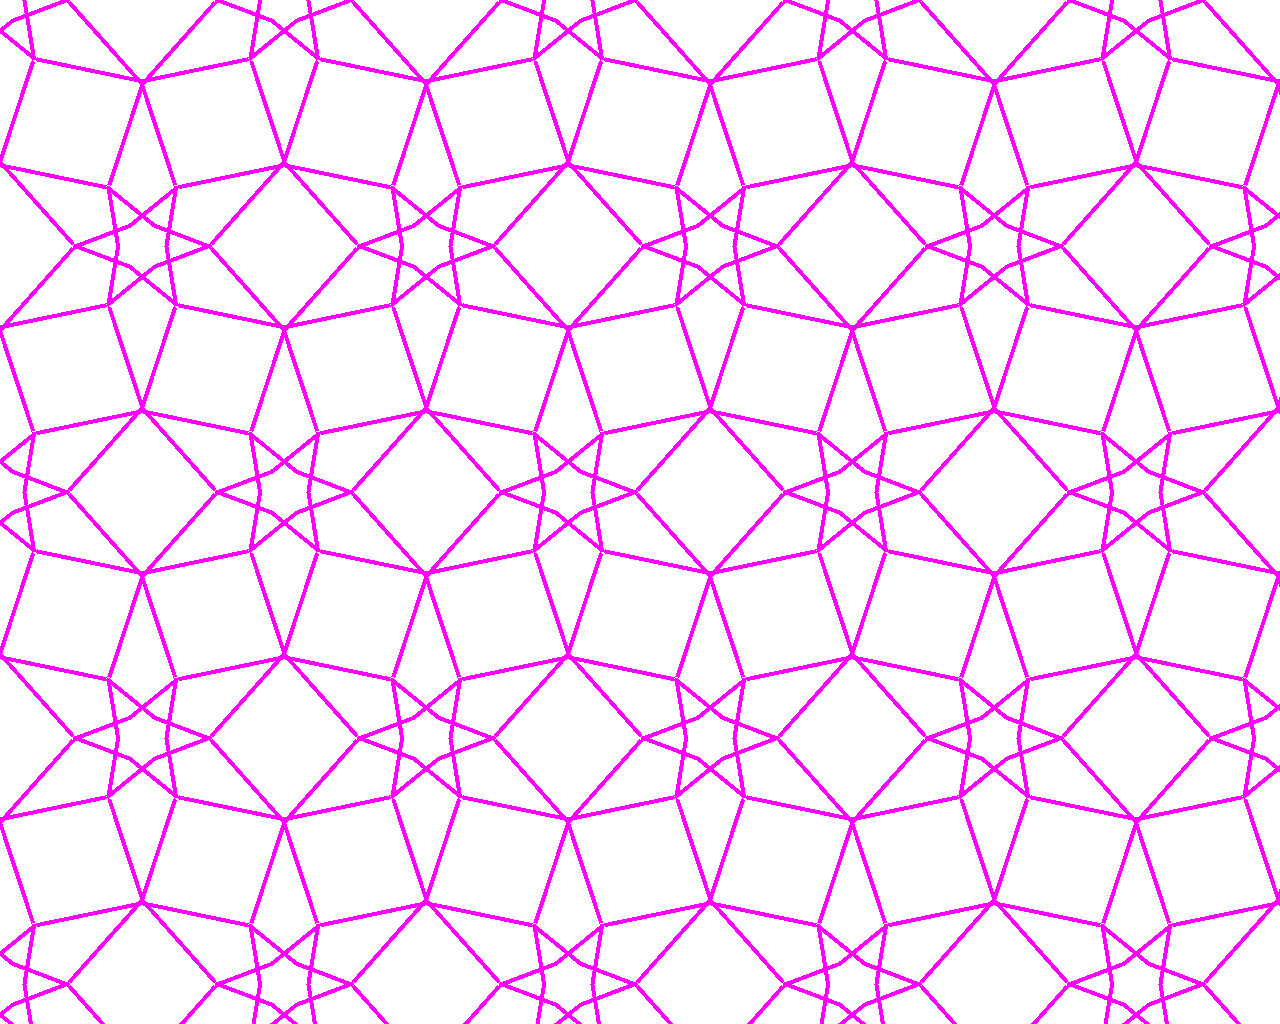
Below are four pictures created using Tess. For each image, only a single shape was drawn directly. The rest of the images were generated by Tess by applying the operations in one of the symmetry groups. Your task is to figure out in each case which symmetry group is being used. To help you figure it out, or to check your answer, you might want to draw a random shape in Tess and apply various groups to it. See if you can make patterns with similar symmetry properties to the ones shown here. For your answer, turn in the name of the group for each of part a), b), c), and d), and explain briefly in each case what characteristics of each pattern helped you to identify the group. (Use the group name from the pop-up menu in Tess, which might be different from the name used in the textbook.)
There are similarities among various wallpaper groups. In this exercise, you will investigate some of the similarities.
Part a) How are the groups W1, W2, W3, W4, and W6 related? To find out, select symmetry group W1. Draw a small irregular shape. Then change the symmetry group select to W2, W3, W4, and W6. Select your shape and more it around with the Arrow tool, if that helps you see what is going on. Write a paragraph discussing what you discover.
Part b) Both W6 and W31 have a basic hexagonal symmetry. What's the essential difference between them, and which one can be "done with mirrors." (See Exercise 20 from Section 5.1, which you did as part of Assignment 6.) Again, you can investigate the difference between them by using a small irregular shape, switching between W6 and W31, and possibly dragging the shape around. Write a paragraph discussing what you discover.
The last exercise, of course, is to make a pretty picture using Tess, which will be graded partly on aesthetics. Use one of the wallpaper groups. Use several shapes and colors. It is not possible to save an image in the evaluation copy of Tess. You can make a printout of your picture to turn in. Or you can make an image file, as follows: Press the "Print Screen" key. This makes a copy of the screen and places it in the Clipboard; from there, you can paste it into another program and save it. For example, open the "Paint" program (by selecting "Paint" from the "Accessories" menu in the "Programs" menu); then use the "Paste" command from Paint's "Edit" menu to paste the screen image into the program; finally, you can use the "Save" command in Paint's "File" menu to save the image into a file.