last updated: --Mon Apr 17 17:57:59 EDT 2006--
page owned by: bridgeman@hws.edu
| CPSC 324 | Fundamentals of Computer Graphics | Spring 2006 |
This tutorial is intended to introduce some of the basics of the OpenGL library. It is by no means comprehensive - you can learn a lot more about advanced features of OpenGL by checking out the many additional OpenGL sections in the book or the links below. The Red Book is particularly useful as a tutorial-style introduction.
OpenGL is designed as a software interface to the graphics hardware on your computer. It defines a platform-independent API; the API is then implemented in software and/or hardware for various machine architectures. The advantage is that OpenGL programs are easily portable to a variety of computers.
OpenGL provides basic commands to support rendering. In particular, OpenGL doesn't provide functionality to support windows or user interaction (like keyboard presses or mouse actions) - these features are provided by a separate library called GLUT (the OpenGL Utility Toolkit). GLUT also provides some higher-level features, such as more complex geometrical objects.
OpenGL is a state machine, which means that you specify various states or modes which remain in effect until changed. Each command that is executed is carried out within the current state. States include things like the current window (where drawing will appear), color, viewing and projection matrices, drawing modes, positions and characteristics of lights, materials, and features. These elements will be introduced throughout the tutorial, but it is important to keep the idea of a "state machine" in mind as you work with OpenGL in order to understand the effects of a given command. Note: the current state is not reset when a function starts or ends - the current state is in effect until something changes it, regardless of where in the program the next thing is.
OpenGL provides a number of reasonable defaults to help programmers get something on the screen quickly, but even so, even the simplest of OpenGL programs have a certain amount of complexity.
Let's consider a first program, which opens a window and displays the ever-popular Utah teapot:
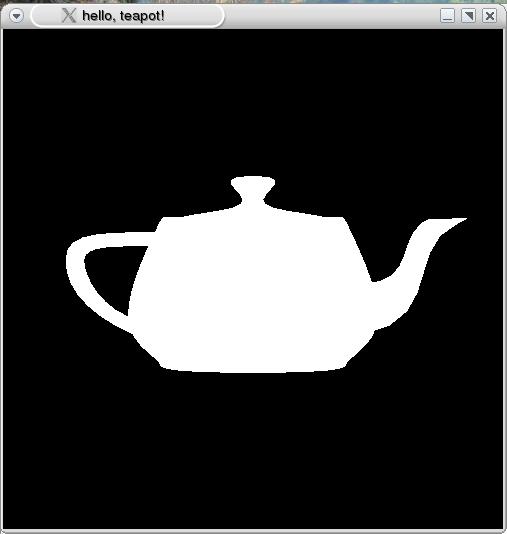
// helloteapot.cc

#include <GL/gl.h>
#include <GL/glut.h>

void display () {

    /* clear window */
    glClear(GL_COLOR_BUFFER_BIT);

    /* draw scene */
    glutSolidTeapot(.5);

    /* flush drawing routines to the window */
    glFlush();

}

int main ( int argc, char * argv[] ) {

    /* initialize GLUT, using any commandline parameters passed to the
       program */
    glutInit(&argc,argv);

    /* setup the size, position, and display mode for new windows */
    glutInitWindowSize(500,500);
    glutInitWindowPosition(0,0);
    glutInitDisplayMode(GLUT_RGB);

    /* create and set up a window */
    glutCreateWindow("hello, teapot!");
    glutDisplayFunc(display);

    /* tell GLUT to wait for events */
    glutMainLoop();
}
The two #include lines include the OpenGL and GLUT header files. You will always want to include these, or else your program won't be able to use any of the OpenGL or GLUT routines.
Let's consider main next. main typically sets up the windows, event handling (keyboard presses, mouse clicks, window resizes, etc), and does any necessary initialization - everything except actually drawing the scene. The steps this main goes through are pretty much the steps you'll see in every program:
glutInit initializes the GLUT library (which is responsible for handling windows and user interaction). As written, you can pass parameters to the initialization routine at runtime by specifying them on the commandline but you don't need to worry about this.
The next batch of commands set up the environment for the creation of windows. They affect the current state, and the settings remain in effect until changed.
glutInitWindowSize and glutInitWindowPosition define the size and position (upper left corner) of the window on the screen. If omitted, the default window size is 300x300 and its placement is left up to the window manager. glutInitDisplayMode specifies the display mode to be used for new windows. GLUT_RGB means that the RGB color model will be used. Other options will be seen later.
Next, the window is created. glutCreateWindow creates a window with the previously-specified size, position, and display mode and gives it the specified title. The window won't actually be displayed, though, until glutMainLoop is called.
glutCreateWindow also affects the state, and the just-created window becomes the current window.
glutDisplayFunc sets the display callback for the current window. The "display callback" is the function that will be called each time the window needs to be displayed (such as when it first appears, if it has been resized, if it has been hidden and needs to be refreshed, etc). This doesn't actually call the display callback function - it just registers it so that future display needs will invoke the callback. You must specify a display callback for each window created before the window is displayed for the first time.
glutMainLoop tells the program to enter the GLUT event processing loop. (This just means the program sits and waits for things to happen, such as window refreshes, window resizes, mouse clicks, key presses, etc.) glutMainLoop never exits, so it should always be the last line of the main program.
Now, let's look at the display function. This is the function that was registered as the display callback for the window. It can be named anything ("display" was just a convenient choice, not a requirement) but must have a void return value and no parameters. It contains everything that should happen each time the window is drawn.
glClear clears the current window (i.e. the one for which the callback was triggered). GL_COLOR_BUFFER_BIT means to clear the information about pixel colors. (There is other information associated with what appears in a window, and more options for glClear will be seen later.)
Next, the geometry is drawn. In this case, the scene contains only a teapot. glutSolidTeapot produces a solid teapot; the parameter specifies the size (experiment with different values to find an appropriate one for your scene).
Finally, use glFlush to flush all of the drawing commands. OpenGL caches drawing commands for efficiency, so nothing will actually appear on the screen until you call glFlush. This should generally be the last thing done by a display callback.
Keep in mind the flow of control in this program - like all C++ programs, main is executed first. The semantics of OpenGL guarantee that display will not be called until main reaches glutMainLoop, but it may be called at any point after that (as the window needs to be redrawn).
Keeping the flow of control in mind is important because of the state machine nature of OpenGL - any state that is changed by things that happen main will still be in effect when display is called for the first time, and any state that display changes will still be in effect the next time display is called.
Compiling an OpenGL program is just like compiling a regular C++ program, except that it needs to be linked with the OpenGL libraries. Assuming the teapot program is saved in the file helloteapot.cc, the following will compile it to an executable named helloteapot:
g++ -o helloteapot helloteapot.cc -lGL -lGLU -lglut -L/classes/s06/cs324/lib -I/classes/s06/cs324/include
It is important to remember the -l, -L, and -I options to avoid linker errors and to tell the compiler where to find the libraries and OpenGL header files.
You can now run the compiled program just like any other executable.
The helloteapot program, and all of the other examples in this tutorial, can be found in /classes/s06/cs324/opengl/ - copy these files to your own directory to experiment with them. A basic Makefile is provided in the same directory to make it easier to compile everything - you can add entries to the Makefile for your own programs/experiments so you don't have to type the long commandline to compile each time. To add to the Makefile, add the name of the executable you want to produce to the all: line and then add an entry of the form:
<name of executable>: <list of all .cc files>
        g++ -o <name of executable> <list of all .cc files> $(LIBS) $(INCPATH) $(LDFLAGS)
Replace <name of executable> and <list of all .cc files> with the appropriate thing (see the Makefile for examples). Note: you must hit TAB on the second line, before the g++ - do not use spaces!
Paste the "hello teapot" program in a file named helloteapot.cc and compile and run it. You will need to close the window or hit control-C in the terminal window to end the program.
Change the initial window size and/or position, and see what the effect is.
Try glutWireTeapot instead of glutSolidTeapot, or experiment with the size of the teapot.
OpenGL lets you configure four parts of the viewing pipeline:
OpenGL puts some constraints on the order in which these elements are defined:
The "viewport" defines what part of the viewing window the final rendered image appears in. Defining the viewport defines what we called the workstation transformation.
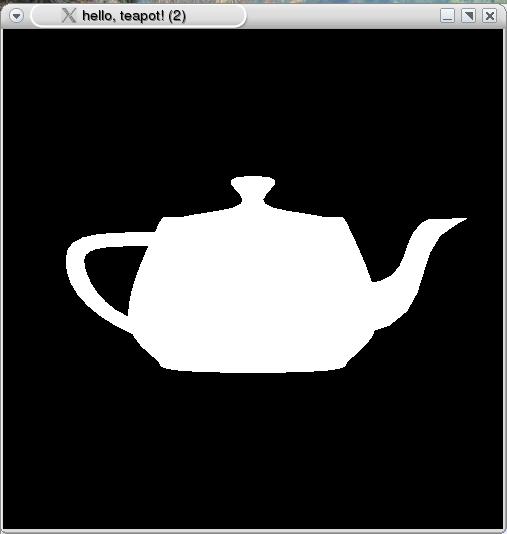
// helloteapot2.cc

#include <GL/gl.h>
#include <GL/glut.h>

void display () {

    /* clear window */
    glClear(GL_COLOR_BUFFER_BIT);

    /* draw scene */
    glutSolidTeapot(.5);

    /* flush drawing routines to the window */
    glFlush();

}

void reshape ( int width, int height ) {

    /* define the viewport transformation */
    glViewport(0,0,width,height);

}

int main ( int argc, char * argv[] ) {

    /* initialize GLUT, using any commandline parameters passed to the
       program */
    glutInit(&argc,argv);

    /* setup the size, position, and display mode for new windows */
    glutInitWindowSize(500,500);
    glutInitWindowPosition(0,0);
    glutInitDisplayMode(GLUT_RGB);

    /* create and set up a window */
    glutCreateWindow("hello, teapot!");
    glutDisplayFunc(display);
    glutReshapeFunc(reshape);

    /* tell GLUT to wait for events */
    glutMainLoop();
}
If you run this program, you should notice one thing: the teapot resizes itself when the window is resized. (Actually, this happens by default, but program demonstrates how to achieve the effect.)
Let's look at the new parts. First, main defines a reshape callback:
glutReshapeFunc(reshape);
glutReshapeFunc is similar to glutDisplayFunc in that it sets up a callback - this time, the callback is the function to call when the window is reshaped (i.e. resized).
The reshape function defines what to do when the window is resized. It must have a void return type, and takes two int parameters (the new width and height of the window). glViewport defines the lower left corner and dimensions of the drawing window:
void glViewport ( GLint x, GLint y, GLsizei width, GLsizei height );
GLint and GLsizei are special OpenGL types; you can just use integer values. These are pixel coordinates in the drawing window.
Experiment with changing the parameters to glViewport. Try resizing the window. What happens, and why?
Move the glViewport line to each of the following places in main:
You'll need to replace "width" and "height" with some hardcoded values, since main doesn't have height and width variables defined. Pick something other than 500 (the size of the window) for at least one value, to make the effects easier to see. What happens, and why?
For the rest of the viewing pipeline (modeling, viewing, and projection transformations), it is necessary to understand and keep track of the current transformation matrix. Remember that OpenGL is a state machine - the current transformation matrix is part of this state, and the operations to set various aspects of the viewing pipeline (other than the viewport) affect this matrix.
In fact, OpenGL maintains more than just a single current transformation matrix: it actually maintains several stacks of matrices. Each matrix mode (set by glMatrixMode, as seen below) has its own stack. We'll be concerned with two matrix modes: GL_PROJECTION (for setting the projection transformation) and GL_MODELVIEW (for setting the modeling and viewing transformations). In each case, the matrix currently in effect is the top matrix on the stack; the viewing pipeline is made up of the current modelview and projection matrices, combined with the viewport specification.
Note: OpenGL puts limits on the sizes of the matrix stacks, though the stack depth is guaranteed to be at least 32 for GL_MODELVIEW and at least 2 for GL_PROJECTION.
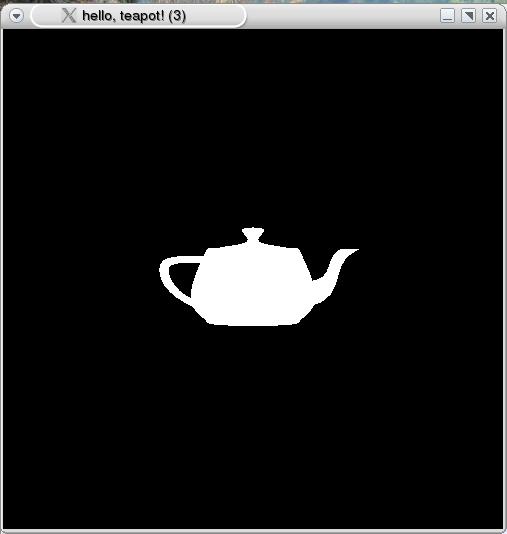
The following program demonstrates defining a parallel-projection camera:
// helloteapot3.cc

#include <GL/gl.h>
#include <GL/glut.h>

void display () {

    /* clear window */
    glClear(GL_COLOR_BUFFER_BIT);

    /* future matrix manipulations should affect the modelview matrix */
    glMatrixMode(GL_MODELVIEW);

    /* draw scene */
    glutSolidTeapot(.5);

    /* flush drawing routines to the window */
    glFlush();

}

void reshape ( int width, int height ) {

    /* define the viewport transformation */
    glViewport(0,0,width,height);

}

int main ( int argc, char * argv[] ) {

    /* initialize GLUT, using any commandline parameters passed to the
       program */
    glutInit(&argc,argv);

    /* setup the size, position, and display mode for new windows */
    glutInitWindowSize(500,500);
    glutInitWindowPosition(0,0);
    glutInitDisplayMode(GLUT_RGB);

    /* create and set up a window */
    glutCreateWindow("hello, teapot!");
    glutDisplayFunc(display);
    glutReshapeFunc(reshape);

    /* define the projection transformation */
    glMatrixMode(GL_PROJECTION);
    glLoadIdentity();
    glOrtho(-2.0,2.0,-2.0,2.0,-2.0,2.0);

    /* tell GLUT to wait for events */
    glutMainLoop();
}
If you run this program, you should notice one new thing: the teapot appears smaller than it did with earlier "hello, teapot!" programs.
There are two new parts. First, main defines the projection transformation:
    glMatrixMode(GL_PROJECTION);
    glLoadIdentity();
    glOrtho(-2.0,2.0,-2.0,2.0,-2.0,2.0);
This is in main because it needs to be defined before any drawing occurs. (It could have also gone before the "future matrix manipulations should affect the modelview matrix" step in display, but the projection never changes so there's no need to repeat the steps every time the window is drawn - put the commands in main and do them just once.)
glMatrixMode specifies which of the viewing pipeline matrices is to be modified - GL_PROJECTION means that subsequent commands will affect the projection transformation stack. Initially, there is a single matrix of some sort on the projection stack:
 a matrix
----------
("----------" marks the bottom of the stack.)
glLoadIdentity resets the current matrix to the identity matrix:
 identity matrix
-----------------
Without this, subsequent commands would build on top of the already-in-effect projection matrix. glOrtho specifies an orthogonal parallel projection:
void glOrtho ( GLdouble left, GLdouble right, GLdouble bottom, GLdouble top,
               GLdouble zNear, GLdouble zFar );
GLdouble is a special OpenGL type, but you can use regular double values like 2.0. The parameters specify the left, right, bottom, and top extents of the view volume and the front (near) and back (far) clipping planes. The values are in VC. Note that in OpenGL, zNear and zFar measure the distance to the clipping plane from the camera (not actual z coordinates) - thus zFar must be greater than zNear. The actual z coordinates of the clipping planes are -zNear and -zFar. The resulting projection stack is:
 ortho * identity
------------------
or just
 ortho
-------
The other new element is the glMatrixMode command in display. The GL_MODELVIEW parameter sets the current matrix stack to be the modelview matrix, used for the viewing and modeling transformations. This line isn't necessary in this particular program because the viewing and modeling transforms aren't modified, but is included to make the point that it is necessary to switch to the modelview matrix before doing anything to affect the modeling or viewing transformations - otherwise the commands in display will modify the projection matrix (because the glMatrixMode(GL_PROJECTION) setting in main remains in effect until changed).
Why do you suppose the teapot appears smaller in helloteapot3 than it did in the earlier programs?
Modify the parameters to glOrtho. Why happens, and why?
Move the three lines under "define the projection transformation" in main so that they are just before glFlush in display. Try resizing the window. What happens, and why?
To set the camera position and orientation (viewing transformation), use the gluLookAt function:
void gluLookAt ( GLdouble eyeX, GLdouble eyeY, GLdouble eyeZ,
                 GLdouble centerX, GLdouble centerY, GLdouble centerZ,
                 GLdouble upX, GLdouble upY, GLdouble upZ );
The viewing transformation is part of the modelview matrix, so glMatrixMode(GL_MODELVIEW) must be set before using gluLookAt. eye defines the VRP, center defines the look at point, and up defines the VUP vector (all in WC).
The following demonstrates setting the viewing transformation. The only changes are in main. (In the picture, the teapot has been changed to wireframe instead of solid to make it easier to see.)

// helloteapot4.cc

#include <GL/gl.h>
#include <GL/glut.h>

void display () {

    /* clear window */
    glClear(GL_COLOR_BUFFER_BIT);

    /* future matrix manipulations should affect the modelview matrix */
    glMatrixMode(GL_MODELVIEW);

    /* draw scene */
    glutSolidTeapot(.5);

    /* flush drawing routines to the window */
    glFlush();

}

void reshape ( int width, int height ) {

    /* define the viewport transformation */
    glViewport(0,0,width,height);

}

int main ( int argc, char * argv[] ) {

    /* initialize GLUT, using any commandline parameters passed to the
       program */
    glutInit(&argc,argv);

    /* setup the size, position, and display mode for new windows */
    glutInitWindowSize(500,500);
    glutInitWindowPosition(0,0);
    glutInitDisplayMode(GLUT_RGB);

    /* create and set up a window */
    glutCreateWindow("hello, teapot!");
    glutDisplayFunc(display);
    glutReshapeFunc(reshape);

    /* define the projection transformation */
    glMatrixMode(GL_PROJECTION);
    glLoadIdentity();
    glOrtho(-2.0,2.0,-2.0,2.0,-2.0,2.0);

    /* define the viewing transformation */
    glMatrixMode(GL_MODELVIEW);
    glLoadIdentity();
    gluLookAt(1.0,1.0,1.0,0.0,0.0,0.0,0.0,1.0,0.0);

    /* tell GLUT to wait for events */
    glutMainLoop();
}
The new part here is the "define the viewing transformation" step. The VRP is set to (1,1,1), the look at point (0,0,0) and the VUP vector (0,1,0).
To see how this affects the teapot, trace through the effect on the modelview stack. Initially, some matrix is on the stack:
 a matrix
----------
glLoadIdentity resets the current matrix to the identity matrix:
 identity matrix
-----------------
Then gluLookAt multiplies the current (identity) matrix by the viewing transform matrix:
 viewing transform
-------------------
Since display is executed after these steps in main, the teapot will have the viewing transform as its MC->VC matrix.
Experiment with changing the parameters to gluLookAt. What happens, and why?
Move the three lines under "define the viewing transformation" in main to the following places:
In each case, try resizing the window. What happens, and why?
A perspective projection is specified with glFrustum:
void glFrustum ( GLdouble left, GLdouble right, GLdouble bottom, GLdouble top,
                 GLdouble zNear, GLdouble zFar );
The parameters specify the left, right, bottom, and top extents of the front of the view volume and the front (near) and back (far) clipping planes. The values are in VC. Note that in OpenGL, zNear and zFar measure the distance to the clipping plane from the camera - thus zFar must be greater than zNear. OpenGL also requires the view volume to be in front of the camera, so both zNear and zFar must be greater than 0.
Changing the distance between the near and far clipping planes can have a big effect on the dimensions of the view volume and the angle of the projectors, making it tricky to set up a reasonable view volume for a given scene. An alternative is to use gluPerspective instead of glFrustum:
void gluPerspective ( GLdouble fovy, GLdouble aspect,
                      GLdouble zNear, GLdouble zFar );
fovy is the angle (in degrees) of the field of view, in the y direction (up and down). aspect specifies the ratio of the width of viewer's angle of view to the height (i.e. the aspect ratio of the view window). zNear and zFar have the same meaning and restrictions as in glFrustum.
When setting up a scene with gluPerspective, try using a wide angle for fovy to get the clipping planes adjusted properly, then narrow the view angle to the desired setting.
Note: Due to how OpenGL handles depth buffering, there can be significant loss of accuracy in depths (and thus problems with visible surface determination) if zNear is very close to 0.
Using glFrustum or gluPerspective, find a set of parameters for which the teapot fits nicely into the drawing window.
Try glFrustum(-1.0,1.0,-1.0,1.0,1.0,3.0), then change the front clipping plane to 0.5. What happens, and why?
If you've set up a scene and a camera and you're getting the infamous black screen of death (nothing appears), try the following:
If you are using a perspective projection, set the field of view to a wide angle.
Set the near and far clipping planes to values you are sure include everything in the scene e.g. 0.001 and 100000.
Make sure your camera is pointed at something.
The basic mechanisms are already in place for specifying the modeling transformations for scene objects: set the matrix mode to GL_MODELVIEW, and then give commands to change the current matrix as appropriate.
OpenGL supplies the following operations for specifying matrices:
void glRotatef ( GLfloat angle, GLfloat x, GLfloat y, GLfloat z );
void glScalef ( GLfloat x, GLfloat y, GLfloat x );
void glTranslatef ( GLfloat x, GLfloat y, GLfloat x );
All three operations multiply the current matrix by the specified matrix (so specifying several operations has a cumulative effect).
glRotatef produces a rotation of the specified number of degrees counterclockwise around the vector (x,y,z). (Rotation appears counterclockwise if (x,y,z) points towards the viewer.) glScalef scales by the specified factors along each axis. glTranslatef translates by the specified vector.
Two other operations are also useful for manipulating the matrix stack:
void glPushMatrix ();
void glPopMatrix ();
glPushMatrix pushes a copy of the current matrix onto the current stack, while glPopMatrix pops the top of the stack (changing the current matrix to whatever was just below the top). Note: the stack depth limited (though at least 32 for GL_MODELVIEW and at least 2 for the other modes including GL_PROJECTION), so be careful how many things you push. glPushMatrix and glPopMatrix are useful for creating separate modeling transforms for different objects.
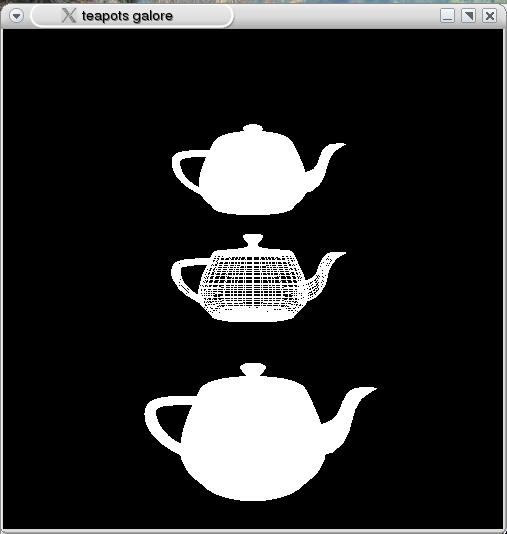
The following program shows an example of modeling transforms and using glPushMatrix and glPopMatrix:
// teapotsgalore.cc

#include <GL/gl.h>
#include <GL/glut.h>

void display () {

    /* clear window */
    glClear(GL_COLOR_BUFFER_BIT);

    /* future matrix manipulations should affect the modelview matrix */
    glMatrixMode(GL_MODELVIEW);

    /* draw scene */
    glPushMatrix();
    glPushMatrix();

    glTranslatef(0,0,-3);
    glutWireTeapot(1);                // middle teapot
    glTranslatef(0,2,0);
    glutSolidTeapot(1);               // top teapot
    glPopMatrix();

    glTranslatef(0,-2,-1);
    glutSolidTeapot(1);               // bottom teapot

    glPopMatrix();

    /* flush drawing routines to the window */
    glFlush();

}

void reshape ( int width, int height ) {

    /* define the viewport transformation */
    glViewport(0,0,width,height);

}

int main ( int argc, char * argv[] ) {

    /* initialize GLUT, using any commandline parameters passed to the
       program */
    glutInit(&argc,argv);

    /* setup the size, position, and display mode for new windows */
    glutInitWindowSize(500,500);
    glutInitWindowPosition(0,0);
    glutInitDisplayMode(GLUT_RGB);

    /* create and set up a window */
    glutCreateWindow("hello, teapot!");
    glutDisplayFunc(display);
    glutReshapeFunc(reshape);

    /* define the projection transformation */
    glMatrixMode(GL_PROJECTION);
    glLoadIdentity();
    gluPerspective(60,1,1,10);

    /* define the viewing transformation */
    glMatrixMode(GL_MODELVIEW);
    glLoadIdentity();
    gluLookAt(0.0,0.0,5.0,0.0,0.0,0.0,0.0,1.0,0.0);

    /* tell GLUT to wait for events */
    glutMainLoop();
}
The "draw scene" section in display handles defining the modeling transforms and the scene elements. The middle teapot is drawn at (0,0,-3), the top teapot at (0,2,-3), and the bottom teapot at (0,-2,-1). The reason? The transforms accumulate, so the glTranslatef(0,2,0) just before the top teapot is applied to a current matrix which already includes the glTranslatef(0,0,-3) from before the middle teapot. However, the first glPopMatrix, combined with the previous glPushMatrix means that the matrix involving the transforms for the middle and top teapots is removed before the bottom teapot's glTranslatef(0,-2,-1) so this applies to the same matrix that the middle teapot's glTranslatef(0,0,-3) does - putting the bottom teapot at (0,-2,-1) instead of (0,0,-4).
Let's trace more carefully what happens as the whole program runs. The display callback is not called until glutMainLoop, so the rest of main - including the "define the viewing transformation" lines - is guaranteed to be executed before anything in display. This means that the modelview matrix stack (representing the combined modeling and viewing transformation steps of the viewing pipeline) is the following:
 viewing transform
-------------------
The viewing transform is the current modelview matrix since it is on top.
Now, the window is displayed on the screen for the first time and display is called. The first glPushMatrix pushes a copy of the current matrix on the modelview matrix stack, making that copy the new current matrix:
 viewing transform
 viewing transform
-------------------
The second glPushMatrix does the same thing:
 viewing transform
 viewing transform
 viewing transform
-------------------
Now, the first translation is combined with the current matrix:
 viewing transform * glTranslatef(0,0,-3)
             viewing transform
             viewing transform
------------------------------------------
The middle teapot is drawn, with viewing transform * glTranslatef(0,0,-3) as the MC->VC matrix for that teapot.
The next translation is again combined with the current matrix:
 viewing transform * glTranslatef(0,0,-3) * glTranslatef(0,2,0)
                       viewing transform
                       viewing transform
----------------------------------------------------------------
...and the top teapot is drawn, with the current matrix as its MC->VC matrix.
Next, the first glPopMatrix pops the top matrix from the stack, making the new top matrix the new current matrix:
                       viewing transform
                       viewing transform
----------------------------------------------------------------
Thus, the glTranslatef(0,-2,-1) is applied to just the viewing transform (not the viewing-transform-and-two-translations) and the bottom teapot is drawn with that MC->VC matrix:
          viewing transform * glTranslatef(0,-2,-1)
                       viewing transform
----------------------------------------------------------------
The final glPopMatrix restores the modelview stack to the same state as it was when display was first called:
                       viewing transform
----------------------------------------------------------------
This is important so that the next time display is called, everything will be positioned the same way it was the first time.
All three teapots are the same size, yet the bottom one appears bigger. Why?
How would you change teapotsgalore.cc to move all three teapots by the same amount?
How would you change teapotsgalore.cc to move just the middle teapot, keeping the other two in same place?
What happens if the second glPopMatrix in display isn't there? Try resizing the window or partially covering it, to force a repaint. Why does this occur? (Consider what happens to the modelview stack.)
What happens if the gluLookAt(0.0,0.0,5.0,0.0,0.0,0.0,0.0,1.0,0.0) line in main is moved after the second glPushMatrix in display? Why does this occur? (Consider what happens to the modelview stack.)
What happens if the glLoadIdentity line in main is moved to just before the "draw scene" comment in display, and why? (Consider what happens to the modelview stack.)
You want to draw a scene in which a car (made up of a body and four wheels) sits in front of a house (made up of the house itself, a roof, and a chimney). How would you structure the transformation matrices and glPushMatrix and glPopMatrix commands so that the entire car can be positioned as a unit, rather than having to move the car body and wheels separately to in order to move the whole car? Do a similar thing for the house.
There's only so much you can do with teapots, even when you can move them around in the scene. The easiest (though not the only) way to create objects is to use the high-level objects defined by GLUT:
void glutSolidCone ( GLdouble base, GLdouble height,
                     GLint slices, GLint stacks );
| A cone oriented along the z axis - the bottom is at z=0 and the top at z=height. base specifies the radius of the base. The cone is subdivided into the specified number of slices around its base and stacks along its height. More subdivisions means more polygons, but a smoother-appearing cone. |
void glutSolidCube ( GLdouble size ); |
A axis-aligned cube with the specified dimension along all sides. |
void glutSolidDodecahedron (); |
A dodecahedron (12-sided solid). |
void glutSolidIcosahedron (); |
An icosahedron (20-sided solid). |
void glutSolidOctahedron (); |
An octahedron (8-sided solid). |
void glutSolidSphere ( GLdouble radius, GLint slices, GLint stacks ); |
A sphere with the specified radius, subdivided into the specified number of slices around the z axis (lines of longitude) and stacks> along the z axis (lines of latitude). More subdivisions means more polygons, but a smoother-appearing sphere. |
void glutSolidTeapot ( GLdouble size ); |
A teapot with lid pointing up (along the y axis) and spout along the x axis, with the specified size. |
void glutSolidTetrahedron (); |
An tetrahedron (4-sided solid). |
void glutSolidTorus  ( GLdouble innerRadius, GLdouble outerRadius,
                       GLint nsides, GLint rings );
|
A torus whose hole is centered around the z axis. The outerRadius (radius of the entire torus) while the innerRadius is the radius of cross-section of the solid part of the torus. The torus is subdivided into nsides strips around the torus (if you took a cross-section, the cross-section would be a polygon with nsides sides) and rings sections. More subdivisions means more polygons, but a smoother-appearing torus. |
All of these objects also have a wireframe form e.g. glutWireTeapot and glutWireTorus.
Create a scene with a car (made up of a rectangular body and four toroidal wheels) sitting in front of a house (made up of a rectangular building, a cone roof, and a rectangular chimeny). Structure the scene so that the car and house can each be positioned as a unit, instead of having to move each component separately.
By default, OpenGL does not do depth-buffering - which leads to incorrect effects once lighting and/or materials are introduced. There are three things to do to turn on depth-buffering:
Request a depth buffer when the display is initialized: glutInitDisplayMode(GLUT_RGB | GLUT_DEPTH) - the GLUT_DEPTH part is what requests the depth buffer, and the single | is a bitwise-or operator (the details are beyond what we are doing here, but it combines the two values).
Enable the depth buffer calculations: glEnable(GL_DEPTH_TEST). This must be done after the window has been created (the command applies to the current window).
Clear the depth buffer when the screen is cleared: glClear(GL_COLOR_BUFFER_BIT | GL_DEPTH_BUFFER_BIT) - the GL_DEPTH_BUFFER_BIT part is what specifies that the depth buffer should be cleared.
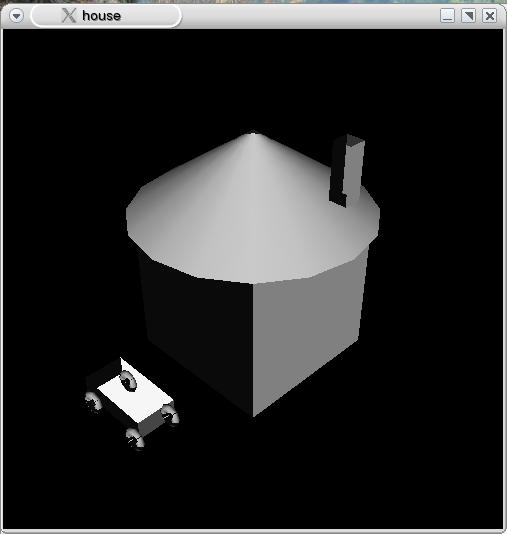
Look for these elements in the following program: (the picture on the right shows what happens when depth-buffering is not enabled)
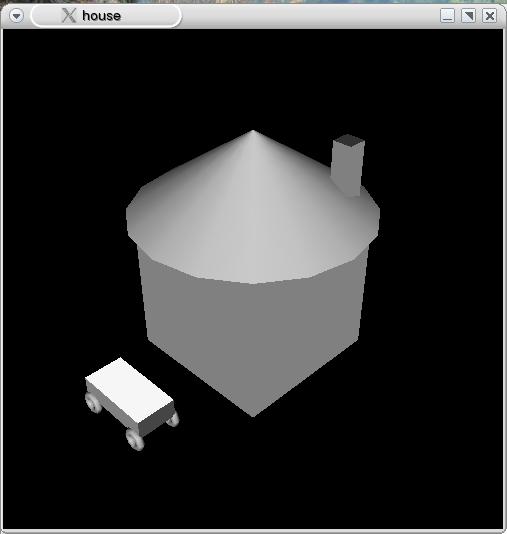
// house.cc

#include <GL/gl.h>
#include <GL/glut.h>

void display () {

    /* clear window */
    glClear(GL_COLOR_BUFFER_BIT | GL_DEPTH_BUFFER_BIT);

    /* future matrix manipulations should affect the modelview matrix */
    glMatrixMode(GL_MODELVIEW);

    /* draw scene */
    glPushMatrix();

    // house
    glPushMatrix();
    glutSolidCube(2);                 // building

    glTranslatef(0,1,0);
    glPushMatrix();                   // roof
    glRotatef(-90,1,0,0);
    glutSolidCone(1.5,1,16,8);
    glPopMatrix();

    glTranslatef(.75,.5,-.75);
    glPushMatrix();                   // chimney
    glScalef(1,3,1);
    glutSolidCube(.25);
    glPopMatrix();
    glPopMatrix();

    glTranslatef(0,-.65,2);

    // car
    glPushMatrix();
    glPushMatrix();                   // body
    glScalef(2,.5,1);
    glutSolidCube(.5);
    glPopMatrix();
    glTranslatef(0,0,.25);
    glPushMatrix();
    glTranslatef(-.4,-.2,0);
    glutSolidTorus(.05,.1,8,8);       // wheel
    glTranslatef(.8,0,0);
    glutSolidTorus(.05,.1,8,8);       // wheel
    glPopMatrix();
    glTranslatef(0,0,-.5);
    glPushMatrix();
    glTranslatef(-.4,-.2,0);
    glutSolidTorus(.05,.1,8,8);       // wheel
    glTranslatef(.8,0,0);
    glutSolidTorus(.05,.1,8,8);       // wheel
    glPopMatrix();
    glPopMatrix();

    glPopMatrix();

    /* flush drawing routines to the window */
    glFlush();
}

void reshape ( int width, int height ) {

    /* define the viewport transformation */
    glViewport(0,0,width,height);
}

int main ( int argc, char * argv[] ) {

    /* initialize GLUT, using any commandline parameters passed to the
       program */
    glutInit(&argc,argv);

    /* setup the size, position, and display mode for new windows */
    glutInitWindowSize(500,500);
    glutInitWindowPosition(0,0);
    glutInitDisplayMode(GLUT_RGB | GLUT_DEPTH);

    /* create and set up a window */
    glutCreateWindow("hello, teapot!");
    glutDisplayFunc(display);
    glutReshapeFunc(reshape);

    /* set up depth-buffering */
    glEnable(GL_DEPTH_TEST);

    /* turn on default lighting */
    glEnable(GL_LIGHTING);
    glEnable(GL_LIGHT0);

    /* define the projection transformation */
    glMatrixMode(GL_PROJECTION);
    glLoadIdentity();
    gluPerspective(40,1,4,20);

    /* define the viewing transformation */
    glMatrixMode(GL_MODELVIEW);
    glLoadIdentity();
    gluLookAt(5.0,5.0,5.0,0.0,0.0,0.0,0.0,1.0,0.0);

    /* tell GLUT to wait for events */
    glutMainLoop();
}
Without lighting, the scene is not very interesting - and it certainly doesn't have much of a 3D feel. The OpenGL lighting model is a little different from the model discussed in class, though it has many similarities.
Each light source has three separately-configurable components: ambient, diffuse, and specular. Each component sets the light's color for that portion of the illumination equation. (This is different from the model discussed in class in two ways: first, the ambient term is now summed over all lights because each light may contribute to the ambient, and second, the color used for the light in each term of the equation may be different.) There are several reasons for modeling lights in this way. Consider two examples:
The ambient light in the scene is the light that has bounced off many surfaces before reaching the viewer's eye, so every light in the scene is contributing to the ambient light (as are lights not directly modeled such as sunlight). Thus, it is reasonable to think of each light's contribution to the ambient separately.
Consider the Cornell box, in which red and green walls reflected some color onto the white boxes. Our direct-illumination model couldn't account for that effect, but in OpenGL it is possible to set up a light source with a red diffuse component to simulate the indirect illumination from the red wall.
To use any lights at all, OpenGL must be told to perform lighting calculations with glEnable(GL_LIGHTING). As with GL_DEPTH_TEST, this affects the current window and so must be done after creating the window. Each individual light must then be separately enabled and configured.
At a bare minimum, if you enable lighting and GL_LIGHT0, you'll get a single white light: (see the house.cc example)
    /* turn on default lighting */
    glEnable(GL_LIGHTING);
    glEnable(GL_LIGHT0);
This often provides enough illumination to get your scene arranged.
Fancier lighting effects requires more than just enabling one or more lights - they also need to be configured with a series of glLightfv commands.
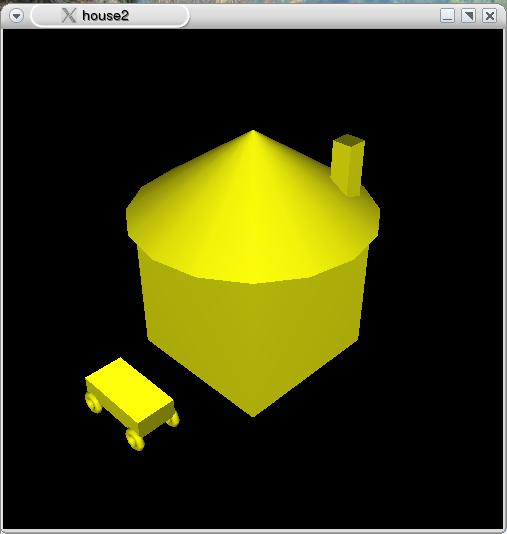
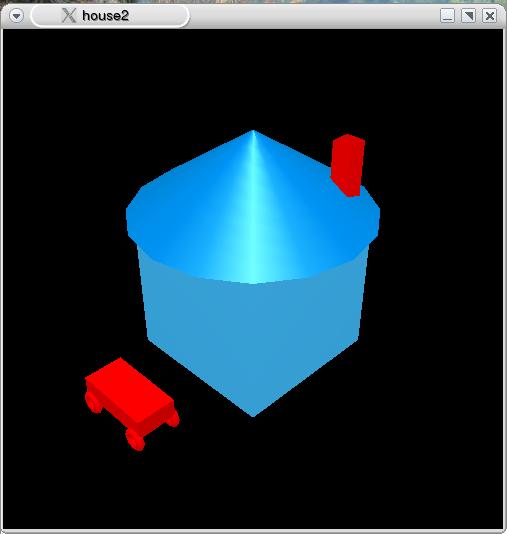
The following example illustrates enabling and configuring a blue ambient light and a yellow point light which contributes the same color (yellow) to the ambient, diffuse, and specular terms. (The picture on the right is without the blue ambient light - the effect is subtle, but the blue ambient light makes the scene a little grayer because yellow + blue = white.) Only the main program is given because the rest of the program is the same as in house.cc.

// house2.cc

int main ( int argc, char * argv[] ) {

    /* initialize GLUT, using any commandline parameters passed to the
       program */
    glutInit(&argc,argv);

    /* setup the size, position, and display mode for new windows */
    glutInitWindowSize(500,500);
    glutInitWindowPosition(0,0);
    glutInitDisplayMode(GLUT_RGB | GLUT_DEPTH);

    /* create and set up a window */
    glutCreateWindow("house2");
    glutDisplayFunc(display);
    glutReshapeFunc(reshape);

    /* set up depth-buffering */
    glEnable(GL_DEPTH_TEST);

    /* set up lights */
    glMatrixMode(GL_MODELVIEW);
    glLoadIdentity();

    GLfloat lightpos[] = { 0.0, 0.0, 15.0 };
    GLfloat lightcolor[] = { 1.0, 1.0, 0.0 };
    GLfloat ambcolor[] = { 0.0, 0.0, 1.0 };

    glEnable(GL_LIGHTING);                               // enable lighting
    glLightModelfv(GL_LIGHT_MODEL_AMBIENT,ambcolor);     // ambient light

    glEnable(GL_LIGHT0);                                 // enable light source
    glLightfv(GL_LIGHT0,GL_POSITION,lightpos);           // config light source
    glLightfv(GL_LIGHT0,GL_AMBIENT,lightcolor);
    glLightfv(GL_LIGHT0,GL_DIFFUSE,lightcolor);
    glLightfv(GL_LIGHT0,GL_SPECULAR,lightcolor);

    /* define the projection transformation */
    glMatrixMode(GL_PROJECTION);
    glLoadIdentity();
    gluPerspective(40,1,4,20);

    /* define the viewing transformation */
    glMatrixMode(GL_MODELVIEW);
    glLoadIdentity();
    gluLookAt(5.0,5.0,5.0,0.0,0.0,0.0,0.0,1.0,0.0);

    /* tell GLUT to wait for events */
    glutMainLoop();
}
It is legal to use values between -1.0 and 1.0 as the color components for the ambient light; only values between 0.0 and 1.0 are legal for light sources. Using negative values for the ambient light serves to darken the overall scene.
For additional light sources, enable and configure GL_LIGHT1, GL_LIGHT2, etc. A maximum of 8 lights is permitted.
Lights are subject to the modelview matrix, just like the objects in the scene. (They are not, however, subject to the projection matrix.) Thus, where light positions are specified in the code matters.
In the house2.cc example above, the light positions are specified before the viewing transformation. Since glLoadIdentity is called before any light positions are set, the MC->VC matrix for the lights will be the identity matrix. This means the lights are effectively defined in VC, and the positions specified are relative to the camera's position. On the other hand, all of the objects in the scene are defined after the modelview matrix has been set to the viewing transformation, so their MC->VC matrix includes the viewing transformation.
Now, consider what happens if the viewing transformation is changed e.g. the eye point is set to (0,0,7) instead of (5,5,5) (i.e. gluLookAt(0.0,0.0,7.0,0.0,0.0,0.0,0.0,1.0,0.0)). The lights still have the same identity MC->VC matrix, while the objects now have a different viewing transform - in the scene it appears that the lights have remained fixed, but the objects have moved.
If, on the other hand, the lighting information is specified after the viewing transformation is defined, the lights will remain in the same position relative to the scene (but move relative to the camera).
Change the eye point to (0,0,7) and observe the effects, in terms of both the scene objects and the light. Make sure this makes sense in light of the discussion in the previous section.
Move the "set up lights" section in main to just before the call to glutMainLoop. (Remove or comment out the glLoadIdentity part when you do this.) Compare the scene when the eye point is set at (5,5,5) to when it is set at (0,0,7). What do you observe, and why?
Materials, like many other OpenGL commands, affect the current state - once a material is set, it remains in effect until changed. The following program demonstrates materials:
// house3.cc

#include <GL/gl.h>
#include <GL/glut.h>

void setMaterial ( GLfloat ambientR, GLfloat ambientG, GLfloat ambientB,
		   GLfloat diffuseR, GLfloat diffuseG, GLfloat diffuseB,
		   GLfloat specularR, GLfloat specularG, GLfloat specularB,
		   GLfloat shininess ) {

    GLfloat ambient[] = { ambientR, ambientG, ambientB };
    GLfloat diffuse[] = { diffuseR, diffuseG, diffuseB };
    GLfloat specular[] = { specularR, specularG, specularB };

    glMaterialfv(GL_FRONT_AND_BACK,GL_AMBIENT,ambient);
    glMaterialfv(GL_FRONT_AND_BACK,GL_DIFFUSE,diffuse);
    glMaterialfv(GL_FRONT_AND_BACK,GL_SPECULAR,specular);
    glMaterialf(GL_FRONT_AND_BACK,GL_SHININESS,shininess);
}

void display () {

    /* clear window */
    glClear(GL_COLOR_BUFFER_BIT | GL_DEPTH_BUFFER_BIT);

    /* future matrix manipulations should affect the modelview matrix */
    glMatrixMode(GL_MODELVIEW);

    /* draw scene */
    glPushMatrix();

    // house
    glPushMatrix();
    setMaterial(0.0,0.5,1.0,0.0,0.5,1.0,1.0,1.0,1.0,1);
    glutSolidCube(2);                 // building

    glTranslatef(0,1,0);
    glPushMatrix();                   // roof
    glRotatef(-90,1,0,0);
    setMaterial(0.0,0.5,1.0,0.0,0.5,1.0,1.0,1.0,1.0,50);
    glutSolidCone(1.5,1,16,8);
    glPopMatrix();

    glTranslatef(.75,.5,-.75);
    glPushMatrix();                   // chimney
    glScalef(1,3,1);
    setMaterial(1.0,0.0,0.0,1.0,0.0,0.0,0.0,0.0,0.0,1);
    glutSolidCube(.25);
    glPopMatrix();
    glPopMatrix();

    glTranslatef(0,-.65,2);

    // car
    setMaterial(1.0,0.0,0.0,1.0,0.0,0.0,1.0,0.0,0.0,50);
    glPushMatrix();
    glPushMatrix();                   // body
    glScalef(2,.5,1);
    glutSolidCube(.5);
    glPopMatrix();
    glTranslatef(0,0,.25);
    glPushMatrix();
    glTranslatef(-.4,-.2,0);
    glutSolidTorus(.05,.1,8,8);       // wheel
    glTranslatef(.8,0,0);
    glutSolidTorus(.05,.1,8,8);       // wheel
    glPopMatrix();
    glTranslatef(0,0,-.5);
    glPushMatrix();
    glTranslatef(-.4,-.2,0);
    glutSolidTorus(.05,.1,8,8);       // wheel
    glTranslatef(.8,0,0);
    glutSolidTorus(.05,.1,8,8);       // wheel
    glPopMatrix();
    glPopMatrix();

    glPopMatrix();

    /* flush drawing routines to the window */
    glFlush();
}

void reshape ( int width, int height ) {

    /* define the viewport transformation */
    glViewport(0,0,width,height);
}

int main ( int argc, char * argv[] ) {

    /* initialize GLUT, using any commandline parameters passed to the
       program */
    glutInit(&argc,argv);

    /* setup the size, position, and display mode for new windows */
    glutInitWindowSize(500,500);
    glutInitWindowPosition(0,0);
    glutInitDisplayMode(GLUT_RGB | GLUT_DEPTH);

    /* create and set up a window */
    glutCreateWindow("house2");
    glutDisplayFunc(display);
    glutReshapeFunc(reshape);

    /* set up depth-buffering */
    glEnable(GL_DEPTH_TEST);

    /* set up lights */
    glMatrixMode(GL_MODELVIEW);
    glLoadIdentity();

    GLfloat lightpos[] = { 0.0, 15.0, 15.0 };
    GLfloat lightcolor[] = { 0.5, 0.5, 0.5 };
    GLfloat ambcolor[] = { 0.2, 0.2, 0.0 };

    glEnable(GL_LIGHTING);
    glLightModelfv(GL_LIGHT_MODEL_AMBIENT,ambcolor);

    glEnable(GL_LIGHT0);
    glLightfv(GL_LIGHT0,GL_POSITION,lightpos);
    glLightfv(GL_LIGHT0,GL_AMBIENT,lightcolor);
    glLightfv(GL_LIGHT0,GL_DIFFUSE,lightcolor);
    glLightfv(GL_LIGHT0,GL_SPECULAR,lightcolor);

    /* define the projection transformation */
    glMatrixMode(GL_PROJECTION);
    glLoadIdentity();
    gluPerspective(40,1,4,20);

    /* define the viewing transformation */
    glMatrixMode(GL_MODELVIEW);
    glLoadIdentity();
    gluLookAt(5.0,5.0,5.0,0.0,0.0,0.0,0.0,1.0,0.0);

    /* tell GLUT to wait for events */
    glutMainLoop();
}
The light positions and colors have been changed slightly, but the main focus of this example is on the setMaterial function and the calls to it in display. setMaterial is not an OpenGL function - the series of glMaterialfv and glMaterialf calls in setMaterial are the actual OpenGL commands. setMaterial is used because it can become quite tedious to have to repeat large numbers of glMaterial* calls each time a new material is specified. Note that the current material remains in effect until changed, so the four wheels of the car have the same material as the body of the car.
Each material has reflectances (or colors) for the ambient, diffuse, and specular terms of the lighting equation. The shininess is the specular exponent in the lighting equation.
Experiment with the different values for the materials. What do you observe, and why?
Create a program with a bunch of curved objects (such as spheres, cones, or torii), and use different material settings for each. Try to create a plastic-looking object, a metal-looking object, and a chalky-looking object.
Animation in OpenGL doesn't require much more than drawing a static scene. The following program displays a slowly moving teapot:
// flyingteapot.cc
#include <GL/gl.h>
#include <GL/glut.h>

double x, y, z;           // current teapot position (initialized in main)

void display () {

    /* clear window */
    glClear(GL_COLOR_BUFFER_BIT | GL_DEPTH_BUFFER_BIT);

    /* future matrix manipulations should affect the modelview matrix */
    glMatrixMode(GL_MODELVIEW);

    /* draw scene */
    glPushMatrix();
    glTranslatef(x,y,z);
    glutWireTeapot(.5);
    glPopMatrix();

    /* flush drawing routines to the window */
    glFlush();
}

void animate () {

    /* update state variables */
    x += .001;
    y += .001;
    z -= .001;

    /* refresh screen */
    glutPostRedisplay();
}

void reshape ( int width, int height ) {

    /* define the viewport transformation */
    glViewport(0,0,width,height);

}


int main ( int argc, char * argv[] ) {

    /* initialize GLUT, using any commandline parameters passed to the
       program */
    glutInit(&argc,argv);

    /* setup the size, position, and display mode for new windows */
    glutInitWindowSize(500,500);
    glutInitWindowPosition(0,0);
    glutInitDisplayMode(GLUT_RGB | GLUT_DEPTH);

    /* create and set up a window */
    glutCreateWindow("flying teapot");
    glutDisplayFunc(display);
    glutReshapeFunc(reshape);
    glutIdleFunc(animate);

    /* depth-buffering */
    glEnable(GL_DEPTH_TEST);

    /* define the projection transformation */
    glMatrixMode(GL_PROJECTION);
    glLoadIdentity();
    glFrustum(-1.0,1.0,-1.0,1.0,.5,3.0);

    /* define the viewing transformation */
    glMatrixMode(GL_MODELVIEW);
    glLoadIdentity();
    gluLookAt(1.0,1.0,1.0,0.0,0.0,0.0,0.0,1.0,0.0);

    /* initialize state variables (teapot position) */
    x = 0;
    y = 0;
    z = 0;

    /* tell GLUT to wait for events */
    glutMainLoop();
}
Let's consider the new parts.
The animation is actually accomplished by defining the idle callback - the "idle callback" is a function which is called when OpenGL isn't handling any other kinds of events (like redisplays or mouse clicks). Like the display callback, the idle callback is a function with no parameters and which returns void. It is called animate in this program, but you can call it anything you want. The idle callback is set up with the glutIdleFunc. Typically you would call this in main, right after setting up the other window callbacks, but you can call it any time you want (such as to change the idle callback function in order to start and stop the animation).
The animate function handles updating the state - that is, anything which is different from one frame to the next. In this case, it is the teapot's position since it is moving. This state should be stored in one or more global variables. Global variables are necessary because both the display function and the animate function need to know the values (display so it can draw and animate so it can update), and the values need to persist between calls to animate - and you aren't allowed to change the parameters or return values for the callback functions themselves. Once the state has been updated, the screen needs to be redrawn to reflect the new state. Do this by calling glutPostRedisplay() - this asks OpenGL to schedule a call to the display callback. Don't call the display function directly!
The only other new elements of the program are changes to display in order to translate the teapot by the specified amount, and in main to initialize the state's variables to the teapot's starting location.
Running the flying teapot program doesn't produce very pleasing results - the image flickers quite a bit because the screen is constantly being cleared and the teapot redrawn. Since the time that the screen is blank or contains only a half-drawn teapot is a significant portion of the time between teapot redraws, the image flickers.
The solution is to use double buffering - instead of clearing and drawing directly to the screen, the image is drawn to an offscreen buffer which can then be transferred to the screen very quickly (and all at once) so that a completed image is on the screen most of the time instead of a half-drawn image.
There are two steps to use double buffering: tell OpenGL to use double buffering when you create a new window by adding GLUT_DOUBLE to the values passed to glutInitDisplayMode, and telling OpenGL to display the offscreen buffer with glutSwapBuffers(). Look for these lines in the improved flying teapot program:
// flyingteapot2.cc - flying teapot with double buffering
#include <GL/gl.h>
#include <GL/glut.h>

double x, y, z;           // current teapot position (initialized in main)

void display () {

    /* clear window */
    glClear(GL_COLOR_BUFFER_BIT | GL_DEPTH_BUFFER_BIT);

    /* future matrix manipulations should affect the modelview matrix */
    glMatrixMode(GL_MODELVIEW);

    /* draw scene */
    glPushMatrix();
    glTranslatef(x,y,z);
    glutWireTeapot(.5);
    glPopMatrix();

    /* flush drawing routines to the window */
    glFlush();

    /* display the offscreen buffer */
    glutSwapBuffers();
}

void animate () {

    /* update state variables */
    x += .001;
    y += .001;
    z -= .001;

    /* refresh screen */
    glutPostRedisplay();
}

void reshape ( int width, int height ) {

    /* define the viewport transformation */
    glViewport(0,0,width,height);

}


int main ( int argc, char * argv[] ) {

    /* initialize GLUT, using any commandline parameters passed to the
       program */
    glutInit(&argc,argv);

    /* setup the size, position, and display mode for new windows */
    glutInitWindowSize(500,500);
    glutInitWindowPosition(0,0);
    glutInitDisplayMode(GLUT_RGB | GLUT_DOUBLE | GLUT_DEPTH);

    /* create and set up a window */
    glutCreateWindow("flying teapot");
    glutDisplayFunc(display);
    glutReshapeFunc(reshape);
    glutIdleFunc(animate);

    /* depth-buffering */
    glEnable(GL_DEPTH_TEST);

    /* define the projection transformation */
    glMatrixMode(GL_PROJECTION);
    glLoadIdentity();
    glFrustum(-1.0,1.0,-1.0,1.0,.5,3.0);

    /* define the viewing transformation */
    glMatrixMode(GL_MODELVIEW);
    glLoadIdentity();
    gluLookAt(1.0,1.0,1.0,0.0,0.0,0.0,0.0,1.0,0.0);

    /* initialize state variables (teapot position) */
    x = 0;
    y = 0;
    z = 0;

    /* tell GLUT to wait for events */
    glutMainLoop();
}
GLUT provides a number of nice high-level objects (cones, spheres, cubes, etc), but sometimes you want something different.
OpenGL provides a number of primitives including points, lines, and polygons. Each of these objects is ultimately made up of an (ordered) collection of vertices. This section deals only with collections of points; see chapter 2 of the Red Book for more information about lines and polygons.
Vertex coordinates are specified with glVertex. There are a number of variations of glVertex, but you can get away with just glVertex3d which takes three (the 3) double (the d) values representing the x, y, and z coordinates of the vertex.
Vertices don't occur by themselves - they are grouped together to form a collection of points (or lines or polygons). The beginning and end of each group is denoted by glBegin and glEnd, and the parameter to glBegin tells OpenGL how to interpret the collection of vertices that is to follow.
For example, the following specifies a collection of individual points (which happen to form the corners of a box):
glBegin(GL_POINTS);
glVertex3d(1,1,1);
glVertex3d(1,2,1);
glVertex3d(2,2,1);
glVertex3d(2,1,1);
glEnd();
Since GL_POINTS was specified, this would be drawn as four individual points (instead of as two lines or one polygon or two triangles or various other options). Changing glBegin's parameter changes the interpretation.
You can specify more information for each vertex besides just its coordinates. For example, the current drawing color can be set:
glBegin(GL_POINTS);
glColor3f(1,0,0);
glVertex3d(1,1,1);
glVertex3d(1,2,1);
glColor3f(0,0,1);
glVertex3d(2,2,1);
glColor3f(1,0,1);
glVertex3d(2,1,1);
glEnd();
This draws the first two points in red, the third in blue, and the last in magenta.
If you want to do more than this - such as to let OpenGL's lighting model light things (which means you need to set vertex normals), see chapter 2 of the Red Book.
Cylinders can be drawn with gluCylinder:
gluCylinder(gluNewQuadric(),base,top,height,slices,stacks);
This draws a cylinder oriented along the z axis with the base of the cylinder at z=0 and the top at z=height. "base" and "top" specify the radius of the cylinder at z=0 and z=height, respectively - use the same value in both cases for a cylinder. Setting "top" or "base" to 0 results in a cone. "slices" and "stacks" specify the number of subdivisions around the z axis and along the z axis - a larger number will result in a smoother-looking polygon, though larger numbers mean more polygons and thus more rendering time.
The key to transparency is blending - the combination of existing color values in the frame buffer (i.e. the color of pixels on the screen) with new colors. Without blending, writing a new color for a pixel overwrites the existing value in the frame buffer. Since blending combines existing clors with new colors, it lets you have transparent objects and perform antialiasing.
If you want to use blending, you need to enable it with glEnable(GL_BLEND). You also need to tell OpenGL how to blend each new color (the source color) with the existing color in the frame buffer (the destination color). There are many options, including simply adding the new source color to the destination color and computing a weighted average of the two colors. However, before saying how to specify the blending function, alpha values need to be introduced.
To handle transparency, the RGB color model is extended to RGBA - each color is made up of a red component, a green component, a blue component...and an alpha component (the A). This alpha value specifies the transparency - 1 means the color is completely opaque, while 0 means it is completely transparent. If you plan to use blending, you should specify that you want to use the RGBA color model when you specify the display mode: use GLUT_RGBA instead of GLUT_RGB in the arguments to glutInitDisplayMode.
Once you have enabled blending, you need to specify the blending function with glBlendFunc. glBlendFunc takes two constants as parameters - the first indicates how much of the source color to use while the second indicates how much of the destination color to use. There are many choices, but the two combinations you are most likely to want to use are glBlendFunc(GL_SRC_ALPHA,GL_ONE_MINUS_SRC_ALPHA) and glBlendFunc(GL_SRC_ALPHA,GL_ONE). Let (Sr,Sg,Sb,Sa) be the source color and (Dr,Dg,Db,Da) be the destination color. With glBlendFunc(GL_SRC_ALPHA,GL_ONE_MINUS_SRC_ALPHA), the combined color is (Sa*Sr+(1-Sa)*Dr,Sa*Sg+(1-Sa)*Dg,Sa*Sb+(1-Sa)*Db,Sa*Sa+(1-Sa)*Da) i.e. the weighted average of the two colors using the source alpha component to determine how much of the source color to use. With glBlendFunc(GL_SRC_ALPHA,GL_ONE), the combined color is (Sa*Sr+Dr,Sa*Sg+Dg,Sa*Sb+Db,Sa*Sa+Da) i.e. the source color is weighted by the source alpha component and added to the destination color. Use the second option if you want pixel colors to be summed with each new contribution and the first if you want to combine pixel colors without making things brighter just by having more things drawn in one pixel.
Note: do not enable depth-buffering if you are using blending! (You want to draw all of the pixels in the scene regardless of overlaps if you are combining several colors into one.) Additional tricks are required if you want combine depth-buffering for some objects with blending for other objects.
The following program demonstrates blending - it draws one million points at random locations within the drawing window and uses glBlendFunc(GL_SRC_ALPHA,GL_ONE) so that more points occurring in a single pixel results in a brighter color.
// particles.cc
#include <cstdlib>

#include <GL/gl.h>
#include <GL/glut.h>

void display () {

    /* clear window */
    glClear(GL_COLOR_BUFFER_BIT);

    /* future matrix manipulations should affect the modelview matrix */
    glMatrixMode(GL_MODELVIEW);

    /* draw scene */
    glBegin(GL_POINTS);
    glColor4f(1,1,1,.1);
    for ( int ctr = 0 ; ctr < 1000000 ; ctr++ ) {
	glVertex3f(rand()%500,rand()%500,0);
    }
    glEnd();

    /* flush drawing routines to the window */
    glFlush();
}

void reshape ( int width, int height ) {

    /* define the viewport transformation */
    glViewport(0,0,width,height);
}


int main ( int argc, char * argv[] ) {

    /* initialize GLUT, using any commandline parameters passed to the
       program */
    glutInit(&argc,argv);

    /* setup the size, position, and display mode for new windows */
    glutInitWindowSize(500,500);
    glutInitWindowPosition(0,0);
    glutInitDisplayMode(GLUT_RGBA);

    /* create and set up a window */
    glutCreateWindow("dots");
    glutDisplayFunc(display);
    glutReshapeFunc(reshape);

    /* blending */
    glEnable(GL_BLEND);
    glBlendFunc(GL_SRC_ALPHA,GL_ONE);

    /* define the projection transformation */
    glMatrixMode(GL_PROJECTION);
    glLoadIdentity();
    glOrtho(-10,510,-10,510,-10,10);

    /* define the viewing transformation */
    glMatrixMode(GL_MODELVIEW);
    glLoadIdentity();
    gluLookAt(0.0,0.0,10.0,0.0,0.0,0.0,0.0,1.0,0.0);

    /* tell GLUT to wait for events */
    glutMainLoop();
}
Note, among other things, the use of glColor4f(1,1,1,.1) instead of glColor3f to specify an alpha of .1 for the points.
Experiment with commenting out glEnable(GL_BLEND) to turn off blending, and with using glBlendFunc(GL_SRC_ALPHA,GL_ONE_MINUS_SRC_ALPHA) instead of glBlendFunc(GL_SRC_ALPHA,GL_ONE).
|
|