| CPSC 120 |
Principles of Computer Science |
Fall 2024 |
Lab 2
Drawing and Interaction
Due: Fri 9/13 at the start of lab
Labs are due at the start of lab. It is OK if you
show up to lab and copy your files to the handin directory at the very
beginning of lab, but this should take at most a couple of minutes and
you should not spend the next lab period finishing up the previous
week's lab. I will check timestamps, and files handed in more than
five minutes after the start of lab will be considered late.
See
the policy on late work and
extensions.
Introduction
This week's lab deals with drawing (shapes and colors) and
interaction (using the mouse position and responding to mouse clicks
and key presses).
Successfully completing this lab means that you are able to:
- use core Processing commands: open a drawing window, clear the
window, set fill and stroke colors, draw basic shapes (ellipses,
rectangles, lines)
- understand fundamental concepts: positioning shapes in the
drawing window, RGB color
- create an interactive sketch that responds to the user moving
and clicking the mouse
- decompose a complex scene into component shapes
- use the Processing API to learn about new things
Academic Integrity and Collaboration
Labs are a
chance to practice and gain understanding. You may get help in
office hours, at Teaching Fellows, and from other students and may
use other materials (such as reference books or websites) but the
course materials (including provided links or references to
documentation and other materials) along with office hours and the
Teaching Fellows should be your primary resources. Always start
with these!
You may not, however, copy or be in possession of someone
else's program or solution before you have handed in your own and you
may not write code collaboratively with another student.
You must document any help received and any outside resources used.
See the full collaboration
policy for more on this.
Be careful not to rely too much on others — things often
look easy (or at least easier) when someone else does it. (You
don't want the exam to be where you discover this!) You should
always make the first attempt at doing something yourself.
Also keep in mind that the goal of the exercises is learning
the process of creating programs, not obtaining any
particular program. When you get help, also ask about that process
— if you're stuck on what to do next, ask not only what to do
next but also how one knows that's what to do, or if your program
isn't working correctly, ask not only what's wrong and how to fix it
but also how to track down the problem for yourself.
And finally, make sure that you always fully understand the help
you received — you should be able to explain your solution
to someone else, and should never just write down code that
someone else wrote or told you to write without be able to
explain what it does and why.
Handin
To hand in your work:
-
Make sure that your name and a short description of the
sketch are included in a comment at the beginning of each
sketch.
-
Make sure that you've auto-formatted each sketch.
-
Copy the entire lab2a, lab2b, lab2c,
and lab2d directories from your sketchbook
(~/cs120/sketchbook) to your handin directory (found
inside /classes/cs120/handin).
Preliminaries
Getting Started
You've started up Processing and are staring at an empty editor
window — now what?
Start by writing comments with your name and a brief description of
the sketch.
Next, determine whether you are writing a static sketch or an
active sketch — do elements of the scene change over time, or
have the potential to change over time? If so, you need an active
sketch; if not, a static sketch is fine.
Then set up the program structure —
copy one of the following templates into your sketch.
  // open window
  // clear the background
  // draw stuff
| |
  void setup () {
    // open window
    // other things done only once at the beginning
  }

  void draw () {
    // draw one frame
    // update what changes for next frame
  }
|
Review the slides from Wednesday's class to remind yourself which
template is for which kind of sketch and to see examples of
each.
Finally, fill in the code for your sketch under the appropriate
comments. (Note that you won't have anything for "update what
changes for next frame" in this lab.) To figure out coordinates and
sizes for elements in your scene, draw a picture of the scene on a
piece of paper, identify what you need to know, label what you do
know, and remember when to eyeball and when you can work out exact
values for the "need to know" values.
Also refer to the in-class exercises handouts (posted on the
schedule page) for summaries of drawing commands and key syntax
discussed in class and check out the examples and solutions
posted on the schedule page to see how these elements are used and
combined.
Incremental Development
Build up your sketch one (small) piece at a time, running it
frequently to make sure it does what you want. This gives you
confidence that you are on the right track, and if something isn't
what you want, it is much easier to find and fix the problem if you
haven't added a ton of new code.
You can also practice incremental development by starting with a
simpler version of a task first. For example, exercises #1 and #2
below break down the task of creating an interactive sketch into two
pieces — first draw a static version of the scene, then add
the interaction.
Readability and Formatting Your Code
Most of the whitespace — spaces, tabs, newlines, and such
— in a program doesn't matter to the computer. (The only
requirement is to separate consecutive words with whitespace.) But
whitespace does make a big difference to the humans (including you!)
reading your program, and there are established conventions about
how to use whitespace to make your programs more
readable.
For example, you may notice that the lines of code inside setup
and draw in a sketch are usually indented:
void setup () {
  size(400,400);
}
(In fact, lines of code inside any set of curly brackets
({}) are indented — we'll see other cases
later.)
Indentation is so useful that Processing (and many other
programming environments) provide an auto-format tool — choose
Tools->Auto Format from the menu. (Once you've written some code,
try messing up the indentation of one line or putting two lines on
one, and then Auto Format to see what happens.) It's also useful to
learn the keyboard shortcut — ctrl-T — so that you can
auto format frequently. (This can help you find some kinds of
syntax errors — if you auto format and things don't indent the
way you expect, there's likely a syntax issue near the beginning of
the incorrectly-indented part.)
Other conventions include using blank lines to visually group
related instructions (an
example) and using line breaks to keep lines from becoming too
long. How long is too long? 80 characters is commonly cited as the
upper limit because that's the typical width of a printed page
— longer than that means lines will wrap awkwardly when
printed. Tip: the following comment is 78 characters wide. Paste
it as the first or last line in your sketch and size the Processing
window so the editor is just wide enough to show the line without
having to scroll sideways. Then make sure to press Enter to add
line breaks to keep lines from extending past the edge of the editor
window. (It is legal to put a line break wherever whitespace is
allowed; pay attention to examples to get a sense of better
spots.)
// ---------------------------------------------------------------------------
Reference and Learning More
Processing provides a bunch of building blocks for sketches —
things like rect and ellipse and fill
and rectMode are part of this. How do you know what all
these building blocks are and how to use them? The traditional way
this information is made available to programmers is through an
API. ("API" stands for "application programming interface"; an
interface is where two different systems meet, and the API defines
how those systems can interact with each other.)
Access the Processing API by clicking on the link below, or from
within the Processing environment, by choosing Help->Reference from
the menu.
Try it out: go to the API, then look for the ellipse command
(type ellipse where it says "Filter by keywords..." or click
on "Shape" in the shortcuts to jump to the right section) and click on
the link to bring up the page about that command. You'll find
a description of the command, some examples, and its syntax.
This
is a useful way to refresh your memory about something you've already
used or to learn about how to use something new.
We'll cover some of Processing's functionality in class and the
book includes other elements not discussed in class, but you are
also encouraged (and sometimes required) to explore the Processing
API on your own to discover things not covered in class or the
book.
Exercises
Put your name and a description of the sketch in comments at the
beginning of each sketch. Also don't forget to Auto Format your code
before handing it in.
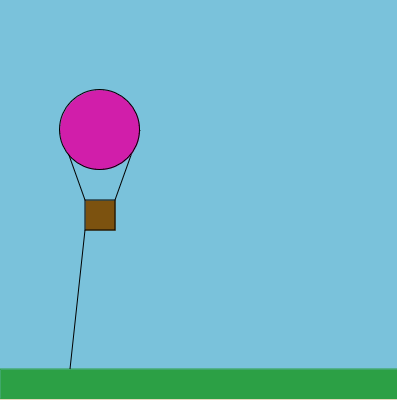
-
Create a static sketch named lab2a which draws a scene
similar to the picture shown. Include all of the elements
shown — hot air balloon, tether (the line extending
down from the basket), grass. The tether should connect to
the lower left corner of the basket and the cables
connecting the balloon to the basket should connect to the
upper corners of the basket as shown. Otherwise you don't
need to match the sizes, positions, and colors exactly, but
you should aim for something close. You can use
Tools->Color Selector to help you find appropriate
colors.
|
|
-
Create an active sketch named lab2b which works like
the example — in particular, now the hot air balloon
should move up and down with the mouse while remaining
tethered to the ground. The bottom of the balloon's basket
should align with the mouse's vertical position.
Hint: start by copying your sketch from #1 and converting
it from a static sketch to an active sketch. Then work on
making the balloon track the mouse — break this step
down further by first making the basket track the mouse and
then make the other parts of the balloon move in sync with
the basket.
|
|
-
Create a sketch named lab2c which works like a paintbrush —
moving the mouse moves a circle around the drawing window, leaving a
trail of circles behind. Clicking the mouse should clear the
background.
Make the circle red and close to the size shown, though you do
not need to match the size exactly.
|
|
-
Create an interactive sketch of your own design. (Name this
sketch lab2d.) What the sketch depicts is up to you (here's a
chance to be creative!) but for full credit it must include the
following required elements:
-
The scene must be original and created by you for this
exercise. While you might be inspired by an example from class
(such as the simple car) or another exercise in this lab (such as
the hot air balloon), you may not copy code from other
exercises in this lab, examples or solutions in the textbook or
from class, or other sources even if you then make some changes
— create your own version (such
as a fancier car) from scratch.
-
The scene must be recognizable as something. Include a
comment at the beginning of the sketch describing what it depicts.
The intent is that you should deliberately choose positions and colors
for the shapes — simply drawing a bunch of shapes at whatever
location they happen to end up at is not acceptable. Simplifying
things (like making a tree out of a rectangle and a triangle) is
fine.
-
You must include comments in your sketch identifying what
thing each drawing command or group of drawing commands is associated
with. For example, the comment
// hot air balloon
would be appropriate just before the commands that set colors and
draw the shapes for a hot air balloon. Also use blank lines to
separate the drawing commands for different elements in the
scene.
-
You must use at least 30 shapes. (That's 30 shape-drawing
commands, not 30 different kinds of shapes.)
-
You must use at least one ellipse, one rectangle, and one line.
-
You must use at least one arc, quad, or triangle. (That's one
total, not one of each.) Look up these shapes in the Processing API
to find out how to use them.
-
You must have at least four different compound things built
out of three or more shapes each. "Compound thing" just means that
you use several shapes to depict one thing; the hot air balloon from
#1 is an example (four shapes).
-
You must have at least one compound thing which moves with the
mouse (interaction), and you must use both mouseX
and mouseY. (This can be done with one thing that uses both,
or with two separate interactive things.)
-
You must use at least five different colors.
Extra Credit
You can earn extra credit by going substantially beyond the required
elements. Some possibilities:
-
Make the red circle in #2 partially transparent.
-
Create a more elaborate scene for #4 — include many more
shapes.
-
Use more than the one required arc, quad, or triangle (that's
more than one kind of shape, not just two arcs instead of one) or make
use of the curve or bezier shapes. (Look them up in the API.)
-
Fancier mouse interaction — tie the size or color of some
things to the mouse movement, such as having a shape stretch wider
or shrink narrower as the mouse moves left and right.
-
Handle key presses — do something when a particular key is
pressed.
Include a brief description of what you've done for extra credit in
a comment at the beginning of your sketch(es). More creative and
challenging elements will earn more points.