


| CPSC 120 | Principles of Computer Science | Fall 2024 |
Labs are due at the start of class. It is OK if you show up and copy your files to the handin directory at the very beginning of class, but this should take at most a couple of minutes and you should not spend the next lab period finishing up the previous week's lab. I will check timestamps, and files handed in more than five minutes after the start of lab will be considered late.
See the policy on late work and extensions.
Fractals are often used to describe natural things because, like many natural things, fractals have the property of self-similarity — which essentially means that you can zoom in as much as you want and will still see the same basic shape. Realistic modeling of nature is of particular interest in computer graphics.
In this lab, you'll use three different recursive patterns to create fractal models of natural things (mountains and plants) and then incorporate them into a scene.
Successfully completing this lab means that you are able to:
The short version:
Help with learning the process of constructing programs is fine; shortcutting the process and arriving at a result that you didn't produce yourself or don't fully understand how to produce is not.
Always attempt the problem yourself first, using this lab handout, the materials from class posted on the schedule page, and the assigned reading in the textbook.
Your primary resources for help should be office hours and the Teaching Fellows.
You may not work with other students to write code together.
You may not shortcut to a solution by copying code (except as specifically authorized in instructions) or using someone else's program as a guide or to understand what yours should be like even if you don't directly copy anything, You may not be in possession of someone else's program or solution before you have handed in your own.
You must document any help received (including from TFs) and any resources used other than the textbook and posted course materials. Put comments in your sketch indicating who helped (or the source used) and how / with what.
Make sure that you understand not only the result achieved, but also how one knows what to do to achieve that result. This gets at the process of writing a sketch — identifying what code elements are needed, filling in the details for a particular task, and pulling it all together.
Review the discussion in previous lab handouts and the full collaboration policy for more details.
To hand in your work:
Make sure that your name and a short description of the sketch are included in a comment at the beginning of each sketch.
Make sure that you've auto-formatted each sketch.
Copy the entire lab7a, lab7b, lab7c, and lab7d directories from your sketchbook (~/cs120/sketchbook) to your handin directory (found inside /classes/cs120/handin).
As with lab 6, the exercises in this lab are about applying the right pattern rather than figuring out how to draw each thing from scratch. For each exercise, review the slides and the in-class exercises handouts for a description of the relevant pattern and the examples in the slides, handouts, and posted on the schedule page for examples of what that pattern looks like in code.
Also read through all of each exercise before starting it — there's important information about how to do the task after the initial statement.
As always, refer to the class materials (slides, in-class exercises handouts, and examples) posted on the schedule page.
You'll need to make use of several potentially-new Processing functions in the exercises below. Look them up in the Processing API.
Put your name and a description of the sketch in comments at the beginning of each sketch. Also don't forget to Auto Format your code before handing it in. (Refer back to lab 2 for more on Auto Format if needed.)
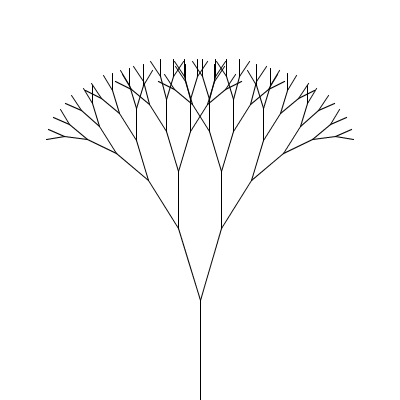
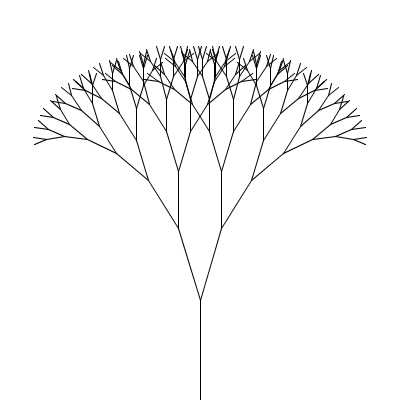
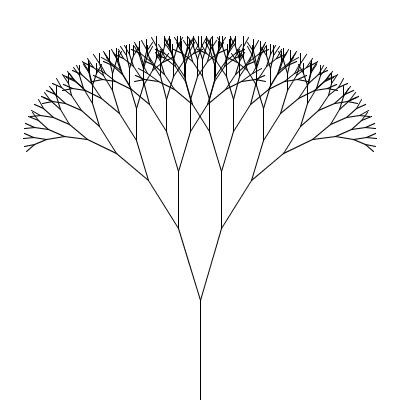
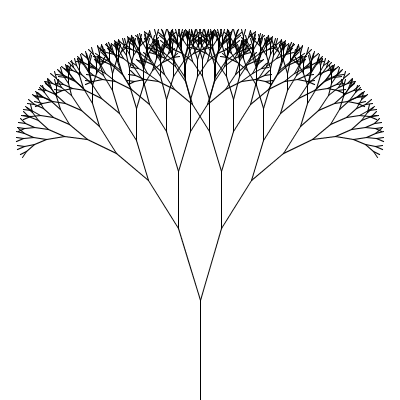
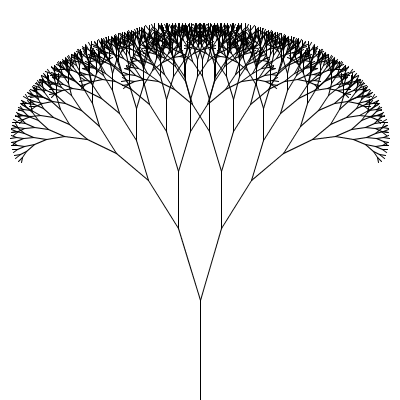
Create a sketch lab7a which draws a fractal canopy as described below. Your drawCanopy function should have all of the parameters described (including b and s). When calling drawCanopy from draw(), use 2*PI/11 for b and 0.75 for s. Size and position the canopy so it fits nicely into your drawing window. (Use -PI/2 as the initial value for a to get the tree standing upright.)
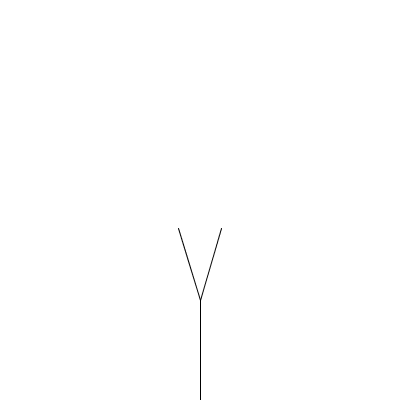
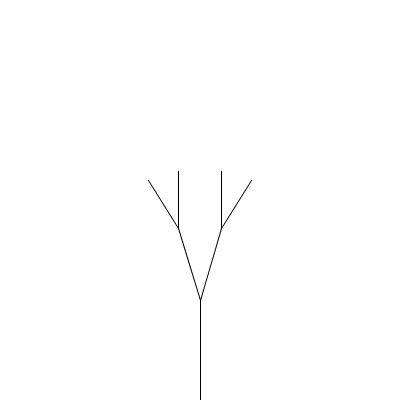
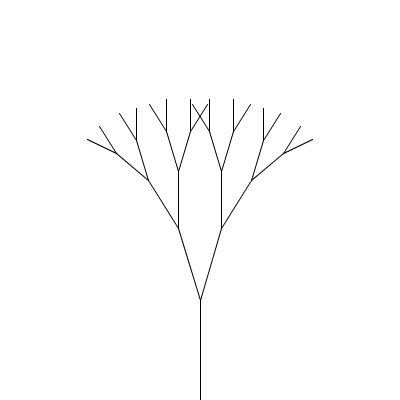
A fractal canopy can be produced by repeatedly adding two shorter line segments at the end of each previous line segment: (click any picture for a larger version)
|
|
|
|
|
|
|
|
|
|
|
This process follows the additive pattern — each level adds to what was drawn in the previous level. The elements of the pattern:
The whole design is a canopy.
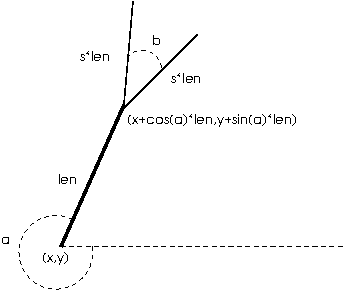
What changes from one level to the next is the position (x,y), length len, and orientation (angle a) of the line segment; the angle b between the two segments in the next level and the scale factor s, which specifies how much the segment lengths shrink from one level to the next, are constant for all levels of a particular canopy but different values can be chosen for different canopies to produce different shapes. All of these things (x, y, len, a, b, and s) will be parameters to the drawCanopy function.
"Small enough" is based on len, the length of the line.
One copy of the design is the line with endpoints (x,y) and (x+cos(a)*len,y+sin(a)*len).
There are two smaller copies, each with position (x+cos(a)*len,y+sin(a)*len) and length s*len. For the orientation, one copy has angle a-b/2 and the other has angle a+b/2. The angle between segments (b) and the scale factor s stay the same.
Implementation notes:
Use the Processing functions cos and sin to compute cos(a) and sin(a) to find the line endpoints.
Create a sketch lab7b which draws a fractal mountain range as described below. The mountain range should span the full width of the window. Experiment with the initial value for maxd so that the mountains are suitably rugged.
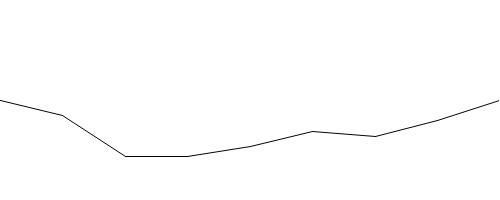
Realistic terrain can be generated using a technique known as the midpoint displacement algorithm:
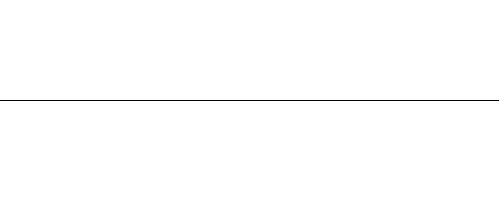
| Start with a line segment connecting two points. (The y coordinates of the points can be equal, as shown in the example, or not.) |
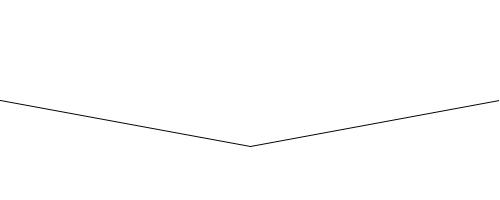
| Replace each line segment with two new line segments which connect the original segment's endpoints with the "displaced midpoint". The displaced midpoint is the midpoint of the original segment moved up or down by a small random amount. |
| Repeat: replace each line segment with two line segments connecting each segment's original endpoints with a displaced midpoint. |
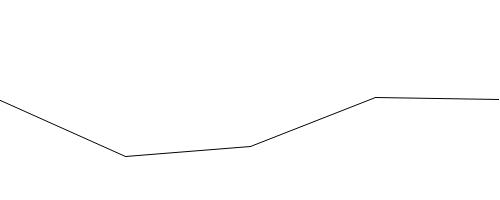
| Repeat: replace each line segment with two line segments connecting each segment's original endpoints with a displaced midpoint. |
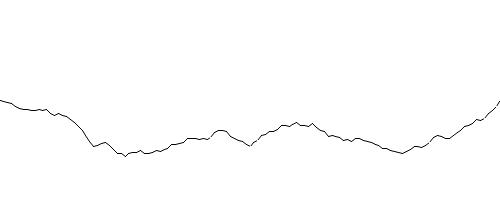
| Keep going, until the line segments are sufficiently short. At that point, draw the line segment. |

|
To create solid terrain, replace the final "draw a line segment" step (when the line segments are sufficiently short) with "draw a quad whose top corners are the line segment's endpoints and whose bottom corners are at the bottom edge of the window". The picture below shows an exaggerated view to illustrate this — the red area is the quad associated with the third line segment. 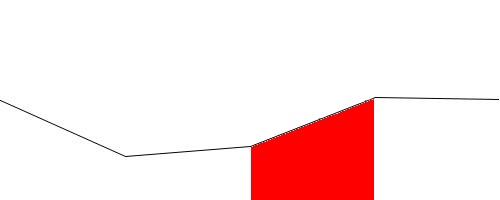
|
The process follows the replacement pattern — the line segment in each level is replaced by the two shorter segments, and only the final line (or quad) is actually drawn. The elements of the pattern:
The whole design is terrain.
What changes from one level to the next are the endpoints (x1,y1) and (x2,y2) of the current segment and the maximum amount the midpoint could be displaced (maxd, for "maximum displacement") — this should decrease with each level to keep the mountains from becoming too jaggedy. (As the line segments get shorter, the displacement needs to get smaller so the lines don't become too steep.) All of these things (x1, y1, x2, y2, and maxd) will be parameters to the drawTerrain function.
"Small enough" is based on the length of the line between (x1,y1) and (x2,y2).
The base shape is a quad whose top corners are (x1,y1) and (x2,y2) and whose bottom corners are at the bottom edge of the window.
There are two smaller copies, one with endpoints (x1,y1) and ((x1+x2)/2,(y1+y2)/2+d) and the other with endpoints ((x1+x2)/2,(y1+y2)/2+d) and (x2,y2) where d is a random value between -maxd and maxd. Both have maximum displacement maxd/2.
Math notes:
Use the Processing function dist to find the distance between two points i.e. the length of the line segment between those points.
Implementation notes:
Use the Processing function random to generate a random value between -maxd and maxd for d.
You will need to create a local variable to store the value for d so that you can use the same value for the two segments. Use the same pattern as with parametric equations — declare, initialize, and use the variable (there is no update) within a new block.
    {
      float d = ...;
      // draw the two smaller copies using d
    }
Since each frame involves generating the terrain from scratch, the random number sequence used for the displacements needs to be reproducible. Use the Processing function randomSeed at the beginning of draw() so you don't get jumpy mountains. (It doesn't matter what value you use for the seed, but it needs to be a constant value so it is the same each time draw() is called.)
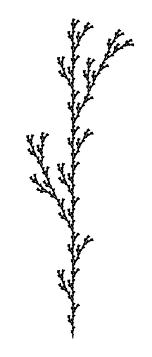
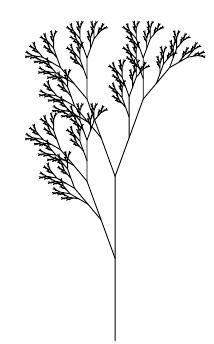
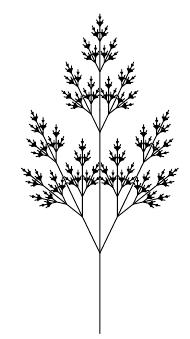
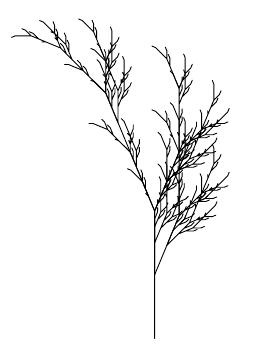
Create a sketch called lab7c which draws one of the fractal plants described below. (Your choice of which one.) Choose a reasonable maximum depth. (Start with a small value and increase slowly until you find something you like — it doesn't take a very big depth to produce something complex enough to overwhelm the system!) The plant should also be positioned nicely in the sketch window and the length of the line drawn should be such that the plant fits within the window.
L-systems were introduced in class as a way of describing certain kinds of fractal shapes, such as plants. Several examples of plant L-systems are given below.
 |
 |
 |
 |
 |
|
| angle | 25.7 degrees | 20 degrees | 20 degrees | 25.7 degrees | 22.5 degrees |
| generator | F | F | X | X | X |
| production rule(s) | F → F[+F]F[-F]F | F → F[+F]F[-F][F] | X → F[+X]F[-X]+X F → FF |
X → F[+X][-X]FX F → FF |
X → F-[[X]+X]+F[+FX]-X F → FF |
You may get a mirror image of the picture shown — that's OK. (It's a result of different interpretations of whether a positive angle corresponds to a right or left turn.)
Additional specifications:
For all of these, the scale factor for the length is 1 — the length passed to the drawPlant function will be the length of the line segments making up the plant rather than the size of the plant as such.
The starting point for all of the plants is at the base of the stem with the turtle facing up.
Implementation notes:
For the two-rule plants, recall that our translation of an L-system description into a Processing sketch means a drawing function for each symbol for which there is a production rule — so you'll need two drawing functions. Also recall that only F symbols result in a line being drawn, so functions for other production rules (such as X) will have an empty body for the if ( depth == 0 ) case.
Create a sketch called lab7d which contains a scene featuring fractals modeling natural things. As usual, there is considerable flexibility in what exactly you create as long as you meet the following requirements:
The scene must be recognizable as something. You do not have to include a lot of things, but there should be a least a few additional things to provide some context for your fractals. (Maybe some grass and sky, a sun, a car driving by...) These additional elements can be animated or interactive but don't have to be. It is OK to reuse elements that you created for previous labs or from class examples. Don't forget to also include a comment at the beginning of the sketch describing what your scene is.
You must include a fractal canopy. This can be just a matter of copying your function from #1 and positioning and sizing the canopy as desired, but you can also try different values for b and/or s for a dfferent look.
You must make use of the midpoint displacement algorithm. This can be just a matter of including a mountain skyline in your scene — copy your drawing function from #2, and call it with appropriate parameters to position the mountains for your scene. You can also get more creative — it doesn't have to be mountains (maybe the shoreline of a lake?), and you can start a slanted line or with more than one line segment to further control the shape.
You must include a fractal plant. This can be just a matter of copying your functions from #3 and positioning and sizing the plant as desired, or you could implement one of the other plants.
You can earn extra credit by going substantially beyond the required elements. Some possibilities:
Implement additional kinds of plants (at least one must involve two production rules) and include them in your scene (#4).
Modify your plant sketch (#3) so that clicking the mouse increases the maximum depth. Since the maximum depth will be something that changes over time, you'll need an animation variable for it.
Modify your canopy and/or mountain sketches (#1, #2) so that clicking the mouse decreases the notion of "small enough". (This has the effect of increasing the maximum depth — the pattern will repeat at more levels.) Since "small enough" will now be something that changes over time, you'll need an animation variable for it.
Animate a fractal shape (plant or other) in your scene (#4) — for example, you might have a tree in the bed of a pickup truck that is driving across the screen. Or have several Koch snowflakes gently drifting down.
Include other kinds of fractals generated by L-systems in your scene. Try some of the ones on this page or the ones on pages 9-12 and 17 in The Algorithmic Beauty of Plants (which you can find in the Files section on Canvas). (But not the ones posted as examples from class!) You can also try googling for "L systems" and see what you can turn up. Include a comment identifying the source for your fractal(s).
Experiment with coloring and/or line thickness (strokeWeight) to make the canopy and/or plants look more realistic. For example, make the trunk/stem of the plant brown and only the line segments at the tips green (for leaves).
Add randomness to make the canopy and/or plants look more realistic: experiment with varying the angle and/or line length by adding a small random amount to the base values. (Choosing a random number in the range -something to something lets the value vary in both directions without having to choose between adding or subtracting.)
Read about stochastic L-systems on pages 28-29 in The Algorithmic Beauty of Plants (which you can find in the Files section on Canvas) and implement the one described on page 28 (or another one that you make up or find elsewhere). You can make a choice with a certain probability p by using random to generate a random number between 0 and 1, and then checking whether the number generated is less than p.
Include a brief description of what you've done for extra credit in a comment at the beginning of your sketch. More creative and challenging elements will earn more points.