| CPSC 424 | Computer Graphics | Fall 2025 |
This lab is the first of four "application labs" introducing Blender, a free and open source "3D creation suite" that supports 3D modeling, rendering, and animation. It can be used to create sophisticated 3D models, visual effects, and even animated films. These labs will provide just a brief introduction to Blender's capabilities, but enough to see how the fundamental concepts of 3D graphics — transformations, lighting, materials, textures — fit into real applications. It will also provide an opportunity to work with some more sophisticated modeling and rendering than we will be able to cover in this course.
Note: the four Blender labs will be grouped together, counting as two (regular) labs.
This lab addresses basic Blender usage for working with 3D objects, transformations, lights, materials, and textures.
Successful completion of this lab means that you can do basic modeling tasks in Blender:
Much of the material for this lab was originally written by David Eck.
This is an individual lab. You may get technical help from others, but the effort and ideas that go into producing solutions should be yours.
![]() You may not use AI for this assignment. (There
is no coding, and you should create your own scene.)
You may not use AI for this assignment. (There
is no coding, and you should create your own scene.)
Hand in your work by copying your ~/cs424/blender1 folder into your handin folder (/classes/cs424/handin/username, where username is your username).
Check that the result is that your files are contained in /classes/cs424/handin/username/blender1 — if not, fix it!
Copy the directory /classes/cs424/blender1 and its contents into your ~/cs424/workspace directory. You should end up with a folder blender1 inside your workspace directory, with a file inside of it.
Make sure that all of the directories are named exactly as specified and end up at the same (top) level in your workspace directory.
Blender version 3.0.1 is available on the Applications menu in the Linux environment (Linux-boot computers and VDI). It is recommended that you use this version rather than more recent versions (the current stable version is 4.5.4, with 5.0 beta also available) as there are likely to be significant differences between major versions and files created with newer versions may not be compatible with 3.0.1. (I will be running your handins using version 3.0.1.)
To use Blender on your own computer, go straight to the full list of releases. (You can download the latest version here.)
The provided scene-1.blend scene contains a circular platform made from a scaled cylinder.
Section B.1 in the textbook should be your first stop for how-to-use-Blender questions for this lab. Note that the book covers Blender 2.93, but it should still be fairly accurate for Blender 3.0.1.
Additional resources:
Ordinarily, the .blend file just contains the path to the file, so that if you move the .blend file, you have to move the file along with it. To fix this, go to File → External Data, and select "Automatically Pack Resources". When this option is selected, Blender will save copies of any image textures in the .blend file, making it independent of the original image files. Make sure any images you use for this lab are packed into the .blend file. (Note: You can make it easier to get to the images by setting the file path for textures — access Edit → Preferences, then choose the "File Paths" tab and look for "Textures" in the "Data" section. Browse to the desired directory e.g. /classes/cs424/textures.)
Reflection and transparency require the Cycles render engine in Blender — make sure to turn this on! Also set the view style to "Rendered" in the 3D View so you can see the effects. (You'll also need the "rendered" view to see textures.)
[Updated!] For reflective objects, turn the "Metallic" setting up and the "Roughness" setting down in the Material controls. The reflection of the environment is combined with the material color.
For transparent (refractive) objects, change the "Surface" from "Principled BSDF" to "Refraction BSDF" in the Material controls. Also set the "IOR" to be a value slightly greater than 1. IOR stands for "index of refraction," and a value other than one makes the object look like it bends the light rays that pass through it. (The index of refraction is a physical property; you can play around with values to get a pleasing effect, or look up the actual value for particular types of materials — see the link in the Reference section above.)
Make sure you have read section B.1 in the text, as that contains essential information on using Blender. It is not a bad idea to make yourself a one-page quick reference sheet summarizing the various commands and operations.
Start Blender and open the scene-1.blend file you copied.
The provided scene contains a circular platform made from a scaled cylinder. Add to this scene as described below.
Arrange a collection of objects on the platform. This can be a random collection or you can create a recognizable scene that is something. You should use primarily mesh objects, except as noted below. In addition:
Most of the objects should be sitting directly on the platform or stacked on top of other things. One or two things floating in space is fine, but the intent is that you fully use the 3D cursor to deliberately place things into the scene rather than just putting things wherever they end up.
Use smooth shading for objects where the poly mesh is approximating a smooth surface (spheres, cylinders, cones, etc).
All of the objects should have a material assigned; choose some different types of materials (plastic vs metal vs rubber vs stone) and apply them in a way that makes the differences apparent.
Some of the objects, including the platform, should have a texture. Use both image textures and procedural textures. You can use the textures in /classes/cs424/textures or your own images. Be sure that you've set "Automatically Pack Resources" so the textures you use are packed into your .blend file.
At least one object should be reflective.
At least one object should be transparent (refractive).
Use Edit Mode to create at least one object with an interesting shape. For this you can stick with the mesh objects or you can try a NURBS shape (such as a NURBS sphere, cylinder, or torus). A NURBS surface is defined by a set of control points that affect the shape of the surface but do not lie directly on the surface like mesh vertex points; manipulate the shape of the surface by manipulating the control points. You can find NURBS objects in the "Surface" submenu of the Add menu.
Do something with lighting, either adding additional light(s) or manipulating the existing light. Aim for an interesting effect that is noticeably different from the basic light in the provided scene.
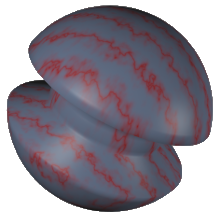 As an example of
what you can do with Edit Mode, the shape shown here, on the right,
was made by editing a UV Sphere. To make it, put the sphere into
edit mode, deselect all the vertices (with the A key), select a
band of vertices around the equator (using box select with the B key),
and then scale down the selected vertices (using the G key).
As an example of
what you can do with Edit Mode, the shape shown here, on the right,
was made by editing a UV Sphere. To make it, put the sphere into
edit mode, deselect all the vertices (with the A key), select a
band of vertices around the equator (using box select with the B key),
and then scale down the selected vertices (using the G key).
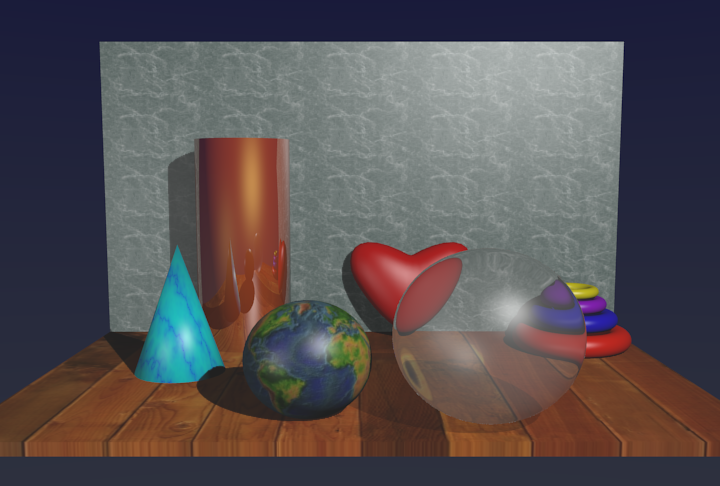
The following is a rough example of the kind of scene you might create, though note that it doesn't perfectly satisfy the requirements of this assignment. In particular, it has a floor and a back wall rather than the circular platform and it doesn't do anything special with the lighting.