In the first three labs, you have written short Java programs using the edit/compile/run cycle on the command line. For serious programming, many programmers prefer to use an integrated development environment, or IDE. An IDE is a GUI program that lets you edit and run programs (often hiding the compile step, unless it generates an error). In general, an IDE also makes it easier to organize large projects, and it provides lots of specialized commands for working with programs. Because of their complexity, IDE's can be difficult to learn, but a well-designed IDE lets you do simple tasks without having to master its full complexity.
There are many IDE's for Java development. This lab will introduce you to Eclipse, one of the most popular. Eclipse is reasonably well designed, and it has the advantage of being free. With just a little experience, you will probably find it to be much easier to write your programs in Eclipse than with a plain text editor.
As a side note, Eclipse is itself written in Java, so it stands as evidence that Java can be used to write large, useful, high-performance programs.
Multiple Desktops: One of the nice features of Linux GUIs is their support for multiple desktops. The boxes labeled "1" and "2" in the panel at the bottom of your screen represent the desktops. Click on a box to change to that desktop. You can organize your windows into groups by placing windows on different desktops. The number of desktops can be changed using the Control Center.
Renaming and Deleting Files You can, of course, use the GUI interface to rename and delete files. But if you want to use the command line for these tasks, the commands that you need are mv and rm. The abbreviations mean "move" and "remove." To delete a file, say rm filename in the directory that contains the file. To rename a file, use mv oldname newname. Warning: If a file named newname already exists, it will be overwritten without warning! (If newname is an existing directory, the result might surprise you -- the file oldname will be moved inside the directory newname.)
You can start Eclipse using the "Integrated Environment" command in the "Development" submenu of the Start Menu. When Eclipse first starts, you will see a Welcome screen from which you can access extensive Eclipse documentation. For now, you want to get right into Java programming, so close the Welcome window by clicking the "X" next to the word "Welcome" in the top-left corner of the window. You can get back to the Welcome window by selecting "Welcome" from the Help Menu.
Java has several "perspectives" which define what's shown in its window and how its organized. For programming, you want to use the "Java" perspective. To select the Java perspective, go to the "Window" menu, then to the "Show Perspective" submenu, and select the "Java" command. The window will be divided into several areas. The areas are called "views". The large area in the center is where you will eventually edit your Java files. To reclaim a little screen real estate, you might want to close the "Outline" view to the right of the edit area, since you won't be needing it for now. (You could get it back using the "View" submenu of the "Window" menu.) Eclipse will remember the window setup when you quit and will restore the setup the next time you run it.
When you started Eclipse, it created a directory named eclipse_workspace. This is where Eclipse will store the Java projects that you work on. It's a good idea to let Eclipse have full control over this directory. That is, don't make any changes to it, or to the files that it contains, by hand.
It is possible to install Eclipse on your own computer (as long as you already have Java 1.4 or higher installed). It is available for Windows and Mac OS X as well as for Linux and can be downloaded from eclipse.org.
(Note: To make it easier to start Eclipse, you might want to add an Eclipse icon to the panel at the bottom of the screen. To do this, right click the panel, then go to Panel Menu / Add to Panel / Application / Development / Integrated Environment. This adds the icon to the right end of the panel. To move it, right click the icon, choose "Move Eclipse Icon", move the mouse to move the icon, and click the left mouse button when the icon is in the position you want.)
Your work in Eclipse will be organized into "projects." To start a project, right-click in the "Project Explorer" view at the left side of the Eclipse window. Go to the "New" submenu, and select "Project". A dialog box will appear. "Java Project" should already be selected; just click the "Next" button. On the next screen, you only need to fill in a name for the project, such as "Lab 4", and press the "Finish" button. Your project will appear in the Package Explorer view.
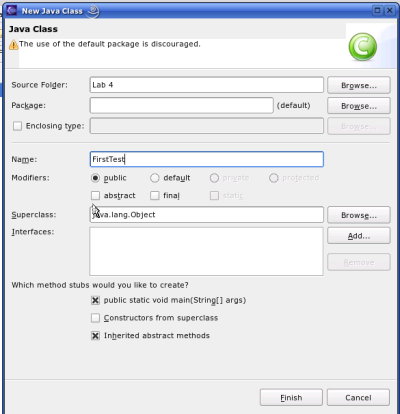
The next step is to add a Java file to the project. To do this, right-click the project name, go to the "New" submenu, and select "Class". (You might think that you should select "File", and in fact you could, but by selecting "Class" you can get Eclipse to write part of the class for you!) A dialog box will appear. Fill in a name for the class, such as "FirstTest". (Note that you should enter just the class name and not the file name "FirstTest.java".) Since you will be writing a main program, you can also check the "public static void main(String[] args)" option. You can ignore the other options for now. The box will look like this:
Click "Finish". The class will be added to the project, and the source code will appear in the edit area. The source code will contain some comments in a standard format -- you can ignore them or erase them for now.
Type the code shown below into the main program, and notice that Eclipse finds the errors. Once you type the final semicolon, it marks the line with an error icon in the left margin. You don't have to fix the error immediately, but you will have to fix it before you will be able to run the program.

The problem with "name" is that this variable is undeclared. Add the declaration "String name;" to the program. As soon as you do this, the red underlining of "name" will disappear. The problem with TextIO still remains. Here, the problem is that TextIO is not a standard part of Java. To make it available to your program, you have to add it to your project.
To add TextIO.java to your project, right-click on the project name in the Package Explorer view and select the "Import" command. A dialog box will appear. Select "File System" to indicate that you want to import files, and click the "Next" button. You will have to select TextIO.java; unfortunately, this is a little complicated. Click the "Browse" button, double-click "cs124" and then double-click "lab2" to select a directory that contains a copy of TextIO.java; click "OK". TextIO.java should appear in the pane below the Browse button -- click the checkbox next to it. The dialog box will look something like this:
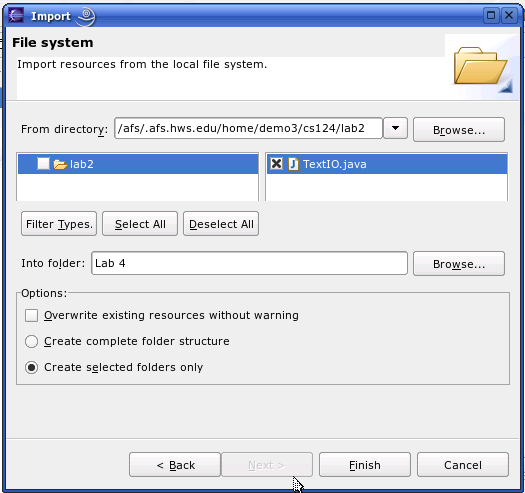
Click "Finish". TextIO should be added to the project, and the TextIO error in your program should go away. Note: If you want to use TextIO in other projects in the future, you won't have to import it -- you can just "Copy" it from one project and "Paste" it into another.
Start typing another line into the program, such as
System.out.println("Hello " + name + ", nice to meet you");
but pause after typing one of the periods. A box will type up listing all the things that you can legally type after the period, and you can select the continuation that you want from this list -- or hit ESC to dismiss the box. You'll notice that if you wait another second after highlighting one of the selections in the list, you'll see documentation for that item.
I find it really annoying to have this type of list pop up automatically as I am typing. Eclipse has many options; this is one that I advise changing. To do so, go to the "Preferences" command in the "Window" menu. Under Java / Edit / Code Assist, you'll find a checkbox labeled "Enable Auto Activation". Uncheck this box, and click OK. You will still be able to call up Code Assist manually. To call up Code Assist manually, press CONTROL-SPACE. You can do this at any time, even in the middle of words.
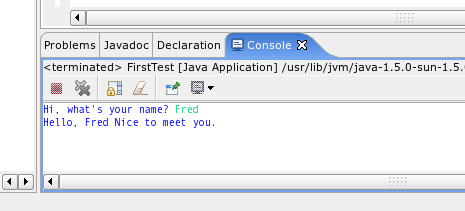
When you are ready to run your program, save it first. (It is possible that when you do this, Eclipse will find errors that it missed when you were typing.) To run the program, right click on the file name of the program in the Package Explorer view, go to the "Run" submenu, and select "Java Application". The program will run, and the command-line IO will go the "Console" pane in the bottom right corner of the window. You might have to click the "Console" tab to bring it to the front:
![]() Once you have run the program once, there is a shortcut for
running it again. Just click the Run button in the toolbar.
(It's the middle button shown at the right.) This button
re-runs the program that you have run most recently. Click the
little triangle to the right of the button to get a menu of
programs that you have run recently.
Once you have run the program once, there is a shortcut for
running it again. Just click the Run button in the toolbar.
(It's the middle button shown at the right.) This button
re-runs the program that you have run most recently. Click the
little triangle to the right of the button to get a menu of
programs that you have run recently.
Exercise 1: When you've have your first program in Eclipse running, call be over so that I can try it.
I was dismayed, after deciding to use Eclipse for this course, to discover that Eclipse does not support printing (at least under Linux). The easiest solution, if you want to get something printed, is to go into the eclipse_workspace directory and print the file from there using the a2ps command on the command line. Please make sure that you understand how to do this before you leave lab. Try printing the program that you wrote for Exercise 1.
The main exercise of the lab asks you to write a longer program with Eclipse. You will need to create another class. (You can put it in the project that you have already created; a project can contain several main programs, and you can use the Run command to run any of them.)
You know that any calculator can compute square roots, but you might wonder how it is done. There is a fast method for computing approximate square roots. It uses a mathematical technique known as Newton's Method. Newton's Method is a general technique for finding approximate solutions of equations. As applied to the square root problem, it works as follows:
Suppose that M is a positive number. To find an approximate value for the square root of M, let x be an initial guess for the answer. In fact, you can let x = M to start. Then, just repeat the computation
                 x       M
          x  =  ---  +  ---
                 2      2*x
As you repeat this computation, the value of x will approach the value of the square root of M. You can stop when the approximation is good enough. For the purposes of this exercise, you can stop when Math.abs(x*x-M) <= M*1.0E-12
Exercise 2: Write a program that implements Newton's Method. The program should let the user continue solving problems as long as the user wants. For each problem, get a positive real number, M, from the user. Starting with x = M, repeat the computation given above until the approximation is good enough. Then print out the final value of x and of x2. Write a program that will be easy for the user to understand; make sure that you output enough information to let the user know what is going on.
If you happen to have extra time in the lab, I suggest that you use it to explore Eclipse further. For example, try to import the graphics program that you worked on for Lab 2 and do some more work on it in Eclipse.