In this lab, you will write your own subroutines. The amount of work that you have to turn in for this lab is rather small, as there are only two relatively short exercises. However, at the end of the lab, you'll find the second "Longer Project," which will be due in two or three weeks. Also, this lab contains a very brief introduction to the Eclipse development environment. In future labs, you have the option of using Eclipse or using the command-line environment.
Do not create a lab6 folder for this lab. Instead of creating a folder for this lab, you will be creating an Eclipse project.
The two exercises for this lab are due next Thursday, as usual.
Eclipse is a professional development environment for Java and for other types of programming. It is a free program that is available for Windows, Mac OS, or Linux, and it is used by many professional Java programers. Eclipse is itself written in Java, so it will give you some idea of how complex a Java application can be. The web site is http://eclipse.org
Eclipse has many sophisticated features. You will learn only a few of them. This section of the lab describes the most essential features for using Eclipse as a productive and convenient Java programming environment.
In Eclipse, your work is organized into "projects," and the files for your projects are stored in a "workspace." The workspace is really just a directory, and the projects are sub-directories of the workspace directory, but you should let Eclipse manage these directories and not make changes to them by hand.
You can find Eclipse under "Development" in the KDE applications menu (or under "Programming" in Gnome). The first time that you start Eclipse, it will want to create the workspace directory. By default, it will use a directory named "workspace" in your home directory. This is OK, but you might want to change the directory name to "workspace-cs124" or something like that (in case you want to use different workspaces for other courses).
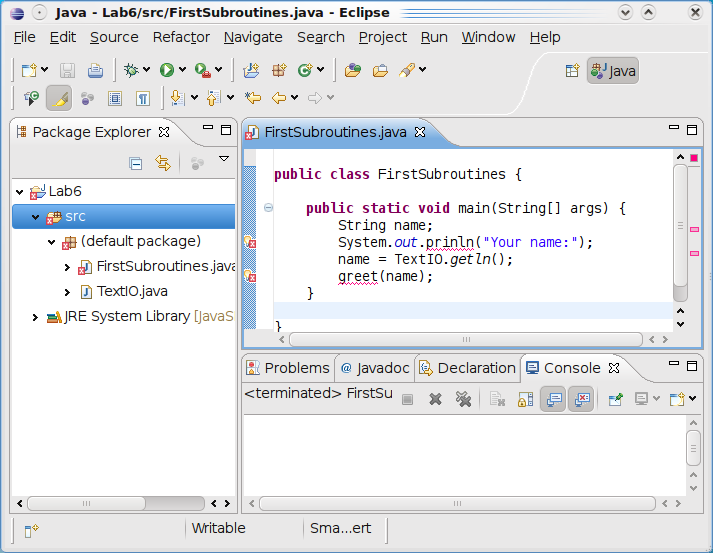
When Eclipse starts the first time, the Eclipse window will be filled with a "Welcome" screen. You should close this screen by clicking on the "X" to the right of the word "Welcome." Once you've done that, you see the Java programming environment, which is divided into several panes. You won't need the panes labeled "Tasks" and "Outline," so you should close them by clicking the "X's" next to the labels. Here is what the Eclipse window will look like, after a programming project has been started:
You can do a lot of what you need to do using the "button bar" near the top of the window. In particular, there are buttons for creating projects, for creating classes, and for running programs. Familiarize yourself with these buttons:
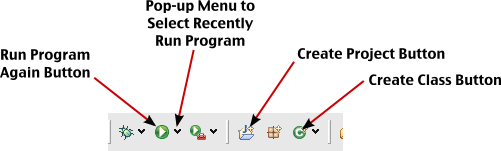
For this lab, you will want to create a project named "lab6". To do this, click the "Create Project Button." A dialog window will open where you can specify details of the project. The only thing that you have to do is enter the "Project Name," which should be lab6. Do this, and click the "Finish" button. The project will appear in the "Package Explorer" pane of the Eclipse window. Click the small triangle next to the name, lab6; this will reveal the contents of the project. Currently, it contains a folder named "src," where your Java source files will be stored.
Next, you need to create a class in your project. First, click the "src" folder to hilite it; this will be the location of the new class. Then click the "Create Class Button." A window will open where you can enter the name and properties of the new class. Enter a name (such as "FirstSubroutines") for the class. Remember that the name has to be a legal Java identifier, and it should start with an upper case letter. (You should ignore the warning at the top of the widow that says, "The use of the default package is discouraged.") You can also, if you like, check the box labeled "public static void main(String[] args)", since that will get Eclipse to write an outline of main() for you. Click the "Finish" button to create the class.
The new class is added to the src directory, in the "default package." The source code appears in the editor pane, which occupies the large center area of the Eclipse window. This is where you type your code.
To see what it's like to run a program in Eclipse, enter the statement System.out.println("Hello World") in the main() routine. To run the program, right-click either the editor pane or the name of the class in the Package Explorer pane. A pop-up menu appears. Go to the sub-menu named "Run As...", and select the option "Java Application." The output from the program will appear in the "Console" pane at the bottom of the window. Once you have run a program in this way, you can use the "Run Program Again Button" to run the same program again.
Note that you do not have to do anything special to compile a program. Eclipse will do it for you automatically. Also, if you forget to save the program, Eclipse will ask you whether you want to do so.
As one final task before you start programming, you should know how to add an existing Java file to a project. You will need TextIO.java for this lab, so you should add that to your project. To do so, just open a directory window to a directory where you have a copy of TextIO.java. Right-click the file icon for that file, and select "Copy." Go to the Eclipse window, right-click the "src" folder in your project, and select "Paste." TextIO.java should appear in the src folder, and you should be able to use it in your program.
Here are some of the neat things that Eclipse can do:
The first exercise is a quick exercise in re-organizing an existing long program into a program that uses subroutines to break up the code into more manageable pieces.
Copy your RandomArt program from Lab 5 into your Eclipse project. You might want to fix the indentation of the program at this point: Select the entire text of the program, and hit Control-I.
This program has four sections that could each be a subroutine. They will be non-static subroutines, because they are being used in the non-static subroutine paintComponent(). Write the outlines of four subroutines, such as:
private void drawPollack(Graphics g) {
}
Now, for each new subroutine, cut the appropriate code from the paintComponent() routine, and paste it into the subroutine you have written. Where you cut out the code in main(), put a call to the subroutine, such as:
drawPollack(g);
Once you've done this, the program should behave in exactly the same way as before, but it should be much easier to read. Make sure that you understand what you have done!
As a final step, you should add a short comment before each subroutine, explaining what it does.
For this lab's second exercise, you will write a few subroutines and a main() routine that uses them. You can do this in the FirstSubroutines class that you created earlier in the lab. The program will test strings entered by the user to determine whether they are palindromes. A palindrome is a string that reads the same backwards and forwards, such as "radar", "racecar", and "able was I ere I saw elba". It is customary to ignore spaces, punctuation, and capitalization when looking for palindromes. For example, "A man, a plan, a canal. Panama!" is considered to be a palindrome.
To determine whether a string is a palindrome, you can: convert the string to lower case; remove any non-letter characters from the string; and compare the resulting string with the reverse of the same string. If they are equal, then the original string is considered to be a palindrome.
In class, we saw how to compute the reverse of str:
String reverse;
int i;
reverse = "";
for (i = str.length() - 1; i >= 0; i--) {
   reverse = reverse + str.charAt(i);
}
Write a static subroutine that finds the reverse of a string. The subroutine should have one parameter of type String and a return value of type String. Use the above code, and add a return statement.
Now write a second subroutine that takes a String as a parameter and returns a String. This subroutine should make a new string that is a copy of the parameter string, except that all the non-letters have been omitted. The new string should be returned as the value of the subroutine. You can tell that a character, ch is a lower-case letter by testing if (ch >= 'a' && ch <= 'z')
Write a comment before each subroutine, saying what it does.
(Note that for the operation of converting str to lower case, you can simply use the built-in toLowerCase subroutine by saying: str = str.toLowerCase();)
Finally, write a main() routine that will read in a string from the user and determine whether or not it is a palindrome. The program should print the string converted to lower case and stripped of any non-letter characters. Then it should print the reverse string. Finally, it should say whether the string is a palindrome. (Use the two subroutines to process the user's string.) For example, if the user's input is "Hello World!", then the output might be:
         stripped:  helloworld
         reversed:  dlrowolleh
         This is NOT a palindrome.
and if the input is "Campus motto: Bottoms up, Mac!", the output might be:
        stripped:  campusmottobottomsupmac
        reversed:  campusmottobottomsupmac
        This IS a palindrome.
To turn in your project, go to your Eclipse workspace directory. It will contain a directory named lab6. Copy the lab6 directory into your homework directory in /classes/f09/cs124/homework, as usual.
For the second project, you are going to work with codes. That is, you are going to take strings and encode them so that they can only be read by someone who knows the secret "key" that you used to do the encoding (or by someone who is able to "break" the code).
A very simple example of coding is given in the sample program SimpleCode.java. This program uses a "Caesar Cipher" in which the key is a single number in the range 1 to 25. (It is very easy to break, since there are only 25 possible keys to try!) In this code, each letter in a string is moved forward in the alphabet by the key amount; if this moves the letter past the end of the alphabet, then wrap around to the beginning of the alphabet. For example, if the key is 3, then 'a' is changed to 'd' and 'y' is changed to 'b'. A string can be decoded by moving each letter backwards in the alphabet by the key amount. In the program, subroutines are used to encode and decode individual letters. For convenience, all letters are converted to lower case. (Traditionally, all spaces and punctuation would also be removed from the string, but in this program I simply copy them unchanged into the coded string.)
You are going to implement a more complex type of code in which the key is an entire word or phrase. Furthermore, your program will be able to encode and decode entire blocks of text and not just single lines.
For your program, you should write three subroutines. One of them will read a multi-line block of text from the user and return it as a single String. This string should contain end-of-line characters ('\n') to separate the lines of text. The user will end the block of text by entering a blank line. The second subroutine will encode a block of text, and the third subroutine will decode a block of text. Both of these subroutines will have two parameters of type String: the block of text and the key.
In addition to these subroutines, you can copy the single-character encoding and decoding subroutines from the sample program SimpleCode.java. And you can use the subroutine that you wrote for Exercise 1 for stripping spaces and punctuation from a string. You will find all these subroutines to be useful in your program.
The main() routine of your program will run in a loop in which it presents the following menu to the user, reads the user's selection, and carries out the user's command:
Here are your options:

     1.  Enter the key.
     2.  Encode a block of text.
     3.  Decode a block of text.
     4.  Exit from this program.

Enter the number of your choice:
Here is how the coding and decoding will work:
When the user enters a key, it can be any line of text. However, the program will convert the key to lower case and strip out everything except letters. The result is a key that consists of lower case letters only. (The longer this string, the harder it will be to break the code.)
When a block of "plaintext" is to be encoded using the key, proceed as follows to compute the encoded "ciphertext." First, convert the plaintext to lower case. For each character in the plaintext, if it is not a letter, copy it unchanged to the ciphertext. For a letter, ch, encode it as follows: Say ch is the i-th character in the plaintext, Let n be the length of the key string. Take character number i % n from the key; let this character be offsetChar. Convert offsetChar into a number from 0 to 25 (by computing (int)offsetChar - (int)'a', as is done in the sample program). Now, encode ch using this offset in the same way that it would be used in the Caesar Cipher (that is, with the encode() method from the sample program). All this gives the coded character, which should be added onto the ciphertext.
When decoding a block of ciphertext, proceed in exactly the same way, but use the offset in the end to decode the character (with the decode() method from the sample program).
At some point, I will email you a coded message and key that you can use to test your program. If your program is working correctly, you should be able to decode my message and send me a coded reply.