In this lab, you will take a quick look at the Eclipse debugger. This is the last lab that will cover a general programming tool.
The second part of the lab asks you to write a class representing a panel that can show a collage of images. You will also write a program to test that class. By writing the class, you will learn more about BufferedImage, and you will use the class in a later project in which the images for the collage will be obtained by "crawling" the web and downloading the images that you encounter. And the main program will show you how to use image resources.
The Twenty Questions Game (Lab 5) and the final version of the Percolation program (Lab 4) should be turned in by noon on Saturday. The Percolation project must be submitted by committing the final version to your CVS repository. For the Twenty Questions project, you can turn it in either by sharing the project into CVS or by copying it into your homework folder in /classes/s11/cs225/homework. If I do not find it in your homework folder, I will check CVS.
This lab is due next week, at the beginning of lab. It can be turned in either in your homework folder or in CVS. The written report that is required for Part 1 can be either included as a file in your project or turned in on paper.
Start a new Eclipse project for Lab 6, and add the file BuggySearchAndSort.java to your project. You can find a copy of the file in /classes/s11/cs225/files-for-lab6.
BuggySearchAndSort defines a search method that is supposed to check whether or not a given integer occurs in a given array of integers. It also contains a "bubble sort" method that is supposed to sort an array of integers into non-decreasing order. There is also a main program that tests the two methods. (It also sorts the list with the built-in method Arrays.sort to give a correctly sorted answer).
If both methods were correct, then running the program would produce output that looks something like this (though with different numbers each time you run it):
    The array is: 4 3 6 9 3 9 5 4 1 9
    This array DOES contain 5.
    Sorted by Arrays.sort():   1 3 3 4 4 5 6 9 9 9
    Sorted by Bubble Sort:     1 3 3 4 4 5 6 9 9 9
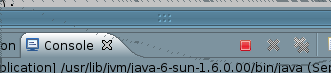
Unfortunately (or fortunately, for the purposes of this lab), the methods in BuggySearchAndSort have bugs that can produce either incorrect results or an infinite loop. (The search methods might give the correct results in some cases, but it gives the wrong answer in many cases.) If you run the buggy program without modifying it, it will go into an infinite loop. Remember that to stop a running program in Eclipse, you can click the Stop button that looks like a small red square in the part of the window where the Console view appears:
(If this button is gray instead of red, it means that no program is currently running in the visible console. However, there might be other consoles that are still running programs; to avoid having a bunch of programs, all running in infinite loops at the same time, you should make sure that a program has been terminated before starting another program run.)
Your job in this lab is to use the Eclipse debugger to find the bugs in BuggySearchAndSort. In the written lab report that you will turn in, you should describe each bug, say how you fixed it, and explain briefly how you used the Eclipse debugger to find the bug.
(Note: It's possible that you could find one or both bugs just by inspecting the code. However, the main purpose of this part of the lab is to get some experience with the debugger, so I would like you to do that rather than simply eyeball the code!)
To debug a program in Java, you have to start the program using a "Debug" command instead of a "Run" command. There is a "Debug As..." command in the same pop-up menu as the "Run As..." command. You can start the debugger by clicking on the "Debug" button,which is just to the left of the "Run" button in the toolbar. It looks like a bug:
![]()
The main point of the debugger is that it allows you to pause the execution of a program and inspect the values of variables. Once the program has been paused, you can also step through the program line-by-line to see what is going on. The program will not pause, however, unless you have added a breakpoint to the program source code. If you run a program that has no breakpoints under the debugger, it behaves just as it would if it were run normally.
To add a breakpoint, simply double-click in the left margin of the source code,
next to one of the lines of code. (By left margin, I mean the same part of the
window where the error and warning "light bulbs" appear.) The breakpoint appears
as a small dot: ![]() .
You can remove the breakpoint by double-clicking this dot. There is also
a "Remove All Breakpoints" command in the "Run" menu. I should
also note that you can use the "Add Java Exception Breakpoint" command in the
"Run" menu to set up a breakpoint that is triggered whenever an exception of
a given type occurs.
.
You can remove the breakpoint by double-clicking this dot. There is also
a "Remove All Breakpoints" command in the "Run" menu. I should
also note that you can use the "Add Java Exception Breakpoint" command in the
"Run" menu to set up a breakpoint that is triggered whenever an exception of
a given type occurs.
When a program is running in Eclipse under the debugger and the execution gets to a line that contains a breakpoint, the execution is paused. If Eclipse is showing the regular Java perspective when this happens, Eclipse will want to switch to the Debug perspective -- another screen full of views (or panes) that are useful for debugging. The first time this happens, Eclipse will put up a dialog box that asks whether you want to switch to the Debug perspective. You should check the box that says "Remember my decision" and say "Yes."
Debugging is complicated, and so is Java's Debug perspective. The most important view is the "Variables" view in the top-right corner. Here, you can inspect the values of variables. An array or object variable has a small triangle (or a "+" sign) next to its name; you can click this triangle to open and close the variable so that you can inspect its contents. If a variable is selected (by clicking it), its value is also shown at the bottom of the view.
The "Debug" view in the top left contains a list of currently active subroutines. Click on a subroutine to inspect its variables. The title bar of the "Debug" view contains some useful buttons:
![]()
The green triangle means "Resume" and can be used when the program is paused to resume normal execution of the program (until it next encounters a breakpoint). There is a red "Stop" button that can be used to terminate the program. Most important are the three "arrow" buttons for the "Step Into", "Step Over", and "Step Out" commands. "Step Over" is easiest to understand -- clicking it causes one line of code to be executed. "Step In" is similar, except that if the line of code contains a subroutine call, it takes you to the first line of the subroutine so that you can continue from there. "Step Out" continues execution until the current subroutine returns (or a breakpoint is encountered), and it stops at the line to which the subroutine returns. Note that these "Step" commands can also be found in the "Run" menu, and that the F5, F6, and F7 keys can be used as keyboard equivalents for the step commands.
(You will want to avoid using the "Step Into" command to step into one of Java's built-in subroutines. If you do that, you will just get a message saying that the source code for the subroutine is not available. If this happens, you can use "Step Out" to get out of the subroutine and return to your own code.)
In the left center area of the Debug perspective, you'll find an edit view where the source code files for the program are displayed. The current line is marked in this view with an arrow in the left margin, and you can watch this arrow move as you step through the program. There is a Console pane at the bottom of the window where program I/O is done. You can even edit your program in the Debug perspective, although I don't recommend it.
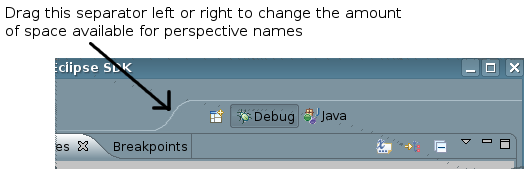
One final remark: There is a list of open perspectives on the right end of the toolbar at the top of the Eclipse window. You can move from one perspective to another by clicking on the name of one of the perspectives in this list. So, when you want to get out of the Debug perspective and back to the normal Java perspective, just click "Java" in the list of perspectives:
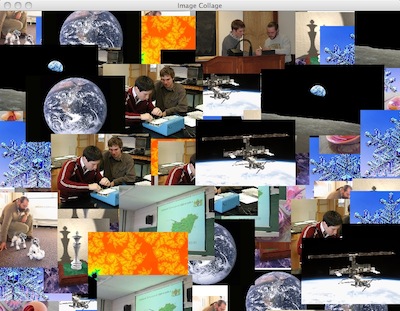
For this part of the lab, you will write a small GUI program in two parts: a class to define an ImageCollagePanel and a main program that tests that class. The amount of programming is not huge; with no comments, my program uses 47 lines for the panel class and 62 lines for the main program. Here is a half-size picture of my programs window after the program has run for a while:
You will need a copy of the folder named images, which you can find in /classes/s11/cs225/files-for-lab6. Copy the entire folder into the src folder in your Eclipse project; it must appear inside the src folder. The images folder contains several images. These images will be image resources in your program. That is, they will be part of the program and must be on the same "class path" as the program's classes.
You can begin by writing a class named ImageCollagePanel. It should be declared as a subpanel of JPanel. The panel defined by this class is passive; its job is to display a collage of images that are added to the panel by another part of the program. By "collage" here, I mean that images are placed in random positions on the panel.
Your class is required to define the following:
You will need to define an instance variable of type BufferedImage to hold a copy of the picture that is displayed in the panel. You should create the buffered image in the constructor, and make its size equal to the preferred size of the panel. Initially, you can fill the image with Color.WHITE. The paintComponent method for the panel should simply draw the buffered image to fill the entire panel.
Remember that if bufim is a BufferedImage, you can obtain a graphics context for drawing on the buffered image by saying
Graphics g = bufim.createGraphics();
Once you have this graphics context, you can use it to draw on the image in the same way that you would draw on the screen in a paintComponent method. In particular, you can draw another buffered image into the image. You can find more information about images in Lab 4 and in Section 13.1.
When adding an image to the collage, you want to place it in a random postion. Ideally, you should allow the image to extend past the boundary of the window, but with at last half of the width and height inside the window. Also, large images should be reduced in size when they are drawn so that they don't cover too much of the collage. In my program, the images in the collage can occupy no more than 1/4 of the height and 1/4 of the width. (A better approach, come to think of it, might be to allow them to occupy no more than, say 1/15 of the total area.) You can scale down an image as you draw it with a statement such as g.drawImage(image,x,y,width,height,null).
For testing the image collage, you should write a separate class. Make it a sub-class of JFrame. You can include a main routine in this frame class to make it possible to run the class as an application. If the name of the class is CollageMain, the main routine would look like:
    public static void main(String[] args) {
       JFrame window = new CollageMain();
       window.setLocation(200,100);
       window.setDefaultCloseOperation(JFrame.EXIT_ON_CLOSE);
       window.setVisible(true);
    }
(You also have to call pack() somewhere on the frame; I do it in the frame's constructor.)
The constructor for the frame class should create an ImageCollagePanel and use it as the content pane in the frame. Also, install a MouseListener on the panel: When the user double-clicks the collage panel, call the panel's fill() method to clear the collage. (If evt is the MouseEvent that is generated when the use clicks the panel, you can test whether it represents a double-click by testing whether evt.getClickCount() == 2.)
The constructor should also load copies of all the image resources. Each image resource should be loaded into a buffered image, and the images should all be stored in an array (or ArrayList) of BufferedImage. Here is some code that will load a single image, assuming that fileName is the name of the file resource and that the file is in a folder named images on the class path:
    ClassLoader cl = getClass().getClassLoader();
    BufferedImage img = ImageIO.read(cl.getResource("images/" + fileName));
You will have to catch the exceptions that can be thrown by this code, but in fact no exception will occur if the image files really are where they should be. Here is an array containing the file names for all the images. You can use this array in your code:
    String[] imageFiles = {
                "10.jpg",
                "11.jpg",
                "12.jpg",
                "18.jpg",
                "7.jpg",
                "8.jpg",
                "9.jpg",
                "big_blue_marble_apollo17.jpg",
                "mandelbrot20_1280x854_antialiased.jpg",
                "snowcrystal.jpg",
                "space_station.jpg"
            };
Finally, you need a way to add images to the collage panel. Another image should be added every, say, 200 milliseconds. You can use a Timer for this. (Using timers for animation was covered in Section 6.5.1.) The timer can be created and started in the constructor for the frame. This can be done as follows:
       new Timer(200, new ActionListener() {
            public void actionPerformed(ActionEvent e) {
                // Code to be executed every 200 milliseconds goes here!
            }
        }).start();
The code in the timer should select a random image from the array of buffered images and add it to the collage panel.