CPSC 225, Spring 2019
Lab 3: Exercises in Recursion
For Lab 3, you will be writing several recursive methods. In the first part of the lab, you work with "turtle graphics," which we have talked about in class. You will use turtle graphics to draw several recursive pictures. At the end of the lab is one additional recursion exercise, to write a method that solves a maze. (The maze-solver does not use turtle graphics.)
Start the lab by creating a new project. (Since this lab uses JavaFX, if you work on the lab computers, be sure to select the right JRE when you create the Eclipse project.) You should add files from the folder /classes/cs225/lab3-files to the src folder of your project. The four files that you need for the lab are: TurtlePane.java, TurtleMain.java, MazePane.java, and MazeMain.java. There are also filea SierpinskiTriangleDemo.java and TreeDemo.java that use turtle graphics to draw Sierpinski triangles and recursive Trees. You can use those files as examples.
Turn in your work for this lab by making a folder named lab3 in your homework folder in /classes/cs225/homework. Copy all the files from your project into that folder. I will print the files TurtleMain.java and MazeMain.java. Your work is due at the beginning of lab next Tuesday.
About The Turtle
The file TurtlePane.java defines a square region that represents the turtle habitat. The habitat has x-coordinates that range from -10 on the left to 10 on the right, and it has y-coordinates that range from -10 on the bottom to 10 at the top. The turtle starts out in the center, at (0,0), facing to the right. The turtle has a "pen" that can be raised or lowered. If the pen is down when the turtle moves, it leaves a trail: The pen draws a line from the starting point to the point to which the turtle moves.
If turtle is a variable of type TurtlePane, you give commands to the turtle by calling instance methods of turtle such as turtle.forward(5), turtle.turn(45), and turtle.penUp(). To learn about all the available methods, read the source code file, TurtlePane.java.
The file TurteMain.java contains the main() routine, so it can be run as an application. The drawing code goes in the runTurtle() method; you will of course define other methods to be called from runTurtle(). Currently, it just draws a square. You will delete the code for drawing the square and add code to make the program draw several recursive pictures. (SierpinskiTriangleDemo.java is a version of TurtleMain.java, with code added for drawing a sequence of Sierpinski triangles. We looked at this example in class. You will not work on SierpinskiTriangleDemo.java, but you can use it as an example. Similarly for TreeDemo.java.)
TurtleMain.java includes a method delay(t) that causes the program to pause for t milliseconds when it is called. You can use this method to insert a delay into your program, to give the user a better chance to see what is going on. There is also a method turtle.setAutoDelay(t) that tells the turtle to delay for t milliseconds after every action. Both of these methods are used in SierpinskiTriangleDemo.java.
Before you start working on the lab exercises, you might want to try some non-recursive turtle graphics to get more familiar with the concept. For example, try adding the following code to the runTurtle():
turtle.setTurtleIsVisible(false);
turtle.setAutoDelay(10);
for (int i = 0; i < 360; i++) {
    turtle.randomColor();
    double dist = 10*Math.random();
    turtle.forward(dist);
    turtle.back(dist);
    turtle.face(i);
}
Recursive Drawing
For your exercises in recursive drawing, you will work entirely in the file TurtleMain.java. You will be writing at least four recursive methods. To show your work to the user, I suggest that you program a kind of slide show that shows the user each of your drawings, one after the other. (If you want to be fancy, you could show different "levels" of the recursive drawing, as I did for the Sierpinski triangle.) The drawing code in the runTurtle() routine might look something like this:
runExercise1();   // (but use better names!!!)
delay(4000);
runExercise2();
delay(4000);
runExercise3();
delay(4000);
runExercise4();
For the first exercise, you should implement the Koch curve, which we looked at in class as an example. You should write a method
private static void koch( double size, int level )
to draw a Koch curve with a given size and level of recursion. Recall that a true Koch curve is a "fractal" which is made up of 4 smaller sized copies of itself. You can't draw a true Koch curve, but you can draw an approximation. For the approximation, a Koch curve of level 0 is just a line segment. For N > 0, a Koch curve of level N is made up of 4 smaller-sized level (N-1) curves. To draw it with turtle graphics, you need to be careful about the sizes and the angles between the pieces. (Hint: The angles inside an equilateral triangle are 60 degrees.) This picture shows Koch curves of various recursion levels. The last one is a pretty good approximation of the real Koch curve:
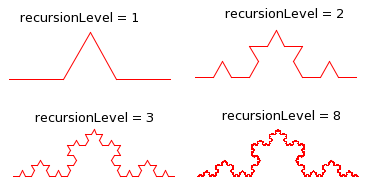
The main program should place the turtle at the desired starting point for the curve and then call your koch() method with a reasonable value for the recursion level. Alternatively, you can do something like what I did with the Sierpinski triangle, where I showed a series of triangles with increasing recursion levels.
For the remaining turtle graphics exercises, you should choose at least three of the following recursive drawings, and write recursive methods to draw them:
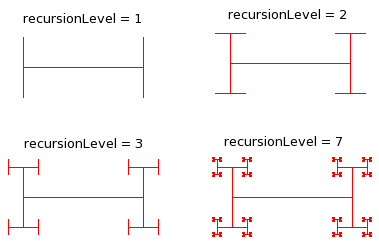 Recursive "I-bar." An I-bar of level 0 is just a line segment. An I-bar of
level N consists of a line segment with a smaller-sized, rotated I-bar of
level (N-1) on each end. (Hint: The turtle should start at the center
of the bar and should return to that position after drawing the bar.)
Recursive "I-bar." An I-bar of level 0 is just a line segment. An I-bar of
level N consists of a line segment with a smaller-sized, rotated I-bar of
level (N-1) on each end. (Hint: The turtle should start at the center
of the bar and should return to that position after drawing the bar.)
|
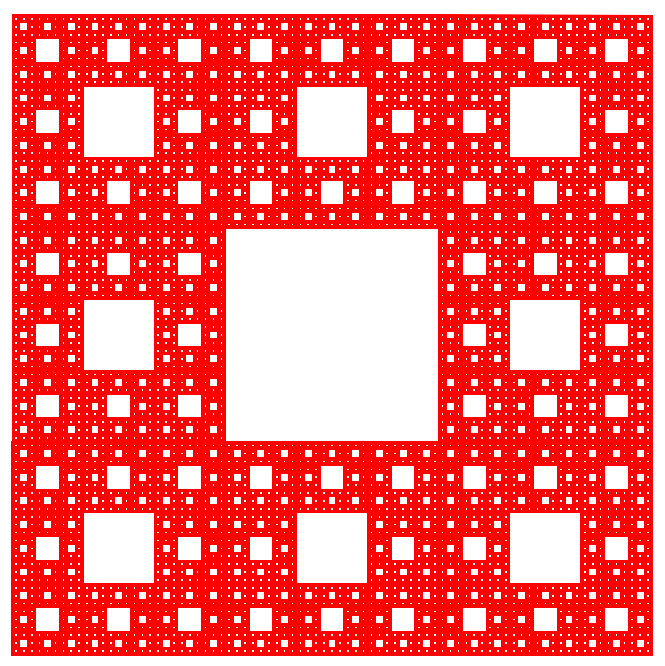
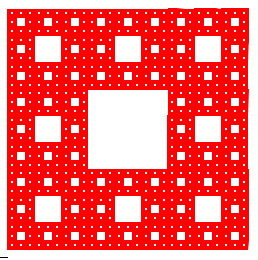 Sierpinski carpet. A Sierpinski carpet of level 0 is just a square. A
Sierpinski carpet of level N consists of 8 1/3-sized Sierpinski carpets of level
(N-1). The picture shows a level-5 carpet. It takes a long time to draw a carpet
with level greater than 5, but there is a bigger picture of a
level-6 carpet at this link.
Sierpinski carpet. A Sierpinski carpet of level 0 is just a square. A
Sierpinski carpet of level N consists of 8 1/3-sized Sierpinski carpets of level
(N-1). The picture shows a level-5 carpet. It takes a long time to draw a carpet
with level greater than 5, but there is a bigger picture of a
level-6 carpet at this link.
|
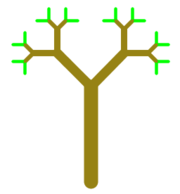
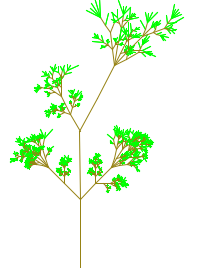
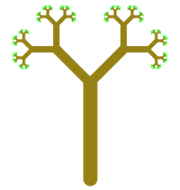 Improved tree. This is a version of the tree example that we covered in
class, in which I have varied the color and line width while drawing the tree.
(Level-0 trees are drawn in green.) A level-4 tree and a level-7 tree are shown.
Improved tree. This is a version of the tree example that we covered in
class, in which I have varied the color and line width while drawing the tree.
(Level-0 trees are drawn in green.) A level-4 tree and a level-7 tree are shown.
|
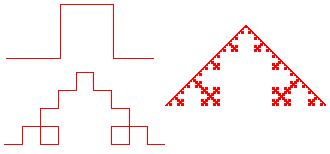 Square Koch. This is a version of the Koch curve that uses squares instead of
triangles. Square Koch curves of level 1, 2, and 8 are shown.
Square Koch. This is a version of the Koch curve that uses squares instead of
triangles. Square Koch curves of level 1, 2, and 8 are shown.
|
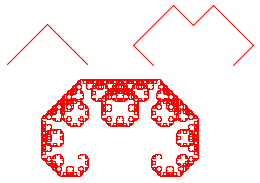 C Curve. A rather pretty thing, composed of two copies of itself at a
90 degree angle. A level-0 curve is a line segment. To get a level-N curve,
start by turning 45 degrees, draw the two level-(N-1) curves with a minus 90 degree
angle between them, then turn 45 degrees
again so you are facing in the original direction. If size is the size of
the level-N curve, the size of each smaller curve is size/Math.sqrt(2).
The pictures were drawn by ccurve(8,1), ccurve(8,3), and ccurve(8,12).
C Curve. A rather pretty thing, composed of two copies of itself at a
90 degree angle. A level-0 curve is a line segment. To get a level-N curve,
start by turning 45 degrees, draw the two level-(N-1) curves with a minus 90 degree
angle between them, then turn 45 degrees
again so you are facing in the original direction. If size is the size of
the level-N curve, the size of each smaller curve is size/Math.sqrt(2).
The pictures were drawn by ccurve(8,1), ccurve(8,3), and ccurve(8,12).
|
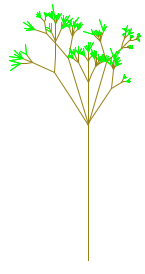
 Random Factors. It's interesting to add some randomness to recursive drawing.
The pictures were drawn by two different versions of the tree algorithm with some randomness
added. The one on the right has a chance of having side branches on each stem.
You could try to do something similar, or you could think up your own
random recursion.
Random Factors. It's interesting to add some randomness to recursive drawing.
The pictures were drawn by two different versions of the tree algorithm with some randomness
added. The one on the right has a chance of having side branches on each stem.
You could try to do something similar, or you could think up your own
random recursion.
|
Maze Solver
The final exercise uses the files MazePane.java and MazeMain.java. You will only work on MazeMain.java, which is the runnable application. If you run MazeMain without making any changes, it will open a window showing a randomly created maze. (It doesn't do anything else — you can just close the window.)
The MazePane class defines the panel that creates and displays the random maze. The maze is made up of a grid of small colored squares. Black squares represent "walls" and white squares represent "corridors." Note that there is a border of black squares all around the edge of the maze. (There is no exit from the maze!)
MazeMain.java has a global variable named maze of type MazePane. This variable has the following methods, which you will use in the maze-solving method:
- maze.getColor(r,c) — Returns the color of the square in row r, column c. For an "empty" square, the return value is null. A square whose color is null is shown as white. The return value for a square that is part of a wall is Color.BLACK.
- maze.setColor(r,c,color) — Set the color of the square in row r, column c to color. Set the color to null if you want to make the square empty again.
Your job is to add a method to complete the solveMaze() method to make it solve the maze. The maze is considered solved if you find a path from location (1,1) to location (maze.getRows()-2,maze.getColumns()-2). These points are the upper left and lower right white squares in the original maze. You should mark the path by setting its color to something other than black or white. You might also want to color squares that your method visits while it is searching for the solution (but you could also reset their color to white.) Here is a picture of a maze that shows the solution in magenta; other squares that were visited during the search are colored light gray:
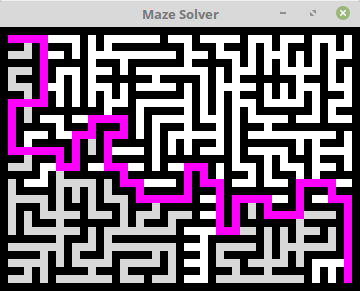
The essential idea of the recursion is: "to solve the maze from (x,y), move one square from that position and try to solve it from there." You can only continue if you move into an empty square. It's possible that you might try all four directions from (x,y) without finding a solution. One interesting point is how to end the process once you find a solution, since at that point you will be deep in the recursion. One way to do it is to return a boolean value from the method. If you find a solution, you can immediately return true; if you try all four directions without finding a solution, you can return false. Another way to get out of a deep recursion is to throw an exception; you would then have to modify the runMazes() method to cath the exception.
The maze will be solved very quickly, unless you add some delays to your solution method. It's nice to watch the maze being solved. To implement that, you can insert a delay of, say 10 or 20 milliseconds, every time you change the color of a square. You might add a loop to the runMazes() method to make the program keep generating and solving mazes until the user closes the window. Note that you can change the size of the maze by changing the constants MAZE_ROWS, MAZE_COLS, and SQUARE_SIZE.