CPSC 441, Fall 2002
Lab 10: PVM Programming
IN THIS LAB, you will be programming for PVM (Parallel Virtual Machine), which was introduced in the previous lab. You will be working on a simple "crowd computation" in which there is no communication among the slave tasks. The specific problem is computation of the Mandelbrot set (an example which is suggested and discussed in the PVM book). As a starting point, you will need a copy of the directory /home/cs441/mandelbrot. You should copy this directory into your account.
The Mandelbrot set was discussed in class. It is a subset of the xy-plane defined by a simple property: Start with any point (a,b) in the plane. Let (zx,zy) = (a,b) and then repeat the computation (zx,zy) = (zx*zx-zy*zy+a,2*zx*zy+b). If the points (zx,zy) eventually move arbitrarily far away from (0,0), then (a,b) is not in the Mandelbrot set. If the points (zx,zy) stay near (0,0) forever, then (a,b) is in the Mandelbrot set. (It's known that once the point (zx,zy) gets more than 2 units away from (0,0), it will keep moving away forever, so it's easy to be sure that a point is not in the set.) To make a nice colored picture, do the following: Use a window to represent some rectangle in the xy-plane. For each pixel, let (a,b) be the real-number coordinates of that pixel. Compute a sequence of points(zx,zy) as defined above. Count the number of repetitions. Stop if (zx,zy) moves outside a specified range (-500 to 500 in the program). In this case, (a,b) is definitely not in the Mandelbrot set. Assign it a color that depends on the number of steps it took for the point (zx,zy) to move outside the specified range. Also stop computing if the number of repetitions reaches some specified maximum value (1000 by default in the program). In this case, (a,b) is either in the Mandelbrot set or close to it. Color such a point black. This produces pictures like this one, which shows the entire Mandelbrot set:
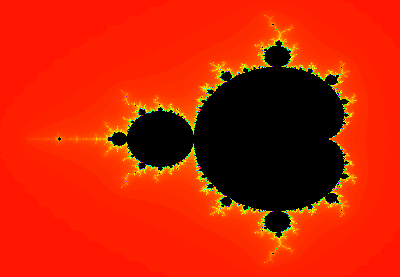
The Mandelbrot set is an amazing thing. It has infinite detail at all levels of magnification. Its mathematics is still not completely understood, but it has been used to make a lot of nice pictures.
Exercise
You will work on this lab in class on Monday, December 9 as well as on Monday, December 2. The program discussed below is due on the last day of class, Friday, December 13. You should turn in printouts of your versions of the files mb_master.cc and mb_slave.cc. Also, try to make at least one nice picture of some part of the Mandelbrot set, and save a parameter file with the info necessary to reproduce the picture. (The file can be saved using one of the menu commands in the program.)
Compiling and Running the Programs
The Mandelbrot directory contains a Makefile that automates the compilation process. All you have to do is type the command make any time you change any file. This will compile any files that need to be recompiled and will create up-to-date versions of two programs, mandel_master and mandel_slave. It will also automatically copy mandel_slave into the directory named pvm3 in your home directory, so that PVM will be able to find it when it spawns the slave tasks.
To run the program, you should first start up PVM and add some hosts to it. Then run the mandel_master program. You should do this directly on the command line. (If you do it by "spawning", you have to be careful to spawn it on the local machine. Otherwise, it won't be able to open a window.) However, you could still use xpvm to monitor the computation, if you want to try that.
The directory mandelbrot contains programs named mandel_master_complete and mandel_slave_complete. These are compiled versions of the programs that you are supposed to write for this lab. You can try running mandel_master_complete to see what it does. (If you want to do this, you must copy mandel_slave_complete into your pvm3 directory so that PVM can find it.) If you want to separate the development of your own master and slave programs, you could write a master program that works with mandel_slave_complete or a slave that works with mandel_master_complete. To work with mandel_master_complete, the slave program must be named "mandel_slave_complete" and it should always use the same message ID in its reply that was used in the original message. The format of the data in the messages should be exactly as described below.
The Master Program
The program mandel_master in the mandelbrot directory already computes and displays Mandelbrot sets, but it does so without using distributed computations. The source code for this program is in several files, but you only need to be concerned with mainwin.h and mb_master.cc. The function MBDisplay::draw() in mb_master.cc does the actual computation. That is, it computes an integer value for each pixel by counting the number of repetitions of a certain process. These values are used to decide the colors of the pixels. You will have to rewrite this method so that it uses PVM. It should divide the work into work units and send the work units to slave tasks. A work unit will consist of a certain number of pixels. The slave unit will do the calculations for the assigned pixels and will send back an answer consisting of one integer value for each pixel. When the master task receives this answer, it will use it to color the pixels.
I suggest that you use one full column of pixels as a work unit. The data for the work unit will be the column number, an x-value, a minimum y-value, a maximum y-value, the number of pixels in the column, and the maximum number of repetitions. As a response, the slave will send back the column number and a repetition count for each pixel in the column, from top to bottom. The column number just serves to identify which work unit this is. (This is precisely how mandel_master_complete and mandel_slave_complete work.) The general algorithm for the master program is:
      send a work unit to each task
      while there are still more work units to receive:
         wait for a response message from any slave task
         if there are still unassigned work units:
            send a new work unit to the task that just sent the response
         use the response message to color one column of pixels
The draw method uses the PVM, but you also have to worry about setting up the virtual machine and tearing it down. The file mb_master.cc contains stubs for three functions that you can use to do this: MBDisplay::initializeVM is called just once at the beginning of the program. You can use it to initialize PVM and spawn the slave tasks that you will use for the rest of the program. (I am not sure how many slave tasks you should use. You can try one per host, but having several tasks on each host might work better.) MBDisplay::killVM is called when the program is about to terminate. You can define this function to kill all the slave tasks. MBDisplay::cleanupVM is a little more complicated. It is called when the program stops a drawing operation. This can happen because the drawing is complete. However, it can also happen if the user stops the drawing prematurely. You might or might not need to put something in cleanupVM to deal with this. For the time being, you might just want to ignore the problem.
The PVM functions that you will need for the "master" part of the program include:
                  pvm_mytid
                  pvm_info
                  pvm_spawn
                  pvm_initsend
                  pvm_pkint and pvm_pkdouble
                  pvm_send
                  pvm_recv
                  pvm_upkint
                  pvm_bufinfo
                  pvm_kill
You will need to add several variables to the class MBDisplay. To do this you will have to edit the class definition in the file mainwin.h. You do not have to add any new functions.
The Slave Program
The slave program is simpler than the master program. It has no relation to the program's graphical user interface. All it has to do is wait for work units, do the work, and return the results to the master task. It will do this repeatedly in an infinite loop until it is killed by the master task when the program ends. You should write your slave program in the file mb_slave.cc. This file exists, but it does essentially nothing.
The slave program will need a function that is essentially a copy of MBDisplay::countIterations from mb_master.cc. The PVM functions that you will need for the slave part of the program include:
                  pvm_mytid
                  pvm_parent (possibly)
                  pvm_recv
                  pvm_bufinfo (possibly)
                  pvm_upkint and pvm_upkdouble
                  pvm_initsend
                  pvm_pkint
                  pvm_send
Using the Program
When you run mandel_master or mandel_master_complete, you will see a GUI that is largely self-explanatory, except for certain mouse operations. The File menu allows you to save a copy of the current image as a PNG file. You can also "Save Parameters" to save the current menu settings and xy-limits in a small text file. Later, you can use the "Load Parameters" command to load this file and recreate the same image. ("Load Parameters is not available while drawing is in progress.)
The "Palette" menu gives you some control over the colors that are used in the image. The "Spectrum" and "GrayScale" palettes probably look best. You'll notice that if you change the palette, it changes in the current image, so you can try a few different palettes on the same image. A palette is just a list of 250 colors. If the maximum number of iterations is more than 250, then the same color has to be assigned to several different repetitions counts. The "Duplicate Palette" and "Stretch Palette" commands in the "Palette" menu provide two ways of doing this. With "Duplicate Palette", all the colors are used for counts between 0 and 249, then repeated for counts between 250 and 499, then again for counts between 500 and 749, and so on. With "Stretch Palette", the palette is stretched to cover the entire range of counts. For example, if the maximum number of iterations is 1000, then the first palette color is used for counts 0, 1, 2, and 3, the second palette color is used for counts 4, 5, 6, and 7, and so on. Unfortunately, these commands will not affect pixels that have already been drawn, only those that are drawn in the future, so you will have to redraw the whole image to see the effect.
Although there are menu commands for zooming in and out, you will ordinarily do this with the mouse. If you left-click a point in the image, you will zoom in by a factor of 2 and the point you clicked on will be moved to the center of the image. You can increase the magnification if you hold down the Shift, Control, and/or ALT keys. If you hold down any one of these keys, the zoom factor is 4; if you hold down two of them, the zoom factor is 8; if you hold down all three, the zoom factor is 16. You can zoom out by right-clicking instead of left-clicking. Whenever you do a zoom, the drawing of the new image starts immediately. Zooming is not possible while an image is being drawn.
Note that you can terminate a drawing operation with the "Stop Drawing" command in the "Control" menu.
If you zoom in too far, you will run out of decimal places in the numbers of type double that are used in the calculation, and the picture will become blocky. At this point, what you are seeing is no longer mathematically valid.