Section 2.5
Java Graphics2D
In the rest of this chapter, we look at specific implementations of two-dimensional graphics. There are a few new ideas here, but mostly you will see how the general concepts that we have covered are used in several real graphics systems.
In this section, our focus is on the Java programming language. Java remains one of the most popular programming languages. Its standard desktop version includes a sophisticated 2D graphics API, which is our topic here. Before reading this section, you should already know the basics of Java programming. But even if you don't, you should be able to follow most of the discussion of the graphics API itself. (See Section A.1 in Appendix A for a very basic introduction to Java.)
The graphics API that is discussed here is part of Swing, an API for graphical user interface programming that is included as part of the standard distribution of Java. Many Java programs are now written using an alternative API called JavaFX, which is not part of the standard distribution. JavaFX is not discussed in this textbook. Its graphics API is, in fact, quite similar to the API for HTML canvas graphics, which is discussed in Section 2.6.
The original version of Java had a much smaller graphics API. It was tightly focused on pixels, and it used only integer coordinates. The API had subroutines for stroking and filling a variety of basic shapes, including lines, rectangles, ovals, and polygons (although Java uses the term draw instead of stroke). Its specification of the meaning of drawing operations was very precise on the pixel level. Integer coordinates are defined to refer to the lines between pixels. For example, a 12-by-8 pixel grid has x-coordinates from 0 to 12 and y-coordinates from 0 to 8, as shown below. The lines between pixels are numbered, not the pixels.
![]()
The command fillRect(3,2,5,3) fills the rectangle with upper left corner at (3,2), with width 5, and with height 3, as shown on the left above. The command drawRect(3,2,5,3) conceptually drags a "pen" around the outline of this rectangle. However, the pen is a 1-pixel square, and it is the upper left corner of the pen that moves along the outline. As the pen moves along the right edge of the rectangle, the pixels to the right of that edge are colored; as the pen moves along the bottom edge, the pixels below the edge are colored. The result is as shown on the right above. My point here is not to belabor the details, but to point out that having a precise specification of the meaning of graphical operations gives you very fine control over what happens on the pixel level.
Java's original graphics did not support things like real-number coordinates, transforms, antialiasing, or gradients. Just a few years after Java was first introduced, a new graphics API was added that does support all of these. It is that more advanced API that we will look at here.
2.5.1 Graphics2D
Java is an object-oriented language. Its API is defined as a large set of classes, The actual drawing operations in the original graphics API were mostly contained in the class named Graphics. In the newer Swing API, drawing operations are methods in a class named Graphics2D, which is a subclass of Graphics, so that all the original drawing operations are still available. (A class in Java is contained in a collection of classes known as a "package." Graphics and Graphics2D, for example, are in the package named java.awt. Classes that define shapes and transforms are in a package named java.awt.geom.)
A graphics system needs a place to draw. In Java, the drawing surface is often an object of the class JPanel, which represents a rectangular area on the screen. The JPanel class has a method named paintComponent() to draw its content. To create a drawing surface, you can create a subclass of JPanel and provide a definition for its paintComponent() method. All drawing should be done inside paintComponent(); when it is necessary to change the contents of the drawing, you can call the panel's repaint() method to trigger a call to paintComponent(). The paintComponent() method has a parameter of type Graphics, but the parameter that is passed to the method is actually an object of type Graphics2D, and it can be type-cast to Graphics2D to obtain access to the more advanced graphics capabilities. So, the definition of the paintComponent() method usually looks something like this:
protected void paintComponent( Graphics g ) {
    Graphics2D g2;
    g2 = (Graphics2D)g;  // Type-cast the parameter to Graphics2D.
       .
       .  // Draw using g2.
       .
}
In the rest of this section, I will assume that g2 is a variable of type Graphics2D, and I will discuss some of the things that you can do with it. As a first example, I note that Graphics2D supports antialiasing, but it is not turned on by default. It can be enabled in a graphics context g2 with the rather intimidating command
g2.setRenderingHint(RenderingHints.KEY_ANTIALIASING,
                             RenderingHints.VALUE_ANTIALIAS_ON);
For simple examples of graphics in complete Java programs, you can look at the sample programs java2d/GraphicsStarter.java and java2d/AnimationStarter.java. They provide very minimal frameworks for drawing static and animated images, respectively, using Graphics2D. The program java2d/EventsStarter.java is a similar framework for working with mouse and key events in a graphics program. You can use these programs as the basis for some experimentation if you want to explore Java graphics.
2.5.2 Shapes
Drawing with the original Graphics class is done using integer coordinates, with the measurement given in pixels. This works well in the standard coordinate system, but is not appropriate when real-number coordinates are used, since the unit of measure in such a coordinate system will not be equal to a pixel. We need to be able to specify shapes using real numbers. The Java package java.awt.geom provides support for shapes defined using real number coordinates. For example, the class Line2D in that package represents line segments whose endpoints are given as pairs of real numbers.
Now, Java has two real number types: double and float. The double type can represent a larger range of numbers than float, with a greater number of significant digits, and double is the more commonly used type. In fact, doubles are simply easier to use in Java. However, float values generally have enough accuracy for graphics applications, and they have the advantage of taking up less space in memory. Furthermore, computer graphics hardware often uses float values internally.
So, given these considerations, the java.awt.geom package actually provides two versions of each shape, one using coordinates of type float and one using coordinates of type double. This is done in a rather strange way. Taking Line2D as an example, the class Line2D itself is an abstract class. It has two subclasses, one that represents lines using float coordinates and one using double coordinates. The strangest part is that these subclasses are defined as nested classes inside Line2D: Line2D.Float and Line2D.Double. This means that you can declare a variable of type Line2D, but to create an object, you need to use Line2D.Double or Line2D.Float:
Line2D line1, line2;
line1 = new Line2D.Double(1,2,5,7); // Line from (1.0,2.0) to (5.0,7.0)
line2 = new Line2D.Float(2.7F,3.1F,1.5F,7.1F); // (2.7,3.1) to (1.5,7.1)
Note that when using constants of type float in Java, you have to add "F" as a suffix to the value. This is one reason why doubles are easier in Java. For simplicity, you might want to stick to using Line2D.Double. However, Line2D.Float might give slightly better performance.
Let's take a look at some of the other classes from java.awt.geom. The abstract class Point2D—with its concrete subclasses Point2D.Double and Point2D.Float—represents a point in two dimensions, specified by two real number coordinates. A point is not a shape; you can't fill or stroke it. A point can be constructed from two real numbers ("new Point2D.Double(1.2,3.7)"). If p is a variable of type Point2D, you can use p.getX() and p.getY() to retrieve its coordinates, and you can use p.setX(x), p.setY(y), or p.setLocation(x,y) to set its coordinates. If pd is a variable of type Point2D.Double, you can also refer directly to the coordinates as pd.x and pd.y (and similarly for Point2D.Float). Other classes in java.awt.geom offer a similar variety of ways to manipulate their properties, and I won't try to list them all here.
There is a variety of classes that represent geometric shapes, including Line2D, Rectangle2D, RoundRectangle2D, Ellipse2D, Arc2D, and Path2D. All of these are abstract classes, and each of them contains a pair of subclasses such as Rectangle2D.Double and Rectangle2D.Float. Some shapes, such as rectangles, have interiors that can be filled; such shapes also have outlines that can be stroked. Some shapes, such as lines, are purely one-dimensional and can only be stroked.
Aside from lines, rectangles are probably the simplest shapes. A Rectangle2D has a corner point (x,y), a width, and a height, and can be constructed from that data ("new Rectangle2D.Double(x,y,w,h)"). The corner point (x,y) specifies the minimum x- and y-values in the rectangle. For the usual pixel coordinate system, (x,y) is the upper left corner. However, in a coordinate system in which the minimum value of y is at the bottom, (x,y) would be the lower left corner. The sides of the rectangle are parallel to the coordinate axes. A variable r of type Rectangle2D.Double has public instance variables r.x, r.y, r.width, and r.height. If the width or the height is less than or equal to zero, nothing will be drawn when the rectangle is filled or stroked. A common task is to define a rectangle from two corner points (x1,y1) and (x2,y2). This can be accomplished by creating a rectangle with height and width equal to zero and then adding the second point to the rectangle. Adding a point to a rectangle causes the rectangle to grow just enough to include that point:
Rectangle2D.Double r = new Rectangle2D.Double(x1,y1,0,0);
r.add(x2,y2);
The classes Line2D, Ellipse2D, RoundRectangle2D and Arc2D create other basic shapes and work similarly to Rectangle2D. You can check the Java API documentation for details.
The Path2D class is more interesting. It represents general paths made up of segments that can be lines and Bezier curves. Paths are created using methods similar to the moveTo and lineTo subroutines that were discussed in Subsection 2.2.3. To create a path, you start by constructing an object of type Path2D.Double (or Path2D.Float):
Path2D.Double p = new Path2D.Double();
The path p is empty when it is first created. You construct the path by moving an imaginary "pen" along the path that you want to create. The method p.moveTo(x,y) moves the pen to the point (x,y) without drawing anything. It is used to specify the initial point of the path or the starting point of a new piece of the path. The method p.lineTo(x,y) draws a line from the current pen position to (x,y), leaving the pen at (x,y). The method p.close() can be used to close the path (or the current piece of the path) by drawing a line back to its starting point. For example, the following code creates a triangle with vertices at (0,5), (2,-3), and (-4,1):
Path2D.Double p = new Path2D.Double();
p.moveTo(0,5);
p.lineTo(2,-3);
p.lineTo(-4,1);
p.close();
You can also add Bezier curve segments to a Path2D. Bezier curves were discussed in Subsection 2.2.3. You can add a cubic Bezier curve to a Path2D p with the method
p.curveTo( cx1, cy1, cx2, cy2, x, y );
This adds a curve segment that starts at the current pen position and ends at (x,y), using (cx1,cy1) and (cx2,cy2) as the two control points for the curve. The method for adding a quadratic Bezier curve segment to a path is quadTo. It requires only a single control point:
p.quadTo( cx, cy, x, y );
When a path intersects itself, its interior is determined by looking at the winding number, as discussed in Subsection 2.2.2. There are two possible rules for determining whether a point is interior: asking whether the winding number of the curve about that point is non-zero, or asking whether it is odd. You can set the winding rule used by a Path2D p with
p.setWindingRule( Path2D.WIND_NON_ZERO );
p.setWindingRule( Path2D.WIND_EVEN_ODD );
The default is WIND_NON_ZERO.
Finally, I will note that it is possible to draw a copy of an image into a graphics context. The image could be loaded from a file or created by the program. I discuss the second possibility later in this section. An image is represented by an object of type Image. In fact, I will assume here that the object is of type BufferedImage, which is a subclass of Image. If img is such an object, then
g2.drawImage( img, x, y, null );
will draw the image with its upper left corner at the point (x,y). (The fourth parameter is hard to explain, but it should be specified as null for BufferedImages.) This draws the image at its natural width and height, but a different width and height can be specified in the method:
g2.drawImage( img, x, y, width, height, null );
There is also a method for drawing a string of text. The method specifies the string and the basepoint of the string. (The basepoint is the lower left corner of the string, ignoring "descenders" like the tail on the letter "g".) For example,
g2.drawString( "Hello World", 100, 50 );
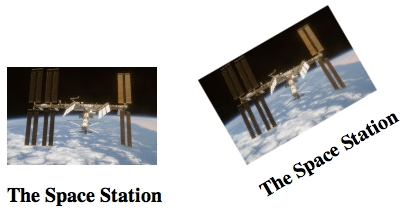
Images and strings are subject to transforms in the same way as other shapes. Transforms are the only way to get rotated text and images. As an example, here is what can happen when you apply a rotation to some text and an image:
2.5.3 Stroke and Fill
Once you have an object that represents a shape, you can fill the shape or stroke it. The Graphics2D class defines methods for doing this. The method for stroking a shape is called draw:
g2.fill(shape);
g2.draw(shape);
Here, g2 is of type Graphics2D, and shape can be of type Path2D, Line2D, Rectangle2D or any of the other shape classes. These are often used on a newly created object, when that object represents a shape that will only be drawn once. For example
g2.draw( new Line2D.Double( -5, -5, 5, 5 ) );
Of course, it is also possible to create shape objects and reuse them many times.
The "pen" that is used for stroking a shape is usually represented by an object of type BasicStroke. The default stroke has line width equal to 1. That's one unit in the current coordinate system, not one pixel. To get a line with a different width, you can install a new stroke with
g2.setStroke( new BasicStroke(width) );
The width in the constructor is of type float. It is possible to add parameters to the constructor to control the shape of a stroke at its endpoints and where two segments meet. (See Subsection 2.2.1.) For example,
g2.setStroke( new BasicStroke( 5.0F,
           BasicStroke.CAP_ROUND, BasicStroke.JOIN_BEVEL) );
It is also possible to make strokes out of dashes and dots, but I won't discuss how to do it here.
Stroking or filling a shape means setting the colors of certain pixels. In Java, the rule that is used for coloring those pixels is called a "paint." Paints can be solid colors, gradients, or patterns. Like most things in Java, paints are represented by objects. If paint is such an object, then
g2.setPaint(paint);
will set paint to be used in the graphics context g2 for subsequent drawing operations, until the next time the paint is changed. (There is also an older method, g2.setColor(c), that works only for colors and is equivalent to calling g2.setPaint(c).)
Solid colors are represented by objects of type Color. A color is represented internally as an RGBA color. An opaque color, with maximal alpha component, can be created using the constructor
new Color( r, g, b );
where r, g, and b are integers in the range 0 to 255 that give the red, green, and blue components of the color. To get a translucent color, you can add an alpha component, also in the range 0 to 255:
new Color( r, b, g, a );
There is also a function, Color.getHSBColor(h,s,b), that creates a color from values in the HSB color model (which is another name for HSV). In this case, the hue, saturation, and brightness color components must be given as values of type float. And there are constants to represent about a dozen common colors, such as Color.WHITE, Color.RED, and Color.YELLOW. For example, here is how I might draw a square with a black outline and a light blue interior:
Rectangle2D square = new Rectangle2D.Double(-2,-2,4,4);
g2.setPaint( new Color(200,200,255) );
g2.fill( square );
g2.setStroke( new BasicStroke(0.1F) );
g2.setPaint( Color.BLACK );
g2.draw( square );
Beyond solid colors, Java has the class GradientPaint, to represent simple linear gradients, and TexturePaint to represent pattern fills. (Image patterns used in a similar way in 3D graphics are called textures.) Gradients and patterns were discussed in Subsection 2.2.2. For these paints, the color that is applied to a pixel depends on the coordinates of the pixel.
To create a TexturePaint, you need a BufferedImage object to specify the image that it will use as a pattern. You also have to say how coordinates in the image will map to drawing coordinates in the display. You do this by specifying a rectangle that will hold one copy of the image. So the constructor takes the form:
new TexturePaint( image, rect );
where image is the BufferedImage and rect is a Rectangle2D. Outside that specified rectangle, the image is repeated horizontally and vertically. The constructor for a GradientPaint takes the form
new GradientPaint( x1, y1, color1, x2, y2, color2, cyclic )
Here, x1, y1, x2, and y2 are values of type float; color1 and color2 are of type Color; and cyclic is boolean. The gradient color will vary along the line segment from the point (x1,y1) to the point (x2,y2). The color is color1 at the first endpoint and is color2 at the second endpoint. Color is constant along lines perpendicular to that line segment. The boolean parameter cyclic says whether or not the color pattern repeats. As an example, here is a command that will install a GradientPaint into a graphics context:
g2.setPaint( new GradientPaint( 0,0, Color.BLACK, 200,100, Color.RED, true ) );
You should, by the way, note that the current paint is used for strokes as well as for fills.
The sample Java program java2d/PaintDemo.java displays a polygon filled with a GradientPaint or a TexturePaint and lets you adjust their properties. The image files java2d/QueenOfHearts.png and java2d/TinySmiley.png are part of that program, and they must be in the same location as the compiled class files that make up that program when it is run.
2.5.4 Transforms
Java implements geometric transformations as methods in the Graphics2D class. For example, if g2 is a Graphics2D, then calling g2.translate(1,3) will apply a translation by (1,3) to objects that are drawn after the method is called. The methods that are available correspond to the transform functions discussed in Section 2.3:
- g2.scale(sx,sy) — scales by a horizontal scale factor sx and a vertical scale factor sy.
- g2.rotate(r) — rotates by the angle r about the origin, where the angle is measured in radians. A positive angle rotates the positive x-axis in the direction of the positive y-axis.
- g2.rotate(r,x,y) — rotates by the angle r about the point (x,y).
- g2.translate(dx,dy) — translates by dx horizontally and dy vertically.
- g2.shear(sx,sy) — applies a horizontal shear amount sx and a vertical shear amount sy. (Usually, one of the shear amounts is 0, giving a pure horizontal or vertical shear.)
A transform in Java is represented as an object of the class AffineTransform. You can create a general affine transform with the constructor
AffineTransform trns = new AffineTransform(a,b,c,d,e,f);
The transform trns will transform a point (x,y) to the point (x1,y1) given by
x1 = a*x + c*y + e
y1 = b*x + d*y + f;
You can apply the transform trns to a graphics context g2 by calling g2.transform(trns).
The graphics context g2 includes the current affine transform, which is the composition of all the transforms that have been applied. Commands such as g2.rotate and g2.transform modify the current transform. You can get a copy of the current transform by calling g2.getTransform(), which returns an AffineTransform object. You can set the current transform using g2.setTransform(trns). This replaces the current transform in g2 with the AffineTransform trns. (Note that g2.setTransform(trns) is different from g2.transform(trns); the first command replaces the current transform in g2, while the second modifies the current transform by composing it with trns.)
The getTransform and setTransform methods can be used to implement hierarchical modeling. The idea, as discussed in Section 2.4, is that before drawing an object, you should save the current transform. After drawing the object, restore the saved transform. Any additional modeling transformations that are applied while drawing the object and its sub-objects will have no effect outside the object. In Java, this looks like
AffineTransform savedTransform = g2.getTransform();
drawObject();
g2.setTransform( savedTransform );
For hierarchical graphics, we really need a stack of transforms. However, if the hierarchy is implemented using subroutines, then the above code would be part of a subroutine, and the value of the local variable savedTransform would be stored on the subroutine call stack. Effectively, we would be using the subroutine call stack to implement the stack of saved transforms.
In addition to modeling transformations, transforms are used to set up the window-to-viewport transformation that establishes the coordinate system that will be used for drawing. This is usually done in Java just after the graphics context has been created, before any drawing operations. It can be done with a Java version of the applyWindowToViewportTransformation function from Subsection 2.3.7. See the sample program java2d/GraphicsStarter.java for an example.
I will mention one more use for AffineTransform objects: Sometimes, you do need to explicitly transform coordinates. For example, given object coordinates (x,y), I might need to know where they will actually end up on the screen, in pixel coordinates. That is, I would like to transform (x,y) by the current transform to get the corresponding pixel coordinates. The AffineTransform class has a method for applying the affine transform to a point. It works with objects of type Point2D. Here is an example:
AffineTransform trns = g2.getTransform();
Point2D.Double originalPoint = new Point2D.Double(x,y);
Point2D.Double transformedPoint = new Point2D.Double();
trns.transform( originalPoint, transformedPoint );
// transformedPoint now contains the pixel coords corresponding to (x,y)
int pixelX = (int)transformedPoint.x;
int pixelY = (int)transformedPoint.y;
One way I have used this is when working with strings. Often when displaying a string in a transformed coordinate system, I want to transform the basepoint of a string, but not the string itself. That is, I want the transformation to affect the location of the string but not its size or rotation. To accomplish this, I use the above technique to obtain the pixel coordinates for the transformed basepoint, and then draw the string at those coordinates, using an original, untransformed graphics context.
The reverse operation is also sometimes necessary. That is, given pixel coordinates (px,py), find the point (x,y) that is transformed to (px,py) by a given affine transform. For example, when implementing mouse interaction, you will generally know the pixel coordinates of the mouse, but you will want to find the corresponding point in your own chosen coordinate system. For that, you need an inverse transform. The inverse of an affine transform T is another transform that performs the opposite transformation. That is, if T(x,y) = (px,py), and if R is the inverse transform, then R(px,py) = (x,y). In Java, the inverse transform of an AffineTransform trns can be obtained with
AffineTransform inverse = trns.createInverse();
(A final note: The older drawing methods from Graphics, such as drawLine, use integer coordinates. It's important to note that any shapes drawn using these older methods are subject to the same transformation as shapes such as Line2D that are specified with real number coordinates. For example, drawing a line with g.drawLine(1,2,5,7) will have the same effect as drawing a Line2D that has endpoints (1.0,2.0) and (5.0,7.0). In fact, all drawing is affected by the transformation of coordinates.)
2.5.5 BufferedImage and Pixels
In some graphics applications, it is useful to be able to work with images that are not visible on the screen. That is, you need what I call an off-screen canvas. You also need a way to quickly copy the off-screen canvas onto the screen. For example, it can be useful to store a copy of the on-screen image in an off-screen canvas. The canvas is the official copy of the image. Changes to the image are made to the canvas, then copied to the screen. One reason to do this is that you can then draw extra stuff on top of the screen image without changing the official copy. For example, you might draw a box around a selected region in the on-screen image. You can do this without damaging the official copy in the off-screen canvas. To remove the box from the screen, you just have to copy the off-screen canvas image onto the screen.
In Java, an off-screen image can be implemented as an object of type BufferedImage. A BufferedImage represents a region in memory where you can draw, in exactly the same way that you can draw to the screen. That is, you can obtain a graphics context g2 of type Graphics2D that you can use for drawing on the image. A BufferedImage is an Image, and you can draw it onto the screen—or into any other graphics context—like any other Image, that is, by using the drawImage method of the graphics context where you want to display the image. In a typical setup, there are variables
BufferedImage OSC;  // The off-screen canvas.
Graphics2D OSG;     // graphics context for drawing to the canvas
The objects are created using, for example,
OSC = new BufferedImage( 640, 480, BufferedImage.TYPE_INT_RGB );
OSG = OSC.createGraphics();
The constructor for BufferedImage specifies the width and height of the image along with its type. The type tells what colors can be represented in the image and how they are stored. Here, the type is TYPE_INT_RGB, which means the image uses regular RGB colors with 8 bits for each color component. The three color components for a pixel are packed into a single integer value.
In a program that uses a BufferedImage to store a copy of the on-screen image, the paintComponent method generally has the form
protected void paintComponent(Graphics g) {
    g.drawImage( OSC, 0, 0, null );
    Graphics2D g2 = (Graphics2D)g.create();
      .
      . // Draw extra stuff on top of the image.
      .
}
A sample program that uses this technique is java2d/JavaPixelManipulation.java. In that program, the user can draw lines, rectangles, and ovals by dragging the mouse. As the mouse moves, the shape is drawn between the starting point of the mouse and its current location. As the mouse moves, parts of the existing image can be repeatedly covered and uncovered, without changing the existing image. In fact, the image is in an off-screen canvas, and the shape that the user is drawing is actually drawn by paintComponent over the contents of the canvas. The shape is not drawn to the official image in the canvas until the user releases the mouse and ends the drag operation.
But my main reason for writing the program was to illustrate pixel manipulation, that is, computing with the color components of individual pixels. The BufferedImage class has methods for reading and setting the color of individual pixels. An image consists of rows and columns of pixels. If OSC is a BufferedImage, then
int color = OSC.getRGB(x,y)
gets the integer that represents the color of the pixel in column number x and row number y. Each color component is stored in an 8-bit field in the integer color value. The individual color components can be extracted for processing using Java's bit manipulation operators:
int red = (color >> 16) & 255;
int green = (color >> 8) & 255;
int blue = color & 255;
Similarly, given red, green, and blue color component values in the range 0 to 255, we can combine those component values into a single integer and use it to set the color of a pixel in the image:
int color = (red << 16) | (green << 8) | blue;
OSC.setRGB(x,y,color);
There are also methods for reading and setting the colors of an entire rectangular region of pixels.
Pixel operations are used to implement two features of the sample program. First, there is a "Smudge" tool. When the user drags with this tool, it's like smearing wet paint. When the user first clicks the mouse, the color components from a small square of pixels surrounding the mouse position are copied into arrays. As the user moves the mouse, color from the arrays is blended into the color of the pixels near the mouse position, while those colors are blended into the colors in the arrays. Here is a small rectangle that has been "smudged":
![]()
The second use of pixel manipulation is in implementing "filters." A filter, in this program, is an operation that modifies an image by replacing the color of each pixel with a weighted average of the colors of a 3-by-3 square of pixels. A "Blur" filter for example, uses equal weights for all pixels in the average, so the color of a pixel is changed to the simple average of the colors of that pixel and its neighbors. Using different weights for each pixel can produce some striking effects.
The pixel manipulation in the sample program produces effects that can't be achieved with pure vector graphics. I encourage you to learn more by looking at the source code. You might also take a look at the live demos in the next section, which implement the same effects using HTML canvas graphics.