| CPSC 120 |
Principles of Computer Science |
Fall 2024 |
Lab 9
Repetition, Again
Due: Fri 11/8 at the start of class
Labs are due at the start of class. It is OK if you
show up and copy your files to the handin directory at the very
beginning of class, but this should take at most a couple of minutes and
you should not spend the next lab period finishing up the previous
week's lab.
Introduction
Loops provide a powerful shortcut for repetition — instead of cutting
and pasting (with lots of small, tedious, error-prone edits) to get
multiple copies of something, a loop allows you to repeat things as
often as you want with only a few extra lines of code.
This week's lab focuses on breaking up complex pictures into loops,
and working with the different loop patterns discussed in class
(repeat-as-long-as loops and counting loops;
one thing in the loop body, multiple things in the loop body;
a single loop variable, multiple loop variables;
a single loop, one loop after another, nested loops).
Quilts once again provide the source of inspiration.
Successfully completing this lab means that you are able to:
- recognize applications the loop patterns identified above
- implement the loop patterns
Academic Integrity and Collaboration
The short version:
-
Help with learning the process of constructing programs is
fine; shortcutting the process and arriving at a result that you
didn't produce yourself or don't fully understand how to produce is
not.
-
Always attempt the problem yourself first, using this lab
handout, the materials from class posted on the schedule page, and
the assigned reading in the textbook.
-
Your primary resources for help should be office hours and
the Teaching Fellows.
-
You may not work with other students to write code
together.
-
You may not shortcut to a solution by copying code
(except as specifically authorized in instructions) or using someone
else's program as a guide or to understand what yours should be like
even if you don't directly copy anything,
You may not be in possession of someone
else's program or solution before you have handed in your own.
-
You must document any help received (including
from TFs) and any resources used other than the textbook and
posted course materials. Put comments in your sketch
indicating who helped (or the source used) and how / with
what.
-
Make sure that you understand not only the result achieved,
but also how one knows what to do to achieve that result. This gets
at the process of writing a sketch — identifying what code
elements are needed, filling in the details for a particular task,
and pulling it all together.
Review the discussion in previous lab handouts and the
full collaboration policy for
more details.
Handin
To hand in your work:
-
Make sure that your name and a short description of the
sketch are included in a comment at the beginning of each
sketch.
-
Make sure that you've auto-formatted each sketch.
-
Copy the entire lab9a, lab9b, lab9c,
and lab9d directories from your sketchbook
(~/cs120/sketchbook) to your handin directory (found
inside /classes/cs120/handin).
Preliminaries
Getting Started
Review the posted slides and examples for identifying loop
patterns, as well as the posted slides and examples for
repeat-as-long-as loops, counting loops, and nested loops. Keep in
mind that considering what changes and how it changes is crucial for
deciding on loops — in one loop, whatever changes should change
consistently from one repetition to the next.
Also read through all of each exercise before starting it —
there's important information about how to do the task after the
initial statement.
Then, consider the loop questions to help you build up each loop. It is
strongly recommended that you identify at least what is repeated and
what changes in comments in your sketch.
"Any Size Window"
The exercises ask you to design your sketches so that they work
with any size window. Remember that this means to use the system
variables width and height instead of specific
numbers when referring to the drawing window dimensions.
Exercises
Put your name and a description of the sketch in comments at the
beginning of each sketch. Also don't forget to Auto Format your code
before handing it in. (Refer back to lab 2 for more on Auto Format if
needed.)
You must use loops wherever it is appropriate to do so!
(Reminder: a loop when something repeats more than a few times and
there is predictable change from one copy to the next.) You will
receive very little credit for producing the right drawing without
using loops.
Exercise 1
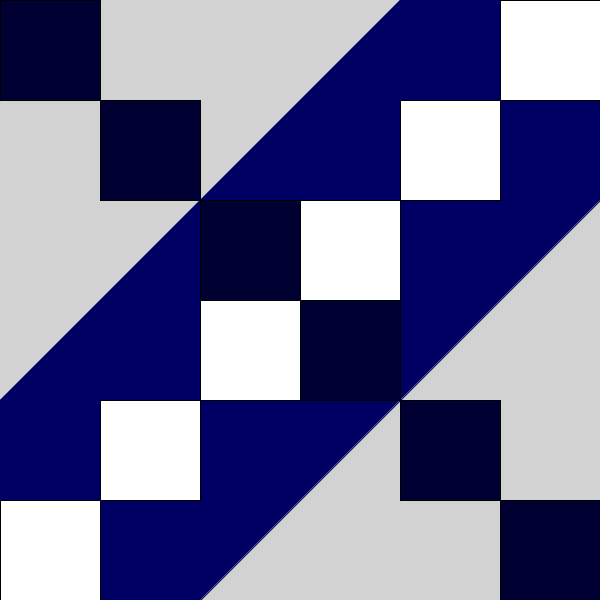
Create a sketch named lab9a which draws a color variation
of the Jacob's Ladder quilt block, as shown. You can choose your
own colors, but you should have two light colors and two dark colors
and the pattern should be the same as shown — things which are
the same color in the picture should be the same color in your
sketch.
Design your sketch so that it works with any size window.
To create this sketch:
-
Create a new sketch, add your name and a description of the
sketch in comments at the beginning, and save your sketch
as lab9a.
-
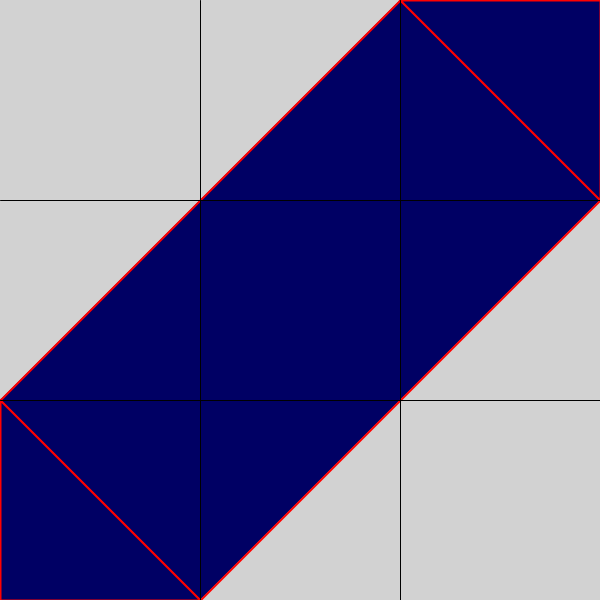
Draw the blue band, which consists of a quad and two triangles as
shown. Note: the shapes are outlined in red in the picture to show
what to draw; you should make the stroke and fill colors the same so
that the blue band looks like a single seamless shape. The black
grid is shown to help you figure out coordinates and sizes; you do not
need to draw it.
-
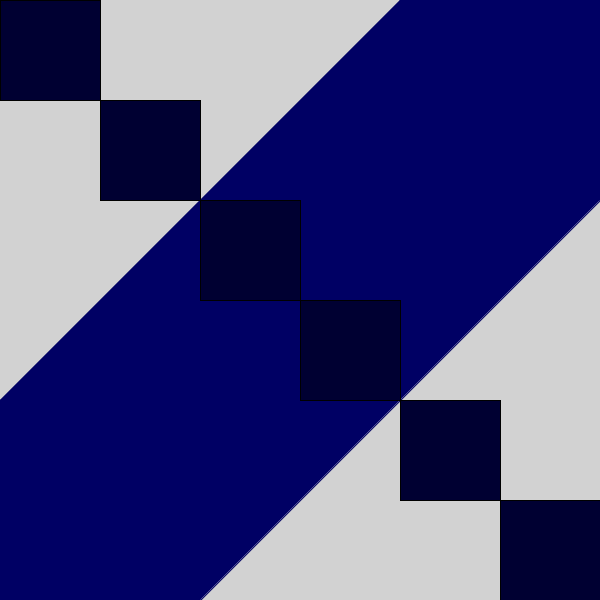
Draw the dark blue squares.
-

Draw the white squares.
Exercise 2
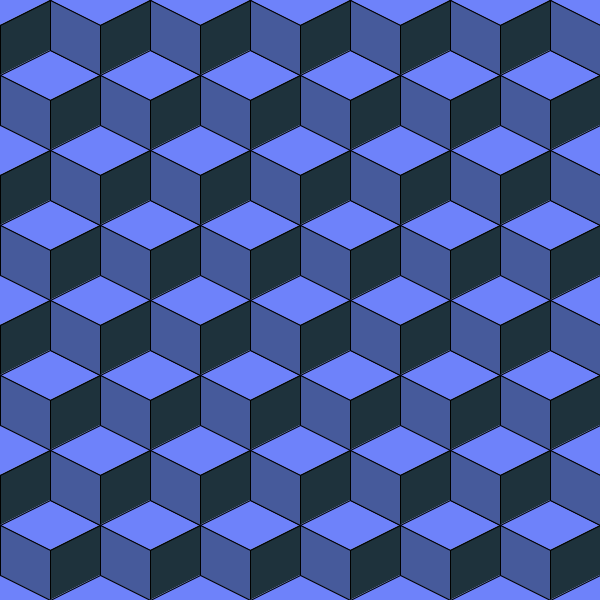
Create a sketch named lab9b which draws a tumbling blocks
quilt, as shown. Use quad to draw the diamond shapes.
You don't need to match the example exactly in
terms of the number of repetitions of the pattern, but the window
should be completely filled. You can also choose your own colors,
but should use lighter, medium, and darker colors in the
configuration shown.
Design your sketch so that it works with any size window.
To create this sketch:
-
Create a new sketch, add your name and a description of the
sketch in comments at the beginning, and save your sketch
as lab9b.
-
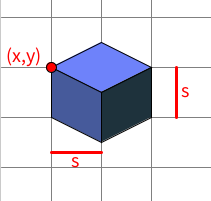
Create a function drawBlock which takes the position
(x,y) and size s of the block as parameters
and draws one block shape as shown. Use quad to draw
each diamond shape. Test your function by calling it
from draw().
-
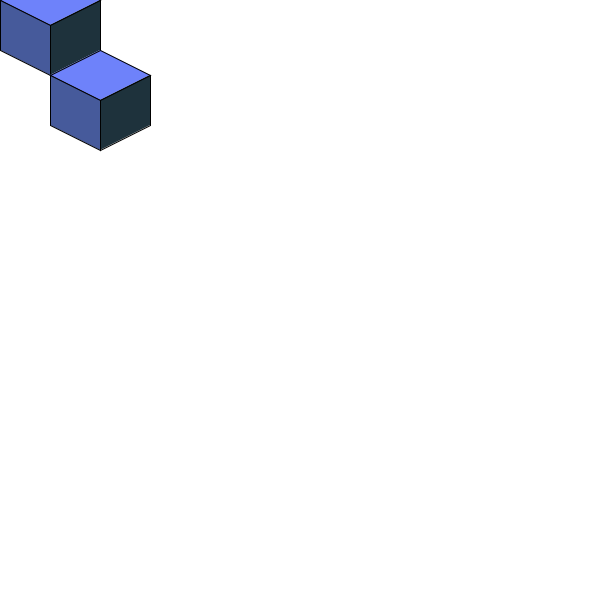
Call drawBlock twice to create the pattern shown.
(Note that part of the pattern sticks up past the top of the
window — that's fine, you don't have to limit drawing to
within the window. Just use drawBlock and let stuff
extend past the edge.)
-
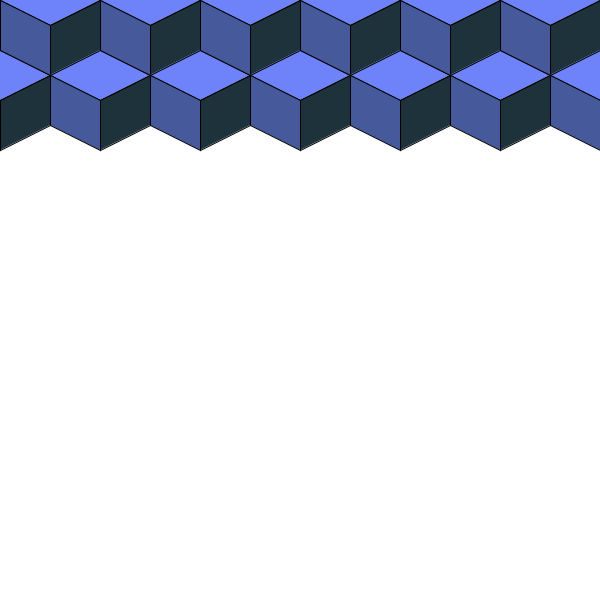
Draw one row of the 2-block pattern.
-

Complete the quilt by repeating the rows.
Exercise 3
Create a sketch named lab9c which draws a strip of 16 flying
geese as shown. You can choose your own colors, but each group of
four triangles should be the same color and the color of successive
groups should change smoothly, as shown. (In the example, red
increases to the right.)
Recall from lab 8 that the height of each triangle should be twice
its width. Design your sketch so that it works with any height of
window, but make sure you size the window so that there is room for 16
triangles the height of the window.

To create this sketch:
-
Create a new sketch, add your name and a description of the
sketch in comments at the beginning, and save your sketch
as lab9c.
-
Draw a set of four geese. (You can use your solution
from lab 8 as a starting point, but you'll need to modify it to
draw four geese instead of filling the width of the window.)

-
Draw four sets of four geese. Note: do not simply
modify your previous solution to draw 16 geese instead of four!
Repeat the drawing of four geese four times.

-
Vary at least one color component with each group of four geese.

Exercise 4
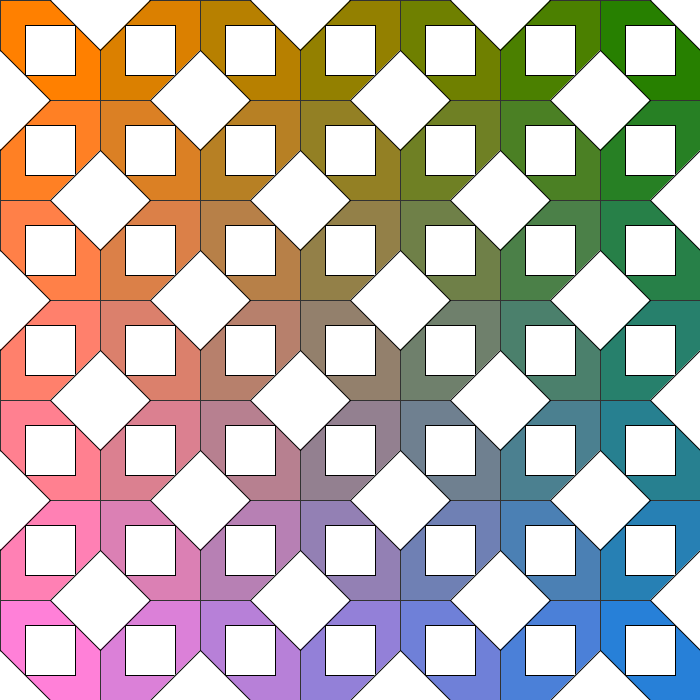
Create a sketch named lab9d which displays a block star
quilt, as shown. (To see the star pattern, focus on the color
rather than the white shapes.) You can choose your own colors, but
you should vary one color component horizontally and a different one
vertically. (In the example, the red decreases to the right and the
blue increases going down.)
Design your sketch so that it works with any size window.
Hint: view the pattern as white shapes (squares and quads) drawn on
top of a background of colored squares. (The white triangles on the
edges are just quads that extend past the edges of the drawing
window — you do not need to handle those specially by drawing
triangles.) Break your development of the sketch down into three
steps: draw the background of squares all the same color, add the
color variation, and then draw the white squares and quads.
Extra Credit
You can earn extra credit by going substantially beyond the required
elements. Create a new sketch called lab9e with a recognizable
scene. (A geometric pattern, such as a quilt, is OK — the idea
is that the scene should be deliberately created and have some overall
theme rather than just being a jumble of different elements.)
Some possibilities for extra credit:
-
Showcase different loop patterns, in particular:
- only one property varies from one repetition to the next
- more than one property (excluding counters) varies from one repetition to the next
- a counting loop, where the loop condition is based on the number of times the loop has repeated
- two or more loops one after another (not nested) are needed to create a single pattern
- nested loops (or a loop which calls a drawing function containing a loop)
Be sure to identify the pattern for each loop you use!
-
Demonstrate more complex ways in which things change from one repetition
to the next. This could include changing things other than position,
size, or color (such as orientation — use rotate()) or
accelerating/decelerating the change. The "twisted square and
variations" and "circular patterns" examples from the extra credit
section in lab 8 have some examples of quilt blocks where orientation
varies. Another possibility is repetition in space that isn't in a
straight line, such as creating a Ferris wheel or water wheel by
positioning things around a circle.
-
Combine loops and animation and/or interaction, having one or
more things drawn with loops that are also animated or interactive. A spinning
Ferris wheel or water wheel is one such possibility.
Include a brief description of what you've done for extra credit in
a comment at the beginning of your sketch. More creative and
challenging elements will earn more points.


