
size(400,400); arc(200, 200, 320, 320, 0, PI+QUARTER_PI, PIE);
| CPSC 120 | Principles of Computer Science | Fall 2025 |
This week's lab deals with animation — things that move (or change in other ways) on their own.
Successfully completing this lab means that you are able to:
Hand in a hardcopy (paper) of your worksheet in class.
To hand in your sketches:
Make sure that your name and a short description of the sketch are included in a comment at the beginning of each sketch.
Make sure that you've auto-formatted each sketch.
Copy the entire lab3a, lab3b, lab3c, and lab3d directories from your sketchbook (~/cs120/sketchbook) to your handin directory (found inside /classes/cs120/handin).
It is OK if you copy your files to the handin directory at the very beginning of class.
Presentation meetings for this lab will be the week of Sept 29.
Exercise #4 is the presentation problem. Come to the presentation meeting prepared to discuss your sketch. You may be asked to point out and explain how your code meets the requirements of the problem, explain how portions of your code work, and/or apply skills from the problem to a new situation (for example, to demonstrate how to figure out coordinates and sizes for a different scene).
The policies on late work and extensions, academic integrity, and the use of AI for this lab are the same as for lab 2. Review them there.
Review this week's slides, in-class exercises handouts, and in-class exercise solutions for information, templates, and examples.
About variable names and comments:
Use descriptive (but brief) variable names that address what the variable is for. For example, variables for positions should generally include x or y in the name to distinguish x coordinates from y coordinates, variables for sizes should include w and h or width and height, and variables for colors should include r, g, b or red, green, blue. If you have several variables for the same sort of thing (such as two variables for x coordinates), include something in the name to distinguish one from the other e.g. carX and cloudX. Be brief but not too brief — other than in the specific cases of coordinates, width/height, and RGB color values (and one or two other situations), one-letter variable names are rarely good choices.
Comment your variable declarations to provide further information about the variable that is not apparent from its name. For example, positions for rectangles and ellipses can be either the center or the upper left corner and it is important to know which is which. Both of the following provide the necessary clarity:
  int y;      // center
 int centerY;
The simple name y is OK if all positions are centers; if there's a mix of some centers and some upper left corners, it is better to include that information in the variable name itself.
Descriptive names and comments serve two important purposes:
(important) It helps someone reading your code (which might be you, a month or a week or even a day after you initially wrote the sketch) understand what the variable is for and thus what's going on in the code without having to have overly long variable names.
(even more important) It makes you have to know precisely what the variable is for. Proper initialization, usage, and updating of a variable is impossible if you don't know what the variable is for (or have only a vague notion) — and is often quite easy if you do know what the variable is for. It also helps prevent bugs resulting from having the wrong idea about a variable.
Some additional notes on working with animation variables:
You can declare two or more variables of the same type in a single statement, for example:
  int x, y;          // center of the circle pattern
  int r, g, b;       // color of the bottom left circle
This is convenient and appropriate when the variables are aspects of the same thing (such as x and y coordinates for a position or r, g, b components for a color) and a single comment can be usefully written about all of the variables together.
Initialize your animation variables in setup(), after the drawing window has been opened. It is legal to declare and initialize a variable in one step e.g.
int y = 375; // y coordinate of the center of the circle pattern
but doing this for animation variables opens you up to doing the perfectly reasonable looking
int y = height-25; // y coordinate of the center of the circle pattern
The problem with this is that the system variables width and height only have correct values after the drawing window has been opened, and variable declarations and initializations at the beginning of the sketch are executed before the body of setup(). (Unfortunately, using width and height before the drawing window is open is not illegal so you won't get an error message or a warning — instead the values will be taken to be 0 and your animation variables will be initialized to unexpected values.) Always putting animation variable initializations in setup() (after opening the drawing window) avoids this problem.
In addition to commenting variable declarations if there is information not apparent from the name, also include comments within your code to explain portions of it. A prime example of this is when there are multiple steps needed to draw an element of your scene, such as the cloud in exercise #1 — put a comment before that section of code identifying what it draws e.g.
// cloud
Processing provides two system variables width and height for the width and height of the drawing window, respectively. (Note that you can only use these values after the window has been opened with size.)
Use these variables to design more flexible sketches. For example, if you want an ellipse to be centered at the lower right corner of a 300x400 window, you could write
  ellipseMode(CENTER);
  ellipse(300,400,50,50);
However, if you change the size of the window but want the ellipse to still be in the lower right corner, you'll have to change both the size command and the coordinates where you've drawn the ellipse. A simpler solution is to instead write
  ellipseMode(CENTER);
  ellipse(width,height,50,50);
This will always center the ellipse at the lower right corner no matter what size the window is, so changing the window size means only change the size command.
Note that this doesn't mean you should always use width and height — think about whether you want something at particular coordinates no matter what size the window is or whether you want it at the same relative position e.g. lower right corner or center. Use width and height only in the latter case.
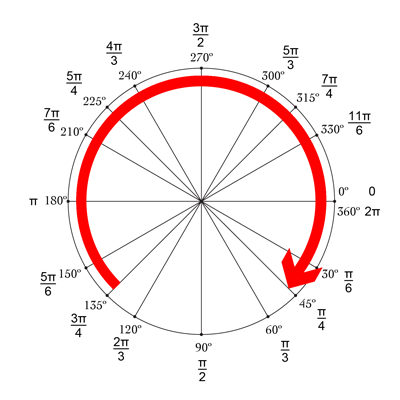
Exercise 3 involves drawing arcs (part of a circle). You may be familiar with measuring angles in degrees — a complete circle is 360 degrees, half a circle is 180 degrees, and so forth.
Angles can also be specified in radians rather than degrees — a whole circle is 2π radians. The picture shows how degrees and radians relate to each other. Important note: Processing measures angles going clockwise rather than counterclockwise — this is reflected in the picture so there's no issue if you use it to determine any necessary angles, but it is important to be aware of this different convention if you are familiar with applications which measure angles in the opposite direction.
Processing uses radians rather than degrees, so when you work with angles (such as with the arc command, which you'll need in exercise #3 below) you'll need to either use radians directly or convert from degrees to radians.
To work with radians directly, you'll need to express the value π (pi). Processing defines constants PI, HALF_PI, QUARTER_PI, and TWO_PI. This means you can just write PI, HALF_PI, etc when you want those values, and you can use them in expressions such as PI/3 (60 degrees) or 7*PI/6 (210 degrees). For example, the documentation for arc includes the following:
|
|
size(400,400); arc(200, 200, 320, 320, 0, PI+QUARTER_PI, PIE); |
This uses radians directly. (PI+QUARTER_PI = 5π/4)
Alternatively, to convert from degrees to radians, use
radians(deg)
where deg is the value in degrees. For example:
|
|
size(400,400); arc(200, 200, 320, 320, radians(0), radians(225), PIE); |
Do the exercises in order.
Read through all of each exercise before you start on it. In particular, note that the "to do this" steps are what you should actually do to complete the exercise — don't just read the first sentence of the problem, look at the example, and try to write the sketch from there. Follow the steps!
Put your name and a description of the sketch in comments at the beginning of each sketch. Also don't forget to Auto Format your code before handing it in.
Be sure to save your sketch frequently (ctrl-S). (Every time you run your sketch is good.) The editor does not auto-save!
|
In this exercise you'll create a sketch which draws the scene shown — a tall building in a grassy field, with a cloud floating by. (Click the mouse to reset the cloud to its starting position.) The requirements for your sketch:
| |
|
To do this:
|
|
|
In this exercise you'll create a sketch with a three-circle pattern where the middle circle grows in size. The requirements for your sketch:
You do not need to make the size of the center circle reset when the pattern reaches the edges of the window as shown in the demo; it is fine for the circle to just keep growing indefinitely. |
|
|
To do this:
| |
|
In this exercise you'll create a sketch with a rolling wheel. The requirements for your sketch:
You do not need to make the wheel reset when it reaches the right edge of the window as shown in the demo; it is fine for the wheel to just disappear off the right side of the window. To do this:
|
|
In this exercise you'll create an animated sketch of your own design. What the sketch depicts is up to you (here's a chance to be creative!) but for full credit it must include the following elements:
Name the sketch lab3d.
The scene must be original and created by you for this exercise. While you might be inspired by an example from class (such as the simple car) or another exercise in this lab, you may not copy code from other exercises in this lab, examples or solutions in the textbook or from class, or other sources even if you then make some changes — create your own version (such as a fancier car) from scratch.
The scene must be recognizable as something. Include a comment at the beginning of the sketch describing what it depicts. The intent is that you should deliberately choose positions and colors for the shapes — simply drawing a bunch of shapes at whatever location they happen to end up at is not acceptable. Simplifying things (like making a tree out of a rectangle and a triangle) is fine.
You must include comments in your sketch identifying what thing each drawing command or group of drawing commands is associated with. For example, the comment
// cloudwould be appropriate just before the commands that set colors and draw the shapes for a hot air balloon. Also use blank lines to separate the drawing commands for different elements in the scene.
You must use at least 30 shapes. (That's 30 shape-drawing commands, not 30 different kinds of shapes.)
You must have at least four different compound things built out of three or more shapes each. "Compound thing" just means that you use several shapes to depict one thing; the cloud from #1 is an example (three shapes).
You must have at least four things which are animated in some way (moving, changing size, changing color/opacity, etc), at least two of which must be compound things and at least two of which must involve a property other than position. Choose reasonable rates of change — for example, something that is moving should move fast enough that you can tell it is moving, but not so quickly that it disappears off the screen right away. Also consider representation — try to avoid using unnecessary animation variables!
You must use at least five different colors.
Clicking the mouse should reset the animation to the beginning so that it appears to start over.
To do this:
Complete the Exercise 4 section of the lab 3 worksheet.
Create a new sketch, add your name and a description of the sketch in comments at the beginning, and save it as lab3d.
Start with the right program structure: copy the template for an animated sketch from the "Program Structure Recap" in Wednesday's in-class exercises handout.
Draw any fixed (not animated) elements. Include comments labeling the sections of code that draw each compound or simple thing. Practice incremental development — add code for a few shapes at a time rather than writing everything before you run the program for the first time.
Add the animated elements one at a time. For each, include a comment labeling the section of code that draws that element and slot your answers from the worksheet into the right spots according to the comments in the program structure template you copied and the rectangle-moving-right example in Wednesday's slides.
Make the sketch reset when the mouse is clicked — the event handler should only set the animation variables back to their initial values. No drawing!
Challenge yourself and earn extra credit by going substantially beyond the required elements. (See the assignments and evaluation policy for more details on extra credit.) Some possibilities for #4:
Include many more shapes, animation, and/or interaction.
Section 4.6 introduced random(). Make use of random() in an interesting way. (The "if you still have time" section of the handout from Wednesday's in-class exercises addresses how to use random colors without a flickering effect. Note that this is in the posted handout, not the version handed out in class.)
More complex animation, such as a compound thing that grows or shrinks (keep the number of variables to a minimum!) or something that speeds up or slows down or something that moves in a curve or other complex path (not just a straight line).
Allow the user to control aspects of the sketch by pressing keys — increase or decrease the speed of something by pressing '+' or '-', or change the color of something to red, green, or blue by pressing 'r', 'g', or 'b', or reset individual elements by pressing specific keys, or ...
It's OK to add on to your lab3d sketch but be sure to include a brief description of what you've done for extra credit in a comment at the beginning of the sketch.