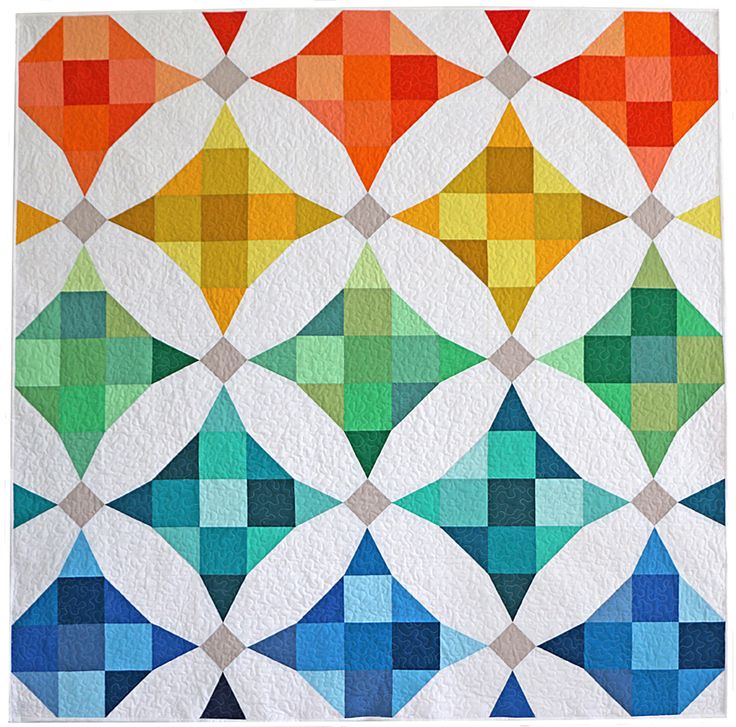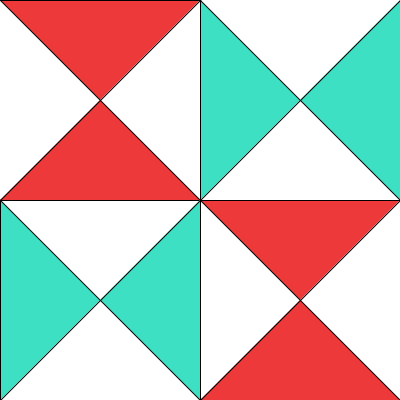
In this exercise you'll create a sketch which draws the hourglass quilt shown. The requirements for your sketch:
-
Name the sketch lab5a.
-
Make the drawing window 400x400.
-
Use the same pattern of colors as shown — you can choose your own colors (you don't need to use white, red, and green) but you must use three different colors and those areas that are the same color in the picture should be the same color in your sketch.
To do this:
-
Create a new sketch, add your name and a description of the sketch in comments at the beginning, and save it as lab5a.
-
Start with the basic sketch structure: open a drawing window and clear the background.
-
Complete the Exercise 1 section of the lab 5 worksheet.
-
Complete the sketch:
-
Write the function definition for the upright hourglass pattern, then use it to draw the upper left and lower right blocks.
-
Write the function definition for the sideways hourglass pattern, then use it to draw the other two blocks.
-
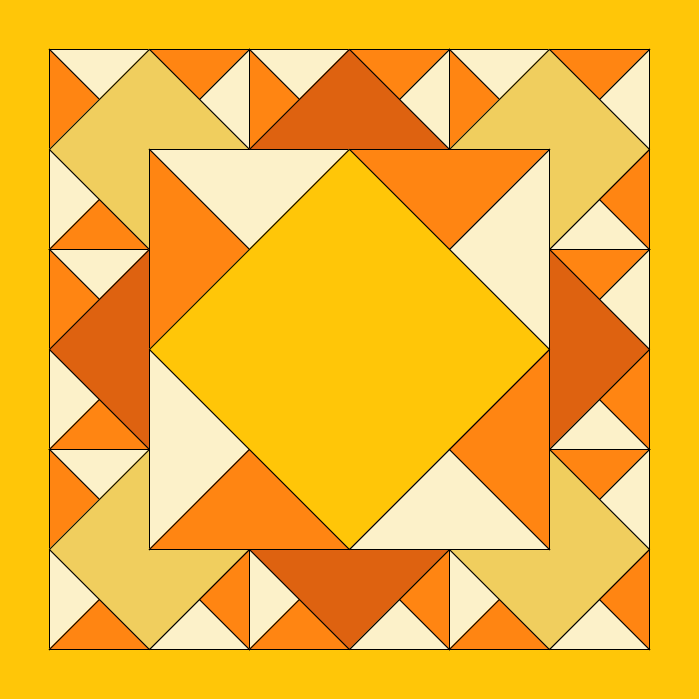
In this exercise you'll create a sketch which draws the quilt shown. The requirements for your sketch:
-
Name the sketch lab5b.
-
Make the drawing window 700x700.
-
Use the same pattern of colors as shown — you can choose your own colors but you must use five different colors and those areas that are the same color in the picture should be the same color in your sketch. Note that the center diamond in the biggest block is the same color as the border around the edge.
Use quad() to draw the center diamond in each block. Look it up in the Processing API to find out how to use it.
To do this:
-
Create a new sketch, add your name and a description of the sketch in comments at the beginning, and save it as lab5b.
-
Start with the basic sketch structure: open a drawing window and clear the background.
-
Complete the Exercise 2 section of the lab 5 worksheet.
-
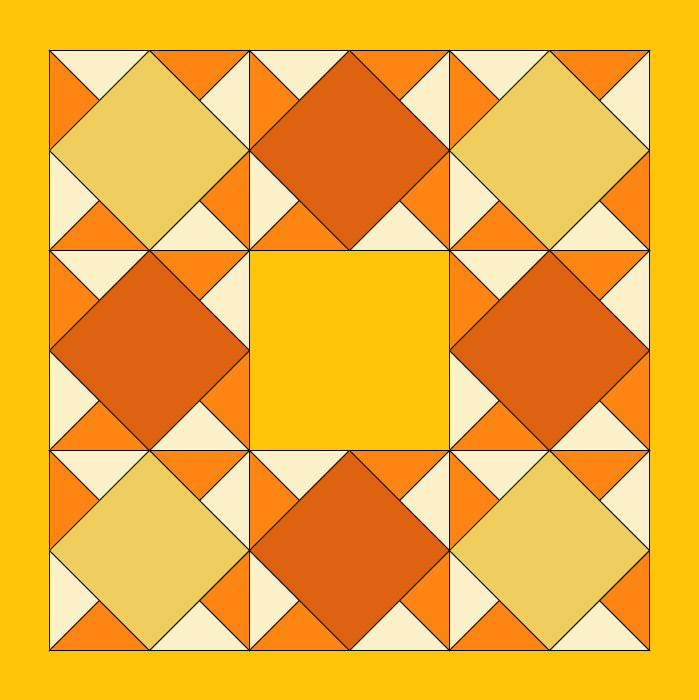
Draw the first layer of blocks as shown:
-
Write the draw block function, then use it to draw the upper left block.
-
One by one, add each of the other seven blocks.
-
-
Add the larger copy of the block in the center.
-
Add the final copy of the block in the center to complete the sketch.
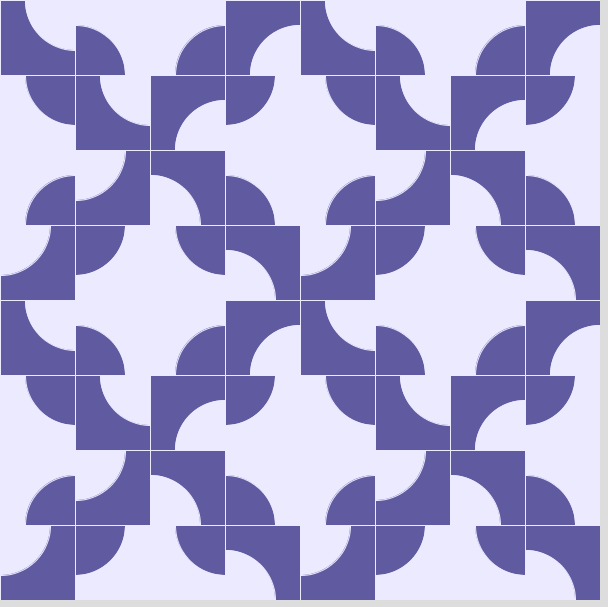
In this exercise you'll create a sketch which draws the quilt shown. (This is a traditional pattern known as Drunkard's Path.) The requirements for your sketch:
-
Name the sketch lab5c.
-
Make the drawing window 400x400.
-
Use the same pattern of colors as shown — you can choose your own colors but you must use two different colors and those areas that are the same color in the picture should be the same color in your sketch.
You'll need to use arc(). Look it up in the Processing API to find out how to use it.
To do this:
-
Create a new sketch, add your name and a description of the sketch in comments at the beginning, and save it as lab5c.
-
Start with the basic sketch structure: open a drawing window and clear the background.
-
Complete the Exercise 3a section of the lab 5 worksheet.
-
Write the drawing functions for the four building blocks and test them by calling them from draw. Draw the blocks anywhere in the drawing window — this is just to see that they work. When your functions work, remove the calls from draw().
-
Complete the Exercise 3b section of the lab 5 worksheet.
-
Write the drawing function for a whole quilt block, then use it to draw the quilt block in the upper left corner.
-
One by one, add the function calls to draw the other three quilt blocks to complete the pattern.
In this exercise you'll create a sketch of your own design. What the sketch depicts is up to you (here's a chance to be creative!) but for full credit it must include the following elements:
-
Name the sketch lab5d.
-
The scene must be recognizable as something. Include a comment at the beginning of the sketch describing what it depicts. The intent is that you should deliberately choose positions and colors for the shapes — simply drawing a bunch of shapes at whatever location they happen to end up at is not acceptable. Simplifying things (like making a tree out of a rectangle and a triangle) is fine.
-
The scene must be original and created by you — it can be something entirely new for this exercise or you can extend your sketches for #4 in previous labs. You may not, however, copy code from other exercises in this lab, examples or solutions in the textbook or from class, or other sources even if you then make some changes — create your own version (such as a fancier car) from scratch.
-
You must use drawing functions and parameters when it is appropriate to do so. For example, if your scene contains two otherwise-identical cars in different positions, for example, there should be a single car-drawing function with parameters for the position rather than just a list of drawing commands for both cars in draw or separate drawing functions for each car.
-
Each function must have a descriptive name related to its purpose (e.g. drawTree would be a good name for a tree-drawing function) and a comment immediately before the function describing the purpose of the function and what each of its parameters are for. For example:
// draw a tree // (x,y) is the position of the bottom center of the tree trunk void drawTree ( int x, int y ) { ... } -
You must have at least four different compound things built out of three or more shapes each, with a drawing function to draw each kind of thing. For example, if you have a car and a (three-shape) tree and a snowman in your scene, you must create a car-drawing function, a tree-drawing function, and a snowman-drawing function.
-
You must demonstrate variation in position, size, and color using functions with parameters. The three properties (position, size, and color) can be covered together or in other combinations — a red car, a blue car, a large snowman, and a small snowman all in different positions covers all three properties, as does just a large red car and a small blue car in different positions.
-
At least one instance where different copies of a compound thing are interactive and/or animated in different ways. For example, two cars could each move in different directions and at different speeds, or one car could move while another changes color, or one car could be animated in some way while the other tracks the mouse, or one car follows the mouse's x coordinate while another follows the mouse's y coordinate. Note: remember not to use mouseX, mouseY, or animation variables in the body of your drawing functions! (While it is legal to do so, it is better programming style in many cases not to.)
To do this:
-
Complete the Exercise 4a section of the lab 5 worksheet.
-
Create a new sketch, add your name and a description of the sketch in comments at the beginning, and save it as lab5d.
-
Start with the basic sketch structure: open a drawing window and clear the background.
-
Build up your sketch bit-by-bit. When you get to something that you identified as needing a drawing function, complete that part of the Exercise 4b section of the lab 5 worksheet before writing code.