
| CPSC 120 | Principles of Computer Science | Fall 2025 |
This course has introduced several core principles of computer science:
This course has also introduced several of the core constructs and concepts in programming:
Also central to computer science is the process of algorithm development — an algorithm is a series of steps built from those core constructs and concepts, and algorithm development involves being able to recognize when elements are applicable to the task at hand. We have focused specifically on when to use these elements in the context of interactive animated sketches, but the concepts — choosing between alternatives, repetition, and so on — are much more widely applicable.
And finally, we've also seen some of the things that programs can do, emphasizing topics in computer graphics and animation:
This project is a capstone project — the purpose is for you to demonstrate your mastery of the course material and to showcase what you can do.
Hand in a hardcopy (paper) of your worksheet in class.
To hand in your sketch:
Make sure that your name and a short description of the sketch are included in a comment at the beginning of your sketch.
Make sure that you've auto-formatted your sketch.
Copy the entire capstone directory from your sketchbook (~/cs120/sketchbook) to your handin directory (found inside /classes/cs120/handin).
Presentation meetings for the project will be on 12/11 and 12/12. A signup link for meeting times will be available on 12/1.
Come to the presentation meeting prepared to discuss your sketch. You may be asked to point out and explain how your code meets the requirements of the problem, explain how portions of your code work, and/or apply skills to a new situation.
The policies on late work and extensions, academic integrity, and the use of AI for this lab are the same as for lab 2. Review them there. One extension token is required for a resubmit without an initial handin by the due date.
Resubmits: Because of the timing at the end of the semester, there is an abbreviated revise-and-resubmit window for the project. Resubmits are due 12/14 11:59pm with presentation meeting redos on 12/15. Note that because of this tight window, it is unlikely that graded projects can be returned before the resubmit deadline — the presentation meeting will be the only source of post-handin feedback. You are encouraged to come to office hours before the due date if you have any questions about the requirements or whether you've met them.
Read through the requirements below to get an overview of the task.
Complete the Elements section of the project worksheet. In keeping with the practice of incremental development, you don't need to plan every detail before you start working on the code, but you should think about the big picture. This section also serves as a checklist to help make sure you include all the required elements. (Though also check the requirements list in project handout to make sure you got everything — not quite everything is listed on the worksheet.)
Complete the animation questions, drawing function questions, conditionals questions, loop questions, and array-ifying questions before writing the corresponding code. You are encouraged to answer the appropriate set of questions as the first step in writing code for any instance of those elements, but you are only required to hand in one set of each.
Implement incrementally — write code for one aspect of the sketch at a time, and make sure everything works before moving on.
Your task is to create a Rube Goldberg-inspired animation which showcases what you've learned in this course. A Rube Goldberg machine is something that performs a simple task in a complicated, chain-reaction fashion. The demo below shows an example of a Rube Goldberg-inspired animation, though note that it does not satisfy many of the requirements of the assignment. (Don't just copy it! It's an illustration of the Rube Goldberg-inspired aspect of the project, not the entire project.) For more about Rube Goldberg and his inventions and comics, see www.rubegoldberg.org.
In the sketch below, position the mouse near the left side of the window to raise the elevator and get everything started; click to restart.
For full credit your sketch must meet the following requirements.
Note:
Elements must be used appropriately in order to count for proficiency and for meeting specifications. This means that the construct and pattern is appropriate for the situation — you can't just throw in a pointless 'if' statement or loop or use arrays when arrays are not needed in order to meet a requirement.
The patterns and conventions discussed in class must be followed in order for elements to count towards proficiency.
Unless otherwise noted below, one element can satisfy (or go towards satisfying) more than one requirement.
| category | requirements |
|---|---|
| scene elements |
|
| programming and software practice |
|
| representation, abstraction, and modularity |
Include:
|
| drawing, interaction, and animation |
Include:
|
| programming constructs |
Include:
|
| topics |
The following are optional for a passing grade on the project. For a 7 or better "meeting specifications" score, include at least one; for an 8.5 or better, include at least two. Note: you should complete the corresponding topic first!
|
You can earn extra credit by going substantially beyond the required elements. There are too many possibilities to list, but here are a few specific elements as well as some more general ones:
Make me say wow! — add complexity (lots of shapes, elaborate patterns, more sophisticated motion paths, more complex behaviors or combinations of behaviors, etc), include more of the topics elements, have a particularly neat theme, or demonstrate exceptional creativity by combining the elements covered in new and interesting ways. If you've done something you think qualifies, point out what it is in a comment.
Include something that goes beyond what we've covered in the course — research a different L-system description or image filter or technique for generating fractals (such as iterated function systems and the Barnsley fern) or behavior or read about something new in the book. Note that this is not about copying code for something interesting from somewhere — you need to understand the idea and write your own code, not just copy someone else's code. Include a description of what the thing is and provide reference(s) to where you found the information about it.
Speed up the sketch by moving expensive-to-compute background elements (i.e. those involving recursion) to setup(): draw the non-animated background elements, copy the screen pixels into an image, and then, in draw() draw that image plus any animated or interactive bits.
Extra credit options for previous labs and topics can also provide some ideas. More creative and challenging elements will earn more points.
With lots of stuff (especially particle systems and recursion), your sketch may run very slowly. If this happens, reduce the number of particles, limit the depth of the recursion (don't use too large of a max depth for your plants, and don't let "too small" be too small for the fractal clouds — it's OK if they look a bit chunky), and don't have too many recursive elements (e.g. one plant instead of 20).
If you still want to be extravagant with recursion, see the extra credit options for a suggestion for speeding things up.
If you are including boids in your sketch, start with the template provided for the Boids I topic — copy the animation variables (declarations and initialization) and steps 1-4 in draw() into your sketch, array-ify those elements if your plans call for a large number of boids, and then focus on steps 2a and 2b.
You'll also need to add the boids library to your sketch — add a "boids" tab to your sketch and paste in the boids library code like you did in topic exercises.
You can review the Boids I and Boids II handouts for descriptions of many of the provided behaviors, but you'll also need to use at least one behavior that you haven't already used. The boids library file contains behaviors that weren't described in topics handouts — look through the file, focusing on the comments and the function headers, to find those behaviors and how to use them. (You can look at the bodies of the functions to see how the behaviors are implemented if you are curious, but it isn't necessary to do that to use them.)
You also need some way to keep your boids contained, either within a smaller region (as in the demo) or the window itself. Note that it is OK for the boids to leave the window or region temporarily, they just can't disappear offscreen indefinitely.
One option is to do this through behaviors, for example, if a boid leaves the window or region, it can switch to seek or a similar behavior to bring it back inside.
Alternatively, you can wrap the boid's position at the edge of the window or region (step 4b in the starter_boids template wraps at the edge of the window) or have the boids "bounce" — as with a bouncing ball, flip the sign of the x or y component of the boid's velocity when the boid hits the edge. (If you have problems with slow-moving boids escaping — much like slow-moving bouncing balls — see the "Bounce Math 'Fix'" section in the Physics topic.)
Fractal clouds can be generated using a midpoint displacement algorithm similar to what you used to generate the terrain in the fractals topic. Here's the idea:
| fractal terrain | fractal clouds | ||
|---|---|---|---|
 |
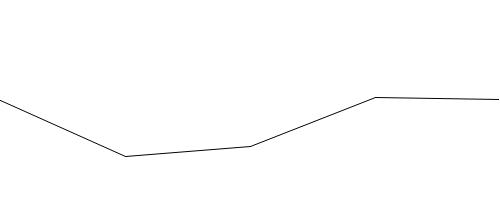
Start with a line segment connecting two points. (The y coordinates of the points can be equal, as shown in the example, or not.) |
 |
Start with a rectangle with a color associated with each corner. (the colors are 0, 2, 4, and 8 in this example) |
 |
Replace each line segment with two new line segments which connect the original segment's endpoints with the "displaced midpoint". The displaced midpoint is the midpoint of the original segment, moved up or down by some amount — if the original segment's endpoints are (x1,y1) and (x2,y2), the displaced midpoint is ((x1+x2)/2,(y1+y2)/2+d) where d is a random amount. |  |
Replace each rectangle with four new rectangles as shown. The midpoint colors along each edge are the average of the colors of the adjacent corners (e.g. the top edge's color midpoint is (0+2)/2 = 1). The center color is the average of the four corner colors plus a random displacement (e.g. (0+2+4+8)/4 = 4.67 plus a random displacement = 3.5 as shown) |
 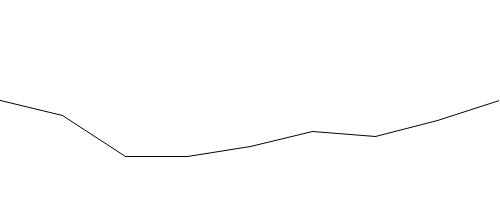 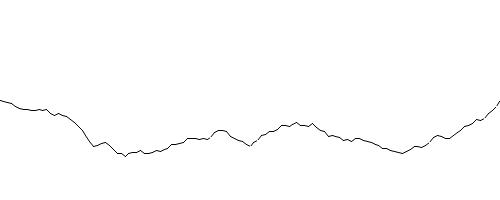 |
Repeat: replace each line segment with two line segments connecting each segment's original endpoints with a displaced midpoint. Keep going until the line segments are sufficiently short. At that point, draw the line segment. | 
|
Repeat: replace each rectangle with four smaller rectangles with colors as shown. Keep going until the rectangles are sufficiently small. At that point, draw the rectangle using the average of its corner colors as its color. |
Observe that this process follows the replacement pattern — the rectangle in each level is replaced by four smaller rectangles, and only the final rectangle is actually drawn. The elements of the pattern:
The whole design is clouds — name your function drawClouds.
What changes from one level to the next are the position and size of the current rectangle, its four corner colors, and the maximum possible displacement maxd for the center color — this should decrease with each level to keep the color changes from becoming too abrupt. (As the rectangles get smaller, the displacement needs to get smaller so the color differences don't become too great.) All of these things (position, size, corner colors, and maximum displacement) will be parameters to the drawClouds function.
"Small enough" is based on the size (width and height) of the rectangle.
The base shape is a rectangle with the specified position and size, and whose color is the average of the corner colors.
There are four smaller copies with half the size (width and height) and position and corner colors as shown above and a maximum displacement half as big (maxd/2).
This description of the algorithm is meant to parallel the description of the fractal terrain, and you can use your terrain function as an example of the structure though the details will be different.
Implementation notes:
For a blue sky with white clouds, you can get away with a single value for each corner's color so only four parameters are needed (one for each corner) rather than twelve (red, green, and blue for each corner). When you draw the rectangle, use fill(c,c,255) where c is the average of the corner color values. If you are drawing something other than clouds, you may need to have three color parameters for each corner. In that case, repeat the math done for the single color values for each of the red, green, and blue components.
Use the Processing function random to generate a random value between -maxd and maxd (the current maximum displacement) for d (the displacement added to the average of the corner colors to get the center color). Create a local variable for d since you will need to use the same value for each of the four smaller copies.
Experiment to find a good starting value for the max displacement — larger values will allow for greater contrast in the result. (However, a value bigger than 255 is not meaningful because color values are 0-255.)
Consider a rectangle to be small if both its height and width are small. Ideally "small" is just a few pixels, but if your sketch runs too slowly, make "small" larger — even large enough that you see a noticeable chunkiness in the pattern.
Since each frame involves generating the pattern from scratch, the random number sequence used for the displacements needs to be reproducible. Use randomSeed at the beginning of draw() so you don't get jumpy sky.