
| CPSC 225 | Intermediate Programming | Spring 2025 |
The projects are opportunities to work on larger programs, and to bring together and apply topics from the course. Specific objectives for this project include:
The checkpoint deadline is a guideline for pacing. There isn't anything to hand in, but you should treat it like a real deadline — if you aren't on track to meet it, you run a greater risk of not completing the project on time.
Fixing problems is an important component of learning, and most assignments will have an opportunity for revise-and-resubmit. The resubmit deadline will be announced when the initial handin is handed back, and will generally allow a week or so for revision.
Revise-and-resubmit requires there to be something to revise and feedback to act on — it is not intended as a de facto extension. To be eligible for revise-and-resubmit, there must be some effort put into the assignment (a 3 or higher) for the original handin.
Late work is generally not accepted. If circumstances beyond your control prevent you from making any progress on an assignment before it is due, you are at significant risk of falling behind in the course. Come talk to me ASAP!
You may use the course materials (slides, examples) posted on the course webpage and the course Canvas site as well as the textbook.
You are encouraged to come to office hours and Teaching Fellows for help with thinking through getting started, Java help, debugging help, or help with anything else you might be stuck on.
The use of generative AI (such as ChatGPT), homework help websites, or other resources (friends, YouTube, etc) as learning cheats is not permitted. "As a learning cheat" means generating, finding, copying, etc code that you incorporate directly or with only minor modifications into your solution. The most egregious version of this is generating the entire program, but the prohibition applies to even small sections of code as well.
Using other resources as learning aids is permitted, but you are strongly encouraged to utilize the course materials, office hours, and Teaching Fellows as your primary sources of help. "As a learning aid" is to understand concepts — e.g. getting examples of loops to understand how to write loops in general or the specific syntax for loops in Java, not their specific application to this program. ("An example of a program to play flip" is a solution, not an example, and is not a learning aid.)
To hand in your work:
Make sure that your name is in an @author tag at the beginning of each file that you modified, and that all of your Java files have been auto-formatted and saved.
Copy the entire omino project directory to your handin directory. Make sure that you end up with omino directly inside your handin directory, with the Java files themselves in a src folder inside omino. Don't introduce extra directories or leave some out!
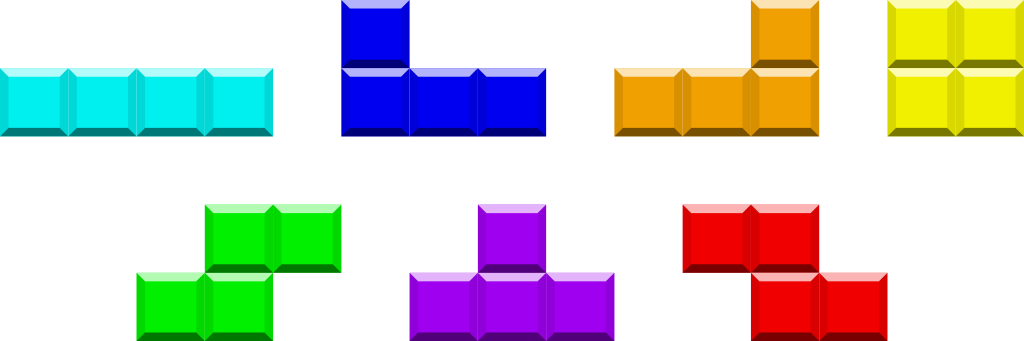
Tetris is a classic computer game dating back to the mid-1980s. In it, tetrominoes (shapes made up of four squares) descend from the top of the screen, piling up on previous pieces. Players try to position the falling pieces to fill complete rows, which are then cleared. The goal is to last as long as possible before the board fills up to the top and no more pieces can be placed. Tetris is an extremely popular game and versions have appeared on a variety of computing platforms — and even in some less conventional places.
In this project, you'll implement a falling-polyomino game (which we'll call Omino!) that is similar to Tetris. It will be more flexible than Tetris, however, in that it will be able to easily support any collection of polyominoes (shapes made up of any number of squares) as well as any size board. Your game will look like the following:
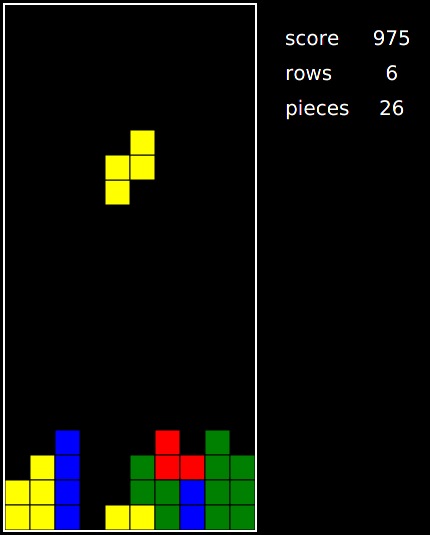
The game will be played using the keyboard: 'j' moves the current piece to the left, 'l' moves it to the right, 'k' rotates counterclockwise, ' ' (spacebar) drops, 'n' starts a new game, 'p' pauses/unpauses the game, and 'q' quits the program.
You have been provided with the user interface for the game; your job is to write the core of the program along with a tester to help verify the correctness of your code. An overview of the program organization and the specifics of the classes you should implement, including their instance variables, constructors, and methods, can be found in the Code Specifications section below. You should read through that whole section to gain an understanding of what you'll be doing before you start implementing. Note that you must use the provided code and create/implement the classes and methods as described below — this is not an assignment to write a Tetris game from scratch, and you will not receive credit if you do.
Your program should be robust — it shouldn't crash if the user uses it incorrectly — and your code should reflect good coding style. Javadoc comments should be present for all classes and methods and comments should include necessary information (including preconditions) without also including unnecessary or inappropriate information. Also choose descriptive names and follow consistent and standard conventions for naming and whitespace. It is strongly recommended that you follow the 225 programming standards. Autoformat will take care of many potential whitespace-related issues, including improper indentation and too-long lines. Use blank lines for grouping and organization within longer methods.
Create a new Eclipse project named omino.
Import the Java files in /classes/cs225/omino into your project. Make sure the imported files end up in the src directory of your project.
There should not be any compiler errors in the imported code, and you should be able to run the program. (You'll just see a window with an empty board — pressing keys to play the game won't do anything at this point as you have to write that part!) Note that this program uses JavaFX, so you'll need to have that set up properly.
Read through the whole handout to understand the code organization and your task and to notice what the Hints, Suggestions, and Technical Notes section has to say — you don't need all the details contained there yet, but you should be aware of what topics are included so that you can refer to the specifics when needed. (Also, if you get stuck on or are confused by something, check out that section first to see if it addresses your problem.)
Implement and test the supporting classes (Block, Polyomino, Piece, and Board, in that order). Be sure to include comments, identify any class invariants and method preconditions in the appropriate comments, and add runtime checks for those conditions where it is productive to do so.
Complete the program by completing and testing the Game and Omino classes as described below. Be sure to include comments, identify any class invariants and method preconditions in the appropriate comments, and add runtime checks for those conditions where it is productive to do so. Also be sure to consider robustness — the program should not crash if the player tries to do something invalid, such as trying to move a piece off the board.
Note: Implementing everything before you try to test it for the first time can lead to a daunting debugging task. However, the testers for Polyomino, Piece, and especially Board should give you confidence that those classes are working, so any bugs when you finally run the program should be limited to Game and Omino (assuming your testers covered the necessary cases). You can also proceed with Game and Omino in several steps:
Implement everything in Game except the movePiece. For movePiece, write the header and comments for movePiece and implement part of the body: determine the new piece and position resulting from LEFT, RIGHT, DOWN, DROP actions and update the current piece and position to the new information. (Don't check if it is legal to place the piece or handle if the piece has landed.)
Implement everything except drawBoard in Omino.
You should now be able to run the program and have a falling piece that you can move left, right, and down and can drop. The board won't fill up yet, though.
Finish movePiece in Game and implement drawBoard in Omino.
At this point everything should work!
To be on track, you should have implemented and tested the supporting classes (Block, Polyomino, Piece, and Board) by the checkpoint deadline given at the beginning of this handout. Of course, being ahead of that is even better!
This program is organized into six main classes:
A polyomino is made up of a bunch of squares (or blocks). Block represents a single block.
Polyomino captures the notion of a particular configuration of blocks independent of orientation, that is, we'll consider three blocks in a line to be the same polyomino even though the blocks could be in a horizontal or a vertical line because you can just rotate one configuration to get the other. (Formally, Polyomino captures the notion of one-sided polyominoes.) A color is associated with each polyomino.
Piece represents a particular orientation of a particular polyomino — three blocks in a vertical line and three blocks in a horizontal line would be two different pieces but the same polyomino.
Board is the main playing area where the pieces land. It keeps track of the blocks from pieces that have landed or have been dropped.
Game brings together the individual elements — the board, the current piece, piece movement, scoring — into the whole game. It has instance variables for those elements, and its methods manipulate those elements to perform game operations like resetting the game state for a new game, moving a piece, handling a piece that has landed, and updating the score.
Omino contains the main program and handles the user interface of the program. After initializing and setting up the user interface, its main job is to link the user interface to the game logic in Game so that when the user presses a key, the program responds correctly.
There are also several supporting classes:
OminoTester will contain test cases for your code.
Action is an enum which defines the possible piece-manipulation actions: Action.LEFT, Action.RIGHT, Action.ROTATE, Action.DROP, and Action.DOWN.
OminoSubject is part of supporting a design known as model-view-controller; the idea is to separate the parts of the program that deal with state (like the current piece, what is on the board, the score, etc) from the parts that deal with the user interface (handling user key presses, drawing the display). You don't need to work with or understand OminoSubject.
As you implement the classes below, also implement the test cases described in OminoTester. The structure should be similar to the testers in labs 2 and 4 — add tester subroutines for each method being tested, and call them from main to run specific test cases.
Implement the classes described below. Be sure include Javadoc comments for the class and each method. Also identify any class invariants and method preconditions in the appropriate comments and add runtime checks for those conditions where it is productive to do so.
A polyomino is made up of a bunch of squares (or blocks). Block encapsulates the position (row and column) of a polyomino block.
Instance variables:
Constructor:
Methods:
Testing:
Block just holds and provides access to row and column values, and its method bodies are short and straightforward. There's not really any value in writing test cases for Block.
Polyomino captures the notion of a particular configuration of blocks independent of orientation i.e. a shape.
To describe a polyomino, a coordinate system is defined where (0,0) is the lower left corner of the rectangle surrounding the shape. There will always be at least one block in row 0 and in column 0, though there is not necessarily a block at (0,0).
For convenience, the list of blocks in a polyonimo will be specified as a string in the form r1 c1 r2 c2 r3 c3 .... The blocks can be listed in any order, and there can be any number of spaces between each row and column (as long as there's at least one).
For example, the two trominoes shown below would be described by the strings 0 0 1 0 2 0 and 0 0 1 0 0 1 respectively.
Since there can be more than one orientation of a given polyomino, we need to account for rotation. While it is possible to compute the correct blocks for all of the orientations given just one orientation, it is easier to work out the correct blocks for each orientation in advance (by drawing pictures of each orientation) and then just storing them all.
Instance variables:
Constructor:
Methods:
getBlocks, which takes the index of the desired orientation (with the idea that orientation 0 is the one in slot 0 of the array of Strings defining the orientations for this polyomino, orientation 1 is the one in slot 1, etc) and returns an array of the Blocks in that orientation of the polyomino
getNumRotations, which returns the number of orientations of this polyomino
getNextRotation, which takes the index of an orientation and returns the index of next orientation in the rotation order
getColor, which returns the polyomino's color
getBlocks will need to turn a string of block coordinates into an array of Block objects. String's split method is very handy here; the following code shows how to create an array of Blocks from a string of the form r1 c1 r2 c2 r3 c3 ...:
  String str = "0 0  1 0  2 0";
  String[] coords = str.split(" +");
  Block[] blocks = new Block[coords.length / 2];
  for ( int i = 0 ; i < coords.length ; i += 2 ) {
    blocks[i / 2] = new Block(Integer.parseInt(coords[i]),
                              Integer.parseInt(coords[i + 1]));
  }
Testing:
Like Block, Polyomino mostly just holds information and provides access to it. There are a couple of things worth testing, though.
Add tester subroutines and test cases for getNextRotation and getBlocks to OminoTester. For getBlocks, though, there's a wrinkle — checking that an array of Blocks has the right contents is a bit cumbersome. Address this by adding a private helper method blocksToString to OminoTester. blocksToString should take an array of Blocks and return a String formatted like the Strings given to Polyomino (i.e. in the form r1 c1 r2 c2 r3 c3 ...). You can then use blocksToString to make a String version of the Blocks array for easier comparison with the expected result.
Piece represents a particular orientation of a particular polyomino. It is immutable, meaning that rotating a piece results in a new piece rather than changing the orientation of the current piece.
Several useful properties of a piece can be computed from its blocks. The dimensions (width and height) are expressed in terms of the number of blocks.
Instance variables:
Constructor:
Methods:
getters for:
getNextRotation(), which returns a new Piece representing the next rotation of this piece
The piece's blocks are the blocks for its particular orientation of the polyomino; you can get this from the polyomino.
Helper methods: (these are just like regular methods, but are private)
computeWidth, which takes an array of Blocks and returns the width
computeHeight, which takes an array of Blocks as a parameter and returns the height
Note that neither of these helper methods use or change any of Piece's instance variables — they work solely with their parameters. Computing the width and height of the piece requires the blocks of the particular orientation of the polyomino; you can get the blocks from the polyomino.
Testing:
Like Polyomino, Piece mostly holds information (or accesses information held by Polyomino) but it does do a little computation that should be tested.
Add a tester subroutine and test case(s) to OminoTester to test that Piece's constructor correctly initializes the width and height.
Board is the main playing area where the pieces land. It is represented as a grid of squares with (0,0) in the lower left corner, and keeps track of which pieces the blocks occupying squares come from.
Instance variables:
Constructor:
Methods:
getters for:
clear, which clears the board (removes all blocks, resulting in an empty board)
canPlace, which takes a piece and its current position (row and column) as parameters and returns whether it is possible to add the piece to the board in that position
addPiece, which takes a piece and its current position (row and column) as parameters and adds the piece to the board
getDropRow, which takes a piece and its current position (row and column) as parameters and returns the row where the piece would land if it was dropped from its current position
clearRows, which removes rows that are filled all the way across, moving higher rows down, and returns the number of rows cleared (0 if no rows were cleared)
The position of a piece is the row and column on the board corresponding to where the piece's (0,0) position is. Remember that (0,0) is in the lower left corner for both the piece and board coordinate systems.
For canPlace, blocks of the piece are allowed to extend above the top of the board, but cannot extend past the sides or the bottom or overlap blocks already on the board.
For addPiece, blocks that extend past the top of the board should be ignored — don't try to add them to the board, but it isn't an error if they exist. Assume that it is legal to add the piece i.e. canPlace is true.
For getDropRow, the landing row is be the row on the board where the piece's row 0 would end up if the piece was dropped. One way to determine the drop row is to keep asking canPlace for lower and lower rows until the last one where the piece can be placed is found. (A cleverer solution is an extra credit option.)
Helper methods: (these are just like regular methods, but are private)
getters for:
Testing:
Many of Board's public methods do complex things, so you should identify and implement tester subroutines and test cases for them. There are two wrinkles, though: you'll want to test methods when there are blocks filled on the board, but the Board constructor only creates an empty board (and there's no real way to set up a particular board configuration), and the only way to check the contents of the board is to use the getter that tells you if a particular position on the board contains a block or not (which is kind of tedious to use to check the whole board).
To deal with the first wrinkle, add a package-level (not public or private) constructor to Board which takes a 2D array of Pieces storing the contents of the board and initializes the instance variables accordingly.
To deal with the second wrinkle, create a private helper method in OminoTester which takes a Board and a 2D array of Pieces storing the contents of the board and returns true if the Board's contents match the array and false otherwise. Interpret "match" as just that the same spots have blocks on the board and in the array — you don't need to check that the same Pieces are in the same spots.
It's still a bit tedious in the tester to set up the array of Pieces for the starting state and the expected result, but keep in mind that you can use the same piece for all the occupied blocks and you don't need to use a full-size board. Also use the initializer list syntax for the array.
Game brings together the individual elements — the board, the current piece, piece movement, scoring — into the whole game.
You've been provided with a skeleton of part of the full Game class. Fill in and add to this skeleton as described in this section instead of creating a brand new class.
The board dimensions (in blocks), polyomino definitions and colors, and scoring information will be hardcoded into the game. Defining these things as constants brings the definitions together in one place and makes them easy to change.
Constants:
While constants are often public, these can be private since they exist only to make it easier to change the definitions within Game.
You are free to choose the board dimensions, point values, colors, and polyominoes subject to the following constraints:
Instance variables:
Constructor: (note that the header has been provided — just fill in the body as described)
Methods:
getters for:
reset, which resets the game state for a new game: clear the board; set the score, number of pieces played, and number of rows cleared to 0; set the current piece to null and its position to (-1,-1); and set the game status to not in progress and not over
start, which starts the game by updating the status to in progress and starting a new piece at the top of the board
movePiece, which takes an action (type Action) as a parameter and moves the piece accordingly, including handling the result of that movement
In particular, movePiece should:
determine the new piece and position resulting from the action (LEFT, RIGHT, DOWN, DROP just result in a new position; ROTATE results in a new piece as well as a new position) — but don't update the current piece or position yet
if it is legal to place the (new) piece in the new position, update the current piece and position to the new information
if the piece has landed (meaning the action was DROP or the action is DOWN and the piece couldn't be placed in its new position) —
Determining the new position for ROTATE is a little tricky as the piece should appear to rotate around its center rather than around its (0,0) block. The computation to figure out the new position:
  newrow = row + (piece height - rotated piece height) / 2;
  newcol = col + (piece width - rotated piece width) / 2;
Helper methods: (these are just like regular methods, but are private)
startNewPiece, which randomly chooses a new piece, positions it so that it is centered just above the top of the board, and increments the count of the number of pieces played
One additional thing is needed in order for changes to the game state in Game to result in the display being updated. Go through the constructor and methods of Game and identify where there are changes to the board's contents, the current piece (its position and/or the piece itself), the score, the number of pieces played, and/or the number of rows cleared. For each such occurrence, add one or more of the lines shown below at the end of the method:
  firePropertyChange(BOARD_PROPERTY);     // if there's a change to board contents
  firePropertyChange(CURPIECE_PROPERTY);  // if there's a change to the current piece (piece and/or position)
  firePropertyChange(SCORE_PROPERTY);     // if there's a change to the score
  firePropertyChange(NUMPIECES_PROPERTY); // if there's a change to the number of pieces played
  firePropertyChange(NUMROWS_PROPERTY);   // if there's a change to the number of rows cleared
Omino contains the main program and handles the user interface of the program. You don't need to look at or understand most of this code (unless you are curious), but you will need to fill in some pieces to connect the code you've written with the user interface. These things are described below, and can be located in the code by looking for TODO comments. (Eclipse hint: with Omino.java opened in an editor tab, look for small blue rectangles in the right margin of the editor. These indicate TODO comments in the file; click on one of the rectangles to go to that comment.)
Note that Omino has a Game instance variable called game_. This has already been initialized in the provided code; you just need to use it.
handleKey defines what happens when keys are pressed. Fill it in as indicated — this is just a matter of calling the right Game method(s).
The run method in MoveTask defines what happens automatically in the game (i.e. pieces drop). Fill it in as indicated — this mostly just involves calling the right Game method(s). To stop the timer, use the stopTimer method in Omino.
drawBoard and drawCurrentPiece should draw the contents of the board and the current piece, respectively. Retrieve the necessary information from game_.
getScore, getNumRowsCleared, and getNumPiecesPlayed are used to update the display of that information in the game window. Correct them so they return the right values. This is just a matter of using the right Game methods.
For the board and the current piece, draw each block as a solid square of size BLOCK_SIZE (defined in Omino) using the associated piece's color with a black outline so that it is possible to distinguish blocks from one another.
Extra credit features are things you can add for extra credit. Make sure you complete the requirements of the assignment first, however, before tackling extra credit options!
Less-involved options: (easier, but fewer points)
Add more kinds of polyominoes — either more of the tetronimoes shown above or bigger polyominoes. The Wikipedia entry provides a good starting point for what the bigger polyominoes look like. (If you look at Wikipedia or another reference, keep in mind that you are interested in one-sided polyominoes.)
Make the points earned for dropping a piece based on the distance that it falls i.e. the distance between its row when dropped and the row where it lands.
Draw fancier-looking blocks, perhaps giving them a 3D look or an interesting pattern. The color should still be derived from the piece's color, however.
Intermediate options: (harder than the easy options, easier than the harder options)
Be more clever in the implementation of getDropRow:
The skirt of a piece defines its lower edge. It can be represented by an array storing the lowest row occupied by a block for each column of the piece. For example, the skirt for the green tetronimo shown below would be { 0, 0, 1 }.
Update Piece by adding an instance variable for the piece's skirt (as an array which stores the lowest row occupied by a block for each column of the piece), a getter for the piece's skirt at a particular column, and a private getSkirt method which which takes an array of Blocks as a parameter and returns the skirt. getSkirt can be used by the constructor to initialize the skirt instance variable.
Then improve the implementation of getDropRow in Board to use the skirt to determine the drop row instead of repeatedly checking canPlace.
More-involved options: (harder, but more points)
Make the game harder by making more difficult pieces more likely. One version of this is to not have an equal probability of choosing each polyomino, so the selection of the next piece is still random but more awkward shapes are less likely to be chosen. A (significantly) more complex version is to create an evil adversary who picks the worst piece for the current board configuration.
Create a computer player which has some strategy for deciding how to rotate and position pieces. A simple strategy is to just drop the piece immediately, but this is unlikely to lead to a good score. Fancier and more successful strategies will earn more points.
If you are thinking of tackling either of the more involved options, stop by to discuss how to best incorporate them into the program — you should add the extra credit functionality rather than replacing the required versions.
This is a GUI program and you will need to work with colors and draw shapes. See section 3.9.1 in the text for more information.
Two key points:
There are two versions of Color — you want the JavaFX version. Review the import statements at the very beginning of each class that involves Color (Polyomino, Piece, etc) — if you see import java.awt.Color;, delete it and either replace it with import javafx.scene.paint.Color; or choose the import involving a javafx package from the auto-fix suggestions.
For the colors of the polyominoes that you set up in Game, use predefined constants like Color.RED, Color.BLUE, Color.GREEN, Color.YELLOW, Color.MAGENTA, Color.CYAN, and Color.ORANGE. If you need more colors (or want fancier ones), see the list defined in the "Field Summary" section of the Color API.
Constants are like variables with a glass lid — once it has been initialized, the value can be seen through the lid but it can't be changed. Section 4.8.3 addresses named constants.
Action is an enum which defines the possible piece-manipulation actions: An enum is essentially a combination of a type and a set of constants — Action is a type that can be used for declaring variables, parameters, and return types and Action.LEFT, Action.RIGHT, Action.ROTATE, Action.DROP, and Action.DOWN are the possible values that something of type Action can have. Section 2.3.5 of the text has more about enums.
For the polyomino definition array, keep in mind that a 2D array is really a 1D array where each slot holds a 1D array — and that you don't have to have the same number of elements in each row. For example, the following defines the two trominoes (three squares) using the initializer list syntax:
  private static final String[][] POLYOMINOES =
    { { "0 0  1 0  2 0", "0 0  0 1  0 2" },
      { "0 0  1 0  0 1", "0 0  0 1  1 1", "1 0  0 1  1 1", "0 0  1 0  1 1" } };
Eclipse can help you with code generation for constructors and getters. When defining a new class, write the declarations for the instance variables, then put the cursor where you want the constructor or getters to go, right-click, and choose "Generate Constructor using Fields..." or "Generate Getters and Setters..."
For the constructor, choose which instance variables are to be initialized directly from parameters passed to the constructor (unselect the others) and click "Generate". You can then fill in the rest of the constructor body as needed.
For getters, select which getters you want to generate by expanding the tab next to the relevant instance variables and selecting the getter item. Click "Generate" when you are done. You can then edit the generated code as desired, such as if you want to change the name of the getter.
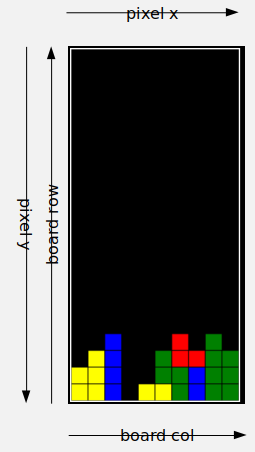
There are several different coordinate systems in use in this program, and it is easy to get them mixed up. Some tips:
It is conventional to use the terms "row" and "column" to refer to positions in 2D arrays and grids, and the terms "x" and "y" to talk about pixel coordinates on the screen — name your variables accordingly.
It is conventional to say "row and column" (rather than "column and row"), so make row the first dimension of the 2D array/grid and column the second.
Row corresponds to y and column corresponds to x. Double-check yourself whenever you are going back and forth between the two concepts.
Distinguish between piece coordinates and board coordinates — if you are working with both in the same context, include "piece" and "board" in the names of your variables so it is clear which is which.
Note that Omino has a constant BLOCK_SIZE which specifies how big to draw the square for each block on the board:
  // size of each block on the screen, in pixels
  public static final int BLOCK_SIZE = 25;
Also note that Omino has an instance variable game_:
  // the game state
  private Game game_;
game_ is initialized when the user interface is set up in the provided code. Use it to access elements of the game state, such as the board.
Drawing the board means going through each spot on the board and, if there's a piece there, drawing a square in that piece's color in the corresponding spot in the drawing window. This means a structure like:
for ( int row = 0 ; row < height ; row++ ) {
  for ( int col = 0 ; col < width ; col++ ) {
    ...
    g.fillRect(left,top,BLOCK_SIZE,BLOCK_SIZE);  // (left,top) is (x,y) coordinates for
			                         // the upper left corner of the rectangle
    ...
  }
}
To figure out left and top, keep in mind that (0,0) in the drawing window is in the upper left corner while our convention for the board array is that row 0, col 0 is in the lower left corner. It's possible to figure out a formula to convert from row and col, but it is easier to add loop variables. Also, since in this case we don't actually know the height of the drawing window in pixels, we'll switch the row loop around to start with the top of the board. All of this leads to the following for drawBoard:
private void drawBoard ( GraphicsContext g ) {
  Board board = /* get the board from game_ */
  for ( int row = board.getHeight() - 1, y = 0 ; row >= 0 ; row--, y += BLOCK_SIZE ) {
    for ( int col = 0, x = 0 ; col < board.getWidth() ; col++, x += BLOCK_SIZE ) {
      if ( /* row and col of board is occupied by a piece */ ) {
        g.setFill(/* get the color of the piece at (row,col) on the board */);
        g.fillRect(x,y,BLOCK_SIZE,BLOCK_SIZE);
        g.setStroke(Color.BLACK);
        g.strokeRect(x,y,BLOCK_SIZE,BLOCK_SIZE);
      }
    }
  }
}
drawCurrentPiece is a little more complicated because it is necessary to figure out a formula to relate (row,col) on the board to (x,y) in the drawing window:
 public void drawCurrentPiece ( GraphicsContext g ) {
   Piece piece = /* get the current piece from game_ */
   if ( piece == null ) {
     return;
   }

   int row = /* get the current row from game_ */, col = /* get the current col from game_ */
   for ( Block block : /* piece's blocks */ ) {
     int r = row + /* block's row */, c = col + /* block's col */;
     g.setFill(/* piece's color */);
     g.fillRect(c * BLOCK_SIZE,
                (/* height of the board, in rows */ - r - 1) * BLOCK_SIZE,
                BLOCK_SIZE,BLOCK_SIZE);
     g.setStroke(Color.BLACK);
     g.strokeRect(c * BLOCK_SIZE,
    	          (/* height of the board, in rows */ - r - 1) * BLOCK_SIZE,
                  BLOCK_SIZE,BLOCK_SIZE);
   }
 }
The original inspiration (and some of the structure) for this assignment comes from materials by Nick Parlante.