| CPSC 329 | Software Development | Fall 2026 |
In this (mostly) group project, you and a partner will extend the Hedgehogs in a Hurry game from project P1 with a JavaFX GUI. This project has three parts:
Teams. You'll work in pairs (and one team of three), starting from one partner's P1 codebase. If neither partner has a P1 complete enough to continue with, a reference implementation is available as a substitute (see B0). Teams: Ainsley and Anik; Brooke and Sebastian; Andrae, Henry, and William
Individual and team work.
Task A1 (individual UI design) is individual. Do it on your own before seeing or discussing your partner's design.
The project reflection (see Project Wrapup) is also individual.
Everything else is a team task, though some of the deliverables are individual. The individual deliverables must be entirely your own work, while the code and team deliverables must be entirely your team's work. Team code is assessed according to ownership (see Team Process).
No AI. Review the course AI policy for details.
Check-in meetings. One short check-in meeting is required, another is strongly recommended:
(required) During B2, once the MVC skeleton has been merged into main and work on the slices has started. It is strongly recommended that this be done by Tuesday 11/10.
(strongly recommended) After completing C1, before starting C2. It is strongly recommended that this be done by Wednesday 11/18.
Drop in during office hours — no appointment is necessary unless you are unable to make any of the scheduled office hours.
The check-in meetings aren't graded; their purpose is to make sure your team is on track. All partners should attend the first (required) meeting. One partner can attend the second (recommended) meeting alone, though all partners are encouraged to attend.
Hand-in meeting. A 20-minute individual hand-in meeting is required after handin of the whole project. These meetings will be scheduled before the due date and normally take place within a day or two of it. Be ready to walk through your own code and other deliverables. Also be ready to explain parts of your partner's work as well as bigger-picture things like design decisions and your team's process. This isn't a quiz about content; it's to confirm that your handin reflects your own understanding and effort.
Due Monday 11/23 at the start of class. There is a single handin for all three parts. Late handins are not accepted for projects, but an occasional 1-2 day extension is possible in case of a last-minute time crunch. (Plan ahead to avoid this!) See the late policy for details.
Schedule. Part B is by far the largest part — don't let Part A go on too long! Also, while the three parts and the steps within each part are largely sequential, there is some room for overlap. See the note at the beginning of each part's Tasks section for specifics.
In Part A, you'll design a GUI for Hedgehogs in a Hurry. Read through this whole part (sections marked with "[A]" in the heading) to get an overview of what you'll be doing, then work through the three tasks in the Tasks section.
The GUI replaces P1's console input and output entirely. It must:
Set up a game with the choices your P1 program offered: the number of players and the rule variants. The game uses random dice only.
Support playing a complete game by the rules of the variants chosen, ending with reporting the winner. Players should be able to play again without restarting the program.
Be usable by players who know at least the standard game. Someone who knows the standard rules for Hedgehogs in a Hurry should be able to use the program. Providing instructions for the supported rules variants and/or the standard rules is optional (extra credit).
Enforce the rules and handle mistakes. Illegal moves and bad input shouldn't get through and the player should be able to tell why. The program shouldn't crash if used incorrectly.
Fancy graphics aren't required — a plain board drawn with shapes and text is fine. A board background image will be provided if you want to use it (not required).
Design principles. Your design must reflect appropriate use of the UI design principles regarding appropriate controls, visual hierarchy and grouping, feedback and visible state, preventing and explaining errors, and consistency that were discussed in class.
Usability. Unlike the throwaway console UI from project P0 (and P1), your GUI should be well-designed, not just functional. Lecture and labs 7 and 8 introduced a two-screen organization (a setup screen and a game screen) and a drag-and-drop gesture, but these are not prescribed — you are free to choose another organization (such as a single screen) or different interactions. Weigh your choices for usability, considering what works best for someone playing the game rather than what is most familiar or easiest to build. What does a player do most often — is it quick and direct or awkward or inconvenient? At each point in the game, does the player know what their options are and do they have what they need to decide what to do?
Accessibility. The design must address the accessibility considerations discussed in class: keyboard operability, labeled controls, contrast, and visible focus. Design for all of them now; Part B specifies what your team will need to implement.
Do these tasks in order, except as noted:
This is a team task.
Hold your team kickoff meeting. Discuss:
Schedule the A2 design meeting. Also decide whether you intend to combine the A2 and B1 design meetings or do them separately.
Decide on a codebase. Pick whose P1 to continue with, considering both completeness and how tangled the turn logic is with console input and output — the latter will impact how much work it is to restructure the code for MVC in B2. If neither partner's P1 is complete enough to continue with, choose the reference implementation. Record the choice and a sentence or two of reasoning in the team log.
Record the results and start the team log. Use Google Docs or a similar collaborative tool until you have created the team repository in B0, then copy the documents over into docs/team-kickoff.txt and docs/team-log.txt respectively.
This is an individual task. Each partner should do the steps in this part separately before seeing or discussing the other's design.
Design a GUI for Hedgehogs in a Hurry. Complete the following steps:
Intention inventory. Identify what the user needs to be able to do and find out as they use the program and what the UI needs to support for each intention. See the Intention Inventory section for more about this step.
Paper sketches. Sketch the screen(s) of the UI, adding annotations for things that aren't visible in a static sketch (what's enabled when, what happens on a click or drag, what changes after an action). Be sure to cover everything in your intention inventory. Hand drawn on paper is fine; if you choose to use a computer tool, keep it rough — this is about getting your ideas down, not spending a lot of time making a polished product.
Paper walkthrough self-test. Evaluate your own design by walking through two or three tasks on your sketches as described in the Usability Evaluation section. Revise your design to address any problems you find and keep notes of what you found and changed.
Handin. Before the A2 design meeting, submit your intention inventory, sketches (photos or scans are fine), and walkthrough notes on Canvas as a single PDF. Also bring a copy to the meeting.
This is a team swarming task.
Design the UI for the Hedgehogs game:
Merge the intention inventories. Create a single inventory of everything the application needs to support.
Adopt a UI design. Compare your sketches first: what did each get right and where do they differ? Then create a sketch of the adopted design, based on the combined intention inventory, the individual sketches, and the problems found in your paper walkthroughs. Be sure to consider the design requirements given in the specifications.
Walk through the adopted design with the same tasks used in A1 and revise as needed to address any problems.
Record the adopted design. Once the team repository has been created (B0), add the combined intention inventory (docs/A2-inventory.txt if plain text or docs/A2-inventory.pdf if you create a table) and the design sketches (photos or scans, docs/A2-design.pdf or .png) to it.
Handin. Once the team repository has been created (B0) and the design documents have been added to the docs directory, create a tag A2-handin on main to mark the end of A2.
In Part B, you'll refactor the code to follow MVC and build the GUI designed in Part A. It ends with a playable JavaFX game and a usability evaluation.
Read through this whole part (sections marked with "[B]" in the heading) to get an overview of what you'll be doing, then work through the five tasks in the Tasks section.
The game. The implemented GUI reflects your adopted design and supports everything in the UI Requirements. If you change the design while building it (for example, after the usability evaluation), record what changed and why in docs/A2-design-changes.txt.
Accessibility. The contrast-related aspects of accessibility, including that player identity is not shown by color alone, are incorporated. The other aspects of accessibility (labeled controls, keyboard operability including keyboard alternatives for mouse interactions, and visible focus) are required for the team of three and optional (extra credit) for pairs.
Robustness. Bad setup input is rejected with a clear message, an illegal move is prevented or explained, and the program doesn't crash if used incorrectly.
Tests. Write JUnit tests for the model API — tests for classes not touched by the refactoring can be carried over from P1 as is, while other tests may need to be modified or scrapped and new tests created. Controller and GUI code doesn't need automated tests. (Optionally, write tests for any controller logic worth testing. Use a fake view to make this possible.)
Thin console version. (required for the team of three; optional for pairs) This is a complete console-based version of the game that uses the same model and controllers as the GUI but with new view(s) and its own main. ("Thin" means the console code doesn't handle any game logic: it only displays what the model reports and turns typed commands into calls to the controllers.) This UI only needs to be functional enough to play the game; something like P0's is fine.
MVC. The code should be organized into packages model, view, controller and app:
The model holds all of the game state and rules, including whose turn it is, the roll, and which step of the turn the player is on. The model has no JavaFX imports and does no console input or output, and nothing in model imports anything from the view or controller packages.
Views display the model and turn the user's interactions into calls to a controller. They don't change the model directly.
Controllers turn the user's intentions into calls to the model. They are organized by responsibility; for example, one controller handles intentions related to setting up a game while another handles the moves in the game. Controller methods are named after the intention rather than the user interaction that expresses that intention (e.g. drawFromStock rather than clickStock).
app contains the Application class and main.
Console version. (teams of three) The console version uses the same model and controllers as the GUI, with only the views replaced, so the controllers must work with either UI.
No side effects. Methods that check whether something is allowed (such as whether a move is legal) should only report — they don't print, prompt, or change the game since the views, the controllers, and the hint generator (part C) all need to be able to ask without changing anything.
Refusals with reasons. Whenever the model refuses something — setup choices that aren't valid, a move that isn't legal, etc — the controller needs to be able to find out why so it can tell the user what the problem is.
Observer. The model notifies its listeners (the views) through a listener interface you define. The recommended starting point is a single broad "the game changed" notification after each complete action, with each view doing a full refresh by pulling the state it needs from the model (as in the Klondike example discussed in class). You can refine this as needed; if so, include a brief explanation of what you changed and why in docs/B-design.txt.
Single entry point for changes. While there may be multiple classes in the model, the views need a single source of notification — thus one model class will be the entry point for all changes to the game and it is the class that notifies the views. Controllers and views can call methods that only report game state on any model class, but controllers change the game only through the methods of the entry-point class.
Fancy graphics aren't required — a plain board drawn with shapes and text is fine. Some images (including a board background, a plain background, and dice pips) are available in /classes/cs329/hedgehogs/board-images if you want to use them (not required). There's a README.txt in that directory describing the images and how to work with them.
Do these tasks in order. B0 can be done in parallel with Part A, and Part C can overlap the end of Part B (see Part C).
This is a team task. It doesn't need a meeting and can be done any time once you've decided on a codebase (A0) — but it must be done before B1, since B1's planning happens in the team repository.
A new team repository will be used for this project:
One person:
Establish a GitHub repository. Create a new private GitHub repository named hedgehogs-gui and add your partner(s) and me (sbridgeman) as collaborators. Remember to create an empty repository — no README, license or .gitignore.
If your team is using the reference implementation, send me an email asking for it. I'll push it to your repository.
The codebase owner: (if you are using one partner's P1)
Push your P1 code to the repository. In Eclipse, in your P1 project (hedgehogs-variants):
Make sure you have the final version of the P1 code: switch to the main branch if needed and pull.
Push to the P2 team repository — choose Team → Remote → Push..., then paste the new repository's URL (from its GitHub page) under "Location" and click Next. The rest is as usual: on the "Push Ref Specifications" page, choose main as the source ref and refs/heads/main as the destination ref, click "Add Spec", then Finish.
This copies main, with its history, into the new repository without changing your P1 repository.
Once the P1 code (a partner's code or the reference implementation) is in the repository, continue:
Everyone (including the codebase owner):
Check out (clone) the repository as a new Eclipse project named hedgehogs-gui.
Make sure the Eclipse project is linked to main before proceeding — switch branches if necessary.
Run the game (and the tests) to make sure everything works. Note: JavaFX should be set up for all projects in your workspace, but if you run into compiler and runtime errors relating to JavaFX as you proceed, review the JavaFX setup in lab 6.
One person:
Mark the start of P2. Create a tag p2-start on main.
Copy the team documents into the repository. Copy the kickoff notes and team log from your shared document into docs/team-kickoff.txt and docs/team-log.txt (the log includes the codebase decision from A0). From now on, keep the log in the repository. If A2 is already done, add its documents and create the A2-handin tag too.
This is (mostly) a team task with one individual step (the independent estimates). It can be combined with the A2 design meeting; in that case, do A2 first before moving on to B1.
Design the MVC code organization. Together (swarm), design the public API of each part starting from the intention inventory (A2). This is the design of the interfaces — method names, parameters, return values, and a sentence on what each does — not their implementation, which comes in B2.
Controller API. Start with the controllers and their public methods, roughly one method per intention, grouped by responsibility and named for the intention (see the Part B specification). These methods are what the views will call from their event handlers.
Model API. This isn't a completely new design — the classes making up the model will likely follow your P1 class structure, with one of them becoming the entry point for all changes to the game state (see the Part B specification). For the methods, consider the callers of the model and keep in mind that the same method can serve multiple callers:
Controller needs. For each controller method, identify what it needs from the model to carry out the intention and, for any intention that can fail, how it finds out why.
View needs. For each part of the screen in your A2 design, identify what it needs to pull from the model to display the game, including which of its controls should be enabled and anything the player needs to be told about what just happened (such as a hedgehog sliding back to the start).
Hint generator needs. Part C adds another caller, the hint generator, which plays the game through the HintableGame interface. In Part C you'll write a small adapter class that implements HintableGame by calling your model's methods. The purpose of an adapter class is to translate between two interfaces (in this case, HintableGame and your model's API). This means your model doesn't need to match HintableGame's methods exactly, but it should support similar functionality: making a complete copy of the game, checking whether a sidestep or forward move from a given square is legal, making those moves, moving on to the next player and rolling for them, and identifying players by their position in the turn order. Read the interface's comments to check for anything else your design would make hard to translate.
View API. Most of what the views do is driven by notifications, but a controller may also need to tell the player something directly, such as why an intention failed. Design the methods the controllers call for this, identifying which view provides them and their names and parameters.
Notifications. Design the listener interface and decide which model operations notify the listeners and when. See the Part B specification for requirements and a recommended starting point. Also address registering the views as listeners, both when the application starts and after a new game starts.
Record the design (the model's public API, the listener interface and when it is notified, the controller classes and their public methods, the view API, and which classes go in which package) in docs/B-design.txt. Including a hand-drawn class diagram is helpful but not required.
Independent estimates. After the MVC design is recorded and before planning the work, each partner, on their own, reads through the task list below and the details in B2 and gives an S/M/L estimate for each task (as in P1). This can be done in a few minutes at the meeting. Submit your estimates on Canvas (PDF or text) before comparing them.
Plan the work. Create a milestone named "B MVC and GUI" with an issue for each task in the task list below. (You may split an issue into smaller ones or add issues within a chunk (such as a bug found along the way or a missing element), but don't move tasks from one chunk to another.) As part of this, decide who owns each slice (see Ownership below) and assign size labels (create the labels first; see Team Process). Once all of the issues have been created, record the dependencies ("requires") from the task list using GitHub's issue relationships — in right-side sidebar on the individual issue's page, choose Relationships → Mark as blocked by. (This makes it possible to see at a glance on the Issues tab which issues are ready to be worked on; visit an issue's individual page to see what it is waiting for.) Put the plan summary in docs/B-plan.txt — address differences in the individual size estimates and how you resolved them.
Handin. Create a tag B1-handin on main to mark the end of the design and planning.
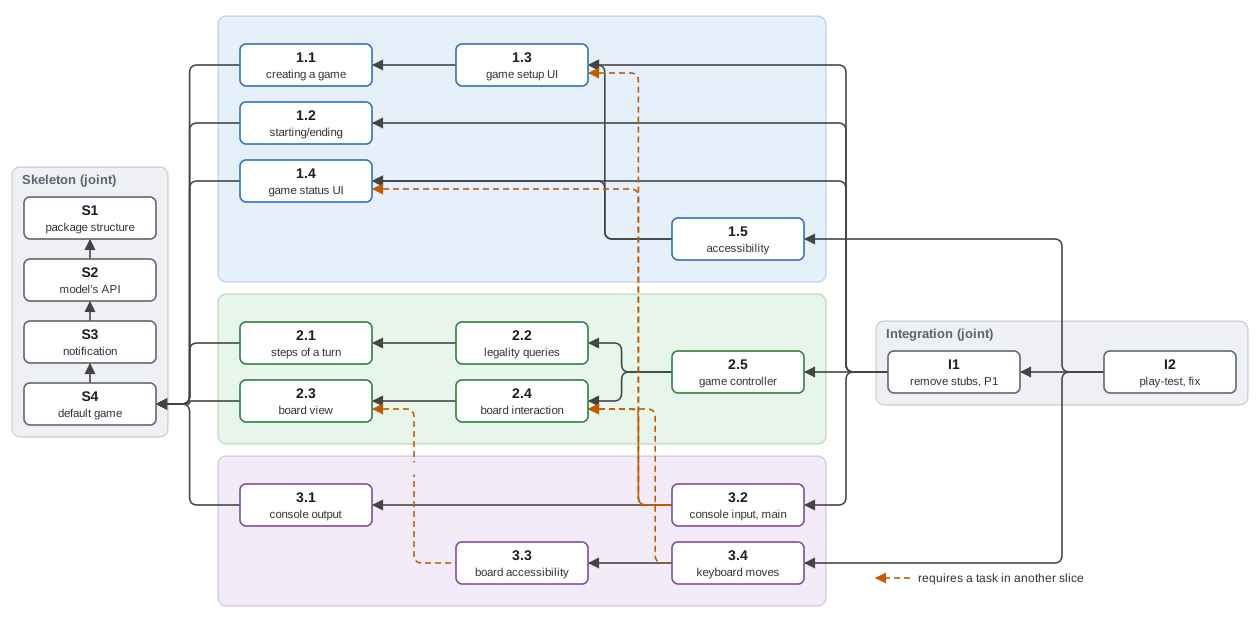
Task list. The implementation work in B2 is organized into four chunks: the skeleton setting up the MVC structure, two slices of the game, each covering a part of its functionality, and a final integration step to make sure everything works together correctly. For teams of three, there is an additional slice 1 task and a third slice, adding a console (text-based) version of the game and additional accessibility requirements.
The details for each task below are given in B2; read them before making your S/M/L estimates. Use the task names below as issue titles. Issue descriptions are optional: use them for anything specific to your team, such as how you divided a task into several issues or a detail about an issue that you agreed on.
Skeleton
| # | Task | Requires |
|---|---|---|
| S1 | Set up the package structure | — |
| S2 | Define the model's API | S1 |
| S3 | Implement notification | S2 |
| S4 | Launch the default game | S3 |
Slice 1: setup and game status
| # | Task | Requires |
|---|---|---|
| 1.1 | Model: creating a game | S4 |
| 1.2 | Model: starting and ending games | S4 |
| 1.3 | Game setup UI | 1.1 |
| 1.4 | Game status UI | S4 |
| 1.5 | Accessibility for the setup and game status views
and the controls outside the board (teams of three) | 1.3, 1.4 |
Slice 2: turns and the board
| # | Task | Requires |
|---|---|---|
| 2.1 | Model: the steps of a turn | S4 |
| 2.2 | Model: legality queries | 2.1 |
| 2.3 | Board view | S4 |
| 2.4 | Board interaction | 2.3 |
| 2.5 | Game controller | 2.2, 2.4 |
Slice 3: console version and keyboard play (teams of three)
| # | Task | Requires |
|---|---|---|
| 3.1 | Console view: output | S4 |
| 3.2 | Console view: input and main | 1.3, 1.4, 2.4, 3.1 |
| 3.3 | Board accessibility: keyboard focus, highlighting and accessible text | 2.3 |
| 3.4 | Keyboard moves on the board | 2.4, 3.3 |
Integration
| # | Task | Requires |
|---|---|---|
| I1 | Remove stubs and P1 code | 1.2, 1.3, 1.4, 2.5 (teams of three: also 3.2) |
| I2 | Play-testing and bug fixing | I1 (teams of three: also 1.5, 3.4) |
Ownership.
The skeleton and integration chunks are pair programmed and jointly owned — label these issues as joint and add both partners as owners (assignees).
Each slice is owned by one partner. The slices cut across model, view, and controller, so each partner works at every level of MVC and each slice can be built and tested without the other (see B2). You choose who owns which slice.
Teams of three. For teams of three, everyone takes part in at least one of the pair programmed chunks: the slice 1 and slice 3 owners pair program the skeleton, and the slice 2 and slice 3 owners pair program integration. When you decide who owns which slice, keep in mind that the slice 3 owner takes part in both pair programmed chunks and that slice 3 depends on both other slices (see the scheduling notes below).
Scheduling. (teams of three) Slice 3 depends on tasks in both other slices, so plan the order of your tasks to avoid delays for the slice 3 owner (see the dependency diagram). In particular, the slice 2 owner should start with the board view and board interaction (2.3, 2.4), and the slice 1 owner should leave 1.2 until after the setup and game status UIs (1.3, 1.4).
This is a team task. Follow the Team Process throughout. Details for each chunk and task are given below the steps.
Build the skeleton (S1-S4) together, using pair programming on a single branch for all four tasks. When it is done, merge it into main through one pull request that closes all four issues.
Build the slices in parallel, each issue on its own branch. Until another slice's work is merged, develop and test against the skeleton's stubs. Each slice should run and show its own work without the other slice being finished.
Check-in meeting. Once the skeleton is merged and slice work has started, come to the required check-in meeting (see Logistics).
Integrate (I1, I2) using pair programming, starting when the tasks I1 requires have been merged. Do I1 on its own branch. For each bug found in I2, open an issue in the milestone and fix it on its own branch.
Handin. Once all of the issues in the milestone are closed, create a tag B2-handin on main to mark the end of B2.
Chunk and task details and implementation notes:
Skeleton — sets up the shared parts of the B1 design that both slices build on: the package structure, the model's public API as stubs, a working listener mechanism, and an application that launches a default game into a window with a place for each slice's views.
| # | Task |
|---|---|
| S1 | Set up the package structure
|
| S2 | Define the model's API
|
| S3 | Implement notification
|
| S4 | Launch the default game
|
Task details and notes:
Moving P1 code to the p1 package (S1). Move all of the P1 code at once using Eclipse's Move refactoring: select all of the P1 classes in the Package Explorer and drag them to p1.
Reusing P1 code (S2).
Any P1 class that can be used as is (or that only needs additions) should be moved from the p1 package into model with Eclipse's Move refactoring (drag it from p1 to model in the Package Explorer) to preserve its history. Move classes that use each other together (ctrl-click to make multiple selections) to keep imports correct. Add any public methods from the B1 API that the class doesn't have yet as stubs.
Otherwise, create a new class in model with the public methods from the B1 API. Copy over any P1 methods that can be used as is; for the rest, write the method as a stub. (It's fine for a new class to have the same name as one still in p1 — being in separate packages keeps the names distinct, and the P1 version will be removed once the slice that replaces it is done.)
Usable code that remains in the p1 package after S2 will be brought into the model as needed when the slices are implemented.
Stubs and placeholders (S2, S4). Stubs (the model methods in S2) and placeholders (the create and message methods in S4) let the code compile and run without the real behavior. For the model's stubs:
Methods that report something about the game (such as whose turn it is, the roll, or what's on a square) should return fixed values that look like a real game in progress — reflecting two players, a few hedgehogs on the board, a roll of 3, currently on the sidestep step of the turn, for example — rather than null or 0 so that the slices have something to work with for testing before the real model exists.
Methods that change the game (such as making a move or starting a new game) can do nothing for now.
Add a TODO comment in the body of each stub and placeholder — this places a blue marker in the right margin of the editor window, making it easier to locate any methods that haven't been implemented yet. Remove the TODO comment when the method is implemented.
Testing notifications (S3). A fake listener implements the listener interface but prints a message when it is notified instead of doing real work. The JUnit test should register the listener, call the notification method, and check that the listener was notified, then it should remove the listener, call the notification method again, and check that the listener was no longer notified.
Application subclass (S4). The Application subclass goes in the app package. start() creates a default game (two players, standard rules) and shows the main game window, laid out as in your A2 design. So that the slices don't need to edit the same part of start(), create separate helper methods (such as createBoardArea) for different parts of the window and call them from start(). For now these create methods should just return a simple placeholder node — an empty pane or a label such as "board goes here".
Slice 1: setup and game status
| # | Task |
|---|---|
| 1.1 | Model: creating a game
|
| 1.2 | Model: starting and ending games
|
| 1.3 | Game setup UI
|
| 1.4 | Game status UI
|
| 1.5 | Accessibility for the setup and game status views
and the controls outside the board (teams of three)
|
Task details and notes:
Reusing P1 code (1.1, 1.2). The P1 classes that could be used as is were moved into the model in S2. What's left in p1 may still have useful parts that are mixed in with console input and output or are just organized differently from your B1 design. When you implement a model method, look there first — copy the parts you can use and adapt them rather than rewriting working logic from scratch.
P1 tests (1.1, 1.2). P1 tests for classes that moved into the model as is came along with them and should still pass. For code you salvage from p1, bring over the P1 tests that still apply, adapting them to the new methods. Write new tests for what the B1 design adds or changes. P1 tests that worked through console input don't carry over; replace them with tests of the new methods.
Notifications (1.1, 1.2). Make sure the listeners are notified whenever there are changes to the game state — including in methods brought over from P1.
Message methods (1.3, 1.4). If a view you're building provides any of the view methods the controllers call to show the player a message (B1), replace their placeholder bodies from S4 as part of building the view.
Editable spinners (1.3). If your setup uses an editable Spinner, a typed value isn't taken until Enter is pressed. A player who types a number and then clicks to start the game gets the old value with no sign that anything went wrong.
Game status UI (1.4). Until slice 2's turn steps (2.1) are merged, the model's methods for the steps of a turn are stubs returning fixed values. Check that the game status UI is right for the state the stubs report and then test it fully once 2.1 is merged.
Slice 2: turns and the board
| # | Task |
|---|---|
| 2.1 | Model: the steps of a turn
|
| 2.2 | Model: legality queries
|
| 2.3 | Board view
|
| 2.4 | Board interaction
|
| 2.5 | Game controller
|
Task details and notes:
Reusing P1 code (2.1, 2.2). Look in p1 first and adapt what you can rather than rewriting working logic from scratch. The P1 turn code is the least likely to copy over as is, since it reads input as it goes, but the logic for each step usually can be reused.
Testing turns (2.1, 2.2). Games use random dice, but tests need to know what will be rolled. You'll need a way to give a game a die with known rolls for testing. If your P1 has die classes for testing, use them. P1 tests that worked through console input don't carry over; replace them with tests of the new methods.
Board view (2.3). Until 2.1 is merged, the board view will only show the hedgehogs the stubs report. Check that it is right for that state, then test it fully once 2.1 is merged.
Message methods (2.3). If the board view provides any of the view methods the controllers call to show the player a message (B1), replace their placeholder bodies from S4 as part of building the view.
Gesture state (2.4). If a gesture takes more than one step, such as picking a hedgehog and then where it goes, keep the in-between state (which hedgehog is picked) in the UI, not in the model.
Clicks and drags (2.4). If you use dragging for one kind of move and clicking for another on the same squares, note that a click event still fires after a short drag. MouseEvent.isStillSincePress() tells you whether the mouse moved since it was pressed.
Slice 3: console version and keyboard play (teams of three)
| # | Task |
|---|---|
| 3.1 | Console view: output
|
| 3.2 | Console view: input and main
|
| 3.3 | Board accessibility: keyboard focus, highlighting
and accessible text
|
| 3.4 | Keyboard moves on the board
|
Task details and notes:
Testing against stubs (3.1, 3.2, 3.4). Until the slice 1 and slice 2 model tasks are merged, the console version and the keyboard moves will only see what the stubs report and do. Check that they are right for that state; playing complete games comes in I2.
Reusing P1 code (3.1, 3.2). P1's console code is a good place to start for printing the board and reading commands — but here it only prints and reads, with the rules left to the model.
Console input and main (3.2). Reading input is part of the console view, just as handling clicks and drags is part of the GUI view. Give the view a method with a loop that reads a command, parses it, and calls the controller method for that intention, until the player quits. main creates and connects the model, the controllers, and the console view, then calls that method to start reading commands.
Keeping focus (3.3). Keyboard focus belongs to a particular node. If the board view's refresh removes nodes and creates new ones instead of updating them in place and the node with focus is one of those removed, be sure to give focus to its replacement after the refresh.
Keyboard moves on the board (3.4). When the user makes a keyboard move, call the same controller methods as the mouse gestures (2.4) — the keyboard is just a different way of specifying the same actions.
Integration
| # | Task |
|---|---|
| I1 | Remove stubs and P1 code
|
| I2 | Play-testing and bug fixing
|
Task details and notes:
Resolving stubs (I1). Look for the TODO comments you added in S2 and S4; implement or remove leftover stubs and placeholders. If you didn't mark stubs with TODOs, check each model method against its task — stubs return values that look like a real game, so one that has been missed is easy to overlook in testing.
Cleaning up p1 (I1). Delete any code remaining in p1 that is no longer needed along with any P1 tests that haven't been carried over.
This is a team task. Do it as soon as B2 is finished so that there's time to make changes if you want to.
Run a hallway test as described in the Usability Evaluation section, with at least two of you there: one to give the tasks and one to take notes.
Record the results in docs/B3-hallway-test.txt:
Make changes (optional, extra credit). If you decide to make any of the proposed changes, create an issue in the "B MVC and GUI" milestone for each one and follow the usual process. These issues are outside the prescribed task split from B1 — any partner can own them or they can be pair programmed (joint). Record each change in docs/A2-design-changes.txt.
Handin. Create a tag B3-handin on main to mark the end of B3.
This is a team task.
Update the design document. Make sure docs/B-design.txt describes the code as it was built. Where the design changed from what you planned in B1, say what changed and why.
Reflect on the estimates. Add a brief reflection (a few sentences to a paragraph) to docs/B-plan.txt comparing the S/M/L estimates to the actual sizes recorded in the pull requests, as in P1. Where were you off, and did the discussion of differences in your estimates predict it?
Check the records. Make sure the team log is up to date, docs/A2-design-changes.txt records any changes to the UI design, and every issue in the milestone is closed.
Handin. Create a tag B4-handin on main to mark the end of B4 and Part B.
In Part C, you'll add a "suggest a move" hint feature to the game. The hint generator logic itself is provided; the work in this part focuses on the UI-related elements of the hint feature. Read through this whole part (sections marked with "[C]" in the heading) to get an overview of what you'll be doing, then work through the three tasks in the Tasks section.
Asking for a hint. The current player can ask for a suggested move for their turn: which hedgehog to sidestep, if any, and which hedgehog to move forward. The hint is a whole-turn suggestion (both sidestep and forward move) based on the player's roll — it doesn't offer suggestions for sidesteps or forward moves separately.
Variants. Hints are supported for every variant except Fizzy Lifting (and not supported for Fizzy Lifting). (The problem with Fizzy Lifting is that the hint generator never suggests a lift.)
Responsiveness. The GUI should stay responsive while the hint is running.
Cancelling. A hint in progress can be cancelled and a hint that no longer applies is never shown.
Robustness. If computing a hint fails, the player is told, and the program keeps working.
Computer player. (required for the team of three; optional (extra credit) for pairs) When setting up a game, each player can be a person or the computer. The computer chooses its moves with the same hint generator, and the same properties apply to the computer player as to the hint: the GUI should stay responsive while the computer player is taking their turn and a move that no longer applies (e.g. because a new game was started) is never shown.
The parts of the UI the hint adds or changes are held to the same design principles as the rest of the GUI (see the Part A specifications). Feedback and visible state matter particularly here: the player should be able to tell that a hint is being computed and how far along it is and why a hint (or any other control) isn't available.
Provided code. The provided classes go in their own package, hint. Don't change them.
Use an adapter. Create a small class to implement HintableGame rather than having the model's entry-point class implement the interface directly. The adapter handles any differences between your model and the interface, such as how tracks and columns are numbered or when the roll happens. (If it turns out that the adapter does nothing but call model methods with the same names, you can drop it and have the model implement HintableGame directly.) Like the rest of the model, the adapter has no JavaFX imports.
Generators. Write your code in terms of the HintGenerator interface, so that switching between the stub and the real generator is a one-line change.
The hint generator code is available in /classes/cs329/hedgehogs/hint. Import the classes into your project, making sure they end up in the hint package within your project's src folder.
Each class's comments have the details; in brief:
HintableGame: the interface the generator uses to play simulated games. Your adapter implements it. Its methods report the board size, the current player and their roll; check and make sidesteps and forward moves (or apply the rule for when no forward move is possible); end the turn; make a copy of the game; and report whether the game is over and who won. Read its comments carefully, particularly about coordinates, the order of calls in a turn, and what a copy must do.
HintGenerator: the interface for something that suggests a turn. Its one method, suggest, takes a HintableGame and a ProgressListener and returns a Hint. suggest stops early and throws an InterruptedException if the thread running it is interrupted. (This happens when a Task is cancelled, for example.)
MonteCarloHintGenerator: computes real hints. The number of simulated games per hint can be set: more games per hint gives better hints but takes longer; fewer games per hint gives faster, weaker hints (handy for testing). The default setting is intended take a few seconds (enough to test GUI responsiveness and cancellation features); adjust as needed if things are running too fast or taking to long.
HintGeneratorStub: delivers a fixed hint (ignoring the game) while simulating the time it takes for a real hint to be computed (and reporting progress as it goes). It can also be set to fail partway through, so that you can check how your program handles a hint that fails. Use this instead of the real hint generator to develop the hint task before the adapter is done.
Hint: a suggested turn, which is an optional sidestep and a forward move. A hint may have just a sidestep (or no move at all) when no forward move is possible.
ProgressListener: receives the generator's progress reports, on the generator's thread. In a Task, pass them on to updateProgress or updateMessage.
HintableGameTest: JUnit tests for your adapter. All you need to do to use the tests is write a subclass that implements createGame(), as described in its comments.
How the generator works. For each possible turn, the generator plays many games to the end from the resulting position, making random moves for every player. It then suggests the turn that won most often for the current player. This is called Monte Carlo evaluation. More simulated games give a more accurate estimate, so time trades directly for quality. Assuming that everyone plays randomly for the rest of the game may sound hopelessly naive, but in games driven largely by chance, such as a dice race like Hedgehogs in a Hurry, this technique does surprisingly well. Its weakness is strategy — simulating many games means it plays much better than random, but it won't match a player who deliberately uses their moves to hinder opponents’ hedgehogs and advance their own.
Coming soon!
Coming soon!
These are the end results your work is assessed against (see Assessment). Team code is assessed according to ownership.
Coming soon!
The team process is the same as in P1 (see the P1 Team Process), except as noted here.
Team kickoff and log. The kickoff is described in A0. Keep the team log as in P1, with an entry for each meeting (date, who attended, decisions, and open questions), starting with the kickoff. Also record the slice ownership decided in B1 and any later changes to it.
Labels. The new repository doesn't have the labels from P1. Before creating the issues in B1, create the size: S, size: M, size: L, and joint labels.
Planning. The tasks are given in the B1 task list, so you don't need to identify them yourselves. Effort estimation works (almost) as in P1: independent estimates on Canvas before comparing them, differences and their resolutions in the plan summary, and actual sizes in pull request descriptions.
Testing. Separate test plans aren't required in P2. Write the JUnit tests as part of each model task.
Ownership in Part B. The skeleton and integration are joint and each slice has one owner, as described in B1. The 40%-60% point split and the limit on joint tasks don't apply to Part B since the slices are prescribed. (They do apply to Part C.) Don't reassign a task to a different owner without checking with me first, and record any reassignment in the team log.
Pair programming. Credit your partner with Co-authored-by: as in P1. When you pair program on one computer and switch drivers, commits all come from one account, so also put the driver's name in each commit message (for example, "Driver: Alice").
Version control. Follow GitHub flow as in P1, except for the skeleton, which is built on one branch for all four tasks (see B2).
Pull request reviews aren't required in Part B. They'll be used in Part C.
An intention inventory lists what the user needs to do or find out along with what the UI needs to support for each. Writing it first — before any decisions are made about controls or layout — keeps the design focused on the user's goals and makes it easier to check that a design covers everything.
For each intention identified, record:
Some goals may be informational when that is something that the user would want to do for its own sake, such as checking how close each player is to winning. If the information is only part of fulfilling another goal, such as determining which track was rolled as part of moving a hedgehog forward, then it is "information needed" rather than a goal itself.
Also note that the inventory records what the user needs to know, not how the UI provides it: information the user needs to know might be shown directly or the user might work it out from what's shown and their knowledge of the rules. That's a design decision you make in your sketches.
Summarize the inventory in a table. For example, some intentions for Klondike solitaire:
| goal | information needed | when | what can go wrong | what changes |
|---|---|---|---|---|
| move the top waste card onto a tableau column | the waste card, the top card of each column, which columns it is legal to move the waste card to | the waste isn't empty and the game isn't over | the move isn't legal — nothing moves | the card is on the column it was moved to, the next waste card shows (or the waste is empty) |
| find out whether there are any moves left | whether the stock and the waste still have cards, the top card of the waste and of each foundation, the face-up cards in each tableau column | any time | the user may not realize the stock can be turned over again | nothing |
| start a new deal | whether the current game will be lost | any time | losing a game in progress by accident | a fresh deal (the old game is gone) |
Also think about what the P1 console version printed as the game went along: whose turn it is and what was rolled, why a move wasn't allowed, what a variant did (a hedgehog sliding back to the start, a push, a skipped forward move), and who won. The board alone doesn't show these, so each needs a place in your inventory and your design.
For Hedgehogs, be sure to cover every phase of using the program: setting up a game, each step of a turn, between turns, the end of a game, starting over, and quitting. Be sure to also include intentions specific to a particular rule variant that your P1 supports.
You'll evaluate the design three times: by walking through your own sketch on paper (A1), by walking through the team's adopted design on paper (A2), and by watching someone else use the finished GUI (B3). All three use the same tasks so you can see how the design changes between rounds and what each kind of evaluation finds.
Tasks. A task is something concrete a user would set out to do. Use the following tasks along with one or two of your own added to cover anything important in your intention inventory that would otherwise be missed:
Hallway test. Find someone from outside the class who hasn't seen your program (such as a friend or roommate). If they aren't familiar with how to play Hedgehogs in a Hurry, give them this rules summary — don't show them your program to explain the game! Give them a chance to ask any questions they may have about the rules and gameplay. They can also refer back to the summary as they play.
Once they understand the rules, begin the test: give them the same tasks as in the paper walkthroughs, one at a time, and ask them to think aloud as they do the task — what they are looking for and what they expect to happen. Don't help or explain the UI — let them try to figure things out on their own. If they get stuck for a while, make a note of it and then give a hint so they can keep going. Since the dice are random, if a particular situation that you want to test (such as a turn with no possible forward move) doesn't arise, just note that rather than trying to make it happen. What to record is described in B3.
Coming soon!
Coming soon!