| CPSC 424 | Computer Graphics | Fall 2025 |
This lab is the third of four "application labs" introducing Blender. The four Blender labs will be grouped together, counting as two (regular) labs.
This lab covers more advanced usage of Blender's lighting and materials.
Successful completion of this lab means that you can use these features of Blender:
Much of the material for this lab was originally written by David Eck.
This is an individual lab. You may get technical help from others, but the effort and ideas that go into producing solutions should be yours.
![]() You may not use AI for this assignment. (There
is no coding, and you should create your own scene.)
You may not use AI for this assignment. (There
is no coding, and you should create your own scene.)
Hand in your work by copying your ~/cs424/blender3 folder into your handin folder (/classes/cs424/handin/username, where username is your username).
Check that the result is that your files are contained in /classes/cs424/handin/username/blender3 — if not, fix it!
Copy the directory /classes/cs424/blender3 and its contents into your ~/cs424 directory.
Sections B.3 in the textbook should be your first stop for how-to-use-Blender questions for this lab. Note that the book covers Blender 2.93, but it should still be fairly accurate for Blender 3.0.1.
Additional resources:
Make sure you have read section B.4 in the text, as it contains essential information on using Blender. It is not a bad idea to make yourself a one-page quick reference sheet summarizing the various commands and operations.
Work with the provided scene scene-3.blend as described below.
Remember to set the 3D View to the "Rendered" view ("Z" key for the view style selector) or periodically generate a fully rendered scene (F12) to see the results of lighting and materials. Note: the provided scene is configured to use the Cycles render engine, which is slower to render but needed to see all of the lighting and materials effects. You may want to use Eevee instead if you are working in the "Rendered" view, just remember to switch back to Cycles occasionally to see the full effect. (The render engine setting is in the Render section of the Properties Editor.)
Set the emission color for the material for the three globes on pedestals and adjust the strength so the effect is visible but not overwhelming. (Look for "Emission" and "Emission Strength" options in the Materials Properties Editor, section B.1.4.)
Set a background image for the scene (section B.4.1). You may want to adjust the "Strength" to turn down the background's contribution to the scene's lighting so that it doesn't overwhelm things.
Several HDR images are available in /classes/cs424/hdr — you can open them directly from that folder. (These are large files, so please avoid copying them into your home directory or your handin folder on the Linux machines. "Automatically Pack Resources" has been turned on in the provided scene-3.blend so your handin will include everything needed.) You can also download a different background from polyhaven.com — choose the "4K" and "HDR" download options.
The rest of the tasks involve using the Shader Editor (section B.4.3). To access the Shader Editor, if you don't see the "Shader" or "Shading" button as described in the book, click on the "Add Workspace" button (a + sign following the list of workspace types to the right of the menubar at the very top edge of the window — if you don't see the + sign, try making the Blender window the full width of your screen) and choose General → Shading. (Choose "Default" from that same listing to go back to the default scene editing view.)
To edit the material for a particular object in the scene, click on the object in the 3D View to select it. If there is not already a material assigned to the object, you will need to either click the "New" button at the top of the Shader Editor or "Use Nodes" in the Material Properties Editor.
For "such as what is shown below" steps, you do not need to match the exact colors and settings shown in the example — the idea is to the use shaders shown, but you can pick your own colors and experiment with different settings.
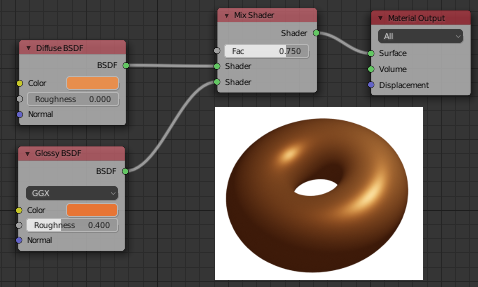
Create a material that mixes diffuse and glossy shaders, such as what is shown below, and apply it to one of the objects in the scene.
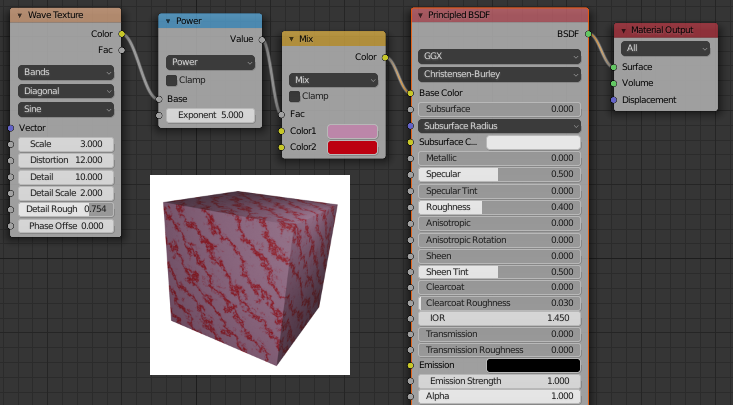
Create a material where a texture is used to control the mixing between two colors, such as what is shown below, and apply it to one of the objects in the scene.
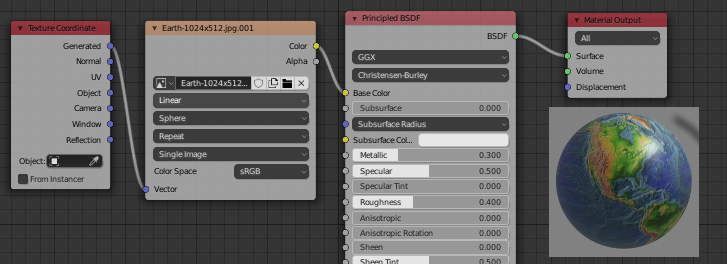
Create a material where a texture is used as the base color of the material, such as what is shown below, and apply it to one of the objects in the scene.
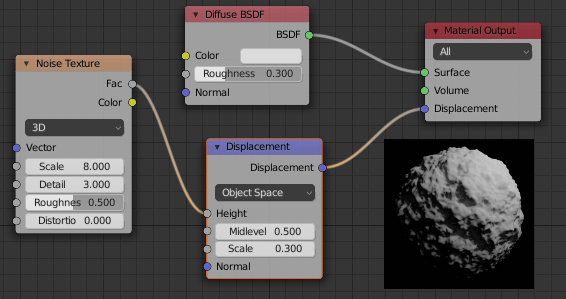
Create a material where a texture is used for displacement mapping, such as what is shown below, and apply it to one of the objects in the scene.
Create a highly reflective metallic material (section B.1.4) and apply it to one of the objects in the scene. Note that you don't need the Shader Editor for this, though you can create a Principled BSDF and edit its properties there instead of in the Material Properties Editor.
Create a transparent refractive material using a Refraction BSDF shader and apply it to one of the objects in the scene. The IOR (index of refraction) setting is actual index of refraction values (≥ 1) rather than the refraction ratio used in three.js. (This can also be done with a Principled BSDF instead, but the Refraction BSDF is simpler.)
For extra credit, create some interesting materials of your own and apply them to the rest of the objects in the scene.