CPSC 220, Fall 2018
Lab 9: First ARMv8 Programming
This week, we return to ARMv8 assembly language programming using the DS-5 IDE. The project folder for this week is /classes/cs220/For_ARM_IDE/lab9, so you will need to load that into your ARM workspace. (If you've forgotten how to do that, instructions are given below.) You could also download a .zip archive, lab9.zip, containing the entire project. You will edit the file lab9.S, and you will implement four functions that are used in main.c. You do not neet to make any changes to main.c.
This lab is due at lab next Thursday. You should just turn in a copy of the completed lab9.S file.
The Larc-in-Logisim project will not be collected until early Saturday morning. It should be completed and in your group folder by that time.
Importing and Running Lab 9
It has been a while since we used the DS-5 ARM IDE, so here are the instructions for importing and running the lab9 project. This is copied from Lab 4.
For each of the ARM assignments in this course, I will provide a DS-5 project as a starting point. You will need to begin work for the assignment by importing the project into DS-5. You can find DS-5 projects in the directory /classes/cs220/For_ARM_IDE. For this lab, you need to import the project named lab9 from that directory into your DS-5 workspace. (Note: Alternatively, you can get a .zip archive of the project through this link; unzip the file into a location that is not in the workspace directory.) To import the project:
- Right-click in the Project Explorer pane at the left of the DS-5 window.
- Select "Import..." from that menu.
- In the dialog box that pops up, click the triangle next to "General" to reveal the general import options, if they are not already visible.
- Click "Existing Projects into Workspace".
- Click "Next".
- Click "Browse" near the top of the window to "Select root directory".
- In the file browser window, click "File System" then browse to "classes" / "cs220" / "For_ARM_IDE" (or to the location of the downloaded project).
- Click the project directory, "lab9" in this case, and click "OK".
- Important: Make sure that the option "Copy projects into workspace" is selected.
- Click "Finish".
The project should appear in the Project Explorer pane. Click the triangle next to the project name to see the files that it contains.
A project must be "built" before it can be run. Building the project means compiling the individual files that contain the source code for the project and linking the components into a complete executable program. (Building is controlled by a "Makefile" which specifies how the project is to be built. Makefiles are commonly used for building C and C++ projects.)
To build the project, press Control-B, or select "Build All" from the "Project" menu. For the lab9 project, assuming that there are no errors, this will create files named main.o, lab9.o, and lab9.afx. These are, respectively, the compiled code from main.c, the compiled code from lab9.S, and the complete executable program.
Important: Whenever you make a change to one of the source files, in a project you should be sure to save the file and build the project. DS-5 does not automatically recompile files that have been modified. If you forget to build the project, you might find yourself running an old version of the program, even though you are looking at the new source code!
Because the program has been compiled for ARM, you can't actually run it on our computers. It has to be run on an ARM hardware simulator. In DS-5, the simulator runs under the Eclipse debugger. This means that you have to run the program by debugging it.
The projects that I will give to you include a ".launch" file. For the lab9 project, the launch file is named lab9.launch. To run the program in the debugger, you can right-click on lab9.launch in the Project Explorer pane, go to the "Debug As" submenu in the popup menu, and select "lab9". (After you have run the program once, it will also appear in the drop-down menu next to the little debug icon in the toolbar at the top of the window, and you can debug the program by selecting it from that menu.)
When the debugger starts, it will also start up the ARM hardware simulator and "connect" to it. This will take a little time. There's a lot of stuff in the debug perspective; you will certainly want to maximize the window.
The main controls for the debugger are in the "Debug Control" pane in the top left corner of the window. There are buttons for running the program and for stepping through the program line by line. "Step over" executes the current line in the program. "Step into" will step into the subroutine, if there is a subroutine call on the current line. "Step out" will run until the current subroutine returns:
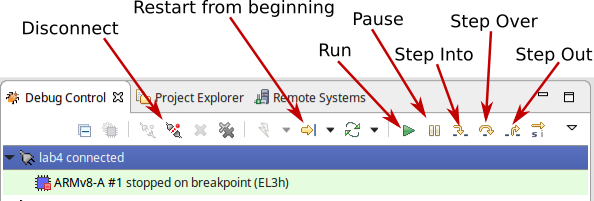
Note that you can add a breakpoint to the source code by double-clicking in the left margin next to a line of code. When the program is run using the Run button and it reaches a breakpoint, the execution will be paused. You can then step through the program from that point.
Before switching back to the usual "C" perspective, you will want to disconnect from the simulator by the clicking the "Disconnect" icon in the Debug Controls. If you forget, you will be asked to do so later. There are small icons for switching perspectives at the right end of the toolbar at the top of the DS-5 window. Just click the "C/C++" icon to get back to the perspective where you can edit and build your project. (But in fact, you could also edit and build right in the Debug perspective.)
The output from the program will go to the "Target Console" in the lower right corner of the DS-5 Debug Perspective. Just above that is a panel where you can see the disassembled machine code that is being executed. And above that is a panel where you can view the current values of program variables and ARM registers. To see, the usual ARM 64-bit registers in that panel, click the "Registers" tab, open the "AArch64" list by clicking the + sign next to "AArch64", and then under that, open the "Core" list.
After you have completed all of the assignments for this lab, the output from the program should look exactly as shown here, except possibly for the addresses of the original and copy arrays for the last function.
Testing dmax().
The max of -3.140000 and -2.780000 is -3.140000
The max of -3.140000 and -17.420000 is -17.420000

Testing riemann().
riemann(0,1,4) = -0.328125
riemann(1,3,1000) = -8.666666

Testing square().
The square of -3.140000 is -9.859600
The square of -2.170000 is -4.708900

Testing threeN().
The 3N+1 sequence starting from 3:
    3
    10
    5
    16
    8
    4
    2
    1

Testing acopy().
Orignal is at 0xfeffff98; copy is at 0x80049c40
The contents of the original and of the copy:
     -3.14      -3.14
   -2.7183    -2.7183
     -1.68      -1.68
        -0         -0
    -17.42     -17.42
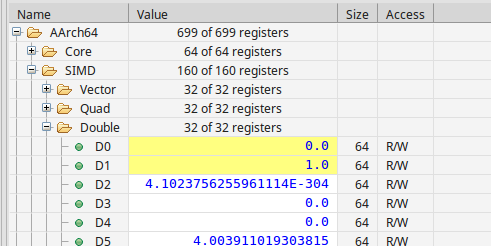
Note, by the way, that to see the contents of the D registers in the DS-5 debugger, you need to look in the set of registers labeled "SIMD" and then inside "Double":
Floating Point Numbers
We have seen that 64-bit floating point values (that is, values of type double) can be manipulated in ARMv8 assembly using the "D" registers. For a simple first assignment, you should implement the function
double dmax( double a, double b )
This function simply returns the larger of the two parameters. But note: It seems that the standard C function printf has a bug in DS-5! When printing a floating point number, it prints the negative of the number. Or maybe I am just missing something... In any case, when the answers are printed, you might see the negative of what you expect.
The second assignment is to implement the function riemann(). You don't need to understand the function; you just need to translate it into assembly language, but if you are interested, it approximates the area under the function f(x) = x*x from x=a to x=b, with a Riemann sum that uses the midpoint rule. Here is how the function could be written in C:
double riemann( double a, double b, long long int N) {
    double dx = (b - a) / N;
    double sum = 0.0;
    for (int i = 0; i < N ; i++) {
        double x = a + (i + 0.5)*dx;
        double y = x*x;
        sum = sum + y;
    }
    return sum * dx;
}
Calling Standard C Functions
It is possible to call C functions from an assembly language program. The usual rules for passing parameter values into the function and for getting the return value have to be followed. However, you have to remember that the function that you call can change the values that are stored in the registers. They could be values that you will need after the function returns. In particular, this applies to the return address, which is stored in register X30. So you need to do something about saving register values before calling the function and restoring their values after the function returns. Soon, we will see how to use the stack for saving register values. However, there is an easier way that you can use in this lab.
There is a rule that says that registers X19 through X28 and D8 through D15 should not be changed by calling a function; that is, their values after the function is called should be the same as their values before the function is called. They are referred to as "callee-saved registers." Standard functions in C will respect this rule, but you don't have to follow it for the simple functions that you are writing for this lab. (If you write a function that is meant to be called by other functions, then you should respect the rule.) This means that, for this lab, you can simply copy any register values that you want to save into the callee-saved registers before calling the function. After the function call, you can copy them back (or use them where they are). The return address must be copied back into register X30 before the RET instruction.
The function square(x) is already implemented in lab9.S. This function prints out a message of the form "The square of X is Y" where X is replaced by the parameter and Y is replaced by the square of X. To do this from C, you would just say:
double y = x*x;
printf( "The square of %f is %f\n", x, y );
But I wanted to call printf from assembly language. To do that, I first added an extern directive to the top of the file:
.extern printf
This is like import in Java or #include in C; it lets the assembler know that printf exists but is defined outside of the file. I needed to define the format string. That is done with an asciz directive, followed by a balign directive:
sqstr: .asciz "The square of %f is %f.\n"
     .balign 4
The balign directive here is important. The instructions in a program must "word-aligned." That is, every instruction has to be stored at a memory address that is a multiple of 4. The directive .balign 4 will add extra zero bytes, if necessary, to bring the address up to a multiple of 4, so that the machine language instructions that follow will be properly aligned. We need it here since the length of the string, including the zero character at the end, is not a multiple of 4.
The address of the string must be passed as the first parameter to printf, which means that it must be loaded into X0. That can be done with the instruction LDR =sqstr. The two numbers that are to be printed are of type double, so that must be in D0 and D1 when printf is called. (The first number is a parameter to the square function and so is already in D0.) And of course, we must be careful to save the return address and restore it after the function call. I use register X20 for that. So the entier function definition for square(x) is:
// square(x) prints x and its square

square:
    MOV X20, X30     // Save return address in X20
    FMUL D1, D0, D0  // Put square of D0 in D1
                     // (NOTE: D0 is already OK for the call to printf.)
    LDR X0, =sqstr   // Address of string in X0
    BL printf        // Call printf
    MOV X30, X20     // Restore return address to X30
    RET

sqstr: .asciz "The square of %f is %f.\n"
     .balign 4
For the third assignment for this lab, you should implement the function threeN(n), which prints out the 3N+1 sequence starting from n. The format of the output should be exactly as follows (for the case n equal to 3):
The 3N+1 sequence starting from 3:
    3
    10
    5
    16
    8
    4
    2
    1
Here is threeN as a C function:
void threeN( unsigned long long int N ) {
    printf("The 3N+1 sequence starting from %lld:\n", N) {
    while (true) {
        printf("    %lld\n", N);
        if ( N == 1 ) {
            break;
        }
        if ( N & 1 == 1) {
            N = 3*N + 1;
        }
        else {
            N = N/2;
        }
    }
}
For the fourth assignment, you should implement the function acopy(a,n), which creates a copy of array of double and returns the address of that new array. The first parameter to the function is the address of the original array. The second parameter is the length of the array. The new array has to be created on the heap. C does not have a new operator for creating things on the heap. Instead, it uses a standard function malloc. The malloc function takes one parameter, which is the size of the desired block of memory on the heap. Size is measured in bytes. The return value from malloc is the address of the new block of memory. In this case, the size of the block of memory has to be 8*n, since it will hold an array of n values of type double, and each double value takes up 8 bytes. You will need to make the malloc function available to the program with an extern directive. You will need to save the return address and any other important register values before calling malloc, and you will need to restore them after calling malloc. The return value from malloc is the address of the new array. You need to copy numbers from the original array into the new array, and then return the address of the new array as the return value of the acopy() function.