CPSC 225, Spring 2016
Lab 7: eCards (GUI Programming)
This week's lab is a GUI program that allows users to place images and text on a panel. Think of it as designing electronic greeting cards. You will learn something about implementing menus and mouse drags. You will use at least one standard dialog box. And you will get to implement a small class hierarchy with an abstract base class.
Start a new project named Lab7 and add the contents of the folder /classes/cs225/Lab7-files to the src folder. There is Java file ECardPanel.java where you will do all the work for the lab and another Java file JMenuRadioGroup.java that defines a class that you will need. There are also two folders of images that will be used as resources in the program. Be sure to add the files and folders to the src directory!
Optionally, you can work with a partner on this lab. If you work with a partner, you should turn in only one lab. Make sure that both names are listed at the top of ECardPanel.java. Labs submitted by a team should implement more features than labs submitted by individuals.
This lab is due next week. I will collect it Friday afternoon soon after the end of class.
Preliminary Notes
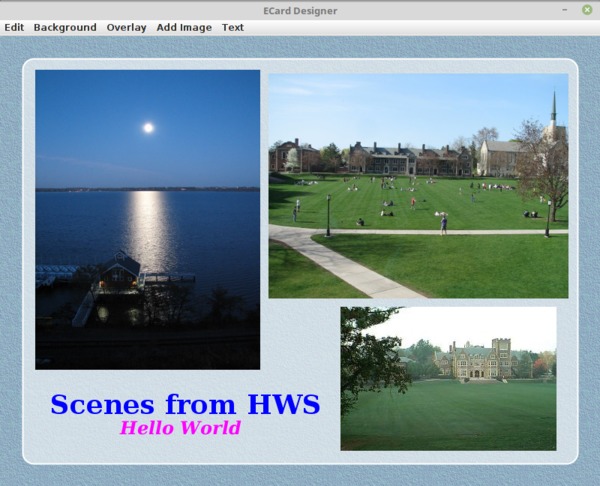
We will be working towards a program that lets the user select a background and place images and text on a panel. The program uses menus in a standard menu bar at the top of the window. It will not be possible for the user to save or open files, but we might add that in a future lab. Here is an "eCard" made using my version of the program:
The program ECardPanel.java already lets the user select a background for the panel, using a "Background" menu. But before I added that capability, I started with some basic GUI framework elements that you might be able to use later in the course or for your final project. If so, you can copy and paste them from this page. First of all, there is a main() routine that I have customized with the name of the panel class (ECardPanel) and the window title ("ECard Designer"):
public static void main(String[] args) {
    ECardPanel panel = new ECardPanel();
    JFrame window = new JFrame("ECard Designer");
    window.setContentPane(panel);
    window.setJMenuBar( panel.getMenuBar() );
    window.pack(); // Resize window based on content's preferred size
    window.setDefaultCloseOperation(JFrame.EXIT_ON_CLOSE);
    window.setResizable(false); // User can't change window size.
    window.setVisible(true);  // Open the window on the screen.
}
Note that the pack() method is called to set the size of the window. This requires that every item in the window have a "preferred size." The preferred size for the ECardPanel is set in the constructor for that class. Another option for the size is to set it based on the size of the window; you can see an example of that in the program for the previous lab. The main program calls a method panel.getMenuBar() to get the menu bar for the top of the window. Here is an outline for that method, along with an ActionListener class that can be used to respond to commands from the menus:
//--------------- Menu Handling ---------------------------------------

public JMenuBar getMenuBar() {
    JMenuBar menubar = new JMenuBar();
    MenuHandler listener = new MenuHandler();
    // TODO: create and add menus, adding listener to menu items
    return menubar;
}

private class MenuHandler implements ActionListener {
    public void actionPerformed(ActionEvent evt) {
        String command = evt.getActionCommand();
        // TODO: implement commands from menu items
    }
}
In getMenuBar(), the listener will be added to all of the menu commands that require it. The command in the menu handler will be the text from the command that was selected from the menu; it will be tested to determine which command to carry out.
Finally, there is a class to handle mouse drag actions. Mouse drags involve three methods: mousePressed(), mouseDragged(), and mouseReleased(). Since not every mouse press starts a drag, there is a boolean variable to keep track of whether a drag action is in progress. It is often useful to keep track of the previous location of the mouse from one call of mouseDragged() to the next. (Sometimes, you also need the starting location, but not in this program.) Here is an outline of a mouse handler class:
//--------------- Mouse Handler ---------------------------------------

private class MouseHandler extends MouseAdapter {
    boolean dragging = false;
    int prevX, prevY;  // Previous location of mouse.
    public void mousePressed(MouseEvent evt) {
        int x = evt.getX();
        int y = evt.getY();
        // TODO: test if this mouse event starts a mouse drag operation;
        //       if so, set dragging to true.
        if (dragging) {
            addMouseMotionListener(this);
            prevX = x;
            prevY = y;
        }

    }
    public void mouseReleased(MouseEvent evt) {
        if (dragging) {
            dragging = false;
            removeMouseMotionListener(this);
        }
    }
    public void mouseDragged(MouseEvent evt) {
        if (dragging) {
            int x = evt.getX();
            int y = evt.getY();
            // TODO:  Implement drag from (prevX,prevY) to (x,y)
            prevX = x;
            prevY = y;
        }
    }
}
An instance of this class is created in the ECardPanel constructor and is added as a MouseListener to the panel.
Adding Images
The program already has a Background menu for selecting the background of the panel. The background can be either a color or a texture. The currently selected background is stored in an instance variable named backgroundPaint of type Paint, and it is used in paintComponent() to fill the panel before anything else is drawn. (Both colors and textures are examples of "paints." I don't want to explain here how to use texture paints. See Section 13.2.4 if you are interested.)
Your first task is to add an "Add Image" menu to the program that will let the user add images to the panel. The available images are stored in the folder named "images", and there is already an array variable named imageFileNames that holds the list of file names for the images. (You are welcome to add images or replace the list of images entirely with images of your own. Just make sure that the images are small enough.) You can imitate what was done with the texture images to some extent, but here are some instructions...
A menu is represented by an object of type JMenu. The constructor specifies the text that will appear in the menu bar. For example,
JMenu imageMenu = new JMenu("Add Image");
The menu must be added to the menu bar:
menubar.add(imageMenu);
and menu items must be created and added to the menu. The menu items are of type JMenuItem (or one of its subclasses). The constructor for a JMenuItem specifies the text that appears in the menu. Often you will want to add an ActionListener to the menu item that will respond when the user selects the menu item from the menu. And the menu item must be added to a JMenu to appear in the menu. So, creating a menu item is often a three-step process. For example
JMenuItem item = new JMenuItem("Do Something");
item.addActionListener( listener );
menu.add(item);
In this case, the text of the items in the "Add Image" menu will be file names from the imageFileNames array. You should create the menu, create the menu items and add them to the menu, and add the menu to the menu bar.
Images are not like the background, since there can be more than one of them in the panel. There is already an ArrayList variable named items that is meant to hold the list of items that have been added to the window. But items are of two types, images and text. Items are represented by the abstract class ECardItem, which is defined at the bottom of ECardPanel.java. You need to create a concrete subclass of ECardItem to represent image items. Then, when the user selects one of the image file names from the "Add Image" menu, you can just create an image item, add it to the items list, and call repaint(), and the new item will appear in the panel. The command for drawing an image in a graphics context g is
g.drawImage(image, x, y, null);
where (x,y) gives the position of the upper left corner of the image. The ECardItem class already has instance variables x and y to represent the upper left corner of the item. The subclass will need an instance variable image of type BufferedImage for the image. So, in outline, the subclass looks like
private class ImageItem extends ECardItem {
    BufferedImage image;
    ImageItem( ... ) {
        // construct the ImageItem
    }
    void draw (Graphics2D g) {
       g.drawImage( image, x, y, null );
    }
}
Depending on how you do things, the parameter to the constructor could be either the image itself or the file name for the image.
You will need to add code to the actionPerformed() method in MenuHandler to create the image item and add it to the list of items. Either there or in the ImageItem constructor, you will need to load the image from the file. The image files are "resources" in the program. That is, they are part of the program itself. The technique for loading an image from a resource file uses a "class loader" and a "toolkit". The code that you need for loading a file with name filename from the image folder in the program is:
ClassLoader cl = getClass().getClassLoader();
BufferedImage image = ImageIO.read(cl.getResource("images/" + filename) );
This code can throw various exceptions, but they won't happen as long as the file named filename is present in the images folder.
You should create the class ImageItem and add code to actionPerformed() to carry out a command from the "Add Images" menu. Don't forget to call repaint.
Dragging Items
Unless your constructor places an image at a different position, images will be added to the panel at the upper left corner of the panel, with x = y = 0. You want the user to be able to drag items into position. You can implement that in the MouseHandler class. Note that the user can drag all kinds of items, not just image items.
When the user clicks an item, first of all that item should be brought to the front. You can implement that by removing the item from the items ArrayList and then immediately adding it back in (at the end). Note that it is possible that the user's mouse click doesn't hit any item; in that case, no drag operation is started. You might want to add an instance variable to keep track of which item is being dragged (but it will, in any case, be the last item in the ArrayList).
When a drag action is in progress, as the user drags the mouse, the item should move along with the mouse. You just have to move the item by the same amount as the mouse has moved. In mouseDragged, the change in position of the mouse can be computed as
int dx = x - prevX;
int dy = y - prevY;
These have to be added to the position of the dragged item. (Don't forget to repaint.)
The only real difficulty is to determine which item the user has clicked. You need to go through the ArrayList and test whether each item was hit by the click. (Go through the list from the end back to the beginning, so that when one item is on top of another, you will find the top item first.) To make it easy to test for hits, you need to make some changes to the ECardItem and ImageItem classes. In addition to the position of the item, you need to know its size. I can see two ways to go here: Either you can add instance variables width and height to ECardItem to hold the size of the item, and use them when testing for hits. Or, you can add an abstract boolean-valued method hit(a,b) to ECardItem to test whether a click at (a,b) hits the item.
If you do the first, you have to make sure that the width and height of an ImageItem are set when the image item is created. If you do the latter, you will have to define the hit method in the ImageItem class. Note that the width and height of a BufferedImage can be obtained by calling image.getWidth() and image.getHeight().
You should implement item dragging, as discussed here. For more on dragging and mouse events, see Section 6.3.4.
A Background Overlay Menu
In addition to plain menu items, you can have checkboxes and radio buttons in a menu. Checkboxes in menu items are represented by objects of type JCheckboxMenuItem, and radio buttons by items of type JRadioButtonMenuItem. Radio buttons always occur in a group, and at most one item in the group can be selected. Unfortunately, Java doesn't make it very easy to manage a group of radio buttons. Fortunately, I have written a class for managing a group of radio buttons in a menu. The file that defines the class, JMenuRadioGroup.java, should already be in your project.
As an example, you will add a "background overlay" menu to the program. The overlay is a large roundrect that covers most of the background. The overlay is optional, and it can, optionally, be translucent. To decide whether to draw the overlay and whether to make it translucent, add two JCheckboxMenuItem instance variables to the ECardPanel class:
private JCheckBoxMenuItem useOverlay, translucentOverlay;
The items can be created and added to a menu in the getMenuBar() method. For example, for the useOverlay checkbox:
useOverlay = new JCheckBoxMenuItem("Use Background Overlay", false);
useOverlay.addActionListener( listener );
overlayMenu.add(useOverlay);
It is not necessary to add more code to the MenuHandler class, since that class only needs to repaint the panel when the user selects an overlay command, and it is already programmed to do that.
You also want to be able to set the color of the overlay. For that, it's nice to use a radio button group. Add an instance variable of type JMenuRadioGroup to ECardPanel:
private JMenuRadioGroup overlayColorGroup;
A JMenuRadioGroup is constructed from an array of String giving the text for the items in the group and from an integer giving the index of the initially selected item. You can create the radio group in getMenuBar() with, for example,
overlayColorGroup = new JMenuRadioGroup( colorNames, 0 );
where colorNames is an array of String containing the names of the available colors. You should check JMenuRadioGroup.java to find out how to add the listener to the items and how to add the items to the menu. Assuming that you also have an array of Color named colors that holds the actual colors corresponding to the names in the colorNames array, then you can complete the implementation of the "Overlay" menu by adding the following code to paintComponent(), just after the background is drawn:
if ( useOverlay.isSelected() ) {
    Color color = colors[ overlayColorGroup.getSelectedIndex() ];
    if ( translucentOverlay.isSelected() )
        g2.setColor( new Color(color.getRed(),
                            color.getGreen(), color.getBlue(), 150) );
    else
        g2.setColor(color);
    g2.fillRoundRect(30, 30, getWidth()-60, getHeight()-60, 30, 30);
    g2.setColor(color);
    g2.setStroke( new BasicStroke(2));
    g2.drawRoundRect(30, 30, getWidth()-60, getHeight()-60, 30, 30);
}
You should complete the implementation of the background overlay. If you want to know more about checkboxes and radio buttons, see Sections 6.5.3, 6.7.1, and 13.3.3.
Adding Text
The main original part of the lab is to design and implement text items. A text item consists of a single line of text. It can have properties such as font, style, size, and color. You will need a subclass of ECardItem to represent text items.
If you are working alone on the lab, I suggest that you have a small selection of possible fonts. You can create the fonts as discussed in Section 6.2.3 and the RandomStringsPanel example in Section 6.2.6. You can have a menu item, such as "Add Big Bold Text...", for each font. To carry out the command, you need a way for the user to enter a line of text. Java has several standard dialog boxes, defined in the class JOptionPane. One of them can be used for inputting a string:
String input = JOptionPane.showInputDialog(component, prompt);
The component is the parent component of the dialog box. It can be this or, if you call the method inside the MenuHandler class, ECardPanel.this. The prompt is the question displayed to the user. If the user cancels the dialog, then the return value is null. If it is not null, then it is the string entered by the user. For more about input and other standard dialog boxes, see Section 6.7.2.
You will also need to know how to "measure" text, that is, find out its width and height. This is discussed in Section 13.2.1. Basically, you need to get a FontMetrics object for the font in which the text will be drawn. The FontMetrics object has a method stringWidth(str) for finding the width of a string and getAscent() for the height (ignoring descenders). It looks like this:
FontMetrics metrics = getFontMetrics(font);
width = metrics.stringWidth(text);
height = metrics.getAscent();
Draw the text with g.drawString(text,bx,by). Note that (bx,by) gives the coordinates of the left end of the baseline of the string. In the text item class, bx is just x, but by is y+height (where x and y are the coordinates of the upper left corner of the item).
You can draw the text items in black, or you can provide a way to select the color. If you are working in a team, you should certainly provide more options for text items. You can see what I did in my sample solution, which you can find in the executable jar file /classes/cs225/ECardComplete.jar.