CPSC 324, Fall 2002
Lab 7: Blender Animation
THIS LAB INTRODUCES ANIMATION techniques in Blender. You will learn how to animate objects, including lights and cameras, and how to save your animations. Several sample Blender files that use animation are available in the folder named lab7-examples in the directory /home/cs324 under Linux and also in the cpsc324 folder on the "N" drive on the Windows network. The file stage2.blend is the same stage setting we used in a previous lab, with some added materials. It does not contain an animation, but you might want to use it while you are practicing some of the animation techniques described in this lab.
![]() Blender is designed to do animations. When working with animations, you see only
one frame at a time in the World Window. Frames are numbered 1, 2, 3, ...
Which frame is visible is controlled by the frames button, as shown at right, which just
displays the current frame number. It can be found at the top-right end of the
buttons window. You can change the current frame with the arrow keys.
The left and right arrow keys move to the previous or to the next frame.
The up and down arrow keys increment and decrement the frame number by 10.
Shift-left-arrow will return you to frame one. You can also click-and-drag
on the frames button to change the frame. And, perhaps most conveniently,
you chan shift-click the frames button if you want to type in a particular
frame number. If you hit ALT-A while the World Window is selected,
the frames will be played in sequence until you hit ESC.
Blender is designed to do animations. When working with animations, you see only
one frame at a time in the World Window. Frames are numbered 1, 2, 3, ...
Which frame is visible is controlled by the frames button, as shown at right, which just
displays the current frame number. It can be found at the top-right end of the
buttons window. You can change the current frame with the arrow keys.
The left and right arrow keys move to the previous or to the next frame.
The up and down arrow keys increment and decrement the frame number by 10.
Shift-left-arrow will return you to frame one. You can also click-and-drag
on the frames button to change the frame. And, perhaps most conveniently,
you chan shift-click the frames button if you want to type in a particular
frame number. If you hit ALT-A while the World Window is selected,
the frames will be played in sequence until you hit ESC.
Animating Objects
 To animate an object, you just have to assign it different positions,
sizes, and/or rotations in different frames. You don't have to assign
a separate value for each frame. If you assign a value for frame number 1
and frame number 30, for example, Blender will interpolate values
for frames 2 through 29. A frame to which you explicitely assign values
is called a key frame, and animation that uses key frames is
called key frame animation. You can have as many key frames as
you want, and each animated object can use different key frames if you want.
To animate an object, you just have to assign it different positions,
sizes, and/or rotations in different frames. You don't have to assign
a separate value for each frame. If you assign a value for frame number 1
and frame number 30, for example, Blender will interpolate values
for frames 2 through 29. A frame to which you explicitely assign values
is called a key frame, and animation that uses key frames is
called key frame animation. You can have as many key frames as
you want, and each animated object can use different key frames if you want.
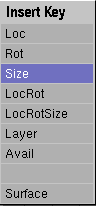
To set up a key frame for an object, go to that frame, using the "frames button" that was mentioned above. Set up the object's size, position, and rotation as you want it to appear in that frame. Then hit the "I" key. (The "I" stands for "insert key frame.") You will see the pop-up dialog shown at the right. Just click on the type of data you want to animate. If you are just animating the size of the object, click "Size." If you are animating size, position, and orientation, click "LocRotSize." The bottom entry in the menu is for animating the shape of an object in edit mode. The "Layer" entry can be used to make an object appear or disappear by moving it from one layer to another (assuming that one of those layers is not turned on).
To have an animation, you need at least two key frames, so go to a different frame, move or otherwise change the object, and use the "I" key again to insert another key frame. Once you've done this, you can use the arrow keys to move from frame to frame. You should see the object's animation. If you want more key frames, just repeat the process.
Warning: Once an object has been animated, it gets is transformation from the animation data. This transformation is applied every time the frame number is changed. You might change the object in one frame, but the change will not be permanent unless you use the "I" key to insert new animation data. In particular, if you are setting up an animation, don't forget to hit the "I" key before changing the frame number!
You can animate cameras and lights in the same way
as any other objects. If you are animating the camera, you will want to
preview the animation in the camera view (Keypad-0).
Animated Materials
 You can also animate material properties of objects. To do this, go to the
desired key frame, select
an object, make sure the Material Buttons are selected (F5), and point
the mouse at the Material Buttons Window. Hit the "I" key. With the mouse
over the Material Buttons, you will get a different Insert Key menu, as
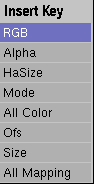
shown to the right. To animate the color of an object, select "RGB" from
this menu. The "Alpha" entry allows you to animate the degree of
transparency of the object. (The alpha value of an object can be set
using the slider named "Alpha" in the Materials Buttons -- but note that
you also have to turn on the option named "ZTransp" for transparency
to work properly. The "ZTransp" option button can be found just to the
right of the "Alpha" slider.) The remaining entries animate more advanced
features of materials and textures that we might return to in a later lab.
You can also animate material properties of objects. To do this, go to the
desired key frame, select
an object, make sure the Material Buttons are selected (F5), and point
the mouse at the Material Buttons Window. Hit the "I" key. With the mouse
over the Material Buttons, you will get a different Insert Key menu, as
shown to the right. To animate the color of an object, select "RGB" from
this menu. The "Alpha" entry allows you to animate the degree of
transparency of the object. (The alpha value of an object can be set
using the slider named "Alpha" in the Materials Buttons -- but note that
you also have to turn on the option named "ZTransp" for transparency
to work properly. The "ZTransp" option button can be found just to the
right of the "Alpha" slider.) The remaining entries animate more advanced
features of materials and textures that we might return to in a later lab.
Of course, to get an animation, you still have to go to another frame, change the object's material properties, and insert a new materials key. To preview a color animation, use the "Z" key to switch from wireframe mode to shaded mode in the World Window.
You can animate the brightness or color of a light in a similar way:
Select the light, activate the Lamp Buttons (F4), point to the Lamp
Buttons with the mouse, and hit the "I" key.
Tracking and Animation
I mentioned tracking in the previous lab. You can make a spotlight or a camera track an object. (Briefly: Right-click the light or camera; shift-right-click the object; hit CONTROL-T and confirm that you want to track; if the light or camera does not point directly at the object, right-click the light or camera, hit ALT-R, and confirm that you want to clear the rotation.)
 Tracking can be an effective way to do animation. For example, you can make the
camera pan across a scene, as is done in the little animation at left.
Or you can make a spotlight that will always shine directly on a moving object.
Often, it is best to make a camera or spotlight track an "empty object"
which will not be visible when the scene is rendered. To add an empty
object to a scene, use the "Empty" command in the "Add" menu. The empty
object appears as a set of axes. You can animate the empty object -- for example
to make it move across the scene. If a camera is tracking the empty,
its view will pan across the scene. I did this in the sample file
hws.blend, which was used to make the little HWS animation.
Tracking can be an effective way to do animation. For example, you can make the
camera pan across a scene, as is done in the little animation at left.
Or you can make a spotlight that will always shine directly on a moving object.
Often, it is best to make a camera or spotlight track an "empty object"
which will not be visible when the scene is rendered. To add an empty
object to a scene, use the "Empty" command in the "Add" menu. The empty
object appears as a set of axes. You can animate the empty object -- for example
to make it move across the scene. If a camera is tracking the empty,
its view will pan across the scene. I did this in the sample file
hws.blend, which was used to make the little HWS animation.
IPO Curves
![]() A value that has been animated can be visualized as a curve that plots
the value as a function of frame number. Such curves are called IPO curves (InterPOlation curves) in Blender.
Blender has a type of window called an IPO Window for displaying and editing IPO curves.
To see an IPO window, find the label "SCR:screen.001" at the top of the screen, next to the menu bar.
There is a small menu button, with a little white rectangle, next to the label. Select
"screen" from this menu. This will add an IPO window to the right side of the screen.
(Blender's screen is actually highly configurable. You can split and join windows
and change the type of a window. Ask how to do this, if you want. The "SCR" menu button allows you
to select from pre-configured screens and to add new screen configurations. No matter which
screen is selected, you are looking at the same 3D world. (The "SCE" menu button next to the
"SCR" button lets you have more than one world in the same project file.))
A value that has been animated can be visualized as a curve that plots
the value as a function of frame number. Such curves are called IPO curves (InterPOlation curves) in Blender.
Blender has a type of window called an IPO Window for displaying and editing IPO curves.
To see an IPO window, find the label "SCR:screen.001" at the top of the screen, next to the menu bar.
There is a small menu button, with a little white rectangle, next to the label. Select
"screen" from this menu. This will add an IPO window to the right side of the screen.
(Blender's screen is actually highly configurable. You can split and join windows
and change the type of a window. Ask how to do this, if you want. The "SCR" menu button allows you
to select from pre-configured screens and to add new screen configurations. No matter which
screen is selected, you are looking at the same 3D world. (The "SCE" menu button next to the
"SCR" button lets you have more than one world in the same project file.))
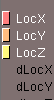 An IPO window shows the IPO curves only for the currently selected object.
Each curve has a name. The names are shown along the right
edge of the window. When you left-click a name, the corresponding curve becomes visible and
other curves are hidden. SHIFT-left-click to show multiple curves. (Initially, all the curves are
visible anyway -- the names of visible curves are shown in white.)
Next to each name is a colored rectangle. This shows the color of the curve.
The IPO curves are actually Bezier curves, and you can edit them. To edit a curve,
it must first be selected. You can select a curve by left-clicking the colored rectangle
or by right-clicking the curve itself. Use the SHIFT key to select multiple curves.
An IPO window shows the IPO curves only for the currently selected object.
Each curve has a name. The names are shown along the right
edge of the window. When you left-click a name, the corresponding curve becomes visible and
other curves are hidden. SHIFT-left-click to show multiple curves. (Initially, all the curves are
visible anyway -- the names of visible curves are shown in white.)
Next to each name is a colored rectangle. This shows the color of the curve.
The IPO curves are actually Bezier curves, and you can edit them. To edit a curve,
it must first be selected. You can select a curve by left-clicking the colored rectangle
or by right-clicking the curve itself. Use the SHIFT key to select multiple curves.
The usual editing features work in the IPO window. You can use the middle mouse button with the shift or control key to change the view, and you can move in and out with the Keypad + key and the Keypad - key. You can drag or scale a selected curve using the "G" key or "S" key as usual. To change the shape of a curve, the curve must be in edit mode. Hit TAB to put the selected curve in edit mode. You will see the Bezier curve control points and handles, and you can manipulate them in the usual way. There is a control point for each key frame. Remember that while you are in edit mode, you can only work with the selected curve. The Home key can be used to scale all the curves to just fit in the window.
By default, animation in Blender is smooth. When an object starts moving, it starts out slowly and speeds up, for example. Often, this is not the behavior you want. You can modify the animation to use sharp transitions by editing the IPO curves. Select the curve or curves, go into edit mode, and select the vertices that you want to modify. Hit the "V" key. This makes the vertex into a sharp rather than a smooth corner. Alternatively, you can hit the "H" key, which makes it possible to drag a corner independently, so that you can make a corner at the point.
![]() Towards the right end of the IPO window header, you will find four little buttons that determine
what happens to the IPO curves outside the range of frames for which you specified key values.
The first setting, which is the default, is that the value stays constant. That is, once
the animation passes the last key frame, the object stops changing. The button for this
option shows a horizontal arrow. The next button causes the curve to be extended in the direction that
it is heading at its endpoint. The third option is to repeat the same curve over and over. This
can be used to make cyclic animations. The
fourth option repeats the same shape over and over, but the shape will be moved vertically or
horizontally to make the endpoints match up. This could be used to make a spiraling motion,
for example. To
change the setting, select the curve or curves that you want to modify, and hit the appropriate
button.
Towards the right end of the IPO window header, you will find four little buttons that determine
what happens to the IPO curves outside the range of frames for which you specified key values.
The first setting, which is the default, is that the value stays constant. That is, once
the animation passes the last key frame, the object stops changing. The button for this
option shows a horizontal arrow. The next button causes the curve to be extended in the direction that
it is heading at its endpoint. The third option is to repeat the same curve over and over. This
can be used to make cyclic animations. The
fourth option repeats the same shape over and over, but the shape will be moved vertically or
horizontally to make the endpoints match up. This could be used to make a spiraling motion,
for example. To
change the setting, select the curve or curves that you want to modify, and hit the appropriate
button.
Path Animation
It's possible to make an object move along a curve. A curve used in this way is called a "path" in blender, and the technique is called path animation. You can make a Bezier curve into a path. To do this, select the curve, go to the Animation Buttons (F7), and turn on the "CurvePath" option. One way to get circular motion is to make an object move along a Bezier circle. There is also a special type of object called a Path that can be used for path animation. To add a Path to a scene, use Add/Curve/Path. The path has control points that can be used to adjust the shape of the path. A Path object comes with the "CurvePath" option already turned on.
An object will follow a path if the path is set to be the "parent" of the object. To make one object the parent of another, select the child object by right-clicking it, then shift-right-click the parent object (the curve in this case), and hit CONTROL-P. You will be asked to confirm that you want to make a parent. You can clear a parent relationship by selecting the child object and hitting ALT-P. Parenting is used for other operations besides path animation. For parenting to a path, this might not be exactly what you want: The object will follow the shape of the curve as the animation is played, but it will not actually be on the curve. You can easily drag it into position on the curve. Alternatively, you could use SHIFT-CONTROL-P instead of CONTROL-P to parent the object to the curve. You will be asked to confirm that you want to "Make parent without inverse." This will make the object jump to the curve.
Try it. Add a Path object to the scene. Before leaving edit mode, drag some of its control points around to change its shape. Then hit TAB to leave edit mode. Add a cube to the scene and parent it to the curve. (Right-click the cube, then SHIFT-right-click the curve, in that order, then hit SHIFT-CTRL-P and confirm that you want to make a parent.) Hit the arrow keys to change the frame number and you will see that the cube moves. If you select the path, go to the Animation Buttons, and turn on the "CurveFollow" option, then the cube will get its orientation from the path. As it follows the path, it will rotate so that it is always facing along the direction of the path. (If you have applied a rotation to the cube, that rotation will be added to the rotation it gets from the path. You can clear the cube's built-in rotation by selecting it and hitting ALT-R.)
You can apply path animation to a camera. Parent the camera to the path using SHIFT-CTRL-P, and the camera will follow the path. This technique can be used to make "fly-through" animations. It's possible that you want the camera to point in the direction of the curve: Just select the curve, and turn on the "CurveFollow" option in the Animation Buttons. For a fly-through you will probably want to clear the camera's built in rotation so that it points straight ahead along the curve: Select the camera, and hit ALT-R. You could use the same technique to make an airplane fly along a path. This technique is used in the sample file flythrough.blend. On the other hand, you might want the camera to move along the path but to track another object. There is nothing to stop you from applying both tracking and path animation to the camera. This is done in the file bounce.blend.
The length of the path -- the number of frames that it takes for an object to move
along the path -- is set for a Bezier curve using the "PathLen:" button, which you will
find next to the "CurvePath" toggle in the Animation Buttons.
However, the motion of the object along a path can also be controlled by an IPO curve
called a "speed IPO". If the curve has a speed IPO, then the PathLen button is ignored.
A "Path" object comes already set up with a speed IPO. (It also has a
"3D" toggle turned on in the Edit buttons, which allows you to shape it in three dimensions
instead of just in a plane, by the way.) To see the speed IPO
in the IPO window, you have to select the curve and set the IPO window to show Animation IPO's
(by clicking on the squiggly arrow icon at the bottom of the window:
![]() ). You can edit this IPO curve just
like any other. For example, you can make it cyclic, you can scale it, and
you can make its handles into sharp corners. Blender's Path object is a NURBS curve,
which means that the curve doesn't necessarily pass through its control points. It's
supposed to give very fluid motion. I used a Path object in my fly-through animation,
but I deleted its speed IPO so that I could set the path length to 300 in the "PathLen"
button.
). You can edit this IPO curve just
like any other. For example, you can make it cyclic, you can scale it, and
you can make its handles into sharp corners. Blender's Path object is a NURBS curve,
which means that the curve doesn't necessarily pass through its control points. It's
supposed to give very fluid motion. I used a Path object in my fly-through animation,
but I deleted its speed IPO so that I could set the path length to 300 in the "PathLen"
button.
Vertex Animation
 So far, I have only talked about animating the transformations
that are applied to objects. It is also possible to animate the basic shape
of a mesh, surface, or curve. Recall that you can edit this shape by going
into edit mode and moving the points, control points, or handles that
define the shape. You can animate the shape by moving these points to different
positions in different key frames. It's a little touchy, though. The
trick is to move the points and insert a key frame in edit mode,
but then to leave edit mode before you move between frames.
So far, I have only talked about animating the transformations
that are applied to objects. It is also possible to animate the basic shape
of a mesh, surface, or curve. Recall that you can edit this shape by going
into edit mode and moving the points, control points, or handles that
define the shape. You can animate the shape by moving these points to different
positions in different key frames. It's a little touchy, though. The
trick is to move the points and insert a key frame in edit mode,
but then to leave edit mode before you move between frames.
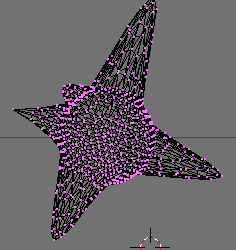
Try adding an object to a scene. Insert a key frame with the "I" key. Select the command at the bottom of the pop-up menu -- it will say "Mesh" for a mesh object, "Curve" for a curve object, or "Surface" for a surface object. Now, leave edit mode. Change to another frame, and enter edit mode. Move some of the vertices, then hit the "I" key to insert another key frame. Leave edit mode and go to the next key frame, and so on. (If you move between frames while in edit mode, the object might just disappear -- I can't say why.) An example of this type of animation can be found in the sample file vertexanim.blend. The picture shows the object from this animation, in edit mode, in frame number 64.
(A note on moving points: In the default edit mode, if you grab a point and
move it, only that single point will move. You can change to a mode in which
nearby points are dragged along with the point. Blender calls this
"proportional editing". To turn it on, hit the little grid icon
( ![]() ),
at the bottom of the World Window. It is only visible in edit mode.
Alternatively, just hit the "O" key. When you turn on proportional
editing the grid icon changes to a group of three icons
(
),
at the bottom of the World Window. It is only visible in edit mode.
Alternatively, just hit the "O" key. When you turn on proportional
editing the grid icon changes to a group of three icons
( ![]() )
The two icons on the right determine whether the shape of the "bump" that
you make when you drag a point is pointed or rounded.)
)
The two icons on the right determine whether the shape of the "bump" that
you make when you drag a point is pointed or rounded.)
Saving an Animation
An animation can consist of a large number of frames, so you have to think about the disk space occupied by all those frames. Blender allows you to save animations in several different formats. One option is to save all the frames in separate files. This can be useful for further processing, but when you publish your animation, you want it all in one file. Blender can do this for you. If you want to use a format that is not provided by Blender, you can have it output separate frames and use another program to combine the frames into a single file. Blender can save animations in Microsoft's AVI format. It can make two types of AVI files: "AVI Raw" and "AVI Jpeg." AVI Raw files are uncompressed and are huge. You should avoid them. AVI Jpeg files use JPEG compression and are a more reasonable size. Unfortunately, only recent versions of Microsoft's Media Player can deal with AVI Jpeg.
 To save an animation in Blender, you must work in the World Buttons
(F10). The first thing to do is to set up a name for the file or files
that will contain the animation. This is done by filling in the label
at the upper right corner of the World Buttons. Click on this label
if you want to enter a new value. A "//" at the beginning of the
name refers to the current directory (that is, the directory from which
Blender was run). You could also enter a full path name.
If you want to create an AVI
file, for example, you might put "//myanim.avi" in this label.
If you are going to store the frames in separate files, it is advisable
to put the files in a subdirectory. Blender will use the name that
you specify and tack "0001", "0002", "0003", "0004",.... on to the
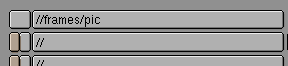
file names. For example, the setting "//frames/pic" shown here in the
example means that the frames will be stored in a subdirectory named
frames in the current directory and that the individual frame files
will be named "pic0001", "pic002", and so on. The other animation
controls are found on the right side of the World Buttons:
To save an animation in Blender, you must work in the World Buttons
(F10). The first thing to do is to set up a name for the file or files
that will contain the animation. This is done by filling in the label
at the upper right corner of the World Buttons. Click on this label
if you want to enter a new value. A "//" at the beginning of the
name refers to the current directory (that is, the directory from which
Blender was run). You could also enter a full path name.
If you want to create an AVI
file, for example, you might put "//myanim.avi" in this label.
If you are going to store the frames in separate files, it is advisable
to put the files in a subdirectory. Blender will use the name that
you specify and tack "0001", "0002", "0003", "0004",.... on to the
file names. For example, the setting "//frames/pic" shown here in the
example means that the frames will be stored in a subdirectory named
frames in the current directory and that the individual frame files
will be named "pic0001", "pic002", and so on. The other animation
controls are found on the right side of the World Buttons:
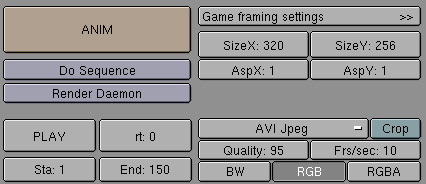
Near the middle of this picture is the pop-up menu that is used to select the format of the output. Here, it is set to "AVI Jpeg." If you want to save the frames in separate files, use plain "Jpeg" as the format. For an animation, you might want to turn down the "Quality" to reduce the image size. You can also set the number of frames per second for an AVI file using the "Frs/sec" button. The "SizeX" and "SizeY" buttons control the image size. The "Sta" and "End" buttons are used to set the starting and ending frame number for the animation. Here, with Sta set to 1 and End to 150, you will get an animation with 150 frames. (The Sta and End values also affect the preview animation that you see when you hit ALT-A in the World Window.) You might want to check the settings of some of the other World Buttons ("Shadows" and "OSA" at least -- and you might try the "MBlur" option, which turns on Motion Blur). When you have everything set up, click the ANIM button, and Blender will render the animation. When the rendering is done, you can get Blender to show you the finished animation by clicking on the "Play" button. The animation will play until you hit the ESCAPE key.
Here are links to AVI Jpeg animations produced in this way from the sample files bounce.blend and flythrough.blend:
bounce.avi (1.6 megabytes, 150 frames)
flythrough.avi (2.5 megabytes, 300 frames)
Clicking on these links should run the animation in recent versions of Internet Explorer. In Mozilla under Linux, you will get a dialog where you can choose to open the animation with xamin. You can also use the xanim command on the command line to open an AVI file, and you will find copies of the above AVI files in /home/cs324/samples_for_lab7.
Even using jpeg image compression, AVI files are large. You can get much higher compression -- but with poorer image quality of course -- by using MPEG movie files. MPEG generally only works well for animations in which the changes from one frame to the next are not very large. You do not have to use MPEG animations for the exercises in this lab, but you might want to keep the information around for future reference. Here is an MPEG version of the bounce animation:
bounce.mpg (118 megabytes, 150 frames)
As you can see, it's less than one-twelfth the size of the AVI version. You can play MPEG movies using the plaympeg command under Linux, and you will find a copy of bounce.mpg in /home/cs324/samples_for_lab7. The xanim program also plays MPEGs but very poorly.
Blender cannot save MPEG files. To make an MPEG, you should have Blender save the frames of the animation as individual Jpeg files. Then use the ppmtompeg command to make the MPEG. This command uses a "parameter file" to tell it what to do. You can find a sample parameter file named ppmtompeg.param in /home/cs324/samples_for_lab7. The parameter file specifies the input files and the output files. The sample parameter file looks for individual frames in JPEG files named "pic0001", "pic0002",... "pic0150" in a subdirectory named "frames" that is in the same directory as the parameter file. You can change these values by editing ppmtompeg.param. When you run the ppmtompeg command, give the name of the parameter file as a command line argument. For example: ppmtompeg ppmtompeg.param
 As a final alternative, you can consider using an animated GIF file. Remember that
GIF does not produce particularly small files unless you are talking about
simple, cartoon-like images or line drawings, so you only want to use GIF
with small images and with a small number of frames. The HWS animation shown
earlier on this page is only 15 frames long and is only 80-by-70 pixels in size,
but it still takes up 105 kilobytes. The tiny bounce animation in this
paragraph is 150 frames and is 602 kilobytes in size. (I would never use
any file this big on a Web page, except as an illustration of what not to do.)
As a final alternative, you can consider using an animated GIF file. Remember that
GIF does not produce particularly small files unless you are talking about
simple, cartoon-like images or line drawings, so you only want to use GIF
with small images and with a small number of frames. The HWS animation shown
earlier on this page is only 15 frames long and is only 80-by-70 pixels in size,
but it still takes up 105 kilobytes. The tiny bounce animation in this
paragraph is 150 frames and is 602 kilobytes in size. (I would never use
any file this big on a Web page, except as an illustration of what not to do.)
To make an animated GIF, save your animation in separate JPEG files, and use the convert command to combine them into an animated gif. the following command assumes that the files are named "pic0001", "pic0002", and so on, and that they are in the directory where the command is given:
convert -delay 5 pic0* bounce.gif
The option "-delay 5" tells convert to make an animation with 5 hundredths of a second between frames. (The HWS animation used 12 hundredths, or about 8 frames per second.) The name of the output file is the last thing on the command line, and it must end in ".gif". Be careful that this file does not already exist, or the convert command will add the frames onto the existing file. (The convert command is actually a very versital command for transforming images between various formats.)
Exercises
Exercise 1. Make a simple, short animation, such as an animation of rotating text. Create a small animated GIF of your animation and put it on your Web site. Also, please save a copy of the .blend file in the homework directory in your home directory, in case I want to test it.
Exercise 2. Make a longer, more interesting animation that uses either path animation or tracking or both. Create an AVI Jpeg animation file, and put a link to it on your Web site. Also, render two or three individual frames from the animation and post them on your web site. Finally, please save a copy of the .blend file in your homework directory.