CS 424: Computer Graphics, Fall 2013
Lab 11: More Advanced Three.js
In this lab, you will continue to work with three.js. Before beginning the lab, you need to be familiar with the material covered in Section 16 of the notes.
You will need copies of all the files from the directory /classes/cs424/lab11-files.
This lab and the next two labs are designed to be short enough that you can mostly finish them during the lab period. Remember that you should be spending time on your final project!
You should copy your work for this lab into your homework folder in /classes/cs424/homework by the beginning of the next lab. It should be in a folder named lab11 or something similar.
Exercise 1: Indexed Face Set
For the first exercise, you will make a textured mesh object directly by creating a THREE.Geometry object and adding the object's vertices, faces, and texture coordinates to the geometry. Here is the object. This house-shaped object is made of 7 quads and 2 triangles:
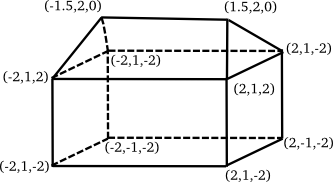
Start with the file IFS.html, which is a copy of the textured pyramid example program that was discussed in Section 16. Your job is simply to replace the pyramid data in that file with the data for the house. You should start by numbering the houses's vertices. Don't forget to list the face vertices in the correct order. You will have to decide what texture coordinates to use; whatever you decide, they should be reasonable.
Texturing doesn't work in IFS.html because the required texture image is not present. You should find a different texture file (not bricks!) to use on the house. You can use one of the image files from /classes/cs424/textures-for-blender, or find one on your own.
Exercise 2: Skybox, Blender Model, and Reflection
The goal of the second exercise is a web page that uses a skybox, loads a JSON model, and uses environment mapping to make the model reflect its environment. Furthermore, the model that you use should be one that you create yourself by exporting a three.js model from Blender. You can use one of the Blender objects that you made for Exercise 2 in Lab 8, or you can make a new one if you prefer. You can use one of the cube maps from /classes/cs424/cubemap-textures, or better yet, you can download a new one from http://www.humus.name/index.php?page=Textures. (Note that the downloaded files will be of very high resolution. I scaled my cube map textures down to 512-by-512 pixels.)
The file starter.html is a three.js program that does nothing but display a simple yellow cube. It uses THREE.OrbitControls, so the view can be rotated using the mouse. You want to add a skybox, replace the cube with your Blender object, and add an environment map to that object using the same texture that you have on the skybox.
Almost everything that you need to know and all the code that you need is in Section 16 of the notes and in the sample programs in that section. You should make your program by adding just the code that you need to starter.html.
I suggest that you start by adding the skybox to starter.html. Then you can move on to loading a model and finally to making the model reflective. (If you would like to do a little more, place two models in the scene, one reflective and one refractive.)
One thing that is not covered in the notes is the exact procedure for exporting a model from Blender. Here are the details.
There seem to be different versions of the three.js exporter for different versions of Blender. We are using Blender 2.62 in the lab. A three.js exporter for this version is in the directory /classes/cs424/blender-2.62-threejs-export. The folder scripts/addons/io_mesh_threejs from that directory has to be copied into the Blender configuration directory .blender/2.62/scripts/addons in your home directory. You might need to create the scripts and addons directories. Then copy io_mesh_threejs into the addons directory.
The next time you start Blender, it will find the export script, but it won't be "activated". To do that, open the Blender "User Preferences", in the "File" menu. Click to the "Addons" tab. Then click "Import-Export" in the list of Categories on the left:
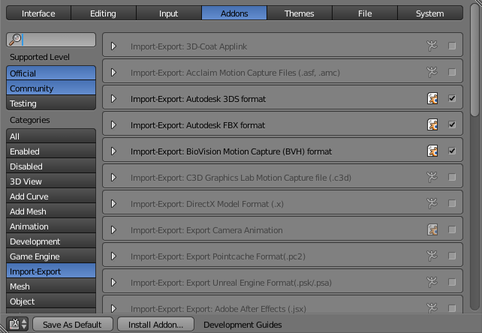
You will find "Import-Export: three.js format" at the very end of the list on the right. Click the checkbox next to it to activate. Then click "Save as Default", or you will have to redo the activation the next time you start Blender and want to use the exporter.
To use the exporter to save a model in three.js JSON format, select all the mesh objects that you want to export as part of the model. Then choose the "three.js" command in the "Export" submenu of the "File menu":

A file save screen will open where you can save the file. The file extension in the file name should be ".js". Options for the three.js export can be found along the left edge of the file save screen, but the default options are OK for our purposes.
Extra Credit
For some extra credit, you can write a demo web page that uses some feature of three.js that is not covered in the notes. You can look at examples on stemkoski.github.io/Three.js/, and you can look in the examples folder in the three.js download. (A copy is in /classes/cs424/threejs.)
Try to find something interesting and make it look good. And don't just copy code! Use the feature that you want to demonstrate in a scene of your own design! You can start your work with another copy of starter.html if you want. Some possibilities include text, morphing animation, dynamic environment maps, particle systems, Fresnel shader, lathing, extrusion, constructive solid geometry, and various effects.